requests模块&代理IP池搭建&视频爬取
requests模块&代理IP池搭建
- 一 requests模块使用
-
- 1.1 get请求
- 1.2 url编码和解码
- 1.3 携带请求头
- 1.4 携带cookie
- 1.5 发送post请求
- 1.6 requests.session
- 1.7 Response
- 1.8 获取二进制数据
- 1.9 解析json
- 二 使用代理
- 三 django后端获取客户端ip地址
- 四 爬取视频网站
- 五 爬取新闻
- 六 BautifulSoup4 介绍
- 七 bs4 遍历文档树
一 requests模块使用
1.1 get请求
import requests

res=requests.get(url)
print(res.text) # http响应体的文本内容

# get请求携带数据
# 1.地址栏中拼接
requests.get('https://www.baidu.com/s?wd=%E7%BE%8E%E5%A5%B3')

# 2. 使用params参数
res=requests.get('https://www.baidu.com/s',params={'wd':'%E7%BE%8E%E5%A5%B3'})
1.2 url编码和解码
from urllib import parse

res = parse.quote('你好')
print(res)  # %E4%BD%A0%E5%A5%BD

res = parse.unquote('%E4%BD%A0%E5%A5%BD')
print(res)  # 你好
1.3 携带请求头
http请求,有请求头,有的网站,通过某些请求头来做反爬。
请求头中数据:
User-Agent:客户端类型(浏览器,手机端浏览器,爬虫类型,程序,scrapy,一般伪造成浏览器)。
referer:上次访问的地址。
cookie:认证后的cookie,相当于登录。
例子:
header={
  # 客户端类型
  'User-Agent': 'Mozilla/5.0 (Windows NT 10.0; Win64; x64) AppleWebKit/537.36 (KHTML, like Gecko) Chrome/106.0.0.0 Safari/537.36'
}
res=requests.get('https://dig.chouti.com/',headers=header)
1.4 携带cookie
res=requests.post('https://dig.chouti.com/link/vote',data=data,headers=header,cookies={'key':'value'})
1.5 发送post请求
def post(url, data=None, json=None, **kwargs):
    r"""Sends a POST request.

    :param url: URL for the new :class:`Request` object.
    :param data: (optional) Dictionary, list of tuples, bytes, or file-like
        object to send in the body of the :class:`Request`.
    :param json: (optional) json data to send in the body of the :class:`Request`.
    :param \*\*kwargs: Optional arguments that ``request`` takes.
    :return: :class:`Response ` object
    :rtype: requests.Response
    """

    return request("post", url, data=data, json=json, **kwargs)
res = requests.post('http://www.aa7a.cn/user.php')

# data=字典是使用默认编码格式:urlencoded
# json=字典是使用json编码格式
1.6 requests.session
能自动维护cookie
session=requests.session()

data = {
     'username': '',
     'password': '',
     'captcha': '',
     'remember': 1,
     'ref': 'http://www.aa7a.cn/',
     'act': 'act_login'
}
res = session.post('http://www.aa7a.cn/user.php', data=data)
res2 = session.get('http://www.aa7a.cn/')
1.7 Response
respone.text           # 响应体的文本内容
respone.content        # 响应体的二进制内容
respone.status_code    # 响应状态码
respone.headers        # 响应头
respone.cookies        # 响应cookie
respone.cookies.get_dict()  # cookieJar对象,获得到真正的字段
respone.cookies.items()     # 获得cookie的所有key和value值
respone.url            # 请求地址
respone.history        # 访问这个地址,可能会重定向,放了它冲定向的地址
respone.encoding       # 页面编码
1.8 获取二进制数据
获取图片或者视频,并写入文件或者数据库。
res = requests.get('https://vd3.bdstatic.com/mda-nhj53kie1idqjgi3/haokan_t/dash/1661088550237665580/mda-nhj53kie1idqjgi3-1.mp4')

with open('download.mp4', 'wb') as f:
    for line in res.iter_content():
        f.write(line)
1.9 解析json
res = requests.get(
    'https://api.map.baidu.com/place/v2/search?ak=6E823f587c95f0148c19993539b99295®ion=%E4%B8%8A%E6%B5%B7&query=%E8%82%AF%E5%BE%B7%E5%9F%BA&output=json')
print(res.text)
print(type(res.text))
print(res.json())
print(type(res.json()))
二 使用代理
代理IP池ProxyPool:https://github.com/jhao104/proxy_pool
下载代码:
git clone [email protected]:jhao104/proxy_pool.git
安装依赖:
pip install -r requirements.txt

# requirements.txt中的flask版本过低会报错,需更新flask版本。
pip install flsak
更新配置:
# setting.py 为项目配置文件

# 配置API服务

HOST = "0.0.0.0"               # IP
PORT = 5000                    # 监听端口


# 配置数据库

DB_CONN = 'redis://:[email protected]:8888/0'


# 配置 ProxyFetcher

PROXY_FETCHER = [
    "freeProxy01",      # 这里是启用的代理抓取方法名,所有fetch方法位于fetcher/proxyFetcher.py
    "freeProxy02",
    # ....
]
启动项目:
# 如果已经具备运行条件, 可用通过proxyPool.py启动。
# 程序分为: schedule 调度程序 和 server Api服务

# 启动调度程序
python proxyPool.py schedule

# 启动webApi服务
python proxyPool.py server

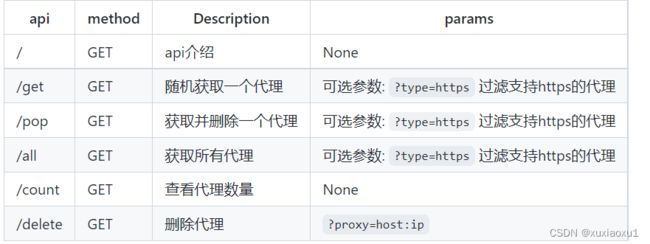
使用
启动web服务后, 默认配置下会开启 http://127.0.0.1:5010 的api接口服务:
三 django后端获取客户端ip地址
写一个django后端获取客户端ip地址,验证是否使用代理池ip。
views.py
from django.shortcuts import render, HttpResponse

# Create your views here.


def pc(request):
    ip = request.META.get('REMOTE_ADDR')
    return HttpResponse(ip)
urls.py
from django.contrib import admin
from django.urls import path
from app01 import views

urlpatterns = [
    path('admin/', admin.site.urls),
    path('get_ip/', views.pc),
]
把项目部署到云服务器上

使用代理ip访问django服务
import requests

res = requests.get(' http://127.0.0.1:5010/pop/').json()

http = 'https' if res['https'] else 'http'

proxy = {http: http + '://' + res['proxy']}
print(proxy)
response = requests.get('http://106.15.187.255:8000/get_ip/', proxies=proxy)
print(response.text)

四 爬取视频网站
import requests
import re
from threading import Thread
import threading
import time


def get_video_list(num):
    res = requests.get(' http://127.0.0.1:5010/pop/').json()

    http = 'https' if res['https'] else 'http'

    proxy = {http: http + '://' + res['proxy']}
    print(proxy)

    response = requests.get(f'https://www.pearvideo.com/category_loading.jsp?reqType=5&categoryId=1&start={num}',
                            timeout=3)

    video_list = re.findall('', response.text)
    return video_list


def download(real_mp4_url, v_id):
    print(f'{v_id}正在下載')
    video = requests.get(real_mp4_url)
    with open(f'D:/pc/{v_id}.mp4', 'wb') as f:
        for line in video.iter_content():
            f.write(line)


if __name__ == '__main__':
    while True:
        num = 0
        video_list = get_video_list(num)
        print(video_list)
        t_list = []
        for i in video_list:
            v_id = i.split('_')[-1]
            video_url = f'https://www.pearvideo.com/videoStatus.jsp?contId={v_id}'
            headers = {
                'Referer': f'https://www.pearvideo.com/{i}'
            }
            res = requests.get(video_url, headers=headers).json()
            real_mp4_url = res['videoInfo']['videos']['srcUrl']
            # https://video.pearvideo.com/mp4/adshort/20200330/1669294741406-15052341_adpkg-ad_hd.mp4'
            # https://video.pearvideo.com/mp4/adshort/20200202/cont-1647782-14861160_adpkg-ad_hd.mp4

            real_mp4_url = real_mp4_url.replace(real_mp4_url.rsplit('/', 1)[-1].split('-')[0], f'cont-{v_id}')
            t = Thread(target=download, args=(real_mp4_url, v_id))
            t_list.append(t)
        for i in t_list:
            i.start()
            print(f'当前线程数{threading.active_count()}')
        # 当线程数小于10个继续下载下一页的24个视频
        while threading.active_count() > 10:
            time.sleep(5)
        num += 24


五 爬取新闻
import requests
from bs4 import BeautifulSoup
import pymysql
from threading import Thread
import threading
import time

def get_course():
    conn = pymysql.connect(
        user='root',
        password='123',
        host='127.0.0.1',
        port=3306,
        database='pc',
        autocommit=True  # 执行增改删操作自动执行conn.commit()
    )
    return conn.cursor(cursor=pymysql.cursors.DictCursor)


def sql(title, desc, url, img, cursor):
    sql = f"INSERT INTO data(`title`,`desc`,`url`,`img`) VALUES ('{title}','{desc}','{url}','{img}')"
    # print(sql)
    # INSERT INTO data(`title`,`desc`,`url`,`img`) VALUES ('雷霆/旗舰MPV首发 东风风行新能源战略','[汽车之家 资讯]  11月24日,东风风行发布了最新的新能源品牌战略――“光合未来”计划,为实现“光合未来”的蓝图,东风风行将积极践行“1156”战...','https://www.autohome.com.cn/news/202211/1271144.html#pvareaid=102624','https://www3.autoimg.cn/newsdfs/g26/M08/4D/80/400x300_0_autohomecar__ChsEdmN8IRmANFxxAABu4yGT2X8696.jpg')
    # INSERT INTO data(`title`,`desc`,`url`,`img`) VALUES (雷霆/旗舰MPV首发 东风风行新能源战略,[汽车之家 资讯]  11月24日,东风风行发布了最新的新能源品牌战略――“光合未来”计划,为实现“光合未来”的蓝图,东风风行将积极践行“1156”战...,https://www.autohome.com.cn/news/202211/1271144.html#pvareaid=102624,https://www3.autoimg.cn/newsdfs/g26/M08/4D/80/400x300_0_autohomecar__ChsEdmN8IRmANFxxAABu4yGT2X8696.jpg)

    # 发送给服务端 执行SQL语句
    try:
        cursor.execute(sql)
    except:
        pass


def get_ul_list(num):
    res = requests.get(f'https://www.autohome.com.cn/news/{num}/#liststart')
    # print(res.text)  # 从返回的html中查找,bs是解析html,xml格式的
    soup = BeautifulSoup(res.text, 'html.parser')
    # 查找:类名等于article的ul标签
    ul_list = soup.find_all(name='ul', class_='article')
    return ul_list


if __name__ == '__main__':
    num = 1
    while True:
        ul_list = get_ul_list(num)
        cursor = get_course()
        for ul in ul_list:
            # 找到ul下所有的li标签
            li_list = ul.find_all(name='li')
            for li in li_list:
                h3 = li.find(name='h3')
                if h3:  # 获取h3标签的文本内容
                    title = h3.text
                    desc = li.find(name='p').text
                    url = 'https:' + li.find(name='a').attrs.get('href')
                    img = li.find(name='img').attrs.get('src')
                    if not img.startswith('http'):
                        img = 'https:' + img
                    t = Thread(target=sql, args=(title, desc, url, img, cursor))
                    t.start()
                    print(f'当前线程数{threading.active_count()}')
            while threading.active_count() > 10:
                time.sleep(1)
            num += 1

六 BautifulSoup4 介绍
Beautiful Soup 是一个可以从HTML或XML文件中提取数据的Python库
pip3 install BeautifulSoup4

BeautifulSoup('要解析的内容:xml格式字符串', "html.parser") #内置解析库html.parser
BeautifulSoup('要解析的内容:xml格式字符串',  "lxml")  # 速度快 必须要装lxml pip3 install lxml
七 bs4 遍历文档树
from bs4 import BeautifulSoup

html_doc = """
The Dormouse's story

lqz is handsome The Dormouse's story

Once upon a time there were three little sisters; and their names were
Elsie,
Lacie and
Tillie;
and they lived at the bottom of a well.

...
"""
soup = BeautifulSoup(html_doc, 'lxml')
# 1 美化html:了解
# print(soup.prettify())

# 2 遍历文档树
'''
#遍历文档树:即直接通过标签名字选择,特点是选择速度快,但如果存在多个相同的标签则只返回第一个
#1、用法
#2、获取标签的名称
#3、获取标签的属性
#4、获取标签的内容
#5、嵌套选择
#6、子节点、子孙节点
#7、父节点、祖先节点
#8、兄弟节点
'''
# 1 基本用法,直接  .标签名字
# res=soup.title
# print(res)
# res=soup.a
# print(res)
# 可以嵌套使用
# res=soup.head.title
# print(res)

# 2 获取标签的名称
# 拿到的所有标签都是一个对象,Tag对象  bs4.element.Tag
# res=soup.head.title
# res=soup.body
# print(res.name)

# 3 获取标签的属性
# res=soup.p
# print(res.attrs)  # 属性字典


# 4 获取标签的内容
# res = soup.p
# print(res.text) # 把该标签子子孙孙内容拿出来拼到一起 字符串
# print(res.string) # None 必须该标签没有子标签,才能拿出文本内容
# print(list(res.strings) )# generator 生成器,把子子孙孙的文本内容放到生成器中

# 5 嵌套选择

# res=soup.html.body.a
# print(res.text)


# 6、子节点、子孙节点
# print(soup.p.contents) #p下所有子节点
# print(soup.p.children) #得到一个迭代器,包含p下所有子节点

# 7、父节点、祖先节点
# print(soup.a.parent) #获取a标签的父节点,直接父节点
# print(list(soup.a.parents)) #找到a标签所有的祖先节点,父亲的父亲,父亲的父亲的父亲...


# 8、兄弟节点
# print(soup.a.next_sibling)  # 下一个兄弟
# print(soup.a.previous_sibling)  # 上一个兄弟

print(list(soup.a.next_siblings)) #下面的兄弟们=>生成器对象
print('-----')
print(list(soup.a.previous_siblings)) #上面的兄弟们=>生成器对象