springboot+vue结合,后端学习前端(三)(前端拦截器+后端拦截器)未登录访问其他页面,直接进入登陆界面
前端拦截器+后端拦截器
- 处理#号问题
-
- 使用 History 模式
- 前端部署到后端项目里(tomcat版本由8.5.23需要提高到9.0.56了)
-
- 默认的错误页面
- 后端登录拦截器
-
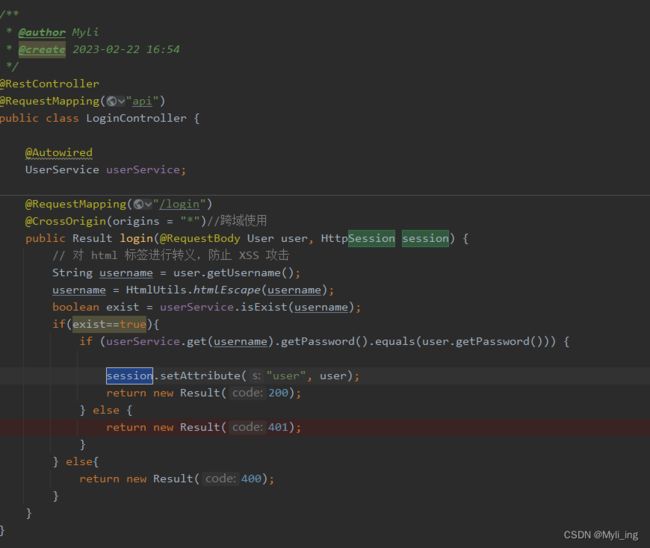
- LoginController添加session
- LoginInterceptor
- 拦截器配置到项目里
- Vuex 与前端登录拦截器
-
- 下载 Vuex
- 引入Vuex
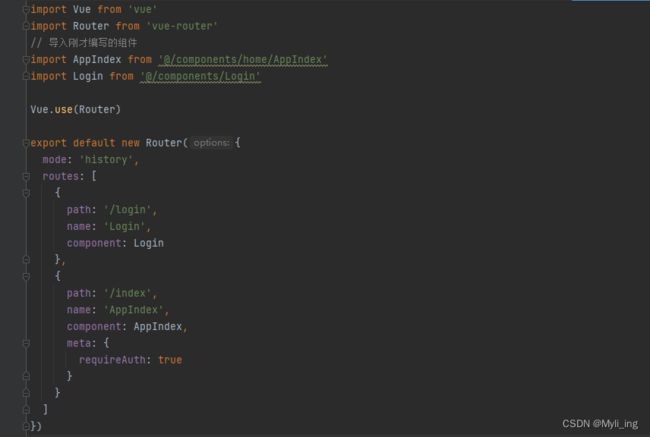
- 修改路由配置
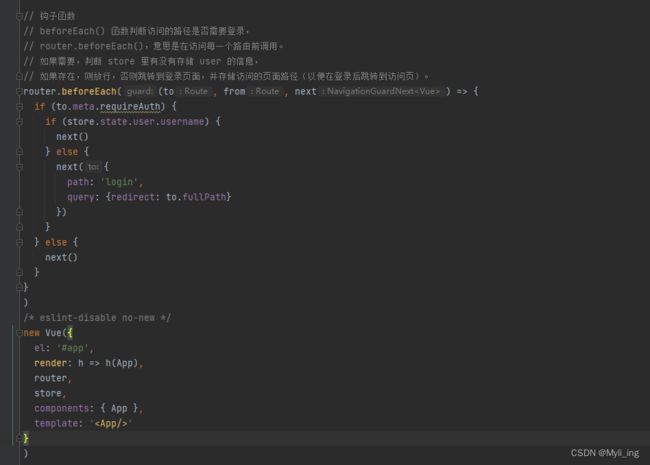
- 钩子函数
- login.vue
- 登录测试
处理#号问题

URL 的 # 号后面的地址被称为 hash ,这种实现方式我们称之为 Hash 模式,是非常典型的前端路由方式
另一种常用的方式被称为 History 模式
使用 History 模式
前端部署到后端项目里(tomcat版本由8.5.23需要提高到9.0.56了)
()
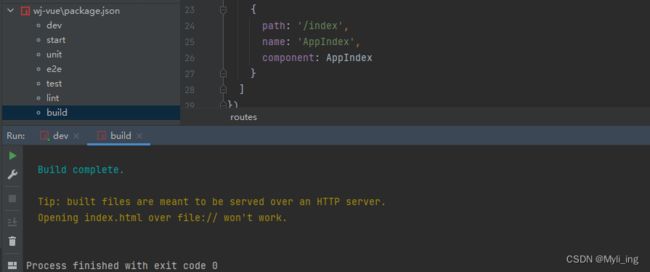
点击蓝色处build,即可打包完成,成功状态如下

或通过命令 npm run build
内容位置如下:

若想把前端与后端合并,可将dist中的所有内容放入后端的项目的 wj\src\main\resources\static 文件夹下
默认的错误页面
新建一个页面
import org.springframework.boot.web.server.ErrorPageRegistrar;
import org.springframework.boot.web.server.ErrorPage;
import org.springframework.boot.web.server.ErrorPageRegistry;
import org.springframework.http.HttpStatus;
import org.springframework.stereotype.Component;

@Component
public class ErrorConfig implements ErrorPageRegistrar {

    @Override
    public void registerErrorPages(ErrorPageRegistry registry) {
        ErrorPage error404Page = new ErrorPage(HttpStatus.NOT_FOUND, "/index.html");
        registry.addErrorPages(error404Page);
    }

}
后端登录拦截器
一个简单拦截器的逻辑如下:
1.用户访问 URL,检测是否为登录页面,如果是登录页面则不拦截
2.如果用户访问的不是登录页面,检测用户是否已登录,如果未登录则跳转到登录页面
LoginController添加session
LoginInterceptor
判断 session 中是否存在 user 属性,如果存在就放行,如果不存在就跳转到 login 页面。
package com.myli.base;


import com.myli.entity.User;
import org.apache.commons.lang.StringUtils;
import org.springframework.web.servlet.HandlerInterceptor;

import javax.servlet.http.HttpServletRequest;
import javax.servlet.http.HttpServletResponse;
import javax.servlet.http.HttpSession;

public class LoginInterceptor  implements HandlerInterceptor{

    @Override
    public boolean preHandle (HttpServletRequest httpServletRequest, HttpServletResponse httpServletResponse, Object o) throws Exception {
        HttpSession session = httpServletRequest.getSession();
        String contextPath=session.getServletContext().getContextPath();
        String[] requireAuthPages = new String[]{
                "index",
        };
        String uri = httpServletRequest.getRequestURI();

        uri = StringUtils.remove(uri, contextPath+"/");
        String page = uri;

        if(begingWith(page, requireAuthPages)){
            User user = (User) session.getAttribute("user");
            if(user==null) {
                httpServletResponse.sendRedirect("login");
                return false;
            }
        }
        return true;
    }
    private boolean begingWith(String page, String[] requiredAuthPages) {
        boolean result = false;
        for (String requiredAuthPage : requiredAuthPages) {
            if(StringUtils.startsWith(page, requiredAuthPage)) {
                result = true;
                break;
            }
        }
        return result;
    }
}
拦截器配置到项目里
package com.myli.base.config;

import com.myli.base.LoginInterceptor;
import org.springframework.boot.SpringBootConfiguration;
import org.springframework.context.annotation.Bean;
import org.springframework.web.servlet.config.annotation.*;

/**
 * @author Myli
 * @create 2023-02-22 17:29
 */
@SpringBootConfiguration
public class MyMvcConfig implements WebMvcConfigurer {

    @Bean
    public LoginInterceptor getLoginIntercepter() {
        return new LoginInterceptor();
    }

    @Override
    public void addInterceptors(InterceptorRegistry registry){
        registry.addInterceptor(getLoginIntercepter()).addPathPatterns("/**").excludePathPatterns("/index.html");
    }
}
访问一个 URL,会首先通过 Configurer 判断是否需要拦截,需要的化,触发拦截器 LoginInterceptor,根据自定义的规则再判断。
/index 与 /index.html 是不同的,也就是说 /index 会触发拦截器而 /index.html 不会,但根据拦截器 LoginInterceptor 中我们定义的判断条件,以 /index 开头的路径都会被转发,包括 index.html。
因为我们做的是单页面应用,之前通过配置 ErrorPage,实际上访问所有路径都会重定向到 /index.html 。我们直接在浏览器地址栏输入 /index 会触发拦截器,经过拦截器重定向到 /login,然后 /login 再经过 Configurer 的判断,再次触发拦截器,由于不在需要拦截的路径中,所以被放行,页面则重新定向到了 /index.html,如果没有再 Configurer 中取消对 /index.html 的拦截,则会再次触发拦截器,再次重定向到 /login。
Vuex 与前端登录拦截器
Vuex,在前端判断用户的登录状态
下载 Vuex
npm install vuex --save
![]()
引入Vuex
src 目录下新建一个文件夹 store,并在该目录下新建 index.js 文件
import Vue from 'vue'
import Vuex from 'vuex'

Vue.use(Vuex)
在该index.js中继续
export default new Vuex.Store({
  state: {
    user: {
      username: window.localStorage.getItem('user' || '[]') == null ? '' : JSON.parse(window.localStorage.getItem('user' || '[]')).username
    }
  },
  mutations: {
    login (state, user) {
      state.user = user
      window.localStorage.setItem('user', JSON.stringify(user))
    }
  }
})
state意思为状态,记录用户信息
mutations方法,触发这个方法时可以为我们的用户对象赋值
localStorage:即本地存储,在项目打开的时候会判断本地存储中是否有 user 这个对象存在,如果存在就取出来并获得 username 的值,否则则把 username 设置为空。这样我们只要不清除缓存,登录的状态就会一直保存。

修改路由配置
src\router\index.js
设置一个 requireAuth 字段
    {
     path: '/index',
     name: 'AppIndex',
     component: AppIndex,
     meta: {
       requireAuth: true
     }
   }
钩子函数
// The Vue build version to load with the `import` command
// (runtime-only or standalone) has been set in webpack.base.conf with an alias.
import Vue from 'vue'
import App from './App'
import router from './router'
import ElementUI from 'element-ui'
import 'element-ui/lib/theme-chalk/index.css'
import store from './store'
// 设置反向代理,前端请求默认发送到 http://localhost:8443/api
var axios = require('axios')
axios.defaults.baseURL = 'http://localhost:8443/api'
// 全局注册,之后可在其他组件中通过 this.$axios 发送数据
Vue.prototype.$axios = axios
Vue.config.productionTip = false
Vue.use(ElementUI)
// 钩子函数
// beforeEach() 函数判断访问的路径是否需要登录,
// router.beforeEach(),意思是在访问每一个路由前调用。
// 如果需要,判断 store 里有没有存储 user 的信息,
// 如果存在,则放行,否则跳转到登录页面,并存储访问的页面路径(以便在登录后跳转到访问页)。
router.beforeEach((to, from, next) => {
if (to.meta.requireAuth) {
if (store.state.user.username) {
next()
} else {
next({
path: 'login',
query: {redirect: to.fullPath}
})
}
} else {
next()
}
}
)
/* eslint-disable no-new */
new Vue({
el: '#app',
render: h => h(App),
router,
store,
components: { App },
template: 'login.vue
把通过的用户信息存起来
<template>
  <body id="poster">
    <el-form class="login-container" label-position="left"
             label-width="0px">
      <h3 class="login_title">系统登录</h3>
      <el-form-item>
        <el-input type="text" v-model="loginForm.username"
                  auto-complete="off" placeholder="账号"></el-input>
      </el-form-item>
      <el-form-item>
        <el-input type="password" v-model="loginForm.password"
                  auto-complete="off" placeholder="密码"></el-input>
      </el-form-item>
      <el-form-item style="width: 100%">
        <el-button type="primary" style="width: 100%;background: #505458;border: none" v-on:click="login">登录</el-button>
      </el-form-item>
    </el-form>
  </body>
</template>

<script>

  export default {
    name: 'Login',
    data () {
      return {
        loginForm: {
          username: 'admin',
          password: '123'
        },
        responseResult: []
      }
    },
    methods: {
      login () {
        var _this = this
        console.log(this.$store.state)
        this.$axios
          .post('/login', {
            username: this.loginForm.username,
            password: this.loginForm.password
          })
          .then(successResponse => {
            if (successResponse.data.code === 200) {
              // var data = this.loginForm
              _this.$store.commit('login', _this.loginForm)
              var path = this.$route.query.redirect
              this.$router.replace({path: path === '/' || path === undefined ? '/index' : path})
            }
          })
          .catch(failResponse => {
          })
      }
    }
  }
</script>

<style>
  #poster {
    background:url("../assets/eva.jpg") no-repeat;
    background-position: center;
    height: 100%;
    width: 100%;
    background-size: cover;
    position: fixed;
  }
  body{
    margin: 0px;
  }
  .login-container {
    border-radius: 15px;
    background-clip: padding-box;
    margin: 90px auto;
    width: 350px;
    padding: 35px 35px 15px 35px;
    background: #fff;
    border: 1px solid #eaeaea;
    box-shadow: 0 0 25px #cac6c6;
  }
  .login_title {
    margin: 0px auto 40px auto;
    text-align: center;
    color: #505458;
  }
</style>
登录测试
输账号密码登录
看一下存了没

然后直接把user一行的数据删掉,
重新进index页面,如果直接到登录界面了,算成功
如果出现乱七八糟的错误,先把webstorm重启,然后看错误存在不存在,如果存在,再解决
注意:store下的indesx.js 中 window.localStorage替换成window.sessionStorage,可以完成浏览器不关闭前数据一直保留,但是不会永久存在!


