Linux CentOS 8(HTTP的配置与管理)
Linux CentOS 8(HTTP的配置与管理)
目录
-
- 一、常见的 HTTP(web)服务软件
- 二、基本的 Apache httpd 配置
- 三、httpd.conf 配置文件详解
-
- 案例1
- 四、配置虚拟主机(在一台主机发布多个站点)
-
- 案例2
一、常见的 HTTP(web)服务软件
-
Apache
Apache 可以运行在几乎所有广泛使用的计算机平台上。Apache 源于 NCSA httpd 服务器,经过多次修改,不仅简单、速度快、而且性能稳定,还可以用来做代理服务器。 -
IIS
它是微软公司主推的服务器,是一种 Web(网页)服务组件,其中包括 Web 服务器、FTP 服务器、NNTP 服务器和 SMTP 服务器,分别用于网页浏览、文件传输、新闻服务和邮件发送等方面,它使得在网络(包括互联网和局域网)上发布信息成了一件很容易的事。它不是开源的。 -
Nginx
是一个高性能的 HTTP 和反向代理 web 服务器(反向代理服务器位于用户与目标服务器之间,但是对于用户而言,反向代理服务器就相当于目标服务器,即用户直接访问反向代理服务器就可以获得目标服务器的资源)。在连接高并发的情况下,Nginx 是 Apache 服务不错的替代品。能够支持高达 50,000 个并发连接数的响应。 -
Openrestry
一个基于 Nginx与 Lua 的可伸缩的高性能 Web 平台。360,UPYUN,阿里云,新浪,腾讯网,去哪儿网,酷狗音乐等都是 OpenResty 的深度用户。 -
Tengine
是淘宝基于Nginx开发的Web服务器项目。它在Nginx的基础上,针对大访问量网站的需求,添加了很多高级功能和特性。目的是打造一个高效、安全的Web平台。
二、基本的 Apache httpd 配置
1、安装Apache
[root@localhost ~]# yum -y install httpd

[root@localhost ~]# rpm -ql httpd | grep conf$       //查httpd的配置文件
与Apache服务器相关的主要目录和文件如下:
/etc/httpd:服务程序的根目录
/etc/httpd/conf/httpd.conf:服务器的主配置文件
/var/www/html/:网页文档的默认根目录(网站根目录)
/etc/init.d/httpd:服务的控制脚本文件
/usr/sbin/httpd:服务的主要执行程序
/var/log/httpd/access_log:访问日志文件
/var/log/httpd/error_log:错误日志文件
2、修改配置文件
[root@localhost ~]# vim /etc/httpd/conf/httpd.conf
3、建立测试网站
[root@localhost ~]# cd /var/www/html/
[root@localhost html]# echo“This is my Website!!” > index.html
4、检查Selinux上下文
[root@localhost ~]# chcon –R -t httpd_sys_content_t /var/www/html/index.html
或
[root@localhost ~]# restorecon –R /var/www/html/
//文件和目录的SELinux信息不匹配时,使用restorecon来恢复网页主目录中所有文件的SELinux配置信息

如果网站文档存放在在其他目录,如放在/opt/www目录,则需要
[root@localhost ~]# semanage fcontext -a -t httpd_sys_content_t ‘/opt/www(/.*)?’
5、启动服务
[root@localhost ~]# systemctl enable httpd
[root@localhost ~]# systemctl start httpd
6、放通防火墙服务
[root@localhost~]# firewall-cmd --permanent --add-service=http --add-service=https
或
[root@localhost~]# firewall-cmd --permanent --add-port=80/tcp --add-port=443/tcp
//http和https的端口号分别为80和443
[root@localhost ~]# firewall-cmd --reload
7、测试
[root@localhost ~]# curl 192.168.21.128
This is my Website!!
三、httpd.conf 配置文件详解
1.切换到 /etc/httpd/conf 目录查看全局环境配置文件内容,如图2-1所示。
[root@localhost ~]# grep -v '#' httpd.conf | grep -v '^$'
参数解析:
-
ServerRoot:用于指定Apache的运行目录(httpd服务器的根目录),包括了运行站点必需的目录和文件。服务启动之后自动将目录改变为当前目录,在后面使用到的所有相对路径都是相对这个目录下。
-
Listen:用于设置服务器监听的网络端口号,默认为80。如有多块网卡,默认监听所有网卡。
-
User/Group apache: 启动服务后转换的用户/组身份,在启动服务时通常以root身份,然后转换身份,增加系统安全性。
-
ServerAdmin:用于设置服务器管理员的E-Mail地址,可以通过此地址及时联系服务器管理员。
-
ServerName :服务器名称(完整主机名)默认是不需要指定的,服务器通过名字解析过程来获得自己的名字。
-
DocumentRoot:网页文件存放的目录。
-
DircectoryIndex: 指定访问的主页的默认主页名字,可以设置多个文件,默认首页文件名为index.html。
-
ErrorLog:错误日志存放的位置。
-
LogLevel:Apache日志的级别。
-
CustomLog:说明日志记录的位置,这里面使用了相对路径,所以ServerRoot需要指出,日志位置就存放在/etc/httpd/logs。
命令解析:
[root@localhost ~]# cd /etc/httpd/conf
[root@localhost conf]# grep -v '#' httpd.conf | grep -v '^$'
#    -v 反选      ^ 以开头      $ 以结尾     ^$ 过滤空白符
注:以上配置项是文件中最主要的全局配置项,其他的配置项,如需要使用可以查看服务器中的相关手册文档。以上详情部分来自:https://www.cnblogs.com/carbon3/p/5616417.html
2、httpd.conf中的区域设置
控制目录的访问权限:
<Directory "/var/www">
          AllowOverride None
          Require all granted
</Directory>

Require指令,用于指定允许、拒绝列表:
Require {all | local | ip | host} {granted | denied | 域名}
Require all granted    //允许所有访问
Require all denied      //拒绝所有访问
Require local           //允许本机访问
Require ip 10.0.0.1     //允许10.0.0.1这个地址访问
Require not ip 10.0.0.1     //不允许10.0.0.1这个地址访问

//如果是一条规则,可以直接使用,但是如果有多条规则,则必须把这些规则包含在如下元素当中:
举例1:允许所有访问,只拒绝10.0.0.1访问 :
                <RequireAll>
                    Require all granted
                    Require not ip 10.0.0.1
                </RequireAll>
举例2:拒绝所有访问,只允许10.0.0.1访问:
                <RequireAny>
                    Require all denied
                    Require ip 10.0.0.1
                </RequireAny>
案例1
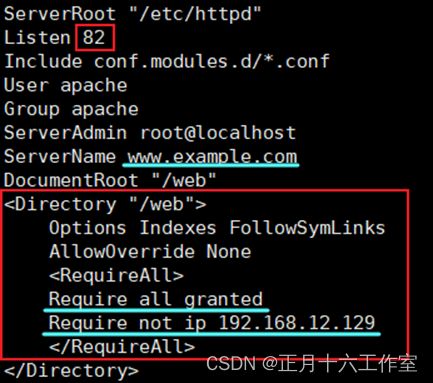
新建一个 web 站点,网站内容放在/web目录,且不允许 192.168.21.129访问,允许其他所有访问。服务器名称 www.example.com,发布端口82。构建过程参考如下:
1、 修改主机名
[root@localhost ~]# hostnamectl set-hostname www.example.com
2、 域名解析
[root@www ~]# vim /etc/hosts
192.168.12.128   www.example.com   www
3、 创建站点的网页文件
[root@www ~]# mkdir /web
[root@www ~]# echo "This is a web dir" > /web/index.html
[root@www ~]# echo "This is a 1 dir" > /web/1.html
4、 安装httpd服务
[root@www ~]# yum -y install httpd
5、 修改主配置文件,如图2-2
[root@www ~]# vim /etc/httpd/conf/httpd.conf
6、 开启httpd服务
[root@www ~]# systemctl enable httpd
[root@www ~]# systemctl start httpd
7、 修改文件安全上下文
[root@www ~]# chcon –R -t httpd_sys_content_t /web/index.html
[root@www ~]# chcon –R -t httpd_sys_content_t /web/1.html
8、 放通防火墙服务
[root@www ~]# firewall-cmd --permanent --add-service=82/tcp
[root@www ~]# firewall-cmd --reload
[root@www ~]# setenforce 0
9、 测试
(1)本机测试:
[root@www ~]# curl 192.168.21.128:82
This is a web dir
[root@www ~]# curl 192.168.21.128:82/1.html
This is a 1 dir
(2)客户端(IP地址为192.168.12.129)测试:
[root@localhost ~]# curl 192.168.12.128:82
curl: (7) Couldn't connect to server
[root@localhost ~]# curl 192.168.12.128:82/1.html
curl: (7) Couldn't connect to server
四、配置虚拟主机(在一台主机发布多个站点)
配置虚拟主机有三种方法:
1、基于IP:服务器上配多个IP,一个IP发布一个站点(一般不用)
192.168.12.128
192.168.12.129
2、基于端口:相同IP+不同端口。
192.168.12.128:80
192.168.12.128:82
192.168.12.128:8080
3、基于域名虚拟主机:相同IP+相同端口+不同主机名(最常用)
www.example.com 192.168.12.128:80
mail.example.com 192.168.12.128:80
案例2
本案例以实现两台虚拟主机www.example.com和mail.example.com为例,其对应的服务器IP地址为192.168.12.128,构建过程参考如下:
1、 域名解析
[root@localhost ~]#  vim /etc/hosts
192.168.12.128   www.example.com  www
192.168.12.128   mail.example.com  mail
2、 创建虚拟站点的网页文件
[root@localhost ~]# mkdir /www /mail
[root@localhost ~]# echo www.example.com  > /www/index.html

[root@localhost ~]# echo mail.example.com > /mail/index.html
3、 制虚拟主机样版文件
[root@localhost ~]# cp /usr/share/doc/httpd/httpd-vhosts.conf /etc/httpd/conf.d/
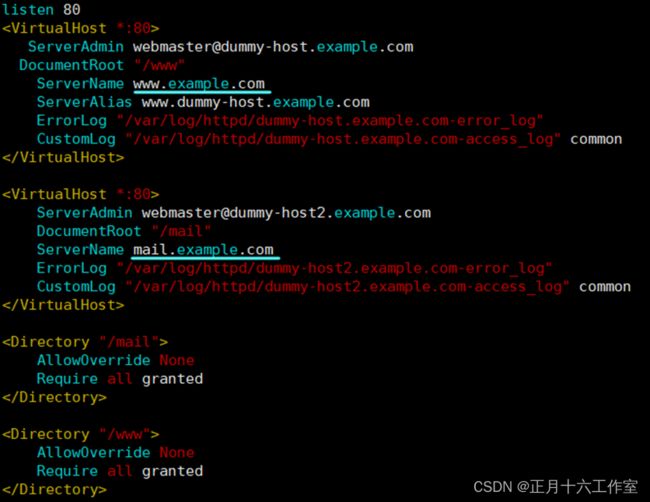
4、 修改配置文件,如图3-1
[root@localhost ~]# vim /etc/httpd/conf.d/httpd-vhosts.conf
5、 重启服务
[root@localhost ~]# systemctl restart httpd
6、 放通防火墙服务
[root@localhost ~]# firewall-cmd --permanent --add-service=80/tcp
[root@localhost ~]# firewall-cmd --reload
[root@localhost ~]# setenforce 0
7、测试
(1)主机测试:
[root@localhost ~]# curl www.example.com
www.example.com
[root@localhost ~]# curl mail.example.com
mail.example.com
[root@localhost ~]# curl 192.168.12.128
www.example.com
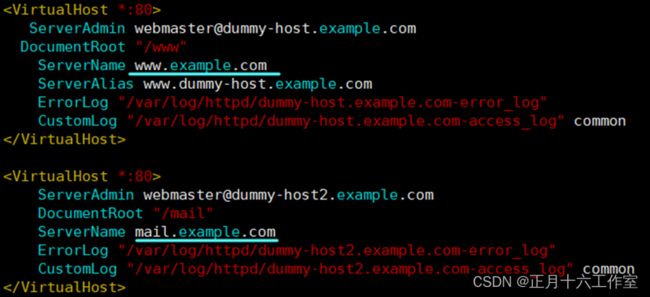
注:网站内容与/etc/httpd/conf.d/httpd-vhosts.conf的虚拟主机顺序有关,图3-2中SeverName为www.example.com写在前。
(2)客户端(IP为192.168.21.129)测试:
[root@localhost ~]# curl www.example.com
curl: (6) Could not resolve host: www.example.com

#客户端不能把域名解析成对应的IP,需要在hosts文件内添加域名与IP的映射。

[root@localhost ~]# vim /etc/hosts
192.168.12.128   www.example.com   www
192.168.12.128   mail.example.com  mail

[root@localhost ~]# curl www.example.com
www.example.com

[root@localhost ~]# curl mail.example.com
mail.example.com
制作成员: 何嘉愉
排版: 裕新
初审: 杨佳佳
复审: 二月二


