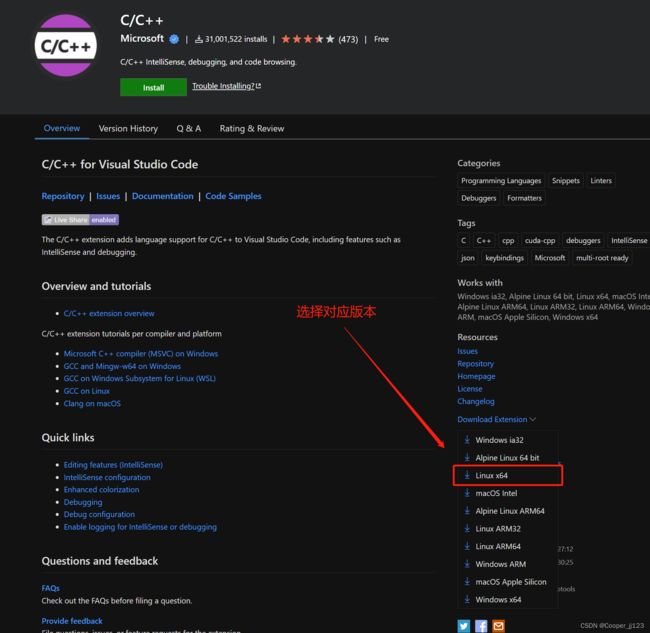
VScod 连接云服务器的一些问题 (无法连接、管道不存在。。。) 、数据库连接问题
vscode删除旧的配置
想重新建立一个连接,发现旧连接无法删除
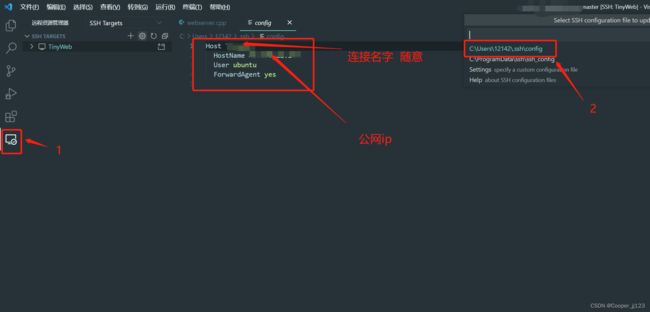
要删除的话旧把 config 中的数据全部删除,然后再重新连接,
找不到mysql/mysql.h头文件的时候,需要安装一个库文件:sudo apt install libmysqlclient-dev
过程试图写入的管道不存在(Bad owner or permissions on C:\Users\Administrator/.ssh/config)”报错
解决方法:
那就把有冲突的本地记录删掉就好了:
删除 C:\Users\你的用户名.ssh\known_hosts
然后重连,问题就解决啦~
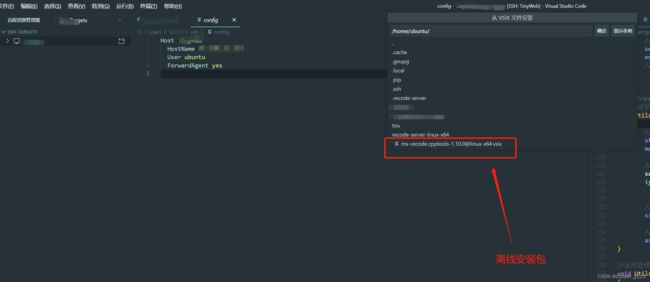
远程服务器上无法在线安装扩展包,安装离线扩展包 .vsix
本地下载好之后 上传到服务器上
比如

在vscode中,ctrl+shift+p打开命令行,输入Extensions: install from VSIX,选中上一步上传好的 vsix 文件,开始安装
数据库安装
安装命令
sudo apt-get update

sudo apt-get install mysql-server
初始化配置
sudo mysql_secure_installation
配置项可以参考以下
#1
VALIDATE PASSWORD PLUGIN can be used to test passwords...
Press y|Y for Yes, any other key for No: N (我的选项)

#2
Please set the password for root here...
New password: (输入密码)
Re-enter new password: (重复输入)

#3
By default, a MySQL installation has an anonymous user,
allowing anyone to log into MySQL without having to have
a user account created for them...
Remove anonymous users? (Press y|Y for Yes, any other key for No) : N (我的选项)

#4
Normally, root should only be allowed to connect from
'localhost'. This ensures that someone cannot guess at
the root password from the network...
Disallow root login remotely? (Press y|Y for Yes, any other key for No) : Y (我的选项)

#5
By default, MySQL comes with a database named 'test' that
anyone can access...
Remove test database and access to it? (Press y|Y for Yes, any other key for No) : N (我的选项)

#6
Reloading the privilege tables will ensure that all changes
made so far will take effect immediately.
Reload privilege tables now? (Press y|Y for Yes, any other key for No) : Y (我的选项)
检查mysql运行状态
systemctl status mysql.service
如果不能以普通用户登录参照下面的错误 数据库错误 ERROR 1698 (28000): Access denied for user ‘root’@‘localhost’
Navicat连接问题
使用Navicat连接云服务器上的mysql,这里我使用ssh连接
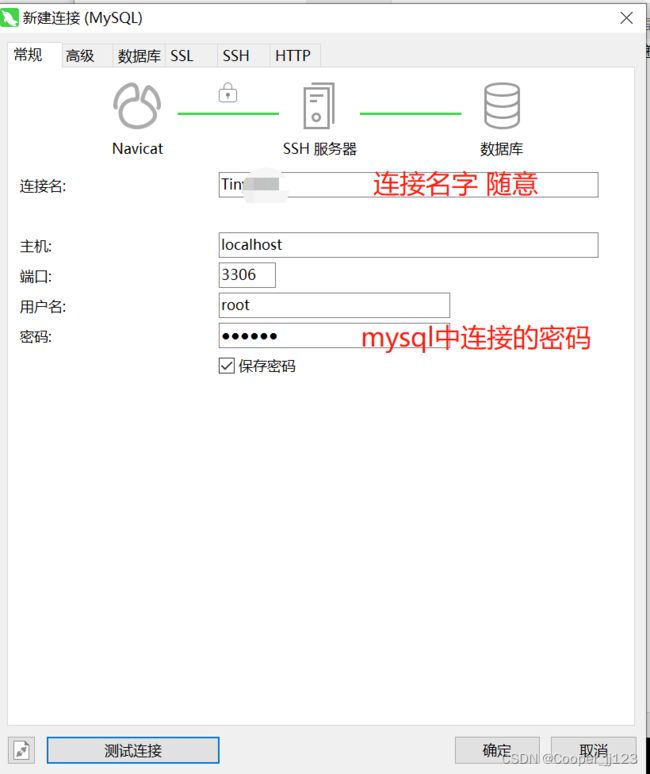
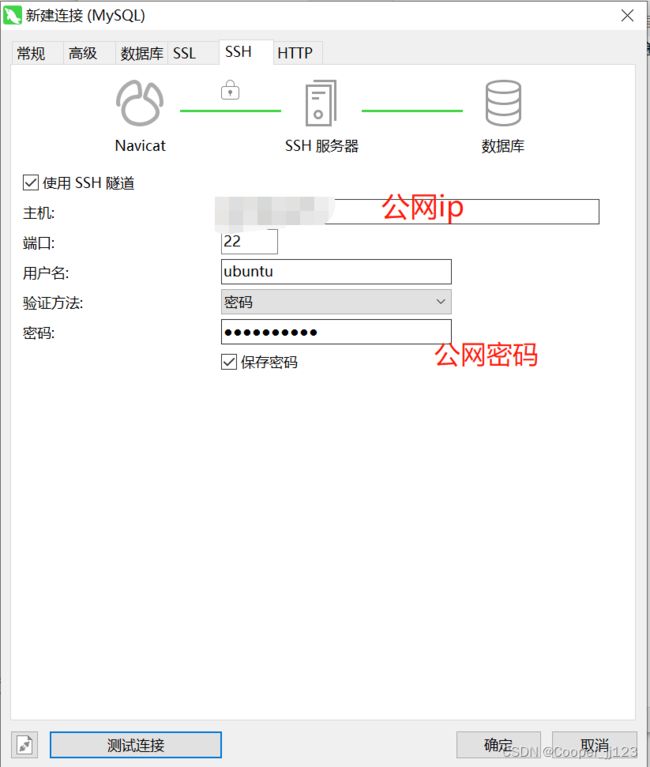
这样配置可以连接成功
数据库错误 ERROR 1698 (28000): Access denied for user ‘root’@‘localhost’
不用sudo 命令登录 mysql 的时候出现以下错误:
ERROR 1698 (28000): Access denied for user 'root'@'localhost'
打开 /etc/mysql/debian.cnf如下:
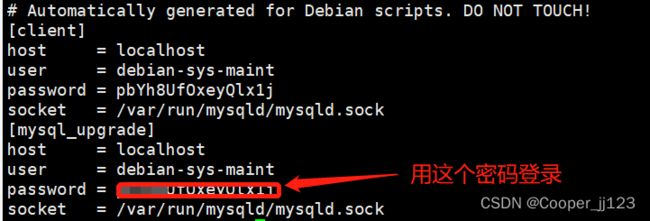
在终端输入 mysql -u debian-sys-maint -p 然后回车输入 password的内容。这样就进入了 MySQL 了
修改root密码
输入以下命令:update mysql.user set authentication_string=PASSWORD(‘123’), plugin=‘mysql_native_password’ where user=‘root’;
然后重新启动服务器,就可以正常登录啦
vscode卡在Setting up SSH Host XX:Copying VS Code Server to host with scp
普通用户,不是sudo用户,使用vscode进行远程连接的时候卡住了,一直在等待Setting up SSH Host XX:Copying VS Code Server to host with scp。(这里远程服务器不分centos、ubuntu。都适用)
原因
是因为在远程的服务器下 家目录/.vscode-server/bin/f80445acd5a3da24aa209168452a3d97cc32(一串很的东西,这里叫做commit_id吧)/vscode-servlet.tar.gz 没有下载下来。
这里可以使用ls - la来进行查看这个文件的大小,看一下是不是没有下载成功。(一般情况都是这个原因,没有下载成功)
解决措施
我们采用手动下载,不让服务器下载。
- 进行下载vscode-servlet.tar.gz。通过下面的连接进行下载。
https://update.code.visualstudio.com/commit:${commit_id}/server-linux-x64/stable(注意把:${commit_id}替换成对应的Commit ID)
-
先记录commit_id。之后用得到 就是 :家目录/.vscode-server/bin/f80445acd5a3da24aa209168452a3d97cc32(一串很的东西,这里叫做commit_id吧)。
-
运行下面这行命令。把~/.vscode-server/bin目录下的东西删除干净。
rm ~/.vscode-server/bin/* -rf
3.2没有~/.vscode-server/bin目录的话进行创建,有的话请忽略这一步。
mkdir -p ~/.vscode-server/bin
- 将下载的压缩包vscode-server-linux-x64.tar.gz放在~/.vscode-server/bin目录下。
- 运行下面这三行命令,其中${commit_id}需要替换成第2步记录的commit_id.
cd ~/.vscode-server/bin
tar -zxf vscode-server-linux-x64.tar.gz
mv vscode-server-linux-x64 ${commit_id}
6.重新启动vscode即可
这里参考了vscode卡在Setting up SSH Host XX:Copying VS Code Server to host with scp

