maven profile 动态使用不同环境、依赖打包部署
目录
- 一、需求
- 二、配置
- 三、激活profile
-
-
- 1、使用命令行激活:
- 2、使用IDEA Maven插件激活:
- 3、更多激活profile的方式:
-
- 四、示例
- 五、参考地址
一、需求
1、项目需要根据需求,使用不同配置或不同依赖。
2、项目A依赖项目B,项目A仅使用项目B中部分模块,不想引入项目B全部依赖。
二、配置
springboot项目B pom.xml:
<profiles>
    <profile>
        <id>testid>
        <activation>

            <activeByDefault>trueactiveByDefault>
        activation>
    profile>

    <profile>
        <id>devid>
        <dependencies>

	        <dependency>
	            <groupId>org.redissongroupId>
	            <artifactId>redisson-spring-boot-starterartifactId>
	            <version>3.13.1version>


	            <scope>compilescope>
	        dependency>
        dependencies>
    profile>
profiles>

<dependencies>

    <dependency>
        <groupId>org.redissongroupId>
        <artifactId>redisson-spring-boot-starterartifactId>
        <version>3.13.1version>

        <scope>providedscope>
    dependency>
dependencies>
1)两处redisson依赖说明:
- profiles标签下的依赖,只有当相应的profile被激活时,才会导入依赖。scope为compile,使得依赖本项目B的 项目A会导入该redisson依赖。
- dependencies标签下的依赖,给本项目B正常使用。scope使用provided,表示用于当前项目编译使用,不向下传递,使得依赖本项目B的 项目A不会导入该redisson依赖。
- 参考:maven scope 的作用
2)默认激活:
三、激活profile
1、使用命令行激活:
示例:
- 编译:
mvn compile -P dev - 打包:
mvn package -P dev - 部署(本地仓库):
mvn install -P dev - 发布(远程仓库):
mvn deploy -P dev - 查看当前激活的profile:
mvn help:active-profiles
参数说明:
- -P [parameter]:-P可以同时多个参数,如
mvn deploy -P test,dev,test和dev都是上面自定义的profile的id值。
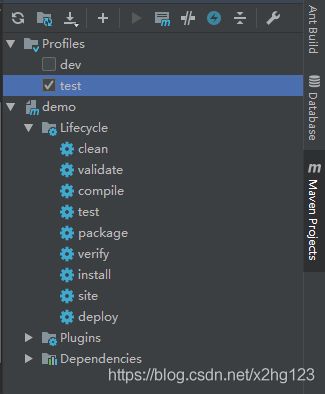
2、使用IDEA Maven插件激活:
1)勾选想要激活的profile,可以多选。
2)点击Lifecycle下相应的选项。
相关区别参考地址:
- 理解maven命令package、install、deploy的联系与区别
3、更多激活profile的方式:
- pom.xml中maven profile的激活方式
四、示例
1、项目B打包发布时激活id为dev的profile:mvn deploy -P dev
(1)注意在pom.xml中加入spring-boot-maven-plugin打包插件,这样项目的依赖会一起打包在jar中,否则即使激活了dev的profile,该profile下的依赖并不会被项目A中使用到。
(2)因为是发布到远程仓库,需要添加相关配置。这里的远程仓库是我本地搭建的一个nexus私服,具体如何搭建使用请自行搜索。
<groupId>com.wy.springbootgroupId>
<artifactId>demoartifactId>
<version>1.0.0-SNAPSHOTversion>
<name>demoname>
<description>Demo project for Spring Bootdescription>


<distributionManagement>
    <repository>
        <id>nexusid>
        <name>Nexus Sitesname>
        <url>http://localhost:8081/repository/maven-snapshots/url>
    repository>
distributionManagement>

<build>
    <plugins>
        <plugin>
            <groupId>org.springframework.bootgroupId>
            <artifactId>spring-boot-maven-pluginartifactId>
        plugin>
    plugins>
build>
2、在项目A中引用项目B:
<dependency>
    <groupId>com.wy.springbootgroupId>
    <artifactId>demoartifactId>
    <version>1.0.0-SNAPSHOTversion>
dependency>
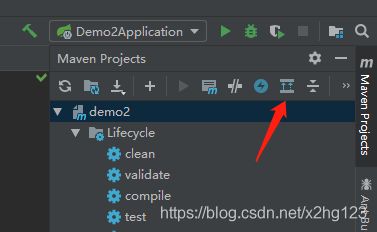
3、查看项目A中所导入的依赖:
(1)点击打开项目的依赖图:
(2)在依赖图中搜索redis,发现成功引入。
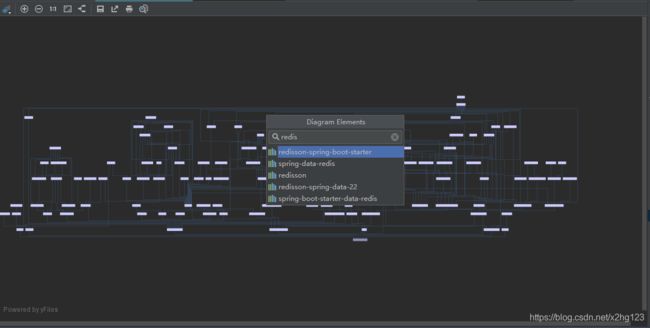
至此,示例演示结束。当然,profile下不仅可以使用不同依赖,还可以做其他配置。
可以参考: maven profile动态选择配置文件
4、相关配置:
(1) 项目B完整pom.xml
<project xmlns="http://maven.apache.org/POM/4.0.0" xmlns:xsi="http://www.w3.org/2001/XMLSchema-instance"
         xsi:schemaLocation="http://maven.apache.org/POM/4.0.0 https://maven.apache.org/xsd/maven-4.0.0.xsd">
    <modelVersion>4.0.0modelVersion>
    <parent>
        <groupId>org.springframework.bootgroupId>
        <artifactId>spring-boot-starter-parentartifactId>
        <version>2.3.4.RELEASEversion>
        <relativePath/>
    parent>
    <groupId>com.wy.springbootgroupId>
    <artifactId>demoartifactId>
    <version>1.0.0-SNAPSHOTversion>
    <name>demoname>
    <description>Demo project for Spring Bootdescription>

    <properties>
        <java.version>1.8java.version>
    properties>

    <profiles>
	    <profile>
	        <id>testid>
	        <activation>

	            <activeByDefault>trueactiveByDefault>
	        activation>
	    profile>

	    <profile>
	        <id>devid>
	        <dependencies>

		        <dependency>
		            <groupId>org.redissongroupId>
		            <artifactId>redisson-spring-boot-starterartifactId>
		            <version>3.13.1version>


		            <scope>compilescope>
		        dependency>
	        dependencies>
	    profile>
	profiles>

	<dependencies>

	    <dependency>
	        <groupId>org.redissongroupId>
	        <artifactId>redisson-spring-boot-starterartifactId>
	        <version>3.13.1version>

	        <scope>providedscope>
	    dependency>
	dependencies>


    <distributionManagement>
        <repository>
            <id>nexusid>
            <name>Nexus Sitesname>
            <url>http://localhost:8081/repository/maven-snapshots/url>
        repository>
    distributionManagement>

    <build>
        <plugins>
            <plugin>
                <groupId>org.springframework.bootgroupId>
                <artifactId>spring-boot-maven-pluginartifactId>
            plugin>
        plugins>
    build>

project>
(2)项目A完整pom.xml
<project xmlns="http://maven.apache.org/POM/4.0.0" xmlns:xsi="http://www.w3.org/2001/XMLSchema-instance"
         xsi:schemaLocation="http://maven.apache.org/POM/4.0.0 https://maven.apache.org/xsd/maven-4.0.0.xsd">
    <modelVersion>4.0.0modelVersion>
    <parent>
        <groupId>org.springframework.bootgroupId>
        <artifactId>spring-boot-starter-parentartifactId>
        <version>2.3.4.RELEASEversion>
        <relativePath/>
    parent>
    <groupId>com.wuyou.springbootgroupId>
    <artifactId>demo2artifactId>
    <version>1.0.0-SNAPSHOTversion>
    <name>demo2name>
    <description>Demo project for Spring Bootdescription>

    <properties>
        <java.version>1.8java.version>
    properties>

    <repositories>

        <repository>
            <id>nexusid>
            <name>nexusname>
            <url>http://localhost:8081/repository/maven-snapshots/url>
            <releases>
                <enabled>trueenabled>
            releases>
            <snapshots>
                <enabled>trueenabled>
            snapshots>
        repository>
    repositories>

    <dependencies>
        <dependency>
            <groupId>org.springframework.bootgroupId>
            <artifactId>spring-boot-starterartifactId>
        dependency>

        <dependency>
            <groupId>org.springframework.bootgroupId>
            <artifactId>spring-boot-starter-testartifactId>
            <scope>testscope>
            <exclusions>
                <exclusion>
                    <groupId>org.junit.vintagegroupId>
                    <artifactId>junit-vintage-engineartifactId>
                exclusion>
            exclusions>
        dependency>

        <dependency>
            <groupId>com.wy.springbootgroupId>
            <artifactId>demoartifactId>
            <version>1.0.0-SNAPSHOTversion>
        dependency>
    dependencies>

    <build>
        <plugins>
            <plugin>
                <groupId>org.springframework.bootgroupId>
                <artifactId>spring-boot-maven-pluginartifactId>
            plugin>
        plugins>
    build>

project>
五、参考地址
- 官网参考地址:http://maven.apache.org/pom.html#Profiles
- pom.xml中maven profile的激活方式
- maven profile动态选择配置文件
- 【IDEA】Maven踩坑:pom文件中的默认profiles不生效+IDEA中Maven的profiles使用说明
- 关于如何激活两个有前置依赖关系的profile
- Maven 打包趟坑与解法