Unreal Engine 4:学习笔记(十一)Plugins
如何使代码模块化,使用Plugins可能是一种比较好的方式,下面通过一个例子,讲一讲如何创建和使用Plugins。
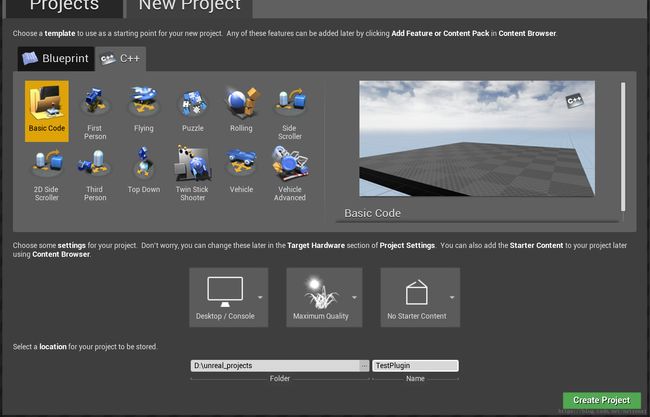
一、创建C++工程TestPlugins:

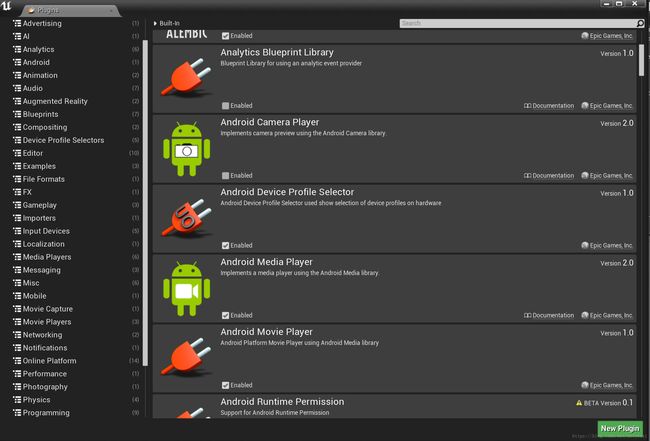
从菜单中选择"Edit"->"Plugins",会弹出如下窗口:
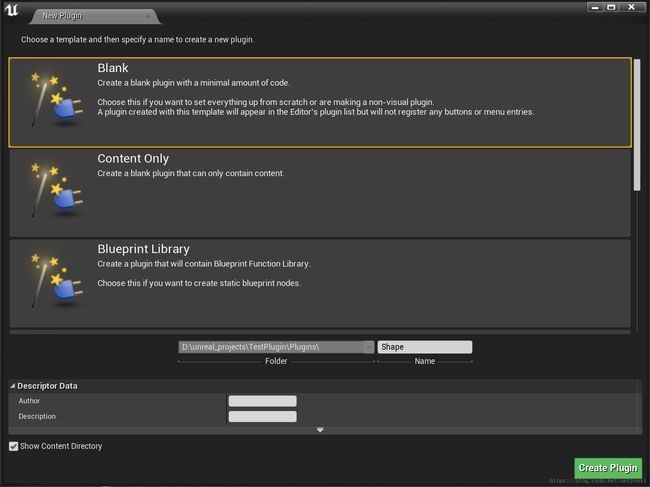
点出“New Plgin”,在弹出的窗口中选中“Blank”,然后输入“Shape”,点出“Create Plugin”后,会创建一个名为“Shape”的plugin:
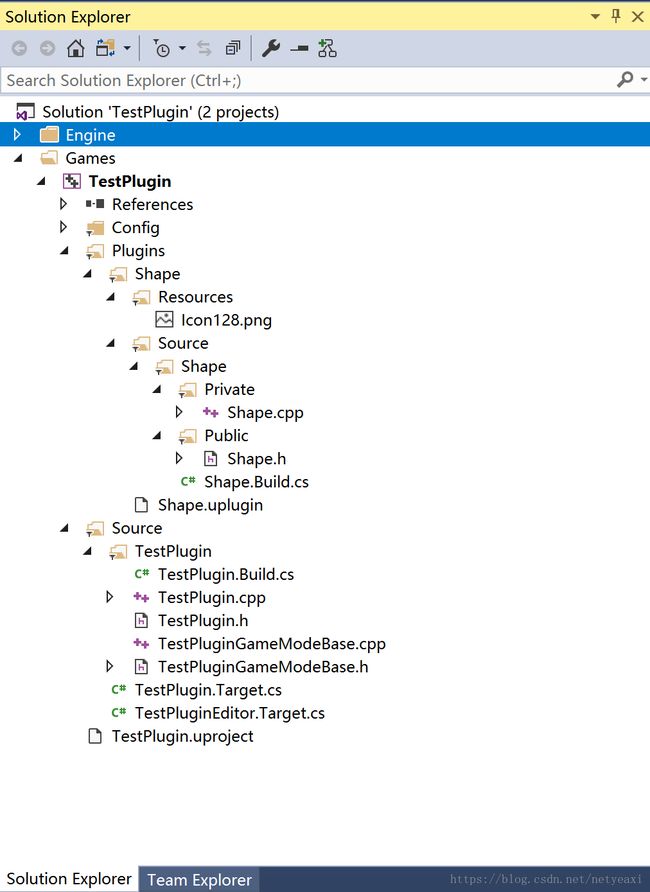
工程的目录结构如下:
从上图可以看到,Shape Plugin的代码目录和TestPlugin工程的基本上是一样的,都有Source文件夹和.uproject文件,Source文件夹下都有.Build.cs文件。打开“Shape.Build.cs”文件,可以看到内容如下:
// Copyright 1998-2017 Epic Games, Inc. All Rights Reserved.

using UnrealBuildTool;

public class Shape : ModuleRules
{
	public Shape(ReadOnlyTargetRules Target) : base(Target)
	{
		PCHUsage = ModuleRules.PCHUsageMode.UseExplicitOrSharedPCHs;

		PublicIncludePaths.AddRange(
			new string[] {
				"Shape/Public"
				// ... add public include paths required here ...
			}
			);


		PrivateIncludePaths.AddRange(
			new string[] {
				"Shape/Private",
				// ... add other private include paths required here ...
			}
			);


		PublicDependencyModuleNames.AddRange(
			new string[]
			{
				"Core",
				// ... add other public dependencies that you statically link with here ...
			}
			);


		PrivateDependencyModuleNames.AddRange(
			new string[]
			{
				"CoreUObject",
				"Engine",
				"Slate",
				"SlateCore",
				// ... add private dependencies that you statically link with here ...
			}
			);


		DynamicallyLoadedModuleNames.AddRange(
			new string[]
			{
				// ... add any modules that your module loads dynamically here ...
			}
			);
	}
}
内容和TestPlugin.Build.cs大致相同,主要是多了对“Public”和“Private”这两个目录的包含,实际上TestPlugin也可以创建这两个目录来存放代码,只要在TestPlugin.Build.cs中中加入如下代码即可:
PublicIncludePaths.AddRange(
	new string[] {
		"TestPlugin/Public"
		// ... add public include paths required here ...
	}
	);


PrivateIncludePaths.AddRange(
	new string[] {
		"TestPlugin/Private",
		// ... add other private include paths required here ...
	}
	);
二、在Shape中添加代码:
代码目录结构:
Shape--+
       |-Public--+
       |         |-circle.h
       |
       |-Private-+
                 |-circle_impl.h
                 |-circle_impl.cpp
                 |-circle.cpp
// circle.h
// 圆的接口类
class SHAPE_API Circle {
public:
virtual ~Circle() {};
// 接口方法:面积
virtual double area() = 0;
static Circle* create(double radius); // 创建circle实例
static void destroy(Circle* circlePtr); // 销毁circle实例
};// circle.cpp
#include "circle.h"
#include "circle_impl.h"
Circle* Circle::create(double radius) {
Circle* circlePtr = new CircleImpl(radius);
return circlePtr;
};
void Circle::destroy(Circle* circlePtr) {
delete circlePtr;
};// circle_impl.h
#include "circle.h"
// 圆的具体实现类
class CircleImpl : public Circle {
private:
double radius;
public:
CircleImpl(double radius);
double area() override;
};// circle_impl.cpp
#include "circle_impl.h"
#include
inline double pi() {
return std::atan(1) * 4;
};
CircleImpl::CircleImpl(double _radius) : radius(_radius) {
};
double CircleImpl::area() {
return pi() * radius * radius;
}; 中宏SHAPE_API会自动被识别,用于把Plugin导出成dll,可能的名字为UE4Editor-Shape.dll。
三、 修改TestPlugin工程
在“TestPlugin.Build.cs”中添加“Shape”Plugin,否则编译时会找不到。
PublicDependencyModuleNames.AddRange(new string[] { "Core", "CoreUObject", "Engine", "InputCore", "Shape" });修改ATestPluginGameModeBase:
// TestPluginGameModeBase.h
#pragma once

#include "CoreMinimal.h"
#include "GameFramework/GameModeBase.h"

#include "circle.h"

#include "TestPluginGameModeBase.generated.h"

/**
 *
 */
UCLASS()
class TESTPLUGIN_API ATestPluginGameModeBase : public AGameModeBase
{
	GENERATED_BODY()

private:
	Circle* circle;

public:

	ATestPluginGameModeBase();

	~ATestPluginGameModeBase();

	void BeginPlay();
};
// TestPluginGameModeBase.cpp
#include "TestPluginGameModeBase.h"
ATestPluginGameModeBase::ATestPluginGameModeBase() {
circle = Circle::create(10);
UE_LOG(LogTemp, Log, TEXT("circle.area=%f"), circle->area());
};
ATestPluginGameModeBase::~ATestPluginGameModeBase() {
};
void ATestPluginGameModeBase::BeginPlay() {
Circle::destroy(circle);
UE_LOG(LogTemp, Log, TEXT("destroy circle"));
};同时在UEEditor将当前Level的GameMode设置成TestPluginGameModeBase:
编译后,点Play,就可以在Output Log中看到打印的日志了。
参考文档:
https://docs.unrealengine.com/en-us/Programming/Plugins
https://wiki.unrealengine.com/An_Introduction_to_UE4_Plugins


