深入了解Redission分布式锁原理以及可重入锁的原理
Redisson是一个基于Redis的Java框架,用于实现各种分布式功能,包括分布式锁。Redisson提供了多种分布式锁的实现,其中包括可重入锁、公平锁、联锁(多个锁同时锁定或释放)、红锁(多个独立Redis节点的分布式锁),以及读写锁等。
基于setnx实现的分布式锁存在以下四个问题
Redisson入门使用教程
Redisson客户端配置:首先,您需要配置Redisson客户端以连接到Redis服务器。通常,这涉及创建一个Config对象,并使用useSingleServer()或其他方法指定Redis服务器的连接信息。示例代码中的配置是连接到本地Redis服务器的示例。(对了这里不要忘记引入redisson依赖)
Config config = new Config();
config.useSingleServer().setAddress("redis://localhost:6379").setPassword("your word");
return Redisson.create(config)
Redisson的使用:
public class RedissonLockExample {
    public static void main(String[] args) {
        // 配置Redisson
        Config config = new Config();
        config.useSingleServer().setAddress("redis://localhost:6379");

        // 创建Redisson客户端
        RedissonClient redisson = Redisson.create(config);

        // 获取锁
        RLock lock = redisson.getLock("myLock");

        try {
            // 尝试加锁,最多等待10秒
            boolean locked = lock.tryLock(10, 30, java.util.concurrent.TimeUnit.SECONDS);

            if (locked) {
                // 锁定成功,执行需要加锁的代码
                System.out.println("获取锁成功,这里来写需要加锁的代码");
                Thread.sleep(5000); // 模拟锁定后的操作
            } else {
                // 锁定失败
                System.out.println("获取锁失败");
            }
        } catch (InterruptedException e) {
            e.printStackTrace();
        } finally {
            // 释放锁
            lock.unlock();
            System.out.println("释放锁");
        }

        // 关闭Redisson客户端
        redisson.shutdown();
    }
深入讲解Redisson可重入锁的工作原理
重入锁原理
重入锁(Reentrant Lock)是一种高级的同步工具,它允许同一个线程多次获取同一把锁,而不会发生死锁。这意味着一个线程在持有锁的情况下可以多次进入锁保护的代码块,而不会被自己阻塞
-
锁计数器:重入锁内部维护一个锁计数器,用于跟踪锁的持有次数。初始时,锁计数器为0,表示没有线程持有该锁。
-
加锁操作:当一个线程首次请求加锁时,锁计数器会增加,同时记录下持有锁的线程。此时,线程获得了锁,并且可以执行锁保护的代码块。
-
重入:如果同一个线程再次请求加锁(重复加锁),锁计数器会继续增加,表示锁被持有多次。线程在退出锁保护的代码块之前,可以多次加锁和解锁,而锁计数器会相应地增加和减少。
-
解锁操作:每次线程解锁时,锁计数器减少。只有当锁计数器减少为0时,锁才会被完全释放,其他线程才有机会获得锁。
作用:
-
避免死锁:重入锁允许同一线程多次获取锁,因此不会因为线程自己持有的锁而导致死锁。这在复杂的多线程场景中非常有用,因为线程可能需要在执行一些递归函数或者多层嵌套的方法时多次获取锁。
-
精细控制锁的释放:与传统的synchronized关键字相比,重入锁允许更灵活地控制锁的释放。线程可以在锁保护的代码块内多次获取和释放锁,而不必将整个代码块包裹在同一个synchronized块中。
我们来看一下trylock的底层逻辑:
通过redis的hash结构来实现锁的重入,如果第一次获取锁就创建,并把value设置为1,再次有线程想要获取锁就再次增加value的值,释放锁时每当一个线程释放时value就减一。直到为0彻底释放完成
由于初始时未填写过期时间等待时间等信息,默认为-1,进而再次调用tryAcquireOnceAsync方法
  RFuture tryLockInnerAsync(long waitTime, long leaseTime, TimeUnit unit, long threadId, RedisStrictCommand command) {
        this.internalLockLeaseTime = unit.toMillis(leaseTime);
        return this.evalWriteAsync(this.getName(), LongCodec.INSTANCE, command,
"if (redis.call('exists', KEYS[1]) == 0) then
redis.call('hincrby', KEYS[1], ARGV[2], 1);
redis.call('pexpire', KEYS[1], ARGV[1]);
return nil; end;
if (redis.call('hexists', KEYS[1], ARGV[2]) == 1)
then redis.call('hincrby', KEYS[1], ARGV[2], 1);
redis.call('pexpire', KEYS[1], ARGV[1]);
return nil; end;
return redis.call('pttl', KEYS[1]);",
 Collections.singletonList(this.getName()), this.internalLockLeaseTime, this.getLockName(threadId));
    }
可见为了保证获取锁的原子性也即不让其他线程在这个线程获取锁的过程中“插队”执行需要将获取锁的代码写入一个Lua脚本当中。
当==0时表示之前未有线程获取锁创建并赋值。当==1时表示存在,为了实现重入就在value上加一,并设置过期时间。注意 这里返回nil代表成功,失败返回对应的时间毫秒值pttl
之后会释放锁
 protected RFuture unlockInnerAsync(long threadId) {
        return this.evalWriteAsync(this.getName(), LongCodec.INSTANCE, RedisCommands.EVAL_BOOLEAN, "if (redis.call('hexists', KEYS[1], ARGV[3]) == 0) then return nil;end;
 local counter = redis.call('hincrby', KEYS[1], ARGV[3], -1); if (counter > 0) then redis.call('pexpire', KEYS[1], ARGV[2]); return 0;
 else redis.call('del', KEYS[1]); redis.call('publish', KEYS[2], ARGV[1]); return 1; end; return nil;",
 Arrays.asList(this.getName(), this.getChannelName()), LockPubSub.UNLOCK_MESSAGE, this.internalLockLeaseTime, this.getLockName(threadId));
    }
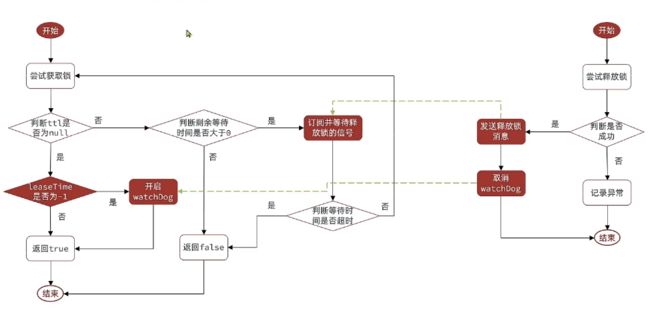
每次释放锁都会对数量减一直至0,并且发布释放锁的通知
重试获取锁机制讲解
trylock源码
 public boolean tryLock(long waitTime, long leaseTime, TimeUnit unit) throws InterruptedException {
        long time = unit.toMillis(waitTime);
        long current = System.currentTimeMillis();
        long threadId = Thread.currentThread().getId();
        Long ttl = this.tryAcquire(waitTime, leaseTime, unit, threadId);
        if (ttl == null) {
            return true;
        } else {
            time -= System.currentTimeMillis() - current;
            if (time <= 0L) {
                this.acquireFailed(waitTime, unit, threadId);
                return false;
            } else {
                current = System.currentTimeMillis();
                RFuture subscribeFuture = this.subscribe(threadId);
                if (!subscribeFuture.await(time, TimeUnit.MILLISECONDS)) {
                    if (!subscribeFuture.cancel(false)) {
                        subscribeFuture.onComplete((res, e) -> {
                            if (e == null) {
                                this.unsubscribe(subscribeFuture, threadId);
                            }

                        });
                    }

                    this.acquireFailed(waitTime, unit, threadId);
                    return false;
                } else {
                    try {
                        time -= System.currentTimeMillis() - current;
                        if (time <= 0L) {
                            this.acquireFailed(waitTime, unit, threadId);
                            boolean var20 = false;
                            return var20;
                        } else {
                            boolean var16;
                            do {
                                long currentTime = System.currentTimeMillis();
                                ttl = this.tryAcquire(waitTime, leaseTime, unit, threadId);
                                if (ttl == null) {
                                    var16 = true;
                                    return var16;
                                }

                                time -= System.currentTimeMillis() - currentTime;
                                if (time <= 0L) {
                                    this.acquireFailed(waitTime, unit, threadId);
                                    var16 = false;
                                    return var16;
                                }

                                currentTime = System.currentTimeMillis();
                                if (ttl >= 0L && ttl < time) {
                                    ((RedissonLockEntry)subscribeFuture.getNow()).getLatch().tryAcquire(ttl, TimeUnit.MILLISECONDS);
                                } else {
                                    ((RedissonLockEntry)subscribeFuture.getNow()).getLatch().tryAcquire(time, TimeUnit.MILLISECONDS);
                                }

                                time -= System.currentTimeMillis() - currentTime;
                            } while(time > 0L);

                            this.acquireFailed(waitTime, unit, threadId);
                            var16 = false;
                            return var16;
                        }
                    } finally {
                        this.unsubscribe(subscribeFuture, threadId);
                    }
                }
            }
        }
    }
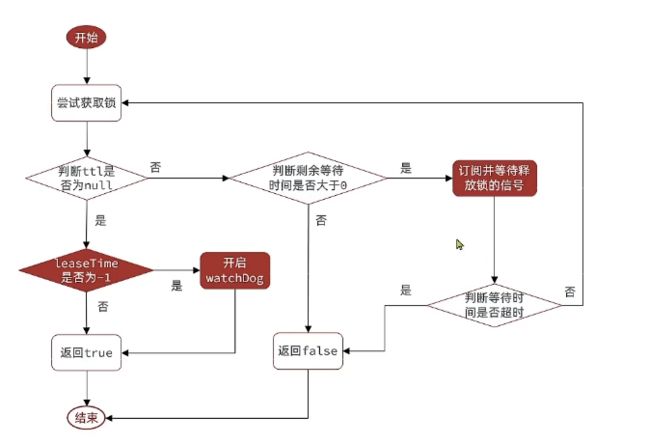
可见这里默认ttl也是为-1,注意tryAcquire方法,返回值为ttl,ttl为null即为获得锁成功
这里由于默认存活时间为-1,所以下面参数默认存活时间为
this.commandExecutor.getConnectionManager().getCfg().getLockWatchdogTimeout()
(watchdog看门狗)也就是30s。
如果ttl为null那么返回true代表获取成功
否则用最大等待时间time减去上面的系统时间算出这段代码的耗时,如果为负数说明超过最大等待时长,返回false,如果time大于0,不直接判断,因为此时别的线程获取锁正在执行,假设立马执行只是会浪费cpu资源,所以这里用了subscribe(threadId)方法来订阅锁释放的信息(上面的unlock代码释放锁会发布信息),然后采用计数器进行等待,等待时长为time,假设没等到,返回false,那么使用unsubscribe()方法结束订阅,返回false。
如果等到别的线程释放锁,就再次判断上面代码是否超时,超时返回false,否则再次带哦用tryAcquire方法
如果ttl小于等待时间time,那么就尝试ttl时间,否则就尝试获取锁在time时间内,知道time结束,这就时重试获取锁机制了。
Redisson分布式锁的原理
获取锁
也就是说如果不设置存活时间,那么会利用看门狗执行任务刷新等待
释放锁


