笔记工具
参考链接
https://www.cnblogs.com/52fhy/p/10745719.html
1. gitbook
参考链接
https://www.gitbook.com/
http://www.chengweiyang.cn/gitbook/
https://github.com/52fhy/gitbook-use
https://www.liqingbo.cn/docs/gitbook/
http://gitbook.hushuang.me/setup.html
https://github.com/52fhy/gitbook-use
http://me.52fhy.com/gitbook-use/
http://gitbook.zhangjikai.com/
https://wjf444128852.gitbooks.io/notes/content/
https://blog.csdn.net/lu_embedded/article/details/81100704
1.1 介绍
大名鼎鼎的文档协作工具
特点:
1、扩展性非常好,有社区支持。支持插件。
2、目录需要手动配置。
3、支持生成html、pdf、epub文件。
1.2 安装
安装 gitbook-cli:
npm install gitbook-cli -g
-
gitbook-cli是gitbook的一个命令行工具, 通过它可以在电脑上安装和管理gitbook的多个版本。 -
gitbook-cli和gitbook是两个软件 -
gitbook-cli会将下载的gitbook的不同版本放到~/.gitbook中, 可以通过设置GITBOOK_DIR环境变量来指定另外的文件夹
1.3 命令
1.3.1 新建项目
新建一个项目:
mkdir test
cd test
初始化目录结构
gitbook init # 这里大约需要10分钟
执行命令会运行一个服务器, 通过 http://localhost:4000/ 可以预览书籍
gitbook serve
# serve 命令也可以指定端口
gitbook serve --port 2333
执行 gitbook build 命令构建书籍,默认将生成的静态网站输出到 _book 目录
gitbook build
# build 命令可以指定路径
gitbook build [书籍路径] [输出路径]
1.3.2 目录结构
gitbook 基本的目录结构
├── book.json
├── README.md
├── SUMMARY.md
├── chapter-1/
|   ├── README.md
|   └── something.md
└── chapter-2/
    ├── README.md
    └── something.md
book.json为配置文件README.md主页SUMMARY.md目录文件
1.3.3 目录文件
SUMMARY.md 示例:
# Summary
## 基本使用
* [前言](introduction.md)
* [安装](installation.md)
* [命令](commands.md)
* [目录结构](structure.md)
* [配置](settings.md)

## 扩展
* [插件](plugins.md)
* [主题](themes.md)
* [bookjson](bookjson.md)
1.3.4 配置文件
book.json 示例:
{
    "title": "Go Web编程",
    "description": "build-web-application-with-golang",
    "author": "谢孟军",
    "output.name": "build-web-application-with-golang-zh",
	"pdf":{
		"fontFamily":"微软雅黑"
	}
}
1.3.5 常用命令
gitbook help					# 列出gitbook所有的命令
gitbook --help					# 输出`gitbook-cli`的帮助信息
gitbook install					# 下载所需的第三方插件依赖
gitbook serve					# 生成静态网页并运行服务器
gitbook build					# 生成静态网页
gitbook pdf						# 生成pdf
gitbook epub					# 生成epub
gitbook build --gitbook=2.0.1	# 生成时指定gitbook的版本, 本地没有会先下载
gitbook ls						# 列出本地所有的gitbook版本
gitbook ls-remote				# 列出远程可用的gitbook版本
gitbook fetch 标签/版本号		 # 安装对应的gitbook版本
gitbook update					# 更新到gitbook的最新版本
gitbook uninstall 2.0.1			# 卸载对应的gitbook版本
gitbook build --log=debug		# 指定log的级别
gitbook builid --debug			# 输出错误信息
注:生成pdf、epub需要安装calibre插件,下载链接:https://calibre-ebook.com/download 。
Mac 环境需要一个命令
sudo ln -s /Applications/calibre.app/Contents/MacOS/ebook-convert /usr/local/bin。
1.4 配置
| 变量 | 描述 | |
|---|---|---|
| root | 包含所有图书文件的根文件夹的路径,除了 book.json | |
| structure | 指定自述文件,摘要,词汇表等的路径,参考 Structure paragraph. | |
| title | 您的书名,默认值是从 README 中提取出来的。在 GitBook.com 上,这个字段是预填的。 | |
| description | 您的书籍的描述,默认值是从 README 中提取出来的。在 GitBook.com 上,这个字段是预填的。 | |
| author | 作者名。在GitBook.com上,这个字段是预填的。 | |
| isbn | 国际标准书号 ISBN | |
| language | 本书的语言类型 —— ISO code 。默认值是 en | |
| direction | 文本阅读顺序。可以是 rtl (从右向左)或 ltr (从左向右),默认值依赖于 language | 的值。 |
| gitbook | 应该使用的GitBook版本。使用 SemVer 规范,并接受类似于 “> = 3.0.0” 的条件。 |
- root
包含所有图书文件的根文件夹的路径, book.json 文件除外。 例:
"root" : "./docs",
- structure
指定 Readme、Summary、Glossary 和 Languages 对应的文件名。
- title
电子书的书名,默认值是从 README 中提取出来的。在 GitBook.com 上,这个字段是预先填写的。 例:
"title" : "gitbook-notes",
- author
作者姓名,在GitBook.com上,这个字段是预先填写的。 例:
"author" : "victor zhang"
- description
电子书的描述,默认值是从 README 中提取出来的。在GitBook.com上,这个字段是预先填写的。
例:
"description" : "Gitbook 教程"
- direction
文本的方向。可以是 rtl 或 ltr,默认值取决于语言的值。
例:
"direction" : "ltr"
- gitbook
应该使用的GitBook版本。使用SemVer规范,接受类似于 >=3.0.0 的条件。
例:
"gitbook" : "3.0.0",
"gitbook" : ">=3.0.0"
- language
Gitbook使用的语言, 版本2.6.4中可选的语言如下: en, ar, bn, cs, de, en, es, fa, fi, fr, he, it, ja, ko, no, pl, pt, ro, ru, sv, uk, vi, zh-hans, zh-tw 例:
"language" : "zh-hans",
- links
在左侧导航栏添加链接信息 例:
"links" : {
    "sidebar" : {
        "Home" : "https://github.com/dunwu/gitbook-notes"
    }
}
- styles
自定义页面样式, 默认情况下各generator对应的css文件 例:
"styles": {
    "website": "styles/website.css",
    "ebook": "styles/ebook.css",
    "pdf": "styles/pdf.css",
    "mobi": "styles/mobi.css",
    "epub": "styles/epub.css"
}
例如要使 h1、h2 标签有下边框, 可以在 website.css 中设置
h1 , h2{
    border-bottom: 1px solid #EFEAEA;
}
1.4.1 plugins 插件列表
可以在插件前面加-符号删除默认插件
默认五种插件如下,更多插件
highlight:代码高亮
search:导航栏查询功能(不支持中文)
sharing:右上角分享功能
font-settings:字体设置(最上方的"A"符号)
livereload:为GitBook实时重新加载
pluginsConfig 配置插件的属性
1.4.2 参考:
{
    "title": "G笔记",
    "description": "好记性不如G笔记",
    "author": "lijiam",
    "output.name": "site",
    "language": "zh-hans",
    "gitbook": "3.2.3",
    "root": ".",
    "links": {
        "sidebar": {
            "首页": "http://www.lijiam.com"
        }
    },
    "plugins": [
        "code",
        "-search",
        "search-pro",
        "github",
        "splitter",
        "tbfed-pagefooter",
        "donate",
        "-sharing",
        "sharing-plus",
        "prism",
        "-highlight",
        "styles-less",
        "toggle-chapters",
        "multipart",
        "ancre-navigation"
    ],
    "pluginsConfig": {
        "github": {
            "url": "https://github.com/lijiam"
        },
        "code": {
            "copyButtons": true
        },
        "tbfed-pagefooter": {
            "copyright": "Copyright © lijiam 2019",
            "modify_label": "本书发布时间:",
            "modify_format": "YYYY-MM-DD HH:mm:ss"
        },
        "donate": {
            "wechat": "/assets/images/wxpay.png",
            "alipay": "/assets/images/alipay.png",
            "title": "",
            "button": "赏",
            "alipayText": "支付宝打赏",
            "wechatText": "微信打赏"
        },
        "sharing": {
            "facebook": true,
            "twitter": true,
            "weibo": true,
            "qq": true,
            "all": [
                "douban",
                "google",
                "qzone",
                "linkedin"
            ]
        },
        "prism": {
            "css": [
                "prismjs/themes/prism-solarizedlight.css"
            ],
            "lang": {
                "flow": "typescript"
            }
        }
    },
    "styles": {
        "website": "assets/styles/website.less",
        "ebook": "assets/styles/ebook.less",
        "pdf": "assets/styles/pdf.less",
        "mobi": "assets/styles/mobi.less",
        "epub": "assets/styles/epub.less"
    }
}
1.5 插件
安装插件
在根目录下创建book.json文件
1.5.1 配置
在book.json的plugins参数中添加插件名。 如:
{
    "plugins": ["mathjax"]
}
1.5.2 安装:
打开终端
gitbook install
或
npm install gitbook-plugin-插件名
1.5.3 重启服务或者重新打包
如果使用gitbook install安装的很慢,建议使用npm init初始化一个package.json文件,然后每个包通过npm命令安装,以后就可以通过npm install一键快速安装依赖包了。
1.5.4 注意:
1、插件一定先要在book.json文件里面plugins中才能生效,如果只是安装了插件,而没配置的话是不会生效的。
2、gitbook命令安装慢,而且是全部插件都安装一遍,如果只安装一个插件的话建议使用NPM命令安装。
1.5.5 插件列表 plugins
配置使用的插件
"plugins": [
    "-search",
    "back-to-top-button",
    "expandable-chapters-small",
    "insert-logo"
]
其中-search中的 - 符号代表去除默认自带的插件
1.5.5.1 Gitbook默认自带有5个插件:
| 插件 | 说明 |
|---|---|
| highlight | 代码高亮 |
| search | 导航栏查询功能(不支持中文) |
| sharing | 右上角分享功能 |
| font-settings | 字体设置(最上方的"A"符号) |
| livereload | 为GitBook实时重新加载 |
1.5.6 插件属性配置pluginsConfig
配置插件的属性 例如配置insert-logo的属性:
  "pluginsConfig": {
    "insert-logo": {
      "url": "images/logo.png",
      "style": "background: none; max-height: 30px; min-height: 30px"
    }
  }
1.5.7 一些实用插件
记录一些实用的插件 用法:在book.json中添加"plugins"和"pluginConfig"字段。然后执行gitbook install,或者使用NPM安装npm install gitbook-plugin-插件名,也可以从源码GitHub地址中下载,放到node_modules文件夹里(GitHub地址在进入插件地址右侧的GitHub链接)
1.6 常见问题
1、gitbook生成pdf时缺少ebook.css
找到 C:\Users\YJC\.gitbook\versions\3.2.3\lib\output\website,将copyPluginAssets.js文件中67行和112行的“confirm: true” 改为:“confirm: false”。
2. Loppo
参考链接
https://github.com/ruanyf/loppo
https://gitee.com/ruanyf/loppo
https://redux.ruanyifeng.com/
2.1 介绍
Loppo是Markdown文档的极其简单的静态站点生成器。您只需一个命令即可获得站点。请访问演示。
特点:
1、简单小巧,支持自动生成目录。
2、不支持插件。
3、原理是将 Markdown 文件编译生成 html 文件。
4、生成的页面很美观、大方,支持响应式。
简单的配置(示例)
简单的网站结构(示例)
友好的模板语法(示例)
内置实用程序命令
2.2 安装
安装Loppo
npm install loppo -g
2.3 使用
注意:Loppo仍处于初期阶段。在生产中使用它需要您自担风险。
首先,将您的文档安排为以下结构。
|- myProject
   |- README.md
   |- docs
      |- page1.md
      |- page2.md
      |- ...
输入您的项目目录。
cd myProject
运行命令。
loppo
会生成:
dist/
chapters.yml
loppo.yml
-
dist是编译输出目录; -
chapters.yml是自动生成的文档目录,根据当前目录生成,如果增删了源文件,需要删除该文件使得下次重新生成; -
loppo.yml是配置文件,第一次生成后不会再变更。
2.4 配置
loppo.yml 文件是配置文件:
dir: docs
output: dist
site: Documents
theme: oceandeep
customization: false
themeDir: loppo-theme
direction: ltr
id: test-loppo
我们可以手动进行修改。
dir: 源文件所在目录。默认是当前目录下的 docs目录。
output:编译输出文件目录。
site:项目文档名称。可以自定义,显示在页面 title 里。
theme:主题。默认oceandeep。暂时不知道有没有其他主题。
现在,Loppo将在dist子目录下构建文档站点。构建过程完成后,您可以在浏览器中打开该站点。
open dist / index.html
3. idoc
参考链接: https://github.com/jaywcjlove/idoc
3.1 介绍
简单的文档生成工具
特点:
1、简单小巧,支持自动生成目录。有几个主题可以选择。
2、不支持插件。
3、原理是将 Markdown 文件编译生成 html 文件。
3.2 安装
全局安装:
sudo npm install idoc -g
3.3 使用
创建并初始化项目:
mkdir test-idoc
cd test-idoc

# 初始化
idoc init
填入必要的项目信息,初始化完成。会在项目目录下生成:
md/
 |-- index.md
package.json
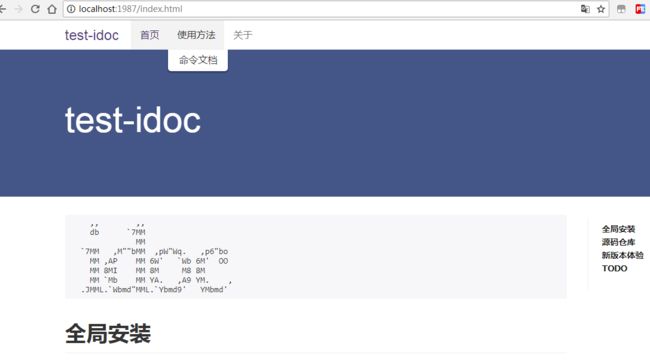
运行 idoc server 预览生成的静态页面。默认预览地址为 http://localhost:1987/
预览的时候改动md文件,浏览器刷新可以看到改动后的内容。
其中 初始化 步骤也可以手动执行,把目录和配置文件建好就行了。
3.4 目录结构
idoc对目录结构没有要求,只要你把md文件放在md/目录下面,idoc会自动识别。支持子目录。例如:
md/
 |-- 首页.md
 |-- 关于.md
 |-- 使用方法/
	|-- 命令文档.md
	|-- 命令文档2.md
3.5 配置文件
package.json文件。
{
"name": "idoc",
"version": "0.0.1",
"description": "",
"keywords": [
""
],
"homepage": "http://JSLite.io",
"author": "jaywcjlove " ,
"repository": {
"type": "git",
"url": "https://github.com/jaywcjlove/idoc"
},
"licenses": "MIT",
"idoc": {
"theme": "default",
"logo": "idoc-logo.svg",
"md": [
"首页.md",
{
"使用方法": [
"主题文件.md",
"初始化.md",
"配置说明.md"
]
},
"关于.md"
]
}
}
其中 idoc.md块无需手动配置,idoc build 自动生成。其它配置无需多说明,也能看的懂。
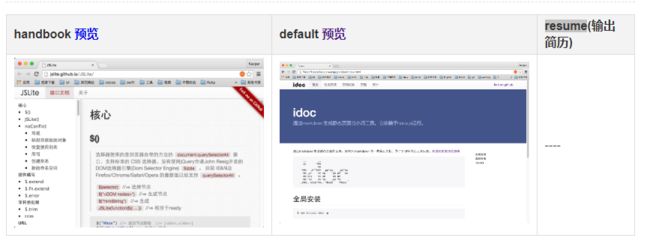
3.6 主题
支持:
handbook
default
resume
参考链接
https://wangchujiang.com/idoc/html/主题.html
3.7 常用命令
- build
生成静态 HTML 页面到指定目录中。
idoc build
- watch
监控 md 文件发生变化自动 build。
idoc watch
- server
打开本地静态 html 服务器,预览你生成的页面。
idoc server
- clean
清除生成的静态文件。
idoc clean
- theme
$ idoc theme 与 $ idoc -t 相同
选择默认主题或者第三方主题,默认两个主题 handbook 或者 default。
# 选择主题
# 第三方主题,克隆到当前跟目录就可以使用命令选择了
$ idoc theme
# theme 简写 -t
$ idoc -t

# 制作主题 需要指定制作的主题目录
$ idoc -t ~/git/idoc-theme-slate/
- deploy
将文档部署到 git 仓库的 gh-pages 分支中。
目前需要手动添加分支。
idoc deploy
4. docsify
参考链接: https://docsify.js.org/#/
https://github.com/docsifyjs/docsify
4.1 介绍
一个神奇的文档站点生成器,简单轻巧,无需静态构建html
特点:
1、扩展性非常好,有社区支持。支持插件。
2、目录需要手动配置。
3、发布无需编译生成 html,动态解析 md 文件。
4.2 安装
全局安装:
npm i docsify-cli -g
4.3 使用
创建并初始化项目:
mkdir test-docsify
cd test-docsify

# init project
docsify init ./docs
执行完毕,生成 docs 目录。里面有3个文件:
.nojekyll:让gitHub不忽略掉以_打头的文件- index.html:整个网站的核心文件
- README.md:默认页面
接下来预览一下效果:
docsify serve docs
会在本地运行server服务,我们打开浏览器,输入:http://localhost:3000 即可看到 demo 页面。
项目的目录结构示例:
.
└── docs
    ├── README.md
    ├── guide.md
    └── zh-cn
        ├── README.md
        └── guide.md
实际路由对应关系是:
docs/README.md        => http://domain.com
docs/guide.md         => http://domain.com/guide
docs/zh-cn/README.md  => http://domain.com/zh-cn/
docs/zh-cn/guide.md   => http://domain.com/zh-cn/guide
4.4 增加一个页面
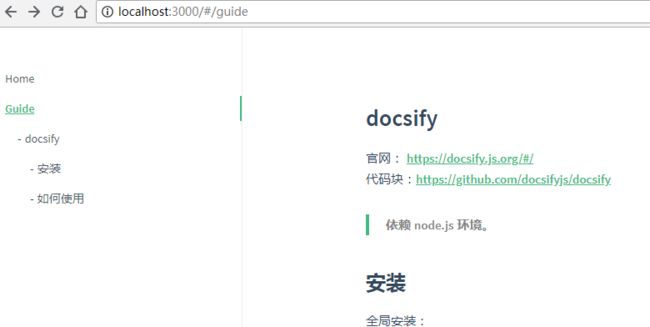
我们新增 guide.md 文件作为示例:
## docsify

官网: https://docsify.js.org/#/
代码块:https://github.com/docsifyjs/docsify

> 依赖 node.js 环境。

### 安装

全局安装:

npm i docsify-cli -g


### 如何使用

创建并初始化项目:
我们启动 server 预览效果:
docsify serve docs
浏览:http://localhost:3000/#/guide
server 启动后,我们修改文件保存后,浏览器会实时刷新。
4.5 Sidebar
我们可以给文档增加左侧菜单。菜单文件名是_sidebar.md。格式要求示例:
* [Home](/)
* [Guide](guide.md)
* [About](about.md "关于我,这是title tag")
括号里可以增加 title tag,通常用于SEO。
保存后需要修改 index.html 添加loadSidebar: true以启用左侧菜单:
window.$docsify = {
  loadSidebar: true,
  subMaxLevel: 3,
  name: '',
  repo: '',
  auto2top: true,
  search: 'auto'
}
其中:
loadSidebar:是否显示左侧菜单subMaxLevel:配置菜单层级,默认仅显示一级name:配置项目名repo:配置代码库地址auto2top:更改路由时自动滚动到屏幕顶部search:配置启用搜索功能。需要加载对应js文件。后面有说明。
也可以增加分组菜单,必须用tag键留空格,否则层级是相同的。示例:
* [首页](/)
* 开始学习
	* [loppo](loppo.md "非常简单的静态站点生成器")
	* [idoc](idoc.md)
	* [gitbook](gitbook.md)
	* [docsify](docsify.md)
* 参考
4.6 配置高亮
docsify使用 Prism 突出显示页面中的代码块。默认情况下,它仅支持CSS,JavaScript和HTML。你可以使用 Prism 加载其他语言:
Copy<script src="//unpkg.com/docsify/lib/docsify.min.js">script>
<script src="//unpkg.com/prismjs/components/prism-bash.min.js">script>
<script src="//unpkg.com/prismjs/components/prism-php.min.js">script>
<script src="//unpkg.com/prismjs/components/prism-java.min.js">script>
<script src="//unpkg.com/prismjs/components/prism-go.min.js">script>
<script src="//unpkg.com/prismjs/components/prism-c.js">script>
<script src="//unpkg.com/prismjs/components/prism-asm6502.js">script>
<script src="//unpkg.com/prismjs/components/prism-makefile.js">script>
从这个库里获取更多选项支持:https://github.com/PrismJS/prism/tree/gh-pages/components。
4.7 搜索
修改 index.html ,头部引入:
<script src="//unpkg.com/docsify/lib/plugins/search.js">script>
然后配置里开启搜索:
search: 'auto'
4.8 copy-code
如果需要支持代码后面显示复制按钮,可以引入该插件:
<script src="//unpkg.com/docsify-copy-code">script>
无需额外配置。
4.9 自定义导航栏
参考:https://docsify.js.org/#/custom-navbar
4.10 主题修改
仅需替换 index.html 里的vue:
<link rel="stylesheet" href="//unpkg.com/docsify/lib/themes/vue.css">
可用的主题:
<link rel="stylesheet" href="//unpkg.com/docsify/lib/themes/vue.css">
<link rel="stylesheet" href="//unpkg.com/docsify/lib/themes/buble.css">
<link rel="stylesheet" href="//unpkg.com/docsify/lib/themes/dark.css">
<link rel="stylesheet" href="//unpkg.com/docsify/lib/themes/pure.css">
其它主题:
docsify-themeable :A delightfully simple theme system for docsify.
参考:https://docsify.js.org/#/themes
4.11 配置参考
参考:https://docsify.js.org/#/configuration
4.12 插件参考
参考:https://docsify.js.org/#/plugins
4.13 发布到GitHub Pages
参考:https://docsify.js.org/#/deploy
5. Valine
5.1 介绍
Valine 诞生于2017年8月7日,是一款基于LeanCloud的快速、简洁且高效的无后端评论系统。
理论上支持但不限于静态博客,目前已有Hexo、Jekyll、Typecho、Hugo、Ghost 等博客程序在使用Valine。
参考链接
- https://valine.js.org/
- https://github.com/xCss/Valine
- https://www.npmjs.com/package/valine
- https://www.leancloud.cn/
特点
- 快速、安全、轻量易用
- Emoji
- 无后端实现
- MarkDown 全语法支持
- 文章阅读量统计
v1.2.0+
5.2 安装
5.3 使用
6. 其他
- mkdocs:https://www.mkdocs.org/
- sphinx:
类似线文档
VuePress
看云
语雀
BookStack
docsify
Docute
MinDoc
Wikitten
DokuWiki
MkDocs
北半球(疑似关闭)
Penflip
Gittalk:个人博客评论系统


