0.airflow架构
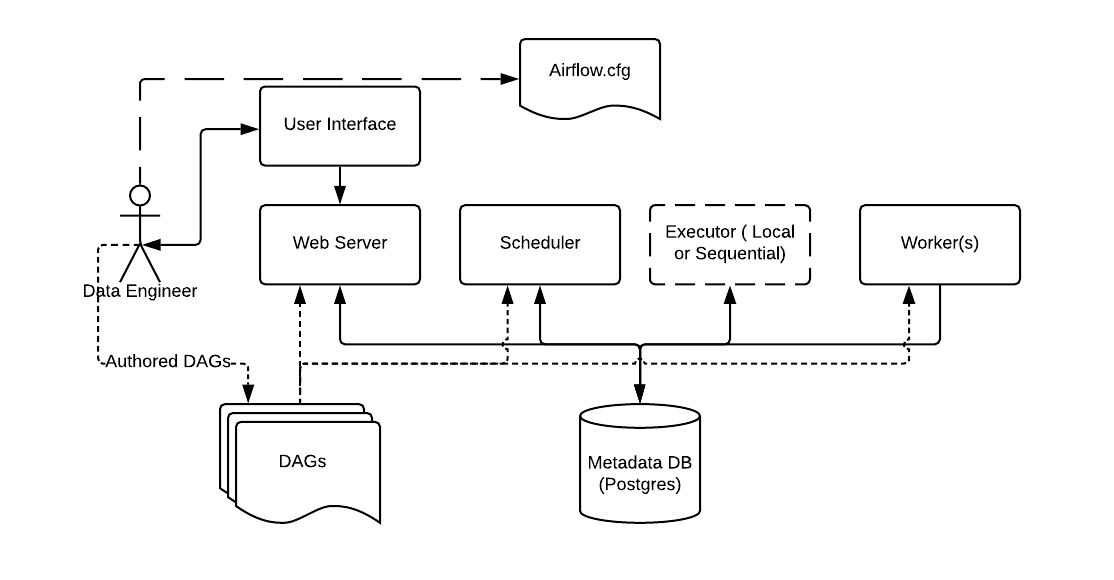
从开发的角度出发来看,使用Local Execultor的基础 Airflow架构是一个绝佳的理解Apache Airflow架构的起点。

以下是airflow 主要组件的说明:
-
元数据库(Metadata Database): Airflow使用 SQL 数据库 来存储关于 数据流水线运行相关的元数据信息。在图片下方,元数据库由在Airflow当中很受欢迎的Postgres来表示。Airflow也支持MySQL作为其元数据库。
-
Web服务器和调度器(Web Server and Scheduler): Airflow web服务器 和 调度器 在本台机器中是分别的进程(在这个例子中) 且和上面所提到的元数据库进行交互。
-
执行器(Executor)被单独的显示出来了,由于其通常与Airflow一同本探讨,但是其并不是单独的一个进程,它运行在 调度器之中。
-
工作节点(Worker)是不同的经常,其与图中的其他组件进行交互。
-
airflow.cfg是被WebServer Scheduler 及 Worker组件使用的配置文件
- DAGs 指的是 包含Python代码的 DAG文件, 代表将要被Airflow运行的数据流水线。这些文件的位置在Airflow配置文件中指定,他们需要被Web Server ,Scheduler及 Worker组件访问到。
1.依赖安装配置
1.0 airflow用户创建并设置密码
| 使用 root 用户执行下面的命令
useradd airflow
passwd airflow
# 输入airflow,收到提示后再次输入 airflow
|
1.1 python 3
centos7自带的python版本为 2.7.5,需要安装 python 3以支持 airflow的使用。
| #安装 pyenv 安装 pyenv-virtualenv
curl -L https://raw.githubusercontent.com/yyuu/pyenv-installer/master/bin/pyenv-installer | bash
exec "$SHELL"
#安装 python 3.7.7
pyenv install 3.7.7
#新增虚拟环境
pyenv virtualenv 3.7.7 airflow
#使用虚拟环境
pyenv activate airflow
#查看当前虚拟环境的python版本
python -V
#退出当前虚拟环境
pyenv deactivate
#设置环境变量
vim /etc/profile
export PYENV_ROOT="/data/pyenv"
export PATH="$PYENV_ROOT/bin:$PATH"
eval "$(pyenv init -)"
eval "$(pyenv virtualenv-init -)"
|
1.2 mysql
使用 mysql 作为 airflow 的元数据库,按照步骤安装好mysql软件包
| # 查找centos 7 自带的 mariadb 软件包
rpm -qa | grep mariadb
# 删除 mariadb 相关的软件包
rpm -e mariadb* --nodeps
# 在mysql 配置中加入 airflow需要的参数
vim /etc/my.cnf
explicit_defaults_for_timestamp=1
# 下载 mysql rpm包
wget -t 0 https://dev.mysql.com/get/Downloads/MySQL-5.7/mysql-5.7.26-1.el7.x86_64.rpm-bundle.tar
# 解压rpm包
tar -xvf mysql-5.7.26-1.el7.x86_64.rpm-bundle.tar
# 一次安装相关mysql rpm软件包
rpm -ivh mysql-community-common-5.7.26-1.el7.x86_64.rpm
rpm -ivh mysql-community-libs-5.7.26-1.el7.x86_64.rpm
rpm -ivh mysql-community-client-5.7.26-1.el7.x86_64.rpm
rpm -ivh mysql-community-server-5.7.26-1.el7.x86_64.rpm
# 启动 mysql 服务
systemctl start mysqld
# 查看 mysql 服务状态
systemctl status mysqld
# 查看 mysql 临时密码
grep password /var/log/mysqld.log
# 使用 root 用户登录
mysql -u root -p
# 设置新mysql 新密码, 新密码需要满足 有字符 数字 大小写字母
GRANT ALL PRIVILEGES ON *.* TO 'root'@'%' IDENTIFIED BY 'Aa@123456' WITH GRANT OPTION;
# 刷新权限
flush privileges;
# 新建 airflow 元数据库
CREATE DATABASE airflow CHARACTER SET utf8 COLLATE utf8_unicode_ci;
CREATE USER 'airflow' IDENTIFIED BY 'airflow';
GRANT ALL PRIVILEGES ON airflow.* TO 'airflow';
|
1.3 redis
使用redis作为 Celery的broker,参考这篇文章即可
redis快速安装部署
2.airflow安装
2.0 airflow 基本安装包
| pip install -i https://pypi.tuna.tsinghua.edu.cn/simple apache-airflow==1.10.12
pip install -i https://pypi.tuna.tsinghua.edu.cn/simple apache-airflow[async]==1.10.12
pip install -i https://pypi.tuna.tsinghua.edu.cn/simple apache-airflow[celery]==1.10.12
pip install -i https://pypi.tuna.tsinghua.edu.cn/simple apache-airflow[crypto]==1.10.12
pip install -i https://pypi.tuna.tsinghua.edu.cn/simple apache-airflow[devel_hadoop]==1.10.12
pip install -i https://pypi.tuna.tsinghua.edu.cn/simple apache-airflow[hdfs]==1.10.12
pip install -i https://pypi.tuna.tsinghua.edu.cn/simple apache-airflow[hive]==1.10.12
pip install -i https://pypi.tuna.tsinghua.edu.cn/simple apache-airflow[jdbc]==1.10.12
pip install -i https://pypi.tuna.tsinghua.edu.cn/simple apache-airflow[kerberos]==1.10.12
pip install -i https://pypi.tuna.tsinghua.edu.cn/simple apache-airflow[ldap]==1.10.12
pip install -i https://pypi.tuna.tsinghua.edu.cn/simple apache-airflow[mysql]==1.10.12
pip install -i https://pypi.tuna.tsinghua.edu.cn/simple apache-airflow[password]==1.10.12
pip install -i https://pypi.tuna.tsinghua.edu.cn/simple apache-airflow[presto]==1.10.12
pip install -i https://pypi.tuna.tsinghua.edu.cn/simple apache-airflow[redis]==1.10.12
pip install -i https://pypi.tuna.tsinghua.edu.cn/simple apache-airflow[ssh]==1.10.12
|
2.1 airflow operator 使用到的 软件包
| pip install -i https://pypi.tuna.tsinghua.edu.cn/simple impyla
pip install -i https://pypi.tuna.tsinghua.edu.cn/simple sasl
pip install -i https://pypi.tuna.tsinghua.edu.cn/simple thrift
pip install -i https://pypi.tuna.tsinghua.edu.cn/simple thrift-sasl
pip install -i https://pypi.tuna.tsinghua.edu.cn/simple PyHive
pip install -i https://pypi.tuna.tsinghua.edu.cn/simple pyspark
pip install -i https://pypi.tuna.tsinghua.edu.cn/simple apache-airflow-backport-providers-apache-spark
|
3.airflow配置
3.0配置 airflow.cfg文件
| # 设置 AIRFLOW_HOME 目录
export AIRFLOW_HOME=/opt/airflow
# 运行 airflow 命令,这时会在 /opt/airflow 目录下生产 airflow的配置文件
airflow
# 进入到 AIRFLOW_HOME目录下
cd /opt/airflow
# 修改 airflow 配置文件
vim airflow.cfg
# dag 文件的根目录
dags_folder = /opt/airflow/dags
# 日志的根目录
base_log_folder = /opt/airflow/logs
# dag处理器的日志路径
dag_processor_manager_log_location = /opt/airflow/logs/dag_processor_manager/dag_processor_manager.log
# 时区改为北京时间
default_timezone = Asia/Shanghai
# 执行器使用 CeleryExecutor
executor = CeleryExecutor
# 使用 mysql 作元数据管理
sql_alchemy_conn = mysql://airflow:airflow@localhost/airflow
# 设置并发为 320
parallelism = 320
# 设置 dag 并发为 100
dag_concurrency = 100
# 设置每个 dag 最大
max_active_runs_per_dag = 1
# 将载入 dag 样例设置为否
load_examples = False
# 设置 插件的目录
plugins_folder = /opt/airflow/plugins
# 设置终端url
endpoint_url = http://localhost:7080
# 设置 基准
base_url = http://localhost:7080
# 设置 webserver端口
web_server_port = 7080
# 将airflow.cfg暴露到 web 界面
expose_config = True
# 将每页显示的 dag 数目设置为10
page_size = 10
# 开启rbac
rbac = True
# 配置 celery 的 broker 为 redis
broker_url = redis://:123@localhost:6379/0
# 设置 celery 的结果存储的介质,使用mysql
result_backend = db+mysql://airflow:airflow@localhost/airflow
# 设置 scheduler 下发任务的队列
default_queue = queue_edw
# 设置最小处理dag 文件的间隔
min_file_process_interval = 1
# 设置scheduler子处理任务的日志目录
child_process_log_directory = /opt/airflow/logs/scheduler
# 设置 scheduler 最大运行的 僵尸进程阈值
scheduler_zombie_task_threshold = 30
# 设置 scheduler的最大线程数
max_threads = 20
|
3.1 依赖组件配置
若使用hive的话,airflow用户需要提交任务到yarn上,需要配置相关权限
Fair Scheduler Allocations (Deployed)
yarn.admin.acl
需要在上面两个配置中添加 airflow 用户
4.airflow 命令
| # 查看 airflow 版本
airflow version
# 初始化 元数据库
airflow initdb
# 升级 元数据库
airflow upgradedb
# 重置 元数据库
airflow resetdb
# 在后台启动 airflow 的 web 服务
airflow webserver -D
# 在后台启动 airflow 的调度器
airflow scheduler -D
# 在后台启动 celery 的 flower监控组件
airflow flower -D
# 启动worker服务 -q 指定 task 传递的队列
airflow worker -q queue_edw -D
# 关闭airflow 相关服务
ps -ef|egrep 'celeryd|serve_logs|scheduler|airflow-webserver|flower'|grep -v grep|awk '{print $2}'|xargs kill -9
rm /opt/airflow/*.pid
|
5. 分布式安装配置
经过 1-4步 即可在物理机中运行起一个 单机版本的 airflow, 若想要将 airflow 分布式安装到多个节点,只需 在其余节点 重复 1-3步,然后再复制 第 4 步的 airflow.cfg 文件到 其余节点即可。
为了方便安装,需要配置ssh,并互相授信,以方便传递配置文件。
更多关于Apache Airflow的文章,请查看 Apache Airflow系列文章。
欢迎加入Apache Airflow技术交流群.

或者加入QQ群 704721809。
参考文档
[0] Basic Airflow architecture
https://airflow.readthedocs.io/en/latest/start.html#basic-airflow-architecture
[1] 使用 pyenv 管理 Python 版本
https://einverne.github.io/post/2017/04/pyenv.html
[2] Linux 使用rpm方式安装最新mysql(5.7.22)步骤以及常见问题解决
https://blog.csdn.net/hao134838/article/details/80163181
[3] redis快速安装部署
https://blog.csdn.net/guancong3412/article/details/88683044
[4] Airflow Installation Doc
https://airflow.readthedocs.io/en/latest/installation.html
[5] Configuration Reference
https://airflow.readthedocs.io/en/latest/configurations-ref.html
[6] Using the Command Line Interface
https://airflow.readthedocs.io/en/latest/usage-cli.html
[7] MySQL 5.7中explicit_defaults_for_timestamp参数
https://www.jianshu.com/p/dfa0380eb6b9

