keepalived高可用
文章目录
- 一、高可用基本概述
-
- 1.1 什么是高可用
- 1.2 高可用使用什么工具
- 1.3 高可用是如何实现的
- 1.4 VRRP诞生背景及原理
- 二、 高可用Keepalived
-
- 2.1 Keeplaived基本介绍
- 2.2 Keepalived核心概念
- 2.3 Keeplaived应用场景
- 2.4 Keeplaived安装配置
-
- 2.4.1 配置Master
- 2.4.2 配置Backup
- 2.4.3 地址漂移测试
- 2.5 Keepalived延迟抢占
- 2.6 Keepalived非抢占式
- 2.7 Keeplaived邮件通知
- 2.8 Keepalived双主模式
- 三、nginx高可用
-
- 3.1 高可用Nginx
- 四、 高可用脑裂
-
- 4.1 什么是脑裂
- 4.2 脑裂是如何产生的
- 4.3 脑裂影响的范围
- 五、keepalived如何投递生产使用
-
- 5.1 云主机
- 5.2 物理机
- 六、Nginx平滑升级
-
- 6.1 什么是平滑升级
- 6.2 平滑升级过程
- 6.3 信号含义
- 6.3 Nginx平滑升级实践
-
- 6.3.1 安装Nginx所需依赖
- 6.3.2 编译并安装Nginx
- 6.3.3 备份旧Nginx二进制
- 6.3.4 向旧Master发送USR2信号
- 6.3.5 向旧Master发送WINCH信号
- 6.3.6 向旧Master发送QUIT信号
- 6.4 Nginx平滑回滚
一、高可用基本概述
1.1 什么是高可用
- 简单理解:两台机器启动着相同的业务系统,当有一台机器宕机,另外一台服务器能快速的接管,对于访问的用户是无感知的。
- 专业理解:高可用是分布式系统架构设计中必要的一环,主要目的: 减少系统不能提供服务的时间。假设系统一直能够提供服务,我们说系统的可用性是100%。如果系统每运行100个时间单位,会有1个时间单位无法提供服务,我们说系统的可用性是99%。高可用参考URL高可用的目的:减少系统down机时间,提高SLA(Service-Level Agreement)服务等级;
服务等级协议 9999

1) 首先计算全年的总小时数:
  365 * 24 = 8760 (时)

2) 3个9的标准
(365 * 24)* (1 - 99.9%) = 8760 (时) * 0.001=  8.76 (时)

3) 4个9的标准
(365 * 24)* (1 - 99.99%) =  8760 (时)* 0.0001 = 0.876 * 60 =  52.56 (分)

4) 5个9的标准
(365 * 24)* (1 - 99.999%) =  8760 (时) * 0.00001 = 0.0876 (时) * 60 =  5.256 (分)
1.2 高可用使用什么工具
通常服务高可用我们选择使用 keepalived 软件实现;
1.3 高可用是如何实现的
keepalived 软件是基于 VRRP 协议实现的。VRRP ((Virtual Router Redundancy Protocol)虚拟路由冗余协议,主要用于解决单点故障问题。
1.4 VRRP诞生背景及原理
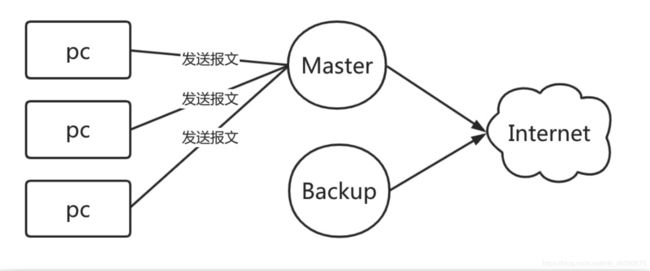
比如公司的网络是通过网关转换进行上网的,那如果该路由器故障了,网关无法转发报文了,此时所有人都将无法上网,这么时候怎么办呢?

通常做法是增加一个 Backup 路由,然后修改用户PC电脑网关指向为Backup,但这里有几个问题
1.如果用户过多修改起来会非常的麻烦;
2.如果用户将指向都修改为Backup,那Master如果恢复了该怎么办?
那我们直接将 Backup 网关 IP 配置为 Master 网关 IP不就可以了吗?其实也不行
因为PC在第一次通信时,是通过ARP广播获取到Master网关的Mac地址、IP地址,同时PC还会将Master网关对应IP与MAC地址存储至ARP缓存表中;
所以当PC与网关进行通信时,会直接读取ARP缓存表中的MAC地址与IP地址,进行数据包转发,也就意味着当Master节点故障,将Backup节点IP修改为Master的IP,最终PC的数据包还是会转发给Master,不会转发给 Backup节点。(除非PC的ARP缓存表过期,在次发起ARP广播的时候才能正确获取Bakcup的Mac地址与对应的IP地址。)
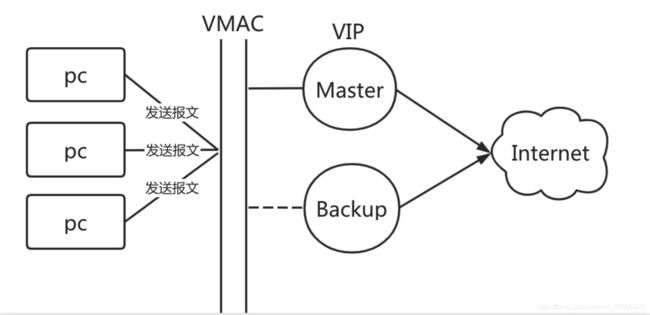
那如何才能做到出现故障自动转移,此时VRRP就应运而生;
VRRP其实是通过软件或硬件的形式在Master和Backup外层增加一个虚拟MAC地址(简称VMAC)、以及虚拟IP地址(简称VIP);那么在这种情况下,当PC请求VIP的时候,无论是Master处理还是Backup处理,PC仅会在ARP缓存表中记录VMAC与VIP的对应关系。
二、 高可用Keepalived
2.1 Keeplaived基本介绍
Keepalived 基于 VRRP实现,原生设计是为了高可用LVS服务;
通过 vrrp 协议,可以完成地址漂移技术;
为VIP 地址所在的节点生成 IPVS 规则(需要在配置文件中预先定义);
为IPVS 集群的 RS 节点做健康状态检测;
-
核心组件
-
vrrp stack:用来实现 vrrp 协议重要组件之一;
-
Netlink接口:设置和删除网络接口上的虚拟IP地址;
-
ipvs wrapper:使用getsock和setsock来建立IPVS规则;
-
checkers:监测RS节点的方式,支持tcp、http、ssl等;
-
system call:支持启动额外系统脚本的功能;
-
SMTP:为 当发生角色状态转换时,发送事件通知邮件;
-
WatchDog:监控进程
-
控制组件:
-
配置文件分析器
-
内存管理组件

2.2 Keepalived核心概念
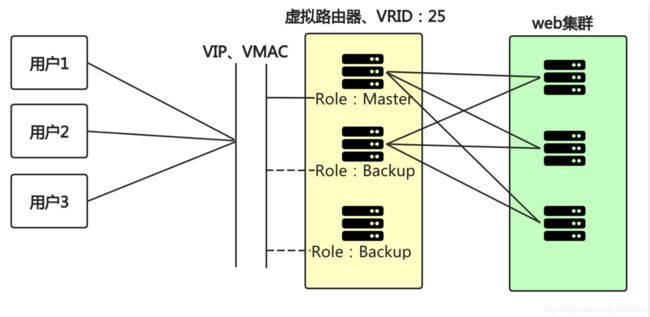
- 虚拟路由器:由一个Master路由器和多个Backup路由器组成;
- Master路由器:虚拟路由器中承担报文转发任务的路由器;
- Backup路由器:Master路由器出现故障时,能够代替Master路由器工作的路由器;
- VRID:虚拟路由器的标识,由相同 VRID 的一组路由器构成一个虚拟路由器;
- 组播:组播是有特定的成员,是一种可控的广播,组播成员需要加入“组播组”才能收到该组播的信息。
- 虚拟IP地址:虚拟路由器的IP地址,一个虚拟路由器可以拥有一个或多个IP地址;
- 虚拟MAC地址:一个虚拟路由器拥有一个虚拟MAC地址;
- 优先级:VRRP根据优先级来确定虚拟路由器中每台路由器的地位;
- 抢占式:如果Master故障,Backup自动接管,当Master恢复了会将VIP地址抢回来;
- 非抢占式:如果Master故障,Backup自动接管,当Master恢复则自动转为Backup,不会抢占VIP;
2.3 Keeplaived应用场景
当需要使用 Keepalived 时,通常是因为我们的业务系统需要保证 7x24 小时不DOWN机;
- 比如公司内部 OA 系统,每天公司人员都需要使用,则不允许Down机;
- 比如公司对外发布的业务系统(例如共享单车),每天有大量的用户使用,是不可以出现故障的;
也就是说作为企业的业务系统,要保证随时随地都可以使用,不可以中断。
2.4 Keeplaived安装配置
| 状态 | eth0 | eth1 | 角色 |
|---|---|---|---|
| 节点1 | 10.0.0.5 | 172.16.1.5 | Master |
| 节点2 | 10.0.0.6 | 172.16.1.6 | Backup |
| VIP地址 | 10.0.0.100 |
2.在 Master 以及 Backup 节点分别安装 Keepalived
[root@proxy01 ~]# yum install keepalived -y
[root@proxy02 ~]# yum install keepalived -y
2.4.1 配置Master
[root@proxy01 ~]# cat /etc/keepalived/keepalived.conf
global_defs {
    router_id lb01                  # 当前物理设备的标识名称
    #vrrp_mcast_group4 224.0.0.18   # 组播地址,default 224.0.0.18
}
vrrp_instance VI_1 {
   state MASTER                    # 角色状态;
   interface eth0                  # 绑定当前虚拟路由使用的物理接口;
   virtual_router_id 50            # 当前虚拟路由标识,VRID;
   priority 200                    # 当前物理节点在虚拟路由中的优先级;
   advert_int 3                    # vrrp通告时间间隔,默认1s;
   authentication {
       auth_type PASS              # 密码类型,简单密码;
       auth_pass 1111              # 密码不超过8位字符;
   }
   virtual_ipaddress {
          10.0.0.100               # VIP地址
  }
}
2.4.2 配置Backup
[root@proxy02 ~]# cat /etc/keepalived/keepalived.conf
global_defs {
    router_id lb02                  # 当前物理设备的标识名称
    #vrrp_mcast_group4 224.0.0.18   # 组播地址,default 224.0.0.18
}
vrrp_instance VI_1 {
   state BACKUP                    # 角色状态;
   interface eth0                  # 绑定当前虚拟路由使用的物理接口;
   virtual_router_id 50            # 当前虚拟路由标识,VRID;
   priority 100                    # 当前物理节点在虚拟路由中的优先级;
   advert_int 3                    # vrrp通告时间间隔,默认1s;
   authentication {
       auth_type PASS              # 密码类型,简单密码;
       auth_pass 1111              # 密码不超过8位字符;
   }
   virtual_ipaddress {
          10.0.0.100               # VIP地址
  }
}
重启
[root@proxy01 ~]# systemctl start keepalived

[root@proxy02 ~]# systemctl start keepalived
2.4.3 地址漂移测试
1.检查 keepalived 的 VIP 地址能否在两个节点间漂移;
[root@proxy01 ~]# ip addr | grep 10.0.0.100
    inet 10.0.0.100/32 scope global eth0
可以看到vip地址存在MASTER中。
2.手动模拟proxy01故障,则vip转移到proxy02上了。
[root@proxy01 ~]# systemctl stop keepalived
[root@proxy02 ~]# ip addr | grep 10.0.0.100
    inet 10.0.0.100/32 scope global eth0
3.现在又手动启动proxy01上的keepalived vip又会被抢占回来。
[root@proxy01 ~]# systemctl start keepalived
root@proxy01 ~]# ip addr | grep 10.0.0.100
    inet 10.0.0.100/32 scope global eth0
4.通过 windows 查看 arp 缓存表,验证地址漂移后是否会自动更新 MAC 地址。
执行arp -a


- wireshark抓vrrp包如下:

当前状态谁处于工作中,谁会向组播地址发送检查或通知信息,时间间隔三秒。
2.5 Keepalived延迟抢占
延迟抢占指的是当Master故障后,Backup接管,当Master恢复后不立即抢占VIP地址,延迟一段时间在抢占VIP
配置延迟抢占式步骤如下:
1、两台节点的 state都必须配置为 BACKUP;
2、在节点的 vrrp_instance 中添加 preempt_delay
3、其中一个节点的优先级必须要高于另外一个节点的优先级;
# Master
vrrp_instance VI_1 {
	state BACKUP
 	priority 200
 	preempt_delay 10s     # 延迟10s后抢占VIP
 }

 # Backup
 vrrp_instance VI_1 {
 	state BACKUP
	 priority 100
	 preempt_delay 10s
 }
2.6 Keepalived非抢占式
通常 master 服务故障后 backup 会变成 master,但是当 master 服务恢复后,master会抢占VIP,这样就会发生两次切换;对业务繁忙的网站来说并不是太友好;
此时我们可以配置keepalived为非抢占式,(前提两台主机的硬件配置信息一致);
配置非抢占式步骤如下:
1、两台节点的 state都必须配置为 BACKUP;
2、两台节点都在 vrrp_instance 中添加 nopreempt 参数;
3、其中一个节点的优先级必须要高于另外一个节点的优先级;
# Master
vrrp_instance VI_1 {
	state BACKUP
 	priority 200
 	nopreempt # 不抢占
 }

 # Backup
 vrrp_instance VI_1 {
 	state BACKUP
	 priority 100
	 nopreempt # 不抢占
 }
2.7 Keeplaived邮件通知
1.配置邮箱(所有节点都需要配置)
[root@lb01 ~]# # yum install mailx -y
cat >> /etc/mail.rc <<EOF
set from=1529082090@qq.com
set smtp=smtps://smtp.qq.com:465
set smtp-auth-user=1529082090@qq.com
set smtp-auth-password=ndwejmpmwwgaiedc
set smtp-auth=login
set ssl-verify=ignore
set nss-config-dir=/etc/pki/nssdb
EOF
2.通知脚本(所有节点都需要配置)
[root@proxy01 keepalived]# cat /etc/keepalived/notify.sh
#!/usr/bin/bash
# 收件人
Email="[email protected]"
# 主机名
Host=$(hostname)
#主机ip
IP=$(ifconfig eth0 | awk 'NR==2{print $2}'
)
# 时间
Date=$(date  +"%F %T")
# 定义消息格式
Message () {
	subject="${Host}:${IP}切换为 $1 状态"
	content="${Date} ${Host}成功切换为 $1 状态"
	echo "${content}" | mail -s "${subject}" "${Email}"
}
case $1 in
	master)
		Message master
		;;
	backup)
		Message backup
		;;
	fault)
		Message fault
		;;
	*)

	echo "Usage: $0 { master | backup | fault }"

	exit
esac
- MASTER配置
[root@proxy01 keepalived]# cat keepalived.conf
global_defs {
    router_id lb01                  # 当前物理设备的标识名称
    #vrrp_mcast_group4 224.0.0.18   # 组播地址,default 224.0.0.18
}
vrrp_instance VI_1 {
   state MASTER                    # 角色状态;
   interface eth0                  # 绑定当前虚拟路由使用的物理接口;
   virtual_router_id 50            # 当前虚拟路由标识,VRID;
   priority 200                    # 当前物理节点在虚拟路由中的优先级;
   advert_int 3                    # vrrp通告时间间隔,默认1s;
   #preempt_delay 10s
   authentication {
       auth_type PASS              # 密码类型,简单密码;
       auth_pass 1111              # 密码不超过8位字符;
   }
   virtual_ipaddress {
          10.0.0.100               # VIP地址
  }
   notify_master "/etc/keepalived/notify.sh master" # 当前节点成为主节点时触发的脚本
   notify_backup "/etc/keepalived/notify.sh backup" # 当前节点成为备份点时触发的脚本
   notify_fault "/etc/keepalived/notify.sh fault" # 当前节点成为失败节点时触发的脚本
}
4.BACKUP配置
[root@proxy02 keepalived]# cat keepalived.conf
global_defs {
    router_idi lb02                  # 当前物理设备的标识名称
    #vrrp_mcast_group4 224.0.0.18   # 组播地址,default 224.0.0.18
}
vrrp_instance VI_1 {
   state BACKUP                    # 角色状态;
   interface eth0                  # 绑定当前虚拟路由使用的物理接口;
   virtual_router_id 50            # 当前虚拟路由标识,VRID;
   priority 100                    # 当前物理节点在虚拟路由中的优先级;
   advert_int 3                    # vrrp通告时间间隔,默认1s;
   #preempt_delay 10s
	authentication {
       auth_type PASS              # 密码类型,简单密码;
       auth_pass 1111              # 密码不超过8位字符;
   }
   virtual_ipaddress {
          10.0.0.100               # VIP地址
  }
   notify_master "/etc/keepalived/notify.sh master" # 当前节点成为主节点时触发的脚本
   notify_backup "/etc/keepalived/notify.sh backup" # 当前节点成为备份点时触发的脚本
   notify_fault "/etc/keepalived/notify.sh fault" # 当前节点成为失败节点时触发的脚本

}
在 proxy01上停止与启动keepalived服务,进行邮箱测试。
邮件测试结果如下:

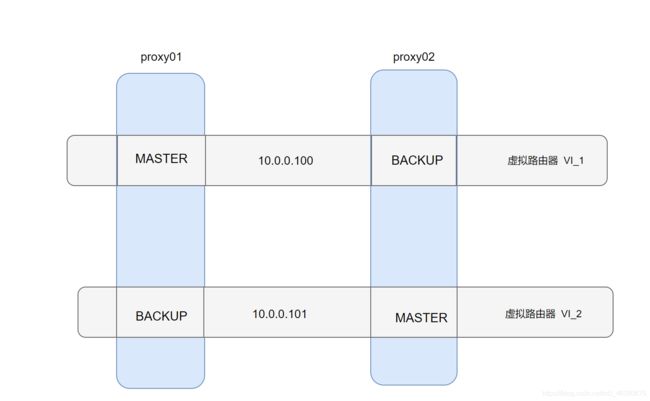
2.8 Keepalived双主模式
两个或以上 VIP 分别运行在不同的 keepalived 服务器;实现服务器并行访问 web 应用,提高服务器资源利用率。
proxy01配置:
[root@proxy01 keepalived]# cat keepalived.conf
global_defs {
    router_id lb01                  # 当前物理设备的标识名称
    #vrrp_mcast_group4 224.0.0.18   # 组播地址,default 224.0.0.18
}
vrrp_instance VI_1 {
   state MASTER                    # 角色状态;
   interface eth0                  # 绑定当前虚拟路由使用的物理接口;
   virtual_router_id 50            # 当前虚拟路由标识,VRID;
   priority 200                    # 当前物理节点在虚拟路由中的优先级;
   advert_int 3                    # vrrp通告时间间隔,默认1s;
   #preempt_delay 10s
   authentication {
       auth_type PASS              # 密码类型,简单密码;
       auth_pass 1111              # 密码不超过8位字符;
   }
   virtual_ipaddress {
          10.0.0.100               # VIP地址
  }

}

vrrp_instance VI_2 {
   state BACKUP                   # 角色状态;
   interface eth0                  # 绑定当前虚拟路由使用的物理接口;
   virtual_router_id 55            # 当前虚拟路由标识,VRID;
   priority 100                    # 当前物理节点在虚拟路由中的优先级;
   advert_int 3                    # vrrp通告时间间隔,默认1s;
   #preempt_delay 10s
   authentication {
       auth_type PASS              # 密码类型,简单密码;
       auth_pass 1111              # 密码不超过8位字符;
   }
   virtual_ipaddress {
          10.0.0.101             # VIP地址
  }

}
proxy02配置:
[root@proxy02 keepalived]# cat keepalived.conf
global_defs {
    router_id lb02                  # 当前物理设备的标识名称
    #vrrp_mcast_group4 224.0.0.18   # 组播地址,default 224.0.0.18
}
vrrp_instance VI_1 {
   state BACKUP                    # 角色状态;
   interface eth0                  # 绑定当前虚拟路由使用的物理接口;
   virtual_router_id 50            # 当前虚拟路由标识,VRID;
   priority 100                    # 当前物理节点在虚拟路由中的优先级;
   advert_int 3                    # vrrp通告时间间隔,默认1s;
   #preempt_delay 10s
	authentication {
       auth_type PASS              # 密码类型,简单密码;
       auth_pass 1111              # 密码不超过8位字符;
   }
   virtual_ipaddress {
          10.0.0.100               # VIP地址
  }
   notify_master "/etc/keepalived/notify.sh master" # 当前节点成为主节点时触发的脚本
   notify_backup "/etc/keepalived/notify.sh backup" # 当前节点成为备份点时触发的脚本
   notify_fault "/etc/keepalived/notify.sh fault" # 当前节点成为失败节点时触发的脚本

}

vrrp_instance VI_2 {
   state MASTER                    # 角色状态;
   interface eth0                  # 绑定当前虚拟路由使用的物理接口;
   virtual_router_id 55            # 当前虚拟路由标识,VRID;
   priority 200                    # 当前物理节点在虚拟路由中的优先级;
   advert_int 3                    # vrrp通告时间间隔,默认1s;
   #preempt_delay 10s
	authentication {
       auth_type PASS              # 密码类型,简单密码;
       auth_pass 1111              # 密码不超过8位字符;
   }
   virtual_ipaddress {
          10.0.0.101               # VIP地址
  }
   notify_master "/etc/keepalived/notify.sh master" # 当前节点成为主节点时触发的脚本
   notify_backup "/etc/keepalived/notify.sh backup" # 当前节点成为备份点时触发的脚本
   notify_fault "/etc/keepalived/notify.sh fault" # 当前节点成为失败节点时触发的脚本

}
三、nginx高可用
3.1 高可用Nginx
1.Nginx与Keepalived之间是什么关系?没关系。Nginx仅借助Keepalived的VIP地址漂移技术,从而实现的高可用;
2.如果Nginx无法访问,keepalived的VIP会自动漂移至Backup节点吗?不能,因为Keepalived与Nginx之间没有关系;当Nginx不存活时,会导致用户请求失败,但Keepalived虚拟地址并不会进行漂移,所以需要编写一个keepalived辅助脚本,监控nginx;
- 当监控到Nginx处于非活动状态,则动态调整优先级状态,确保备节点能正常接管 VIP;
- 当监控到Nginx处于活动状,则重新抢占 VIP地址
[root@proxy01 keepalived]# cat keepalived.conf
global_defs {
    router_id lb01                  # 当前物理设备的标识名称
}

vrrp_script check_nginx {
    # 一条指令或者一个脚本文件,执行成功让它回0(成功)或非0(失败),keepalived以此为依据判断其监控的服务状态
	script "/usr/bin/killall -0 nginx &>/dev/null && exit 0 || exit 1" # -0表示试探,不会真正杀死
	interval 3     # 指定脚本执行的间隔
	timeout 2      # 指定脚本执行的超时时间
	weight -150    # 当监控服务不存活则动态降权,确保Backup能接管成功
	fall 2         # 判定服务异常的检查次数
	rise 3         # 判定服务正常的检查次数
}


vrrp_instance VI_1 {
    state MASTER                    # 角色状态;
    interface eth0                  # 绑定当前虚拟路由使用的物理接口;
    virtual_router_id 50            # 当前虚拟路由标识,VRID;
    priority 200                    # 当前物理节点在虚拟路由中的优先级;
    advert_int 3                    # vrrp通告时间间隔,默认1s;
    #nopreempt
    authentication {
        auth_type PASS              # 密码类型,简单密码;
        auth_pass 1111              # 密码不超过8位字符;
    }

    virtual_ipaddress {
        10.0.0.100        # VIP地址
    }


	track_script {
		check_nginx
	}

 	notify_master "/etc/keepalived/notify.sh master"  # 当前节点成为主节点时触发的脚本
	 notify_backup "/etc/keepalived/notify.sh backup"  # 当前节点转为备节点时触发的脚本
	 notify_fault "/etc/keepalived/notify.sh fault"    # 当前节点转为“失败”状态时触发的脚本
}
抓包分析:

四、 高可用脑裂
4.1 什么是脑裂
由于某些原因,导致两台keepalived高可用服务器在指定时间内,无法检测到对方的心跳消息,当两(多)个节点同时认为自已是唯一处于活动状态的服务节点,从而出现争抢VIP,这种VIP资源的争抢即为“脑裂”。
4.2 脑裂是如何产生的
- 服务器网线松动等网络故障
- 服务器硬件故障发生损坏现象而崩溃
- 主备都开启firewalld防火墙

当开启防火墙,双方都检测不到对方的心跳信息,都只以为自己存活,都向组播中发送通知,这样对于有状态的HA,是致命的,应该避免。
4.3 脑裂影响的范围
- 对于无状态服务的HA(Highly Available),比如Nginx、无所谓脑裂不脑裂;
- 对于有状态服务(比如MySQL)的HA,必须要严格防止脑裂。
- 对于MySQL来说,可能出现多种情况,比如无法正常访问、或者得不到正确的返回结果,但大部分是无法正常访问,或直接没有响应;
- 可以使用第三方仲裁 fence 设备来避免脑裂;(fence通过关掉电源来踢掉坏的服务器)
五、keepalived如何投递生产使用
5.1 云主机
云主机不支持组播;
云上面提供负载均衡,且底层实现了高可用机制; 产品(SLB)
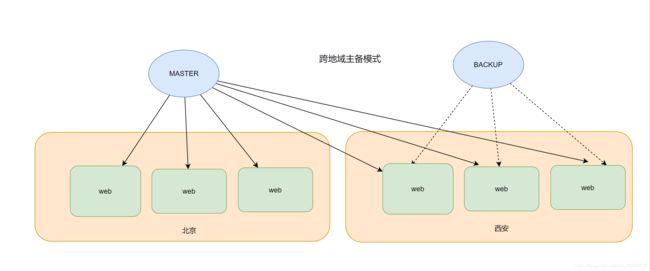
方:1:异地备用
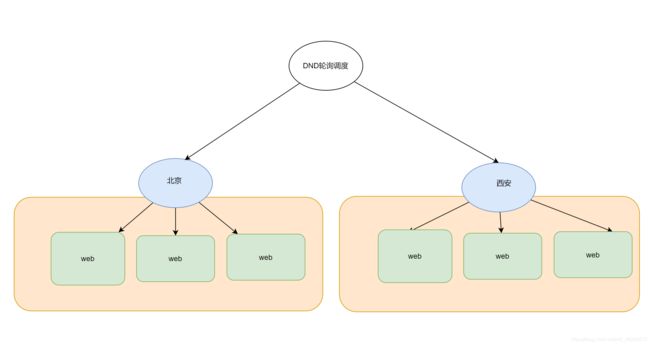
方案2:
5.2 物理机
略
六、Nginx平滑升级
6.1 什么是平滑升级
在进行服务版本升级过程中,用户访问体验是无感知的、不会造成服务中断。
6.2 平滑升级过程
- 下载新版本nginx
- 查询原旧版本nginx编译参数
- 将旧nginx二进制文件进行备份,然后替换成为新的nginx二进制文件
- 向旧nginx的Master进程发送USR2信号
- 旧master进程的pid文件添加后缀.oldbin
- master进程会用新nginx二进制文件启动新的master进程
5.向旧master进程发送WINCH信号,旧的worker子进程优雅退出
6.向旧master进程发送QUIT信号,旧的master进程就退出了
6.3 信号含义
| 信号 | 含义 |
|---|---|
| QUIT | 优雅关闭、quit |
| HUP | 优雅重启、reload |
| USR1 | 重新打开日志文件、reopen |
| USR2 | 平滑升级可执行的二进制程序 |
| WINCH | 平滑关闭Worker进程 |
6.3 Nginx平滑升级实践
6.3.1 安装Nginx所需依赖
[root@web01 ~]# yum install gcc redhat-rpm-config \
libxslt-devel gd-devel perl-ExtUtils-Embed \
geoip-devel gperftools-devel pcre-devel openssl-devel -y
6.3.2 编译并安装Nginx
1.下载最新的nginx
[root@web01 ~]# wget https://nginx.org/download/nginx-1.21.1.tar.gz
2.解压并进入目录
[root@web01 ~]# tar -xf nginx-1.21.1.tar.gz
[root@web01 ~]# cd nginx-1.21.1/
3.查看旧版本的nginx的编译参数
[root@web01 nginx-1.21.1]# nginx -V
nginx version: nginx/1.20.1
built by gcc 4.8.5 20150623 (Red Hat 4.8.5-44) (GCC)
built with OpenSSL 1.0.2k-fips  26 Jan 2017
TLS SNI support enabled
configure arguments: --prefix=/etc/nginx --sbin-path=/usr/sbin/nginx --modules-path=/usr/lib64/nginx/modules --conf-path=/etc/nginx/nginx.conf --error-log-path=/var/log/nginx/error.log --http-log-path=/var/log/nginx/access.log --pid-path=/var/run/nginx.pid --lock-path=/var/run/nginx.lock --http-client-body-temp-path=/var/cache/nginx/client_temp --http-proxy-temp-path=/var/cache/nginx/proxy_temp --http-fastcgi-temp-path=/var/cache/nginx/fastcgi_temp --http-uwsgi-temp-path=/var/cache/nginx/uwsgi_temp --http-scgi-temp-path=/var/cache/nginx/scgi_temp --user=nginx --group=nginx --with-compat --with-file-aio --with-threads --with-http_addition_module --with-http_auth_request_module --with-http_dav_module --with-http_flv_module --with-http_gunzip_module --with-http_gzip_static_module --with-http_mp4_module --with-http_random_index_module --with-http_realip_module --with-http_secure_link_module --with-http_slice_module --with-http_ssl_module --with-http_stub_status_module --with-http_sub_module --with-http_v2_module --with-mail --with-mail_ssl_module --with-stream --with-stream_realip_module --with-stream_ssl_module --with-stream_ssl_preread_module --with-cc-opt='-O2 -g -pipe -Wall -Wp,-D_FORTIFY_SOURCE=2 -fexceptions -fstack-protector-strong --param=ssp-buffer-size=4 -grecord-gcc-switches -m64 -mtune=generic -fPIC' --with-ld-opt='-Wl,-z,relro -Wl,-z,now -pie'
4.复制参数并编译新的版本
[root@web01 nginx-1.21.1]# ./configure --prefix=/etc/nginx --sbin-path=/usr/sbin/nginx --modules-path=/usr/lib64/nginx/modules --conf-path=/etc/nginx/nginx.conf --error-log-path=/var/log/nginx/error.log --http-log-path=/var/log/nginx/access.log --pid-path=/var/run/nginx.pid --lock-path=/var/run/nginx.lock --http-client-body-temp-path=/var/cache/nginx/client_temp --http-proxy-temp-path=/var/cache/nginx/proxy_temp --http-fastcgi-temp-path=/var/cache/nginx/fastcgi_temp --http-uwsgi-temp-path=/var/cache/nginx/uwsgi_temp --http-scgi-temp-path=/var/cache/nginx/scgi_temp --user=nginx --group=nginx --with-compat --with-file-aio --with-threads --with-http_addition_module --with-http_auth_request_module --with-http_dav_module --with-http_flv_module --with-http_gunzip_module --with-http_gzip_static_module --with-http_mp4_module --with-http_random_index_module --with-http_realip_module --with-http_secure_link_module --with-http_slice_module --with-http_ssl_module --with-http_stub_status_module --with-http_sub_module --with-http_v2_module --with-mail --with-mail_ssl_module --with-stream --with-stream_realip_module --with-stream_ssl_module --with-stream_ssl_preread_module --with-cc-opt='-O2 -g -pipe -Wall -Wp,-D_FORTIFY_SOURCE=2 -fexceptions -fstack-protector-strong --param=ssp-buffer-size=4 -grecord-gcc-switches -m64 -mtune=generic -fPIC' --with-ld-opt='-Wl,-z,relro -Wl,-z,now -pie'
5.仅make即可,不需要make install。因为make后会生成新的二进制文件
[root@web01 nginx-1.21.1]# make
6.3.3 备份旧Nginx二进制
将旧的nginx二进制文件进行备份,然后替换成为新的nginx二进制文件
[root@web01 nginx-1.21.1]# mv /usr/sbin/nginx /usr/sbin/nginx.old
[root@web01 nginx-1.21.1]# cp objs/nginx /usr/sbin/
6.3.4 向旧Master发送USR2信号
向旧的Nginx的Master进程发送USR2信号。(平滑升级二进制可执行文件)
#查看原nginx进程
[root@web01 nginx-1.21.1]# ps aux | grep [n]ginx
root       7166  0.0  0.3  47360  3608 ?        Ss   Aug23   0:00 nginx: master process /usr/sbin/nginx -c /etc/nginx/nginx.conf
www       13885  0.0  0.2  47364  2676 ?        S    16:51   0:00 nginx: worker process


# 发送USR2信号
[root@web01 nginx-1.21.1]# kill -USR2 7166

# 重新检查进程 发现新老存了
[root@web01 nginx-1.21.1]# ps aux | grep [n]ginx
root       7166  0.0  0.3  47360  3608 ?        Ss   Aug23   0:00 nginx: master process /usr/sbin/nginx -c /etc/nginx/nginx.conf
www       13885  0.0  0.2  47364  2676 ?        S    16:51   0:00 nginx: worker process
root      17751  0.5  0.4  46652  4068 ?        S    20:46   0:00 nginx: master process /usr/sbin/nginx -c /etc/nginx/nginx.conf
www       17752  0.0  0.1  47072  1956 ?        S    20:46   0:00 nginx: worker process
[root@web01 nginx-1.21.1]#

#pid文件会自动添加.oldbin后缀,该文件中记录的是旧master的pid进程号
[root@web01 nginx-1.21.1]# cat /var/run/nginx.pid
17751
[root@web01 nginx-1.21.1]# cat /var/run/nginx.pid.oldbin
7166
6.3.5 向旧Master发送WINCH信号
向旧的master进程发送WINCH信号,旧的worker子进程优雅退出
[root@web01 nginx-1.21.1]# kill -WINCH 7166
[root@web01 nginx-1.21.1]# ps aux | grep [n]ginx
root       7166  0.0  0.3  47360  3608 ?        Ss   Aug23   0:00 nginx: master process /usr/sbin/nginx -c /etc/nginx/nginx.conf
root      17751  0.0  0.4  46652  4068 ?        S    20:46   0:00 nginx: master process /usr/sbin/nginx -c /etc/nginx/nginx.conf
www       17752  0.0  0.1  47072  1956 ?        S    20:46   0:00 nginx: worker process
6.3.6 向旧Master发送QUIT信号
向旧的master进程发送QUIT信号,旧的master进程优雅的彻底退出
[root@web01 nginx-1.21.1]# kill -QUIT 7166
[root@web01 nginx-1.21.1]# ps aux | grep [n]ginx
root      17751  0.0  0.4  46652  4068 ?        S    20:46   0:00 nginx: master process /usr/sbin/nginx -c /etc/nginx/nginx.conf
www       17752  0.0  0.1  47072  1956 ?        S    20:46   0:00 nginx: worker process
升级后请求后端,看版本是否为1.21.1

6.4 Nginx平滑回滚
思路:如果旧进程的master还在,只需要给旧的master发送 HUP信号重新拉起worker进程,然后平滑退出新master进程即可。如果旧master进程已死,则回滚思路与升级一模一样。
- 替换 nginx 二进制文件
- 向旧的1.21 master 发送USR2信号
- 向旧的1.21 master 发送WINCH
- 向旧的1.21 master 发送QUIT
# 替换
[root@web01 ~]# mv /usr/sbin/nginx /usr/sbin/nginx.new
[root@web01 ~]#
[root@web01 ~]# mv /usr/sbin/nginx.old /usr/sbin/nginx

# 查看新进程状态
[root@web01 ~]# ps aux | grep [n]ginx
root      17751  0.0  0.4  47364  4344 ?        S    20:46   0:00 nginx: master process /usr/sbin/nginx -c /etc/nginx/nginx.conf
www       17801  0.0  0.3  47368  3668 ?        S    21:08   0:00 nginx: worker process

# 向当前新进程发送USR2信号,查看已经拉起课新master
[root@web01 ~]# kill -USR2 17751
[root@web01 ~]# ps aux | grep [n]ginx
root      17751  0.0  0.4  47364  4344 ?        S    20:46   0:00 nginx: master process /usr/sbin/nginx -c /etc/nginx/nginx.conf
www       17801  0.0  0.3  47368  3668 ?        S    21:08   0:00 nginx: worker process
root      17834  0.0  0.4  46648  4048 ?        S    21:19   0:00 nginx: master process /usr/sbin/nginx -c /etc/nginx/nginx.conf
www       17835  0.0  0.1  47068  1956 ?        S    21:19   0:00 nginx: worker process


# 向当前新进程发送WINCH信号,查看已经关闭了worker进程,且master由systemd接管,pid为1
[root@web01 ~]# kill -WINCH 17751,
[root@web01 ~]# ps aux | grep [n]ginx
root      17751  0.0  0.4  47364  4344 ?        S    20:46   0:00 nginx: master process /usr/sbin/nginx -c /etc/nginx/nginx.conf
root      17834  0.0  0.4  46648  4048 ?        S    21:19   0:00 nginx: master process /usr/sbin/nginx -c /etc/nginx/nginx.conf
www       17835  0.0  0.1  47068  1956 ?        S    21:19   0:00 nginx: worker process
[root@web01 ~]# ps -ef | grep [n]ginx
root      17751      1  0 20:46 ?        00:00:00 nginx: master process /usr/sbin/nginx -c /etc/nginx/nginx.conf
root      17834  17751  0 21:19 ?        00:00:00 nginx: master process /usr/sbin/nginx -c /etc/nginx/nginx.conf
www       17835  17834  0 21:19 ?        00:00:00 nginx: worker process

# 发送QUIT信号
[root@web01 ~]# kill -QUIT 17751
[root@web01 ~]# ps aux | grep [n]ginx
root      17834  0.0  0.4  46648  4048 ?        S    21:19   0:00 nginx: master process /usr/sbin/nginx -c /etc/nginx/nginx.conf
www       17835  0.0  0.1  47068  1956 ?        S    21:19   0:00 nginx: worker process

再次访问,可以看到版本又回滚到1.20.1。