Vue过渡与动画、配置代理、插槽、*Vuex、路由、防抖和节流
目录
一、过渡与动画
动画
(一)、自己手动写动画效果
(二)、利用Vue 来完成动画效果
过渡
(一)、利用Vue 来完成过渡效果
二、配置代理
1、前端请求服务器的方法
2、解决跨域问题
三、插槽
四、Vuex
(一)、工作原理
(二)、步骤
(三)、getters 配置项
(四)、
1、vuex 中的辅助函数 mapState,mapGetters
2、vuex 中的工具函数 mapActions,mapMutations
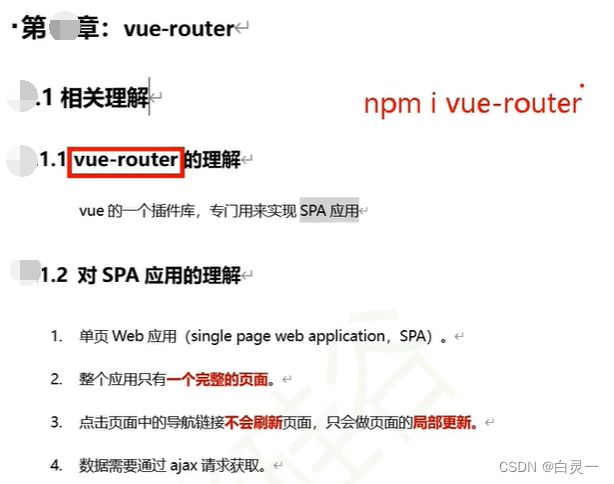
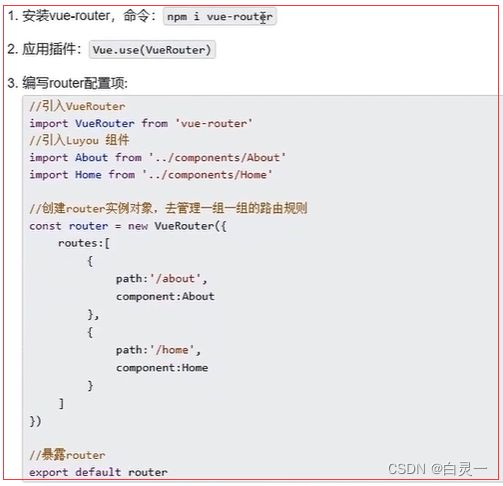
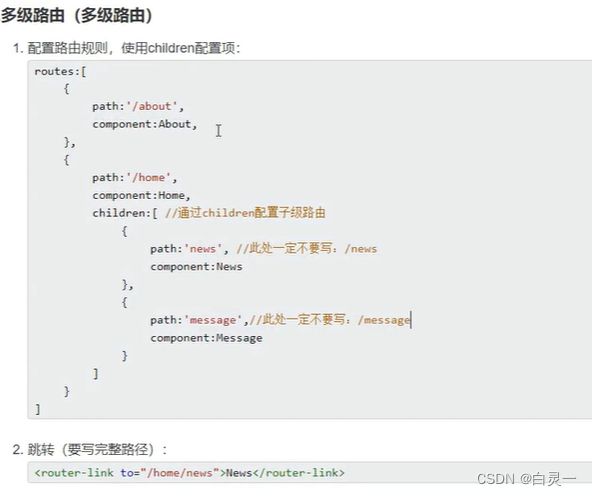
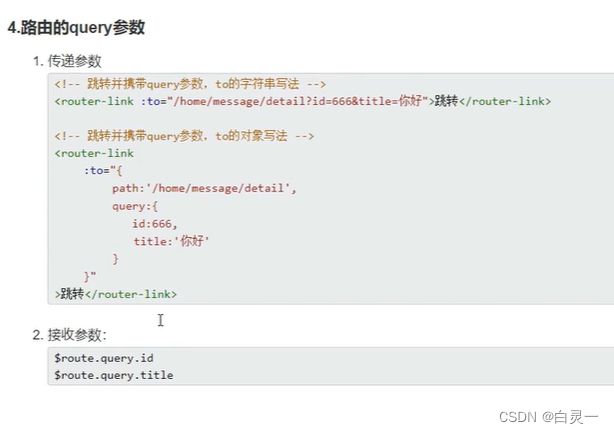
五、路由
基本使用
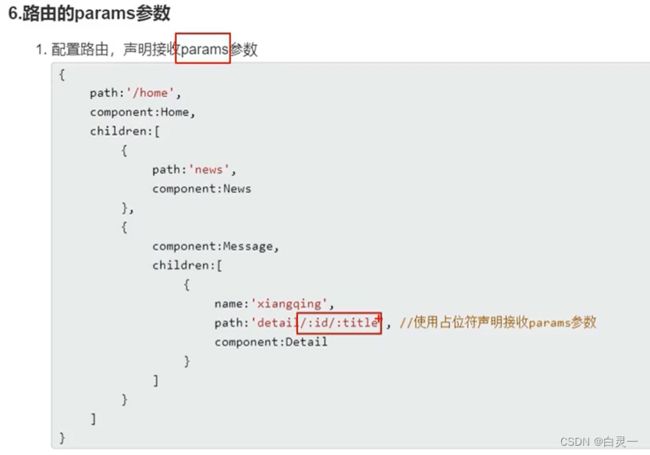
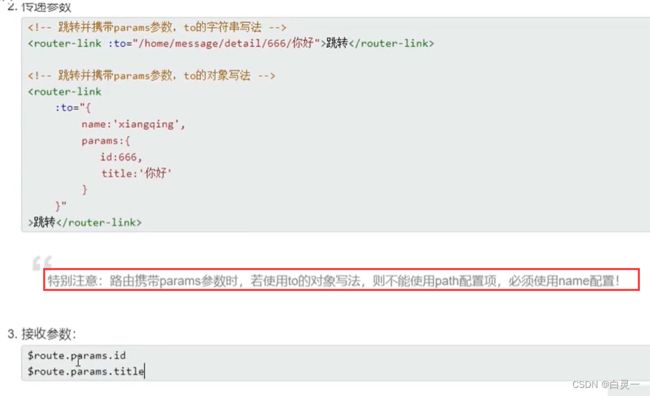
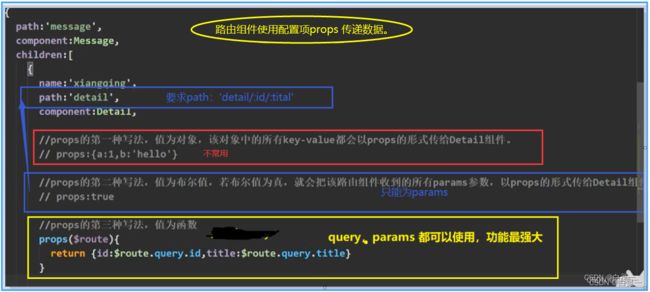
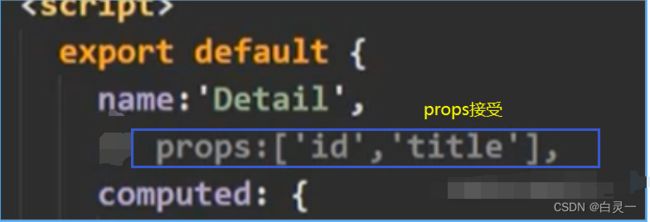
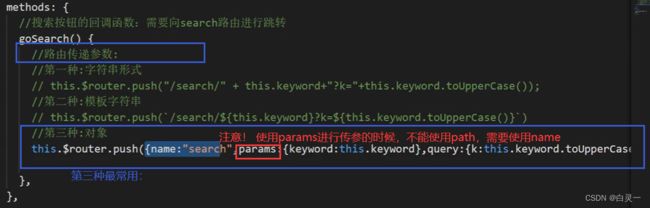
路由传参的几种方法
常见问题:
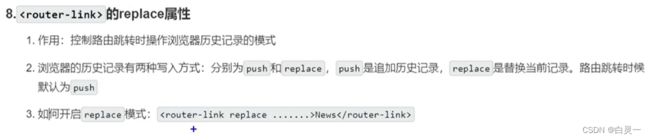
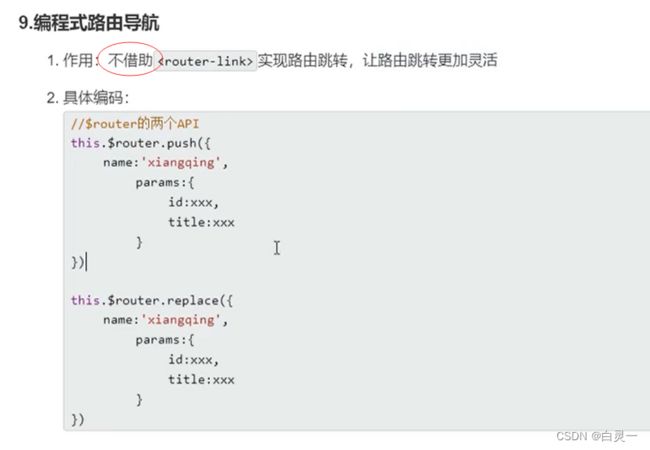
声明、编程式的路由导航
一、过渡与动画
动画
(一)、自己手动写动画效果
(二)、利用Vue 来完成动画效果
|
我们只需要准备:
需要注意的时当有两个过渡元素时: 一个 |
过渡
(一)、利用Vue 来完成过渡效果
1、如果元素比较多使用
      Vue-过渡1
      Vue-过渡2
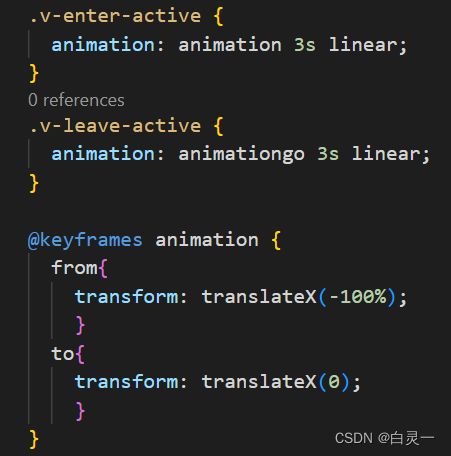
.demo1-enter,.demo1-leave-to {
  transform: translateX(-100%);
}
.demo1-enter-to ,.demo1-leave{
  transform: translateX(0);
}
.demo {
  width: 100px;
  height: 100px;
  background-color: rgb(247, 209, 163);

  transition: 1s linear;
}
(二)、引入其他的样式库 如npm网的 animate.css
二、配置代理
1、前端请求服务器的方法
(1)、Ajax var xhttp = new XMLHttpRequest();
(2)、Jquery
(3)、axios
(4)、fetch
2、解决跨域问题
(1)、cors (后端上改代码,地址可以直接使用)
(2)、jsonp(前端,后端都需要修改代码,地址可以直接使用)
(3)、代理服务器 (只有前端上改代码,地址不可以直接使用)
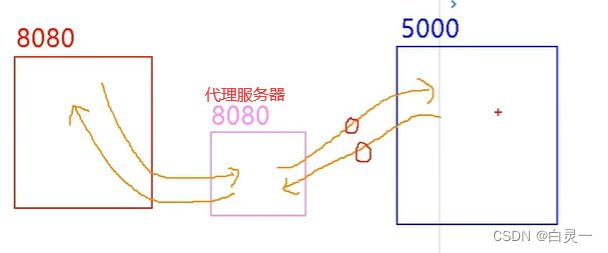
方法一、
  // 缺点:1、只能请求一个服务器;

  // 2、不能灵活地控制到底走不走代理;在App.vue文件里访问axios.get('http://localhost:8080/first')时,如果本端口文件里面有,则不会走代理服务器地址

  方法一
  devServer: {
    proxy:'http://localhost:3000'
  }
methods:{
getStudents(){
// 这里请求的是代理路径,http://localhost:8080/first
axios.get('http://localhost:8080/api/first').then(
response=>{
console.log('请求成功了',response.data)
},
error =>{
console.log('请求失败了',error.message)
}
)
}
}方法二、
 // 方法二
  // 这是脚手架的东西,重写之后需要重新启动下脚手架
  devServer: {
    proxy:{
      // 这里 '/api' 的作用是只跳转端口后面跟'/api'的服务代理
      '/api':{
        target:'http://localhost:3000',
        pathRewrite:{'^/api':''},  // 将这个'^/api'重写为''
        // ws:true,  //用于支持websocket
        // changeOright:true   //代理服务器告诉请求服务器与其服务器一致,用于控制请求头中的host值。
      },
      '/demo':{
        target:'http://localhost:3001',
        pathRewrite:{'^/demo':''},  // 将这个'^/api'重写为''
        // ws:true,  //用于支持websocket
        // changeOright:true   //代理服务器告诉请求服务器与其服务器一致,用于控制请求头中的host值。
      }
    }
  }
methods:{
getStudents(){
// 这里请求的是代理路径,http://localhost:8080/first
axios.get('http://localhost:8080/api/first').then(
response=>{
console.log('请求成功了',response.data)
},
error =>{
console.log('请求失败了',error.message)
}
),
axios.get('http://localhost:8080/demo/first').then(
response=>{
console.log('请求成功了',response.data)
},
error =>{
console.log('请求失败了',error.message)
}
)
}
}
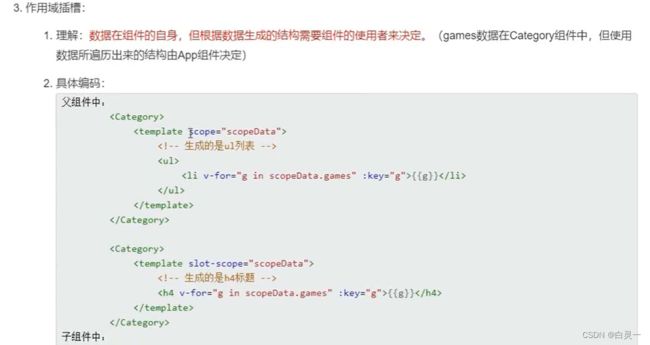
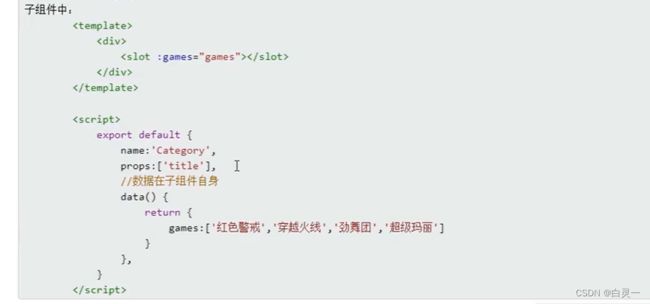
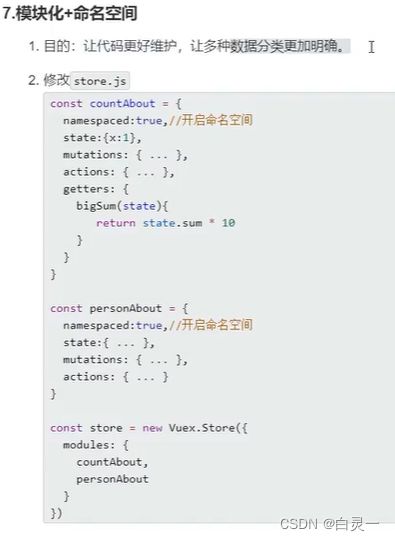
三、插槽


四、Vuex
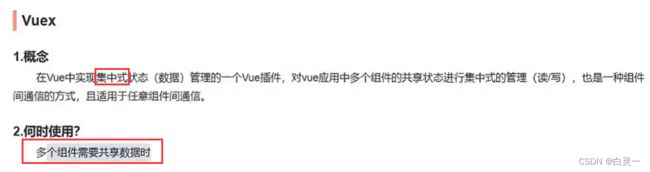
vuex 存储的数据不是持久化
(一)、工作原理
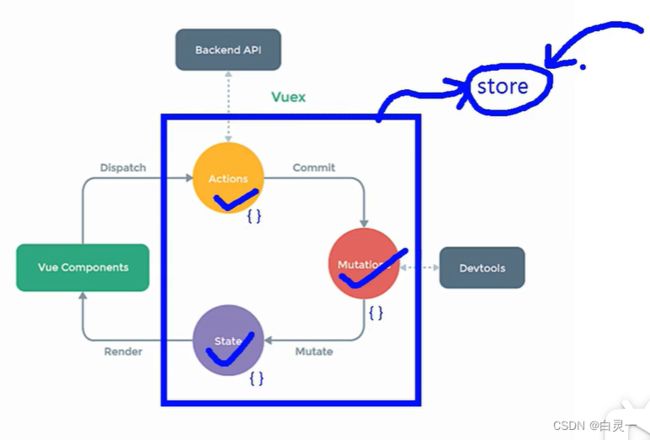
(二)、步骤
1、搭建环境
2、vm 可以通过$store 访问到 vuex 中的内容
3、判断是否有必要调用 dispatch。
当在store的actions 中不进行判断,或者其他行为时,直接调用mutations中的commit方法,可以不使用dispatch;否则按照顺序 先调用dispatch ,进入action 后再在其中调用mutations中的 commit方法。
4、在mutations中的 commit()方法中进行数据操作。
| dispatach方法接收两个参数及两个以上的参数时用对象的方式接受 this.$store.dispatch('details/getAddOrUpdateShopCart',{ skuId:this.$route.params.skuId, skuNum:this.counter}) } 也可以用这种形式 this.$store.dispatch({ type: "details/getAddOrUpdateShopCart", skuId:this.$route.params.skuId, skuNum:this.counter}) } |
因为dispatach方法只能接收两个参数,所以第二个参数第三个参数要以对象的形式传递
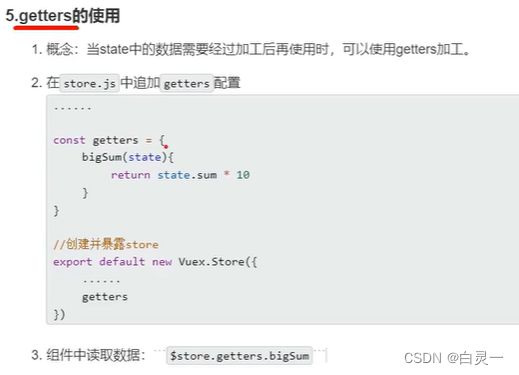
(三)、getters 配置项
(四)、
1、vuex 中的辅助函数 mapState,mapGetters
当一个组件需要获取多个状态的时候,将这些状态都声明为计算属性会有些重复和冗余。为了解决这个问题,我们可以使用 mapState 辅助函数帮助我们生成计算属性。
两种写法:对象式和数组式。数组式的要求前后的名称一致。
computed: {
    // $store.state.sum 可以映射为 sum
    // ... 为对象中放一个对象的es6语法
    // 借助mapState生成 计算属性,从state中读取数据(对象写法)
    // ...mapState({
    //   sum:'sum',
    // })

    // **************************************

    // 借助mapState生成 计算属性,从state中读取数据(数组写法)
    ...mapState(['sum']),
    ...mapGetters(['bigSum'])
  },
2、 vuex 中的工具函数 mapActions,mapMutations
mapActions 工具函数会将 store 中的 dispatch 方法映射到组件的 methods 中。和 mapState、mapGetters 也类似,只不过它映射的地方不是计算属性,而是组件的 methods 对象上。
mapMutations是Vuex的mutation的辅助函数,用于在组件中映射mutation内的方法,以便在该组件中直接使用mutation里的方法 。
|
|

五、路由
|
基本使用:
8、声明式的路由导航 需要使用 不借助 router-link 实现路由跳转 |