SpringBoot项目整合RabbitMQ三种交换机类型实例
一、RabbitMQ介绍
RabbitMQ即一个消息队列,主要是用来实现应用程序的异步和解耦,同时也能起到消息缓冲,消息分发的作用。消息中间件最主要的作用是解耦,中间件最标准的用法是生产者生产消息传送到队列,消费者从队列中拿取消息并处理,生产者不用关心是谁来消费,消费者不用关心谁在生产消息,从而达到解耦的目的。在分布式的系统中,消息队列也会被用在很多其它的方面,比如:分布式事务的支持,RPC> 的调用等等。
二、相关概念
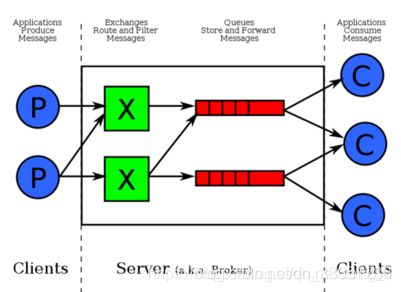
通常我们谈到队列服务, 会有三个概念: 发消息者、队列、收消息者,RabbitMQ 在这个基本概念之上, 多做了一层抽象, 在发消息者和 队列之间, 加入了交换器 (Exchange). 这样发消息者和队列就没有直接联系, 转而变成发消息者把消息给交换器, 交换器根据调度策略再把消息再给队列。
交换机(Exchange)
交换机的功能主要是接收消息并且转发到绑定的队列,交换机不存储消息,在启用ack模式后,交换机找不到队列会返回错误。交换机有四种类型:Direct, topic, Headers and Fanout
Direct:direct 类型的行为是"先匹配, 再投送". 即在绑定时设定一个 routing_key, 消息的routing_key 匹配时, 才会被交换器投送到绑定的队列中去.
Topic:按规则转发消息(最灵活)
Headers:设置 header attribute 参数类型的交换机
Fanout:转发消息到所有绑定队列
Direct Exchange:
实现方式如下:

DirectExchange是RabbitMQ Broker的默认Exchange,它有一个特别的属性对一些简单的应用来说是非常有用的,在使用这个类型的Exchange时,可以不必指定routing key的名字,在此类型下创建的Queue有一个默认的routing key,这个routing key一般同Queue同名。
适用场景:
这种类型的Exchange,通常是将同一个message以一种循环的方式分发到不同的Queue,即不同的消费者手中,使用这种方式,值得注意的是message在消费者之间做了一个均衡,而不是说message在Queues之间做了均衡。
Fanout Exchange:
实现方式如下:
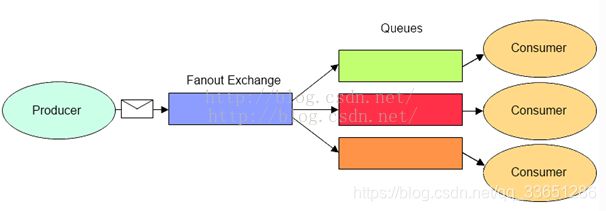
使用这种类型的Exchange,会忽略routing key的存在,直接将message广播到所有的Queue中。
适用场景:
第一:大型玩家在玩在线游戏的时候,可以用它来广播重大消息。这让我想到电影微微一笑很倾城中,有款游戏需要在世界上公布玩家重大消息,也许这个就是用的MQ实现的。这让我不禁佩服肖奈,人家在大学的时候就知道RabbitMQ的这种特性了。
第二:体育新闻实时更新到手机客户端。
第三:群聊功能,广播消息给当前群聊中的所有人。
Topic Exchange:
实现方式如下:
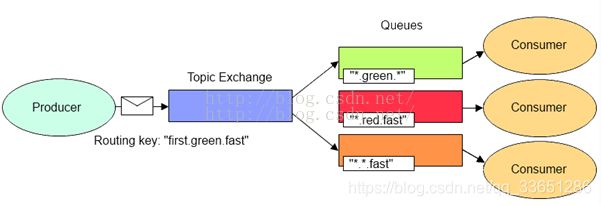
Topic Exchange是根据routing key和Exchange的类型将message发送到一个或者多个Queue中,我们经常拿他来实现各种publish/subscribe,即发布订阅,这也是我们经常使用到的ExchangeType。
使用场景:
新闻的分类更新
同意任务多个工作者协调完成
同一问题需要特定人员知晓
Topic Exchange的使用场景很多,我们公司就在使用这种模式,将足球事件信息发布,需要使用这些事件消息的人只需要绑定对应的Exchange就可以获取最新消息。
Headers Exchange:
实现方式如下:

Headers Exchange不同于上面三种Exchange,它是根据Message的一些头部信息来分发过滤Message,忽略routing key的属性,如果Header信息和message消息的头信息相匹配,那么这条消息就匹配上了。
关于Headers Exchange我知道的并不多,但是这篇博客,我会在我持续深入理解RabbitMQ的基础上不断调整和更新,若有什么地方理解偏差,还请大家一起讨论。越来越体会到看英文资料的重要性。
三、SpringBoot集成RabbitMQ
1、添加jar包
在pom.xml文件中添加相关依赖
<dependency>
	<groupId>org.springframework.bootgroupId>
	<artifactId>spring-boot-starter-amqpartifactId>
dependency>
<dependency>
	<groupId>org.springframework.bootgroupId>
	<artifactId>spring-boot-testartifactId>
dependency>
2、配置RabbitMQ
在application.properties文件中添加相关配置信息:
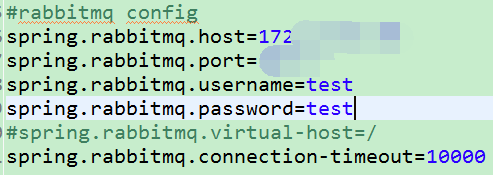
这里填写成你本地或者远程服务器搭好的RabbitMQ信息。
3、配置文件
我们这里写三种交换机类型的绑定实现:
a:direct类型:
package com.example.demo.configuration;

import org.springframework.amqp.core.Queue;
import org.springframework.context.annotation.Bean;
import org.springframework.context.annotation.Configuration;

@Configuration
public class DirectConfig {
    @Bean
    public Queue Queue() {
        return new Queue("queue");
    }
}
a:topic类型:
package com.example.demo.configuration;

import org.springframework.amqp.core.Binding;
import org.springframework.amqp.core.BindingBuilder;
import org.springframework.amqp.core.Queue;
import org.springframework.amqp.core.TopicExchange;
import org.springframework.beans.factory.annotation.Qualifier;
import org.springframework.context.annotation.Bean;
import org.springframework.context.annotation.Configuration;

@Configuration
public class TopicConfig {
    @Bean(name="message")
    public Queue queueMessage() {
        return new Queue("topic.message");
    }

    @Bean(name="messages")
    public Queue queueMessages() {
        return new Queue("topic.messages");
    }

    @Bean
    public TopicExchange exchange() {
        return new TopicExchange("exchange");
    }

    @Bean
    Binding bindingExchangeMessage(@Qualifier("message") Queue queueMessage, TopicExchange exchange) {
        return BindingBuilder.bind(queueMessage).to(exchange).with("topic.message");
    }

    @Bean
    Binding bindingExchangeMessages(@Qualifier("messages") Queue queueMessages, TopicExchange exchange) {
        return BindingBuilder.bind(queueMessages).to(exchange).with("topic.#");//*表示一个词,#表示零个或多个词
    }
}
a:fanout类型:
package com.example.demo.configuration;

import org.springframework.amqp.core.Binding;
import org.springframework.amqp.core.BindingBuilder;
import org.springframework.amqp.core.FanoutExchange;
import org.springframework.amqp.core.Queue;
import org.springframework.beans.factory.annotation.Qualifier;
import org.springframework.context.annotation.Bean;
import org.springframework.context.annotation.Configuration;


@Configuration
public class FanoutConfig {
    @Bean(name="Amessage")
    public Queue AMessage() {
        return new Queue("fanout.A");
    }


    @Bean(name="Bmessage")
    public Queue BMessage() {
        return new Queue("fanout.B");
    }

    @Bean(name="Cmessage")
    public Queue CMessage() {
        return new Queue("fanout.C");
    }

    @Bean
    FanoutExchange fanoutExchange() {
        return new FanoutExchange("fanoutExchange");//配置广播路由器
    }

    @Bean
    Binding bindingExchangeA(@Qualifier("Amessage") Queue AMessage, FanoutExchange fanoutExchange) {
        return BindingBuilder.bind(AMessage).to(fanoutExchange);
    }

    @Bean
    Binding bindingExchangeB(@Qualifier("Bmessage") Queue BMessage, FanoutExchange fanoutExchange) {
        return BindingBuilder.bind(BMessage).to(fanoutExchange);
    }

    @Bean
    Binding bindingExchangeC(@Qualifier("Cmessage") Queue CMessage, FanoutExchange fanoutExchange) {
        return BindingBuilder.bind(CMessage).to(fanoutExchange);
    }

}
4、发送者与接收者
发送者
package com.example.demo.rabbitmq;

import org.springframework.amqp.core.AmqpTemplate;
import org.springframework.beans.factory.annotation.Autowired;
import org.springframework.stereotype.Component;

@Component
public class HelloSender {
    @Autowired
    private AmqpTemplate rabbitTemplate;

    public void send(){
        rabbitTemplate.convertAndSend("queue", "Hello,Rabbit!"); //direct类型
        rabbitTemplate.convertAndSend("exchange", "topic.message", "Hello,Rabbit!"); //topic类型
        rabbitTemplate.convertAndSend("fanoutExchange", "", "Hello,Rabbit!"); //fanout类型
    }
}
接收者
package com.example.demo.rabbitmq;

import org.springframework.amqp.rabbit.annotation.RabbitListener;
import org.springframework.stereotype.Component;

@Component

public class HelloReceiver {

    @RabbitListener(queues="topic.message")
    public void process(String str) {
        System.out.println("ReceiverA  : " + str);
    }

    @RabbitListener(queues="topic.message")
    public void process2(String str) {
        System.out.println("ReceiverB  : " + str);
    }

    @RabbitListener(queues="queue")
    public void process1(String str) {
        System.out.println("Receiver  : " + str);
    }

    @RabbitListener(queues="fanout.A")
    public void process3(String str) {
        System.out.println("ReceiverA  : " + str);
    }

    @RabbitListener(queues="fanout.B")
    public void process4(String str) {
        System.out.println("ReceiverB  : " + str);
    }

    @RabbitListener(queues="fanout.C")
    public void process5(String str) {
        System.out.println("ReceiverC  : " + str);
    }
}
本文转载整合了两位作者的文档
原文链接
SpringBoot项目整合RabbitMQ三种交换机类型实例:https://blog.csdn.net/dandanzmc/article/details/52262850
RabbitMQ的四种ExChange:https://blog.csdn.net/dandanzmc/article/details/52262850