pytorch faster R-CNN源码测试、训练自己的数据集
本文参考了这位大佬的博客,总结的相当到位
本文使用的pytorch版faster R-CNN源码https://github.com/jwyang/faster-rcnn.pytorch.git
本机配置
8代i5 + GTX1060(6G显存)+ ubuntu16.04操作系统 + python3.6 + pytorch0.4.0(github作者给了0.4.0版本和1.0版本的,我只使用了0.4.0)
关于安装pytorch0.4.0,发现还挺麻烦的,总是找不到合适的语句下载各个版本的pytorch,终于找到一个好的总结
https://ptorch.com/news/145.html
具体配置要求按照github里作者的readme一步一步来就ok,一些常见问题就参照上面的博主的,讲的非常详细,记录一下可能不太懂的地方:
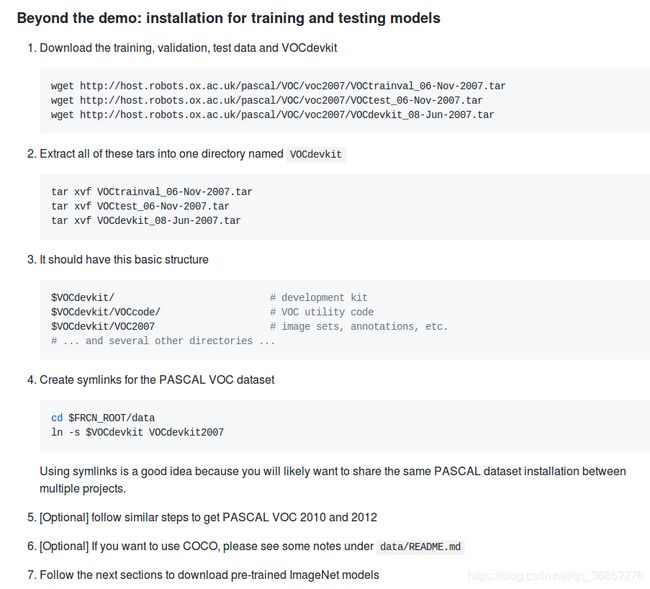
1.数据集的准备部分,对于VOC数据集,就点开py-faster-rcnn,按照官方给定的数据集下载就好
 点开后如图所示

按照给定的顺序下载、解压文件,然后保存为指定结构,放在项目根目录,然后建立软连接
上面的FRCN_ROOT就是项目根目录

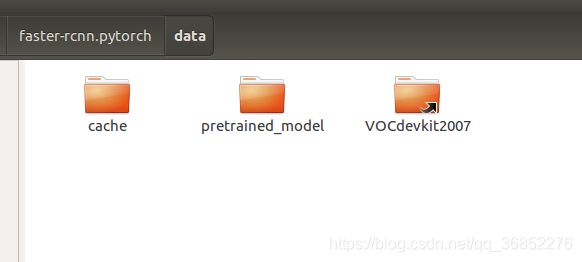
在data里通过ln -s建立软连接

训练、测试、预测的例子
//训练
$ CUDA_VISIBLE_DEVICES=1 python trainval_net.py --dataset pascal_voc --net vgg16 --bs 1 --nw 4  --cuda
//批量测试
$  python test_net.py --dataset pascal_voc --net vgg16 --checksession 1 --checkepoch 20 --checkpoint 10021  --cuda
//个例实验
$ python demo.py --net vgg16  --checksession 1  --checkepoch 20 --checkpoint 10021 --cuda --load_dir models
2.关于设置Compilation
找到你的显卡对应的architecture,然后修改make.sh

训练自己的数据集,思路就是把自己的数据集整理成VOC数据集的格式,按照原样放进原数据集的位置,然后修改部分代码,适应新的数据集
这个部分参照了这位博主的博客https://www.cnblogs.com/blog4ljy/p/9195752.html
非常详细,对着这个可以将各种格式写成xml格式
放一下我自己的部分代码备忘
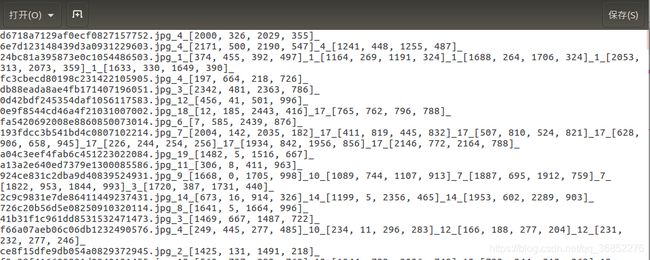
我的数据的保存格式是
文件名1_分类_bbox_分类_bbox_
文件名2_分类_bbox_分类_bbox_分类_bbox_
...
from lxml.etree import Element, SubElement, tostring
from xml.dom.minidom import parseString
from PIL import Image

import os

#从txt中读取数据,通过下划线进行分割,产生了一个s_total列表,列表中每个元素都是一张图片的各种信息,用列表排开
s_total = []
with open('/home/xbw/guangdong/result.txt','r') as f_obj_res:
    lines = f_obj_res.readlines()
    for line in lines:
        s = []
        ss = ''
        for j in range(len(line)):
            if line[j] =='_':
                s.append(ss)
                ss = ''
            else:
                ss += line[j]
        s_total.append(s)

#保存xml文件
for s_value in s_total:
    image_name = s_value[0]
    bbox = []
    category = []
    for i in range(1,len(s_value)):
        if i%2!=0:
            category.append(s_value[i])
        else:
            bbox.append(eval(s_value[i]))
    save_xml(image_name,category,bbox)

#保存xml文件函数的核心实现,输入为图片名称image_name,分类category(一个列表,元素与bbox对应),bbox(一个列表,与分类对应),保存路径save_dir ,通道数channel
def save_xml(image_name, category,bbox, save_dir='/home/xbw/guangdong/voc_dataset/Annotations/',channel=3):

    file_path = '/home/xbw/guangdong/guangdong1_round1_train1_20190818/defect_Images/'
    img = Image.open(file_path + image_name)
    width = img.size[0]
    height = img.size[1]

    node_root = Element('annotation')

    node_folder = SubElement(node_root, 'folder')
    node_folder.text = 'VOC2007'

    node_filename = SubElement(node_root, 'filename')
    node_filename.text = image_name

    node_size = SubElement(node_root, 'size')
    node_width = SubElement(node_size, 'width')
    node_width.text = '%s' % width

    node_height = SubElement(node_size, 'height')
    node_height.text = '%s' % height

    node_depth = SubElement(node_size, 'depth')
    node_depth.text = '%s' % channel

    for i in range(len(bbox)):
        left, top, right, bottom = bbox[i][0],bbox[i][1],bbox[i][2], bbox[i][3]
        node_object = SubElement(node_root, 'object')
        node_name = SubElement(node_object, 'name')
        node_name.text = category[i]
        node_difficult = SubElement(node_object, 'difficult')
        node_difficult.text = '0'
        node_bndbox = SubElement(node_object, 'bndbox')
        node_xmin = SubElement(node_bndbox, 'xmin')
        node_xmin.text = '%s' % left
        node_ymin = SubElement(node_bndbox, 'ymin')
        node_ymin.text = '%s' % top
        node_xmax = SubElement(node_bndbox, 'xmax')
        node_xmax.text = '%s' % right
        node_ymax = SubElement(node_bndbox, 'ymax')
        node_ymax.text = '%s' % bottom

    xml = tostring(node_root, pretty_print=True)
    dom = parseString(xml)

    save_xml = os.path.join(save_dir, image_name.replace('jpg', 'xml'))
    with open(save_xml, 'wb') as f:
        f.write(xml)

    return
我修改的文件作为备忘
训练中
1、在训练自己数据集的时候,要修改数据集里面的类别:faster-rcnn.pytorch/lib/datasets/pascal_voc.py
这里的修改要适应自己的数据集
修改前:
        self._classes = ('__background__',  # always index 0
                         'aeroplane', 'bicycle', 'bird', 'boat',
                         'bottle', 'bus', 'car', 'cat', 'chair',
                         'cow', 'diningtable', 'dog', 'horse',
                         'motorbike', 'person', 'pottedplant',
                         'sheep', 'sofa', 'train', 'tvmonitor')
修改后:
        self._classes = ('__background__',  # always index 0
                         '1', '2', '3', '4',
                         '5', '6', '7', '8', '9',
                         '10', '11', '12', '13',
                         '14', '15', '16',
                         '17', '18', '19', '20')
2、出现assert(boxes[:,2]>=boxes[:,0]).all()问题
在faster-rcnn.pytorch/lib/datasets/imdb.py中,图中黄色代码下面添加

      for b in range(len(boxes)):
if boxes[b][2]3、训练新的数据集以前,要删掉原来训练数据集产生的缓存,这个缓存会使得自动加载原来的数据集,而你的数据集已经发生改变,因此会报错Keyerror:'width'
因此需要删掉faster-rcnn.pytorch/data/cache/voc_2007_trainval_gt_roidb.pkl文件
就是下图这两个

4、训练过程中loss全都是nan,解决办法是修改faster-rcnn.pytorch/lib/datasets/pascal_voc.py

如上图,把上面的-1全部去掉,因为这个脚本对VOC数据集的处理是全部-1了,但是自己的数据集不用减,就使得计算溢出产生了nan
测试中
1、在跑demo文件过程中,也需要把类别修改成适应你的新数据集的形式
修改前:
  pascal_classes = np.asarray(['__background__',
                       'aeroplane', 'bicycle', 'bird', 'boat',
                       'bottle', 'bus', 'car', 'cat', 'chair',
                       'cow', 'diningtable', 'dog', 'horse',
                       'motorbike', 'person', 'pottedplant',
                       'sheep', 'sofa', 'train', 'tvmonitor'])
修改后:
  pascal_classes = np.asarray(['__background__',
                         '1', '2', '3', '4',
                         '5', '6', '7', '8', '9',
                         '10', '11', '12', '13',
                         '14', '15', '16',
                         '17', '18', '19', '20'])
2、关于产生目标输出的问题,我做的一个比赛要求是输出图片名、框的坐标,而demo只是生成了标注的图片,因此需要对demo进行修改
在/faster-rcnn.pytorch/demo.py中
im2show = vis_detections(im2show, pascal_classes[j], cls_dets.cpu().numpy(), 0.5)
标黄的这个vis_detections函数就是进行图像标注的函数,我需要它输出每次的图片名,就把图片名作为参数传进去,改为
![]()
im2show = vis_detections(im2show, pascal_classes[j], cls_dets.cpu().numpy(),imglist[num_images], 0.5)
最后那个0.3是score的阈值,暂时默认就好不影响,后面需要修改再自己设置
然后在faster-rcnn.pytorch/lib/model/utils/net_utils.py中找到这个vis_detections函数
我将每次图片名和产生的框坐标和score写入到txt文件中,把原来的函数修改为
def vis_detections(im, class_name, dets, image_name ,thresh=0.8):
    """Visual debugging of detections."""
    for i in range(np.minimum(10, dets.shape[0])):
        bbox = tuple(int(np.round(x)) for x in dets[i, :4])
        score = dets[i, -1]
        if score > thresh:
            cv2.rectangle(im, bbox[0:2], bbox[2:4], (0, 204, 0), 2)
            #这是我修改的,加了一个写入txt的部分
            with open('/home/xbw/xxx/answer_5.txt','a') as xbw_obj:
                xbw_obj.write(image_name + '_' + class_name + '_' + str(bbox) + '_' + str(score) + '_\n')
            cv2.putText(im, '%s: %.3f' % (class_name, score), (bbox[0], bbox[1] + 15), cv2.FONT_HERSHEY_PLAIN,
                        1.0, (0, 0, 255), thickness=1)
#            cv2.imshow("result",im)
#            cv2.waitKey(1)
    return im
同时如果想要不把结果图像写入硬盘,而是直接显示结果,那么就可以在demo.py最后的部分将写入注释掉,用opencv的cv2.imshow直接显示即可
关于加载已经训练的模型继续训练,faster-rcnn.pytorch/trainval_net.py已经给我们留好了接口,

训练过程中只要把这几个参数加上就行了,对应的是训练好模型名字里的几个值
例如我训练好的模型名为faster_rcnn_1_9_9547.pth,它就对应了 checksession 为1 ,checkepoch为 9,checkpoint为 9547
例如我要继续训练这个模型到20次epoch,就可以写
CUDA_VISIBLE_DEVICES=0 python trainval_net.py --dataset pascal_voc --net res101 --bs 1 --nw 4 --cuda --r true --checksession 1 --checkepoch 8 --checkpoint 9547 --epochs 20


