IDEA插件开发
文章目录
- 写在前面
-
- 1、使用IDEA新建插件项目
-
- 1.1、配置SDK并新建项目(非gradle项目)
- 1.2、项目目录结构
- 1.3、plugin.xml
- 1.4、AnAction
- 1.5、测试运行
- 1.6、打包,安装插件
- 2、AnAction API
-
- 2.1、plugin.xml
-
- 2.1.1、action、group 标签
- 2.1.2、extensions 标签
- 2.2、Action
-
- 2.2.1、actionPerformed() 方法
- 2.2.2、PsiClass操作API
- 2.2.3、XML 文件操作
- 2.3、Service
- 3、Gradle 创建IDEA插件项目
- 4、踩坑日记
-
- 4.1、版本不兼容问题(intellij 2020、gradle 6.5、JDK 1.8)
- 4.2、中文乱码问题
写在前面
idea这些插件都是怎么开发的?本文手把手带你开发
IDEA插件开发,注意JDK版本:
IDEA 2020.3 以上版本插件开发时,需要使用 Java 11。
IDEA 2022.2 及更高版本插件开发时,需要使用 Java 17
1、使用IDEA新建插件项目
1.1、配置SDK并新建项目(非gradle项目)
1、在新建时配置idea SDK

配完成sdk,点下一步填写项目名就可以新建项目了
2、在项目新建完成之后也可以配置SDK

1.2、项目目录结构
项目目录结构如下:

1.3、plugin.xml
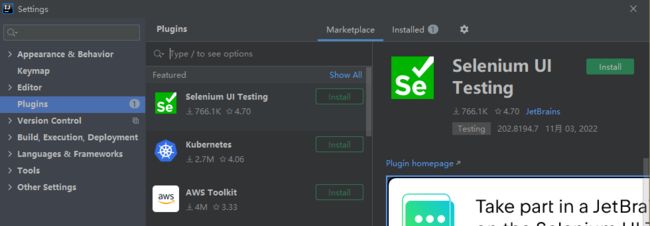
plugin.xml 中的内容,在插件安装后的对应位置,如下

1.4、AnAction
IntlliJ的插件由一个个Action组成,而我们编程的入口也是这个Action。
这里我们写一个弹出框试试。

新建完成后,plugin.xml里面会生成一个action标签,与该插件安装后对应关系如下

除了plugin.xml有变动,还会生成一个HelloBoy 类,我们给他添加如下代码
public class HelloBoy extends AnAction {

    @Override
    public void actionPerformed(AnActionEvent e) {
        Project project = e.getData(PlatformDataKeys.PROJECT);
        String title = "boy";
        String msg = "Hello,boy";
        Messages.showMessageDialog(project, msg, title, Messages.getInformationIcon());
    }
}
1.5、测试运行
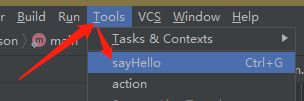
点击运行
![]()
在弹出的idea项目中,点击菜单栏上面的Tools
1.6、打包,安装插件
打包,项目更目录下会生成jar包

安装插件

安装完成,可能需要重启一下idea,然后就能顺利看到这个弹筐了

2、AnAction API
Action官方文档: idea Action官方文档
2.1、plugin.xml
plugin.xml action示例
<idea-plugin>
  <id>com.idea.helloid>
  <name>插件名字写在这里name>
  <version>1.0version>
  <vendor email="邮箱@qq.com" url="http://www.666.com">666有限公司vendor>

  <description>
    支持HTML标签,
这里你最少要写40个字知道不,否则它就会有红色的波浪线 ]]>
  description>

  <change-notes>
    这里也支持HTML标签,
这里也要至少有40个字,否则就会有红色波浪线 ]]>
  change-notes>


  <idea-version since-build="173.0"/>


  <depends>com.intellij.modules.platformdepends>

  <extensions defaultExtensionNs="com.intellij">

  extensions>

  <actions>
    <group popup="true" id="HelloWorld" text="sayMenu">
      <add-to-group group-id="EditorPopupMenu" anchor="last" />
    group>

    <action class="HelloBoy" id="helloAction" text="sayHello">
      <add-to-group group-id="MainMenu" anchor="first" />
    action>
  actions>

idea-plugin>
plugin.xml扩展点示例
<idea-plugin url="https://example.com/my-plugin-site">
  <id>com.example.mypluginid>
  <name>插件名name>
  <version>1.0.0version>


  <vendor url="https://www.66.com" email="demo@example.com">公司名vendor>


  <product-descriptor code="PMYPLUGIN" release-date="20221111" release-version="20221" optional="true"/>


  <idea-version since-build="193" until-build="193.*"/>

  <description>
    支持HTML标签,
这里你最少要写40个字知道不,否则它就会有红色的波浪线 ]]>
  description>

  <change-notes>这里也支持HTML标签,
这里也要至少有40个字,否则就会有红色波浪线 ]]> change-notes>


  <depends>com.intellij.modules.platformdepends>
  <depends>com.example.third-party-plugindepends>


  <depends optional="true" config-file="mysecondplugin.xml">com.example.my-second-plugindepends>


  <resource-bundle>messages.MyPluginBundleresource-bundle>


  <extensionPoints>
    <extensionPoint
        name="testExtensionPoint"
        beanClass="com.example.impl.MyExtensionBean"/>
    <applicationService
        serviceImplementation="com.example.impl.MyApplicationService"/>
    <projectService
        serviceImplementation="com.example.impl.MyProjectService"/>
  extensionPoints>


  <applicationListeners>
    <listener
        class="com.example.impl.MyListener"
        topic="com.intellij.openapi.vfs.newvfs.BulkFileListener"/>
  applicationListeners>


  <projectListeners>
    <listener
        class="com.example.impl.MyToolwindowListener"
        topic="com.intellij.openapi.wm.ex.ToolWindowManagerListener"/>
  projectListeners>

  <actions>
    <action
        id="VssIntegration.GarbageCollection"
        class="com.example.impl.CollectGarbage"
        text="Collect _Garbage"
        description="Run garbage collector">
      <keyboard-shortcut
          first-keystroke="control alt G"
          second-keystroke="C"
          keymap="$default"/>
    action>
  actions>


  <extensions defaultExtensionNs="VssIntegration">
    <myExtensionPoint implementation="com.example.impl.MyExtensionImpl"/>
  extensions>


  <application-components>
    <component>

      <interface-class>com.example.Component1Interfaceinterface-class>

      <implementation-class>com.example.impl.Component1Implimplementation-class>
    component>
  application-components>


  <project-components>
    <component>
      <implementation-class>com.example.Component2implementation-class>
      <option name="workspace" value="true"/>
      <loadForDefaultProject/>
    component>
  project-components>


  <module-components>
    <component>
      <implementation-class>com.example.Component3implementation-class>
    component>
  module-components>
idea-plugin>
2.1.1、action、group 标签
单个菜单
	<actions>
        <action id="com.idea.hello" class="com.HelloBoy" text="hello" description="打个招呼">
            <add-to-group group-id="EditorPopupMenu" anchor="first"/>
        action>
    actions>
| 属性 | 说明 |
|---|---|
| id | 当前操作的id,可自定义填写,或写当前绑定的AnAction对象的包名.类名/类名 |
| class | 绑定的AnAction对象 |
| text | 当前这个菜单要显示什么内容 |
| description | 当前菜单的介绍 |
| icon | 菜单旁边要显示什么图标 |
设置action所在的组
<add-to-group group-id="EditorPopupMenu" anchor="first"/>
系统默认有一些组,如下是常用的group-id:
| idea菜单组 | 说明 |
|---|---|
| MainMenu | 主菜单栏(只能group标签依赖) |
| ToolsMenu | Tools菜单栏 |
| FileMenu | File菜单栏(idea界面最顶层菜单栏都是它们的名字+Menu) |
| EditorPopupMenu | 代码编辑页面右击出现 |
我们也可以自己创建菜单组(属性和单个菜单一样),popup=“true” 表示例弹出
  <actions>
        <group popup="true" id="HelloWorld" text="sayMenu">
            <add-to-group group-id="MainMenu" anchor="last" />
        group>

        <action class="HelloBoy" id="helloAction" text="sayHello">
            <add-to-group group-id="HelloWorld" anchor="first" />
        action>
  actions>
2.1.2、extensions 标签
扩展是插件最常用的一种扩展IDEA功能的方式, 只是这种方式没有直接把Action加到菜单或者工具栏那么直接。扩展功能是通过IDEA自带的或者其它插件提供的一些扩展点实现的。
<extensions defaultExtensionNs="com.intellij">
  <appStarter implementation="com.example.MyAppStarter"/>
  <projectTemplatesFactory implementation="com.example.MyProjectTemplatesFactory"/>
extensions>


<extensions defaultExtensionNs="another.plugin">
  <myExtensionPoint
      key="keyValue"
      implementationClass="com.example.MyExtensionPointImpl"/>
extensions>
插件显示在settings中和工具栏下方,示例:
<extensions defaultExtensionNs="com.intellij">

        <applicationConfigurable groupId="tools" instance="cn.luojunhui.touchfish.config.BookSettingsConfigurable" order="last"/>

        <applicationService serviceInterface="cn.luojunhui.touchfish.config.BookSettingsState" serviceImplementation="cn.luojunhui.touchfish.config.BookSettingsState"/>


        <toolWindow id="Touch Fish" secondary="false" anchor="bottom" icon="/icons/fish_14.png" factoryClass="cn.luojunhui.touchfish.windwos.BookWindowFactory">
        toolWindow>
    extensions>
Extension Points 声明扩展点
有两种类型的扩展点:
1、Interface 其它插件提供该接口的实现类
2、Bean 其它插件提供子类, 这种方式其它插件可以设置一些扩展点类的属性值
<idea-plugin>
  <id>my.pluginid>

  <extensionPoints>
    <extensionPoint
        name="myExtensionPoint1"
        beanClass="com.example.MyBeanClass"/>

    <extensionPoint
        name="myExtensionPoint2"
        interface="com.example.MyInterface"/>
  extensionPoints>

idea-plugin>
扩展点类
public class MyBeanClass extends AbstractExtensionPointBean {

  @Attribute("key")
  public String key;

  @Attribute("implementationClass")
  public String implementationClass;

  public String getKey() {
    return key;
  }

  public String getClass() {
    return implementationClass;
  }
}
其他插件使用改扩展点
<idea-plugin>
  <id>another.pluginid>


  <depends>my.plugindepends>


  <extensions defaultExtensionNs="my.plugin">
    <myExtensionPoint1
        key="someKey"
        implementationClass="another.some.implementation.class"/>

    <myExtensionPoint2
        implementation="another.MyInterfaceImpl"/>
  extension>

idea-plugin>
声明扩展点的类使用扩展点
public class MyExtensionUsingService {

  private static final ExtensionPointName<MyBeanClass> EP_NAME =
    ExtensionPointName.create("my.plugin.myExtensionPoint1");

  public void useExtensions() {
    for (MyBeanClass extension : EP_NAME.getExtensionList()) {
      String key = extension.getKey();
      String clazz = extension.getClass();
      // ...
    }
  }
}
2.2、Action
2.2.1、actionPerformed() 方法
public class JsonFormatAction extends AnAction {

    @Override
    public void actionPerformed(AnActionEvent event) {

        // 获取当前project对象
        Project project = event.getData(PlatformDataKeys.PROJECT);
        // 获取当前编辑的文件, 可以进而获取 PsiClass, PsiField 对象
        PsiFile psiFile = event.getData(CommonDataKeys.PSI_FILE);
        Editor editor = event.getData(CommonDataKeys.EDITOR);
        // 获取Java类或者接口
        PsiClass psiClass = getTargetClass(editor, psiFile);
        // 创建并调起 DialogWrapper
        DialogWrapper dialog = new JsonFormat(project, psiFile, editor, psiClass);
        dialog.show();
    }
其他形式
// 获取project. 外部调用 getData(CommonDataKeys.PROJECT) = getDataContext().getData(CommonDataKeys.PROJECT)
Project project = e.getProject();
// 获取数据上下文
DataContext dataContext = e.getDataContext();
// context能够也获取到其余信息, 入参为 PlatformDataKeys 定义的字段
Project project1 = dataContext.getData(PlatformDataKeys.PROJECT);
Editor editor = dataContext.getData(PlatformDataKeys.EDITOR);
PsiFile psiFile = dataContext.getData(PlatformDataKeys.PSI_FILE);
PsiElement psiElement = dataContext.getData(PlatformDataKeys.PSI_ELEMENT);
// 虚构文件
VirtualFile virtualFile = dataContext.getData(PlatformDataKeys.VIRTUAL_FILE);
获取PsiClass
@Nullable
protected PsiClass getTargetClass(Editor editor, PsiFile file) {
    int offset = editor.getCaretModel().getOffset();
    PsiElement element = file.findElementAt(offset);
    if (element == null) {
        return null;
    } else {
        PsiClass target = PsiTreeUtil.getParentOfType(element, PsiClass.class);
        return target instanceof SyntheticElement ? null : target;
    }
}
2.2.2、PsiClass操作API
// 获取全类名
String qualifiedName = aClass.getQualifiedName();
// 获取所有字段
PsiField[] fields = aClass.getFields();
// 获取字段名
String name = psiField.getName()
// PsiClass和PsiField都实现了PsiElement
// 删除
element.delete()
// 添加元素, 向一个类中添加方法, 字段等, 也可以调用 addBefore, addAfter
add(PsiElement element)
// PsiType支持常用基本类型, 但是当创建对象时则不支持.需要自己创建
PsiElementFactory psiElementFactory = JavaPsiFacade.getElementFactory(project);
// String 类型
PsiType stringPsiType = psiElementFactory.createTypeFromText("java.lang.String", null)
// list
PsiType listPsiType = psiElementFactory.createTypeFromText("java.util.List" , null);
// 自定义list
PsiType typeFromText = psiElementFactory.createTypeFromText("java.util.List<" + className + ">", null);
2.2.3、XML 文件操作
以 Mapper.xml 举例声明接口,继承 DomElement,并配合 @Attribute、@SubTag 、@SubTagsList 注解定义一个 xml model,其中需要注意 @SubTagsList 方法要使用复数形式。
public interface Mapper extends DomElement {
@Attribute("namespace")
GenericAttributeValue<String> getNamespace();
/**
* 增删改查对应的节点
*/
@SubTagsList({"select", "insert", "update", "delete"})
List<Statement> getStatements();
@SubTagList("select")
List<Select> getSelects();
@SubTagList("insert")
List<Insert> getInserts();
@SubTagList("update")
List<Update> getUpdates();
@SubTagList("delete")
List<Delete> getDeletes();
}
搜索文件。
比如想搜索项目中的所有 xml 文件,上面使用 Mapper 接口定义了 Mapper.xml 的结构,就可以利用 DomService 搜索所有的 Mapper.xml:
// 当前项目的所有元素 mapper, 分别填入类型, 作用域 GlobalSearchScope
List<DomFileElement<Mapper>> fileElements = DomService.getInstance().getFileElements(Mapper.class, project, GlobalSearchScope.allScope(project));
写入文件。
需要调用WriteCommandAction进行异步写入
WriteCommandAction.runWriteCommandAction(project, () -> {
    doGenerate(psiClass, jsonObject);
});
通知。
在操作成功之后,在 IDEA 右下角通知用户,使用 NotificationGroup 类即可。
// 静态属性
private static final NotificationGroup NOTIFICATION_GROUP = new NotificationGroup("Java2Json.NotificationGroup", NotificationDisplayType.BALLOON, true);

public void actionPerformed(@NotNull AnActionEvent e) {
    // 在方法中调用
    Notification success = NOTIFICATION_GROUP.createNotification(message, NotificationType.INFORMATION);
    Notifications.Bus.notify(success, project);

}
也可以定义为工具类,如下
/**
 * 进行消息通知工具类
 */
public class NotificationUtils {

    private static NotificationGroup notificationGroup = new NotificationGroup("ApiDoc.NotificationGroup", NotificationDisplayType.BALLOON, true);

    public static void warnNotify(String message, Project project) {
        Notifications.Bus.notify(notificationGroup.createNotification(message, NotificationType.WARNING), project);
    }

    public static void infoNotify(String message, Project project) {
        Notifications.Bus.notify(notificationGroup.createNotification(message, NotificationType.INFORMATION), project);
    }

    public static void errorNotify(String message, Project project) {
        Notifications.Bus.notify(notificationGroup.createNotification(message, NotificationType.ERROR), project);
    }

}
2.3、Service
Service是插件的一个组件, 是为了把公共的逻辑放到一起,Service的实例是单例的。
有三种类型的Service, 应用级别的,项目级别的,模块级别的。
声明Service有两种方式
1、类上加@Service注解,service不需要被重写的时候可以使用这种方式
2、在plugin.xml中声明,通过applicationService,projectService扩展点声明
<extensions defaultExtensionNs="com.intellij">

  <applicationService
      serviceInterface="mypackage.MyApplicationService"
      serviceImplementation="mypackage.MyApplicationServiceImpl"/>


  <projectService
      serviceInterface="mypackage.MyProjectService"
      serviceImplementation="mypackage.MyProjectServiceImpl"/>
extensions>
获取Service
MyApplicationService applicationService = ApplicationManager.getApplication()
  .getService(MyApplicationService.class);

MyProjectService projectService = project.getService(MyProjectService.class);
实现类可以封装静态方法,方便获取
MyApplicationService applicationService = MyApplicationService.getInstance();

MyProjectService projectService = MyProjectService.getInstance(project);
和其它Service交互
@Service
public final class ProjectService {

  private final Project myProject;

  public ProjectService(Project project) {
    myProject = project;
  }

  public void someServiceMethod(String parameter) {
    AnotherService anotherService = myProject.getService(AnotherService.class);
    String result = anotherService.anotherServiceMethod(parameter, false);
    // do some more stuff
  }
}
3、Gradle 创建IDEA插件项目
使用gradle创建项目,除了打包方式,依赖引入不同,其他的都差不多

项目结构(第一创建可能会下载很多依赖,加载时间会长一点)

4、踩坑日记
4.1、版本不兼容问题(intellij 2020、gradle 6.5、JDK 1.8)
intellij 2020 编译的插件,不能安装在idea 2022上。

解决办法 :添加 updateSinceUntilBuild false (设置各版本兼容)
intellij {
    version '2020.2.4'
    updateSinceUntilBuild false
}
4.2、中文乱码问题
解决办法:添加 options.encoding = “UTF-8”
tasks.withType(JavaCompile) {
    options.encoding = "UTF-8"
}