华为云物联网设备接入及OBS使用
记录华为云的上云操作及OBS对象上传文件等操作,大部分操作在WSL Ubuntu中完成,与树莓派环境基本一致。
linux操作系统连接华为云
参考这篇文档:Linux配置上云环境及demo
上传TOPIC
	/*
	Topic: $oc/devices/{device_id}/sys/messages/up
	数据格式:
	{
		"object_device_id": "{object_device_id}",
		"name": "name",
		"id": "id",
		"content": "hello"
	}
	"{\"object_device_id\": \"{object_device_id}\",\"name\": \"name\",\"id\": \"id\",\"content\": \"hello\"}"
	*/
	payload = "{\"object_device_id\": \"5ed4fd4c41f4fc02c74fdd27_0\",\"name\": \"massage_test\",\"id\": \"0xffffff\",\"content\": \"Hello, Huawei Yun\"}";
	char *cmd_topic = combine_strings(3, "$oc/devices/", username, "/sys/messages/up");
	// ret = mqtt_subscribe(cmd_topic);
	ret = mqtt_publish(cmd_topic, payload);
	free(cmd_topic);
	cmd_topic = NULL;
	if (ret < 0)
	{
		printf("subscribe topic error, result %d\n", ret);
	}
接收云端下发的命令
首先在产品->功能定义->添加命令中设置一个命令,再在设备->所有设备->设备详情->命令->命令下发中发送命令。
BUG
- 树莓派上传属性有时间无法读取bug
- 数据解析有问题
OBS对象创建
Windows安装OBS Browser+
在使用OBS前,首先申请一个捅,并在查看密钥这里申请访问的AK和SK以便之后登陆使用。下载安装,登陆时账号可以任意配置,填上AK和SK即可。

linux安装obsutil
下载和初始化配置参考:初始化配置
以本人创建的sjlbowl为例,主要运行步骤:
➜  Huawei_cloud_demo tar xvf obsutil_linux_amd64.tar.gz
obsutil_linux_amd64_3.1.15/
obsutil_linux_amd64_3.1.15/setup.sh
obsutil_linux_amd64_3.1.15/obsutil

➜  Huawei_cloud_demo cd obsutil_linux_amd64_3.1.15

➜  obsutil_linux_amd64_3.1.15 chmod 755 obsutil

➜  obsutil_linux_amd64_3.1.15 ls
obsutil  setup.sh
➜  obsutil_linux_amd64_3.1.15 ./obsutil config -i=********************** -k=********************** -e=**********************
Config file url:
  /home/sjl/.obsutilconfig

Update config file successfully!

➜  obsutil_linux_amd64_3.1.15 ./obsutil ls -s
Start at 2020-06-16 05:53:26.3593567 +0000 UTC

obs://sjlbowl
Bucket number is: 1
➜  obsutil_linux_amd64_3.1.15 ./obsutil ls obs://sjlbowl -s
Start at 2020-06-16 05:53:48.4628515 +0000 UTC

Listing objects .

Object list:
obs://sjlbowl/63254f37ca35ea6e8b5e803c86705367.jpg

Total size of bucket is: 2.56MB
Folder number is: 0
File number is: 1
➜  obsutil_linux_amd64_3.1.15 ls
obsutil  setup.sh

➜  obsutil_linux_amd64_3.1.15 touch test.txt
➜  obsutil_linux_amd64_3.1.15 vim test.txt

➜  obsutil_linux_amd64_3.1.15 ./obsutil cp test.txt obs://sjlbowl
Start at 2020-06-16 05:55:42.5142311 +0000 UTC


Parallel:      5                   Jobs:          5
Threshold:     50.00MB             PartSize:      auto
VerifyLength:  false               VerifyMd5:     false
CheckpointDir: /home/sjl/.obsutil_checkpoint

[------------------------------------------------] 100.00% 137B/s 33B/33B 442ms

Upload successfully, 33B, n/a, /mnt/f/Huawei_cloud_demo/obsutil_linux_amd64_3.1.15/test.txt --> obs://sjlbowl/test.txt, cost [442], status [200], request id [00000172BBB2983E681D6BC627C5CB01]
树莓派安装obsutil环境
需要安装golang环境及编译obsutil文件:
git clone https://github.com/huaweicloud/huaweicloud-obs-obsutil.git    # 下载源码
cd huaweicloud-obs-obsutil/
sudo apt-get install golang                                             # 安装golang
export GOPATH=/home/pi/huawei/huaweicloud-obs-obsutil                   # 设置路径
export CGO_ENABLED=0
export GOOS=linux                                                       # 设置目标系统
export GOARCH=arm                                                       # 设置目标处理器
go install -ldflags "-X main.AesKey= -X main.AesIv= -X main.CloudType=dt" obsutil
go build obsutil                                                        # 编译文件
go run obsutil                                                          # 生成当前环境可执行版本
./obsutil config -i=********************** -k=********************** -e=**********************
./obsutil ls -s
./obsutil ls obs://my-bucket-input -s
./obsutil cp ../../face_from_raspberry.jpg obs://my-bucket-input        # 上传文件
树莓派传输视频流
硬件连接
更新Picamera驱动并使用下面文件测试:
from picamera import PiCamera
from time import sleep
import time

camera = PiCamera()
camera.resolution=(720,480)

def take_photo():
    ticks=int(time.time())
    fileName='raspi%s.jpg'%ticks
    filePath='/home/pi/iot/photos/%s'%fileName
    camera.start_preview()
    for i in range(10,0,-1):    # 10s倒计时
        camera.annotate_text='%d'%i
        # camera.annotate_text='%s'%filePath
        sleep(1)
    camera.annotate_text=''
    camera.capture(filePath)
    camera.stop_preview()

take_photo()  # 拍一次
云端设置RTMP推流地址
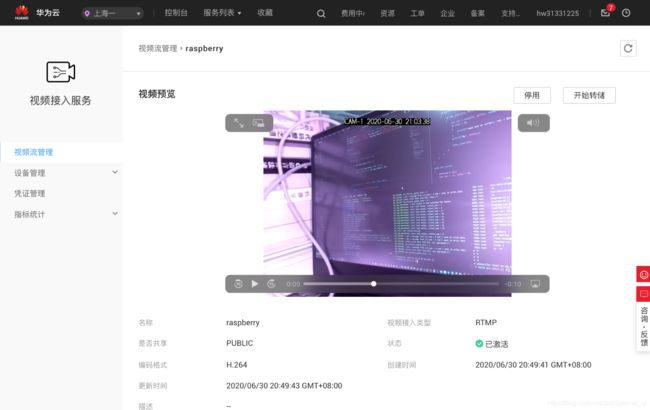
打开控制台,搜索视频接入服务,开通后创建RTMP视频流,激活后可以查看到RTMP推流地址:
rtmp://121.36.222.36:25021/vis/raspberry
参考:创建RTMP视频流
树莓派安装ffmpeg和nginx工具
安装ffmpeg:
sudo apt-get update
sudo apt-get install libx264-dev
wget http://ffmpeg.org/releases/ffmpeg-4.1.tar.bz2
sudo tar jxvf ffmpeg-4.1.tar.bz2
cd ffmpeg-4.1/
sudo ./configure --prefix=/opt/ffmpeg --enable-shared --enable-pthreads --enable-gpl  --enable-avresample --enable-libx264 --disable-yasm
sudo make && sudo make install
安装和配置nginx:
# 下载解压nginx-rtmp-module模块
cd ~
wget https://github.com/arut/nginx-rtmp-module/archive/master.zip
unzip  master.zip

# 下载解压openresty模块
cd ~
wget https://openresty.org/download/openresty-1.13.6.2.tar.gz
tar xvf openresty-1.13.6.2.tar.gz
mv openresty-1.13.6.2 openresty

cd openresty
sudo ./configure --prefix=/opt/openresty --add-module=/home/pi/nginx-rtmp-module-master

# 安装编译nginx
sudo make
sudo make install

# 创建快捷方式
sudo ln -s /opt/openresty/nginx/sbin/nginx /usr/sbin/nginx

# 修改配置文件
sudo vim /opt/openresty/nginx/conf/nginx.conf
# 添加:
rtmp {
	server {
		listen 1935;
		application videotest{
			live on;
		}
	}
}
推流实现
# 命令:
raspivid -w 640 -h 480 -b 15000000 -t 0 -a 12 -a 1024 -a "CAM-1 %Y-%m-%d %X" -ae 18,0xff,0x808000 -o - | ffmpeg -re -i - -s 640x480 -vcodec copy -acodec copy -b:v 800k -b:a 32k -f flv rtmp://121.36.222.36:25021/vis/raspberry

# 结果:
Input #0, h264, from 'pipe:':
  Duration: N/A, bitrate: N/A
    Stream #0:0: Video: h264 (High), yuv420p(progressive), 640x480, 25 fps, 25 tbr, 1200k tbn, 50 tbc
Output #0, flv, to 'rtmp://121.36.222.36:25021/vis/raspberry':
  Metadata:
    encoder         : Lavf58.20.100
    Stream #0:0: Video: h264 (High) ([7][0][0][0] / 0x0007), yuv420p(progressive), 640x480, q=2-31, 800 kb/s, 25 fps, 25 tbr, 1k tbn, 1200k tbc
Stream mapping:
  Stream #0:0 -> #0:0 (copy)
[flv @ 0xae96e0] Timestamps are unset in a packet for stream 0. This is deprecated and will stop working in the future. Fix your code to set the timestamps properly
^Cmmal: Aborting program.0 size=   18177kB time=00:01:25.72 bitrate=1737.1kbits/s speed=   1x

[flv @ 0xae96e0] Failed to update header with correct duration.
[flv @ 0xae96e0] Failed to update header with correct filesize.
frame= 2154 fps= 25 q=-1.0 Lsize=   18220kB time=00:01:26.12 bitrate=1733.1kbits/s speed=   1x
video:18178kB audio:0kB subtitle:0kB other streams:0kB global headers:0kB muxing overhead: 0.232961%
参考:【树莓派】ffmpeg + nginx 推 rtmp 视频流实现远程监控
安装opencv指北
本来打算用opencv做视频流,发现树莓派开启cv后就很卡,遂放弃,但安装opencv的痛苦历程值得记录,不过只要参考下面两个就够了,如果遇到头文件错误就复制一下改路径,如果遇到make -j4卡死到99%,切换成make就行,并提高swap的交换分区大小,缺少bmi类型文件去网上搜一下就行,这些困难不是大事,等cpu编译完才是望眼欲穿。
树莓派3B/3B+和4B安装OpenCV教程 (详细教程)
教你在树莓派上安装OpenCV

