RetinaFace人脸检测模型-Gradio界面设计
前言
本文基于人工智能领域大佬Bubbliiiing睿智的目标检测42——Pytorch搭建Retinaface人脸检测与关键点定位平台
原文链接:https://blog.csdn.net/weixin_44791964/article/details/106872072
这是是我的学习笔记,记录我对开源项目的本地复现,重新封装和功能拓展的学习历程,万分感谢大佬的开源和无私奉献。本文部分内容来自网上搜集与个人实践。如果任何信息存在错误,欢迎读者批评指正。本文仅用于学习交流,不用作任何商业用途。
该项目实现了Retinaface人脸检测模型的训练、测试和评估,可以帮助用户快速上手Retinaface模型。
Retinaface是一种单阶段的人脸检测模型,具有高精度和高效率的优点。该项目将Retinaface应用到人脸检测任务上,实现了模型的端到端流程。
github:
Face-recognition-web-ui
我的相关笔记:
Retinaface实现人脸检测与关键点定位-深度学习学习笔记-1
Facenet实现人脸特征比对-深度学习学习笔记-2
RetinaFace人脸检测模型-Gradio界面设计
FaceNet人脸识别模型-Gradio界面设计
Retinaface+FaceNet人脸识别系统-Gradio界面设计
文章目录
- 前言
- 总体功能
-
- 模型训练
- 模型试用
- 模型评估
- 主体代码
-
- retinaface_trainer.py
- enpredict .py
- eneva .py
- UI界面代码
- 运行环境
- 总结
总体功能
- 模型训练:支持多种backbone,加载预训练权重,冻结权重等
- 模型测试:预测人脸框,可视化结果
- 模型评估:利用数据集计算指标,可视化结果
模型训练
通过RetinaFaceTrainer类进行模型训练。
主要参数:
- backbone:resnet50、mobilenet等
- pretrained:是否加载预训练权重
- freeze_stage:冻结的stage
- model_path:可选预训练模型
主要函数:train_retinaface
模型试用
通过detect_image函数测试模型。
主要参数:
- img_raw:输入图片
- model_path:模型路径
- backbone:选择backbone
主要函数:detect_image_change
模型评估

通过test函数评估模型。
主要参数:
- model_path:模型路径
- backbone:选择backbone
主要函数:evaluation_test
下面我将解释一下生成的评估图如何解释和理解。
在代码中,生成了两种评估图:
-
精确率-召回率曲线 (Precision-Recall Curve):
- 精确率(Precision)是指模型预测的正例中有多少是真正例的比例。
- 召回率(Recall)是指所有真正例中有多少被模型正确地预测出来的比例。
- 曲线上的每个点表示在不同的置信度阈值下模型的精确率和召回率。
- 通常情况下,精确率和召回率是一种权衡关系,增加精确率可能会降低召回率,反之亦然。
- 一种理想的情况是精确率和召回率都很高。曲线越靠近右上角,表示模型在不同置信度阈值下的性能越好。
- 通过查看曲线下的面积(Area Under Curve,AUC),可以评估模型的整体性能。AUC越大,表示模型性能越好。
-
平均精度柱状图 (Average Precision Bar Chart):
- 平均精度 (Average Precision,AP) 表示模型在不同难度级别下的性能。
- 在目标检测任务中,通常将数据集分为不同的难度级别,如"Easy"、“Medium"和"Hard”,每个级别包含不同难度的样本。
- 每个柱状图条表示一个难度级别的平均精度 (AP)。
- AP 是精确率-召回率曲线下的面积,表示模型在该难度级别下的性能。AP 越高,模型性能越好。
- 通过查看不同难度级别下的 AP,可以了解模型在不同情况下的性能表现。
如何解释这些图表:
- 精确率-召回率曲线可视化了模型在不同置信度阈值下的精确率和召回率的权衡关系。您可以根据任务需求选择合适的阈值。
- 如果您更关心模型的整体性能,可以通过 AUC 来评估。AUC 越大,模型性能越好。
- 平均精度柱状图显示了模型在不同难度级别下的性能。通过查看柱状图,您可以了解模型在不同难度情况下的表现。
- 通常情况下,"Easy"级别的 AP 较高,因为这些样本相对容易识别,而"Hard"级别的 AP 较低,因为这些样本更具挑战性。
- 总体来说,您希望看到高的精确率、召回率和 AP,这表示模型能够有效地检测目标。
评估图表可以帮助您理解模型的性能如何随不同阈值、难度级别等因素变化,从而更好地优化模型或选择适当的配置。
主体代码
retinaface_trainer.py
- 导入所需的Python库:
- time - 用于计算时间
- cv2 - OpenCV图像处理库
- numpy - 数值计算库
- torch - PyTorch深度学习框架
- torch.nn - PyTorch的神经网络模块
- 导入RetinaFace相关组件:
- nets/retinaface.py - 包含RetinaFace模型的网络定义
- utils/anchors.py - 用于生成 Anchor boxes
- utils/config.py - 包含RetinaFace的配置文件
- utils/utils.py - 各种图像处理和数据处理工具函数
- utils/utils_bbox.py - 包含目标检测相关的解码、NMS等函数
- 定义Retinaface类:
- 设置默认参数 - 模型路径、backbone、置信度阈值等
- 初始化 - 加载配置文件、构建Anchor、加载模型
- generate方法 - 构建RetinaFace模型,加载预训练权重
- detect_image - 人脸检测pipeline
- get_FPS - 计算FPS
- get_map_txt - 生成map计算所需的txt文件
- 在detect_image内部实现了letterbox预处理、模型前向推理、解码预测框、NMS抑制等流程,生成最后的人脸检测结果
- 获取FPS可以评估模型的实际推理速度
- 生成map txt文件可以进行精度mAP指标的评估
- 整体实现了一个人脸检测模型的加载和使用,提供了基本的评估工具,可以灵活应用到实际产品中
import numpy as np
import torch
import torch.backends.cudnn as cudnn
import torch.optim as optim
from torch.utils.data import DataLoader
from nets.retinaface import RetinaFace
from nets.retinaface_training import MultiBoxLoss, weights_init
from utils.anchors import Anchors
from utils.callbacks import LossHistory
from utils.config import cfg_mnet, cfg_re50
from utils.dataloader import DataGenerator, detection_collate
from utils.utils_fit import fit_one_epoch


class RetinaFaceTrainer:
    def __init__(self, Cuda=True, training_dataset_path='./data/widerface/train/label.txt',
                 backbone="mobilenet", pretrained=True, model_path='',
                 Freeze_Train=True, num_workers=4):
        self.Cuda = Cuda  # 是否使用GPU
        self.training_dataset_path = training_dataset_path  # 人脸标注文件的路径
        self.backbone = backbone  # 选择mobilenet或resnet50为特征提取网络
        self.pretrained = pretrained  # 是否使用预训练权重
        self.model_path = model_path  # 模型权重地址
        self.Freeze_Train = Freeze_Train  # 是否进行冻结训练
        self.num_workers = num_workers  # 使用4个workers线程从DataLoader中读取数据

    def load_model(self):
        if self.backbone == "mobilenet":
            cfg = cfg_mnet
        elif self.backbone == "resnet50":
            cfg = cfg_re50
        else:
            raise ValueError('Unsupported backbone - `{}`, Use mobilenet, resnet50.'.format(self.backbone))

        model = RetinaFace(cfg=cfg, pretrained=self.pretrained)
        if not self.pretrained:
            weights_init(model)
        if self.model_path != '':
            device = torch.device('cuda' if torch.cuda.is_available() else 'cpu')
            model_dict = model.state_dict()
            pretrained_dict = torch.load(self.model_path, map_location=device)
            pretrained_dict = {k: v for k, v in pretrained_dict.items() if np.shape(model_dict[k]) == np.shape(v)}
            model_dict.update(pretrained_dict)
            model.load_state_dict(model_dict)

        model_train = model.train()
        if self.Cuda:
            model_train = torch.nn.DataParallel(model)
            cudnn.benchmark = True
            model_train = model_train.cuda()

        anchors = Anchors(cfg, image_size=(cfg['train_image_size'], cfg['train_image_size'])).get_anchors()
        if self.Cuda:
            anchors = anchors.cuda()

        criterion = MultiBoxLoss(2, 0.35, 7, cfg['variance'], self.Cuda)
        loss_history = LossHistory("logs/")

        return model,model_train, anchors, criterion, loss_history

    def freeze_train(self):
        model,model_train, anchors, criterion, loss_history = self.load_model()

        lr = 1e-3
        # 学习率大收敛快
        Batch_size = 8
        Init_Epoch = 0
        Freeze_Epoch = 2

        optimizer = optim.Adam(model_train.parameters(), lr, weight_decay=5e-4)
        lr_scheduler = optim.lr_scheduler.StepLR(optimizer, step_size=1, gamma=0.92)

        train_dataset = DataGenerator(self.training_dataset_path, cfg_mnet['train_image_size'])
        gen = DataLoader(train_dataset, shuffle=True, batch_size=Batch_size, num_workers=self.num_workers,
                         pin_memory=True, drop_last=True, collate_fn=detection_collate)
        epoch_step = train_dataset.get_len() // Batch_size

        if self.Freeze_Train:
            for param in model.body.parameters():
                param.requires_grad = False

        for epoch in range(Init_Epoch, Freeze_Epoch):
            fit_one_epoch(model_train, model, loss_history, optimizer, criterion, epoch, epoch_step, gen,
                          Freeze_Epoch, anchors, cfg_mnet, self.Cuda)
            lr_scheduler.step()

        lr = 1e-4
        # 学习率小防止震荡
        Batch_size = 4
        Freeze_Epoch = 2
        Unfreeze_Epoch = 4

        optimizer = optim.Adam(model_train.parameters(), lr, weight_decay=5e-4)
        lr_scheduler = optim.lr_scheduler.StepLR(optimizer, step_size=1, gamma=0.92)

        train_dataset = DataGenerator(self.training_dataset_path, cfg_mnet['train_image_size'])
        gen = DataLoader(train_dataset, shuffle=True, batch_size=Batch_size, num_workers=self.num_workers,
                         pin_memory=True, drop_last=True, collate_fn=detection_collate)
        epoch_step = train_dataset.get_len() // Batch_size

        if self.Freeze_Train:
            for param in model.body.parameters():
                param.requires_grad = True

        for epoch in range(Freeze_Epoch, Unfreeze_Epoch):
            fit_one_epoch(model_train, model, loss_history, optimizer, criterion, epoch, epoch_step, gen,
                          Unfreeze_Epoch, anchors, cfg_mnet, self.Cuda)
            lr_scheduler.step()
enpredict .py
这段代码的主要功能是人脸检测:
- 导入必要的库:opencv、numpy等。
- 从enretinaface模块中导入Retinaface类,用于加载Retinaface模型。
- 定义了一些参数:mode、视频路径、保存路径、FPS等。
- 定义detect_image函数,传入原图像路径、模型路径、网络backbone参数,以及临时保存图像的路径。
- 在detect_image函数中:
- 读取原图
- 将BGR转RGB
- 使用Retinaface模型进行预测
- 将预测图像转回BGR
- 显示和保存预测结果图像
- 所以这段代码的主要作用是加载Retinaface模型,进行人脸检测预测,并可视化和保存结果。
- 通过设置不同的mode参数,可以进行图片预测、摄像头预测、视频文件预测等。
- detect_image封装了人脸检测的主要过程,可以灵活应用到不同的模型和数据上。
综上,这段代码实现了一个人脸检测的示例,主要工作是加载模型、图像处理、模型预测、结果可视化等。
import time

import cv2
import numpy as np

from enretinaface import Retinaface

mode = "predict"
video_path = 0
video_save_path = ""
video_fps = 25.0
test_interval = 100
dir_origin_path = "img/"
dir_save_path = "img_out/"


def detect_image(img, model_path, backbone, temp_img_path):
    retinaface = Retinaface(model_path=model_path, backbone=backbone)

    image = cv2.imread(img)
    if image is None:
        print('Open Error! Try again!')
        return
    else:
        image = cv2.cvtColor(image, cv2.COLOR_BGR2RGB)
        r_image = retinaface.detect_image(image)
        r_image = cv2.cvtColor(r_image, cv2.COLOR_RGB2BGR)
        # cv2.imshow("after", r_image)
        # cv2.waitKey(0)
        if temp_img_path != "":
            # 保存到临时文件
            cv2.imwrite(temp_img_path, r_image)
            print("Save processed img to the path :" + temp_img_path)
            return temp_img_path
eneva .py
这段代码的主要功能是进行RetinaFace模型的mAP评估:
- 导入必要的库:os、cv2、numpy、matplotlib等
- 从enretinaface导入Retinaface模型类
- 定义了一些可视化mAP的函数:plot_precision_recall_curve、plot_ap_bar_chart
- 定义了test函数,传入RetinaFace模型路径及网络backbone参数
- 在test函数内:
- 构建Retinaface对象,设置评估时的阈值
- 载入WIDER FACE验证集的图像路径、ground truth路径
- 遍历所有图像,利用Retinaface生成预测结果txt文件保存
- 将所有预测结果和ground truth传入evaluation函数计算mAP
- 将mAP及精确率召回率曲线数据可视化并保存
- 最后返回可视化结果图像路径
- 所以该代码主要实现了对RetinaFace模型在WIDER FACE数据集上进行评估,计算mAP指标,并将精确率/召回率曲线等信息可视化,用于分析模型效果。
- 通过test函数可以方便地对任意模型进行mAP评估。
综上,该代码的主要贡献是实现了RetinaFace在人脸检测任务上的mAP评估和结果可视化。
import os
import cv2
import numpy as np
import tqdm
import matplotlib.pyplot as plt
from enretinaface import Retinaface
from utils.enutils_map import evaluation
def plot_precision_recall_curve(precisions, recalls):
    plt.plot(recalls, precisions)
    plt.xlabel('Recall')
    plt.ylabel('Precision')
    plt.title('Precision-Recall Curve')
    plt.grid(True)
    plt.savefig('precision_recall_curve.png')  # Save the plot to local file
    plt.close()
    # plt.show()

# Function to plot the AP bar chart
def plot_ap_bar_chart(aps):
    labels = ['Easy', 'Medium', 'Hard']
    x = np.arange(len(labels))
    plt.bar(x, aps)
    plt.xlabel('Difficulty Setting')
    plt.ylabel('AP')
    plt.title('Average Precision (AP) by Difficulty Setting')
    plt.xticks(x, labels)
    plt.savefig('ap_bar_chart.png')  # Save the plot to local file
    plt.close()
    # plt.show()

def test(model_path, backbone):
    mAP_retinaface = Retinaface(model_path=model_path, backbone=backbone, confidence=0.01, nms_iou=0.45)
    save_folder = './widerface_evaluate/widerface_txt/'
    gt_dir = "./widerface_evaluate/ground_truth/"
    imgs_folder = './data/widerface/val/images/'
    sub_folders = os.listdir(imgs_folder)

    test_dataset = []
    for sub_folder in sub_folders:
        image_names = os.listdir(os.path.join(imgs_folder, sub_folder))
        for image_name in image_names:
            test_dataset.append(os.path.join(sub_folder, image_name))

    num_images = len(test_dataset)

    # 存储精确率和召回率数据
    precisions = []
    recalls = []
    aps = []

    for img_name in tqdm.tqdm(test_dataset):
        image = cv2.imread(os.path.join(imgs_folder, img_name))
        image = cv2.cvtColor(image, cv2.COLOR_BGR2RGB)
        results = mAP_retinaface.get_map_txt(image)

        save_name = save_folder + img_name[:-4] + ".txt"
        dirname = os.path.dirname(save_name)
        if not os.path.isdir(dirname):
            os.makedirs(dirname)

        with open(save_name, "w") as fd:
            file_name = os.path.basename(save_name)[:-4] + "\n"
            bboxs_num = str(len(results)) + "\n"
            fd.write(file_name)
            fd.write(bboxs_num)
            for box in results:
                x = int(box[0])
                y = int(box[1])
                w = int(box[2]) - int(box[0])
                h = int(box[3]) - int(box[1])
                confidence = str(box[4])
                line = str(x) + " " + str(y) + " " + str(w) + " " + str(h) + " " + confidence + " \n"
                fd.write(line)

    # 计算精确率和召回率数据
    precision, recall, ap = evaluation(save_folder, gt_dir)
    precisions.append(precision)
    recalls.append(recall)
    aps.append(ap)

    # 处理精确率和召回率数据
    precisions = np.array(precisions)
    recalls = np.array(recalls)
    precisions = np.mean(precisions, axis=0)
    recalls = np.mean(recalls, axis=0)
    precisions = np.squeeze(precisions)
    recalls = np.squeeze(recalls)

    np.savetxt('precisions.txt', precisions)
    np.savetxt('recalls.txt', recalls)
    np.savetxt('aps.txt', aps)
    # Plot Precision-Recall Curve
    # Load the data from the local files
    precisions = np.loadtxt('precisions.txt')
    recalls = np.loadtxt('recalls.txt')
    aps = np.loadtxt('aps.txt')
    # Plot Precision-Recall Curve
    plot_precision_recall_curve(precisions, recalls)

    # Plot AP Bar Chart
    plot_ap_bar_chart(aps)
    return "precision_recall_curve.png","ap_bar_chart.png"
UI界面代码
这段代码实现了一个RetinaFace模型的训练、预测和评估的可视化交互界面:
- 导入必要的模块:gradio、RetinaFace相关模块等
- 定义了3个函数:
- train_retinaface: 用于训练RetinaFace模型
- detect_image_change: 用于人脸检测预测
- evaluation_test: 用于模型mAP评估
- 使用gradio构建了一个交互界面,包含3个Tab:
- Tab1:模型训练。可以配置各种超参数进行模型训练
- Tab2:模型预测。可以上传图像进行预测
- Tab3:模型评估。可以进行mAP评估并可视化结果
- 使用gr.Examples提供了示例配置,方便用户快速上手
- 3个Tab通过gr.Button绑定到对应的函数上,实现交互操作
- 界面提供直观的输入输出显示,同时输出训练日志到console
- 该程序实现了一个友好的RetinaFace模型操作界面,集成了模型的训练、预测、评估等核心功能。
- 通过该界面可以方便地对模型进行调试和测试,降低使用门槛,具有很好的可视化和交互性。
总体来说,本代码利用gradio实现了一个RetinaFace模型操作的可视化交互界面,具有训练、预测、评估等核心功能,可以便捷地使用和调试模型。
import gradio as gr
from retinaface_trainer import RetinaFaceTrainer
from enpredict import detect_image
from eneva import test
def train_retinaface(Cuda=True, training_dataset_path='./data/widerface/train/label.txt',
backbone="mobilenet", pretrained=False, model_path='',
Freeze_Train=True, num_workers=4):
trainer = RetinaFaceTrainer(Cuda, training_dataset_path, backbone, pretrained, model_path, Freeze_Train,
int(num_workers))
trainer.freeze_train()
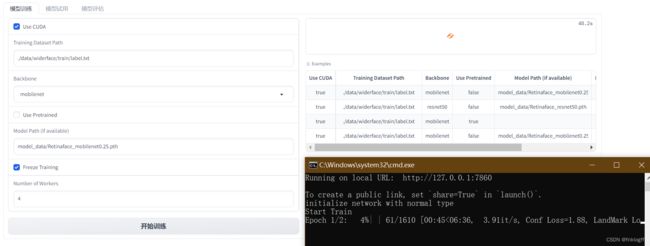
return "训练结束,具体情况请在控制台中查看"
def detect_image_change(image, model_path, backbone):
image_path = image.name
model_path = model_path.name
temp_img_path = "output/result.jpg"
result = detect_image(image_path, model_path, backbone, temp_img_path)
return result
def evaluation_test(model_path, backbone):
model_path = model_path.name
img_path_1, img_path_2 = test(model_path, backbone)
print(img_path_1, img_path_2)
return img_path_1, img_path_2
if __name__ == "__main__":
with gr.Blocks() as demo:
# 顶部文字
gr.Markdown("""
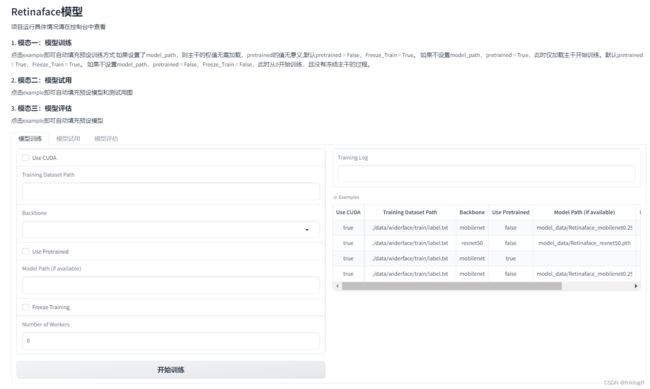
# Retinaface模型
项目运行具体情况请在控制台中查看
### 1. 模态一:模型训练
点击example即可自动填充预设训练方式
如果设置了model_path,则主干的权值无需加载,pretrained的值无意义,默认pretrained = False,Freeze_Train = True。
如果不设置model_path,pretrained = True,此时仅加载主干开始训练。默认pretrained = True,Freeze_Train = True。
如果不设置model_path,pretrained = False,Freeze_Train = False,此时从0开始训练,且没有冻结主干的过程。
### 2. 模态二:模型试用
点击example即可自动填充预设模型和测试用图
### 3. 模态三:模型评估
点击example即可自动填充预设模型
""")
with gr.Tabs():
with gr.TabItem("模型训练"):
# 一行 两列 左边一列是输入 右边一列是输出
with gr.Row():
with gr.Column(): # 左边一列是输入
use_cuda = gr.Checkbox(label="Use CUDA")
dataset_path = gr.Textbox(label="Training Dataset Path")
backbone = gr.Dropdown(['mobilenet', 'resnet50'], label="Backbone")
use_pretrained = gr.Checkbox(label="Use Pretrained")
model_path = gr.Textbox(label="Model Path (if available)")
freeze_training = gr.Checkbox(label="Freeze Training")
num_workers = gr.Number(label="Number of Workers")
with gr.Row():
train_button = gr.Button("开始训练")
with gr.Column():
x_output = gr.Textbox(label="Training Log")
gr.Examples(
examples=[[True,
'./data/widerface/train/label.txt',
"mobilenet",
False,
'model_data/Retinaface_mobilenet0.25.pth',
True,
4],
[True,
'./data/widerface/train/label.txt',
"resnet50",
False,
'model_data/Retinaface_resnet50.pth',
True,
4],
[True,
'./data/widerface/train/label.txt',
"mobilenet",
True,
'',
True,
4],
[True,
'./data/widerface/train/label.txt',
"mobilenet",
False,
'model_data/Retinaface_mobilenet0.25.pth',
False,
4],
],
inputs=[use_cuda, dataset_path, backbone, use_pretrained,
model_path, freeze_training, num_workers])
train_button.click(fn=train_retinaface,
inputs=[use_cuda, dataset_path, backbone, use_pretrained,
model_path, freeze_training, num_workers],
outputs=x_output)
with gr.TabItem("模型试用"):
# 一行 两列 左边一列是输入 右边一列是输出
with gr.Row():
with gr.Column(): # 左边一列是输入
image_input = gr.File(label="Image")
model_input = gr.File(label="model_path")
bone_input = gr.Dropdown(['mobilenet', 'resnet50'], label="Backbone")
# 生成、重置按钮(row:行)
with gr.Row():
image_button = gr.Button("生成")
with gr.Column(): # 右边一列是输出
# 输出框
image_output = gr.Image(label="Output Image")
# 样例框
gr.Examples(
examples=[
["model_data/Retinaface_mobilenet0.25.pth", "mobilenet"],
["model_data/Retinaface_resnet50.pth", 'resnet50'],
["logs/Epoch1-Total_Loss7.8133.pth", "mobilenet"],
["logs/Epoch1-Total_Loss16.7059.pth", "mobilenet"],
["logs/Epoch1-Total_Loss18.3385.pth", "mobilenet"],
["logs/Epoch1-Total_Loss22.6031.pth", "mobilenet"],
["logs/Epoch1-Total_Loss28.5903.pth", "mobilenet"],
],
inputs=[model_input, bone_input]
)
# 样例框
gr.Examples(
examples=[
"img/street.jpg",
"img/timg.jpg"
],
inputs=[image_input]
)
image_button.click(fn=detect_image_change,
inputs=[image_input, model_input, bone_input],
outputs=image_output),
with gr.TabItem("模型评估"):
# 一行 两列 左边一列是输入 右边一列是输出
with gr.Row():
with gr.Column(): # 左边一列是输入
test_model_input = gr.File(label="model_path")
test_bone_input = gr.Dropdown(['mobilenet', 'resnet50'], label="Backbone")
# 生成、重置按钮(row:行)
with gr.Row():
eva_button = gr.Button("测试")
with gr.Column(): # 右边一列是输出
# 输出框
test_image_output_1 = gr.Image(label="Output Image")
test_image_output_2 = gr.Image(label="Output Image")
# 样例框
gr.Examples(
examples=[
["model_data/Retinaface_mobilenet0.25.pth", "mobilenet"],
["model_data/Retinaface_resnet50.pth", 'resnet50'],
["logs/Epoch1-Total_Loss7.8133.pth", "mobilenet"],
["logs/Epoch1-Total_Loss16.7059.pth", "mobilenet"],
["logs/Epoch1-Total_Loss18.3385.pth", "mobilenet"],
["logs/Epoch1-Total_Loss22.6031.pth", "mobilenet"],
["logs/Epoch1-Total_Loss28.5903.pth", "mobilenet"],
],
inputs=[test_model_input, test_bone_input]
)
eva_button.click(fn=evaluation_test,
inputs=[test_model_input, test_bone_input],
outputs=[test_image_output_1, test_image_output_2]),
demo.launch()
运行环境
打包方式基于
半自动化使用.bat手动打包迁移python项目
- Python 3.8
- OpenCV
- Pytorch
- dlib
- gradio
rem 创建虚拟环境
python -m venv venv
call venv\Scripts\activate.bat
python -m pip install -i https://mirrors.aliyun.com/pypi/simple/ --upgrade pip setuptools
pip install dlib-19.19.0-cp38-cp38-win_amd64.whl.whl
pip install -i https://mirrors.aliyun.com/pypi/simple/ opencv-python==4.5.3.56
pip install torch-1.7.1+cu110-cp38-cp38-win_amd64.whl
pip install torch==1.7.1+cu110 torchvision==0.8.2+cu110 torchaudio==0.7.2 -f https://download.pytorch.org/whl/torch_stable.html
pip install -i https://mirrors.aliyun.com/pypi/simple/ gradio
pip install -i https://mirrors.aliyun.com/pypi/simple/ scikit-learn
pip install -i https://mirrors.aliyun.com/pypi/simple/ -r requirements.txt
requirements.txt
scipy==1.7.1
numpy==1.21.2
matplotlib==3.4.3
opencv_python==4.5.3.56
torch==1.7.1
torchvision==0.8.2
tqdm==4.62.2
Pillow==8.3.2
h5py==2.10.0
总结
该文档概括了项目的功能,避免逻辑重复,同时提炼出主要的参数和函数,可以帮助用户快速理解和使用。