vue+docxtemplater实现读取word文档,根据后端数据生成echarts图表插入word,并下载为docx格式文件
一、需求
word自带的图表不能满足需求,并且编写过程繁琐,需要写一个页面,主要功能是能读取服务器的word模板,根据后台给的数据,自动生成echarts图表并插入到word指定位置,然后点击能下载插入echarts后的最新word文档,实现数据更新就生成新的word表格,节省人力和时间。其次附带的一些功能,比如预览,类似ctrl+f的检索,批注内容什么的,记录一下问题。
二、效果(demo)
这里只是实现大体效果, 页面样式没有设计
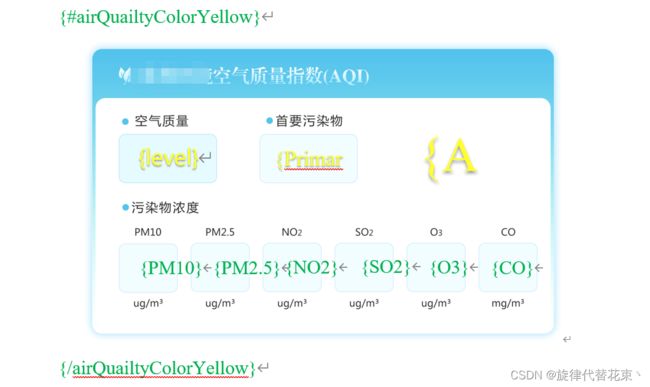
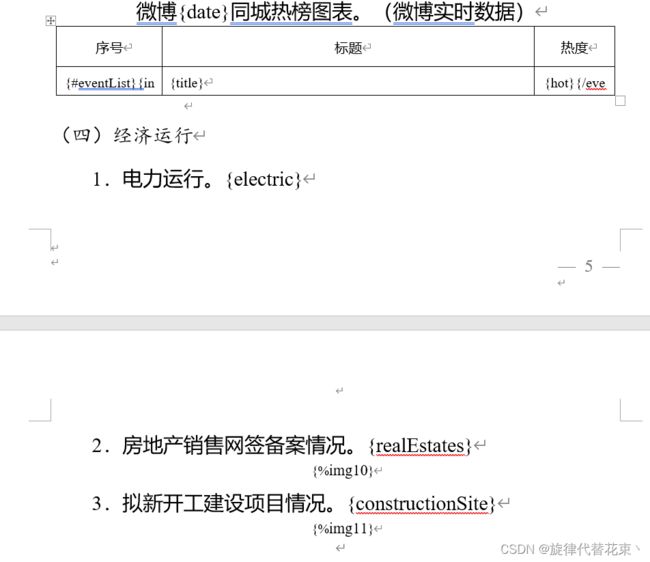
1.1 word模板部分示例:
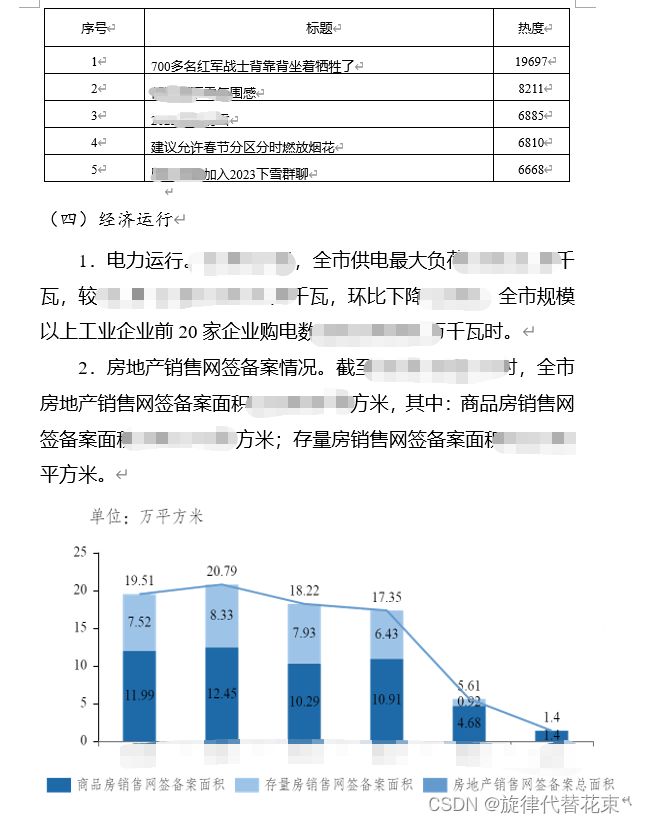
1.2 导出之后的word:
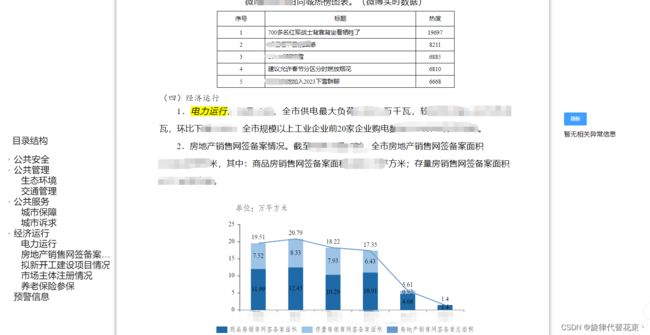
1.3 页面预览效果(左侧目录,中间预览,右侧批注,实现目录检索并对位添加批注):
三、实现
1.1 需要安装的包
//-- 安装 docxtemplater
npm install docxtemplater pizzip  --save
//-- 安装 jszip-utils
npm install jszip-utils --save
//-- 安装 jszip
npm install jszip --save
//-- 安装 FileSaver
npm install file-saver --save
//安装 docxtemplater-image-module-free
npm install --save docxtemplater-image-module-free
//安装PizziP
npm install pizzip --save
//docx-preview预览插件
npm i docx-preview --save
//字体包载入监测插件
npm i FontFaceObserver
1.2 需要引入的相关文件和包
import PizZip from ‘pizzip’;
import docxtemplater from ‘docxtemplater’;
import JSZipUtils from ‘jszip-utils’;
import { defaultOptions, renderAsync } from ‘docx-preview’;
import { saveAs } from ‘file-saver’;
//请求数据的api
import { getTreeData, getTextData, getChartsData, searchLocal, getCommentsInfo, updateSubDocx } from ‘./api/api.js’;
import FontFaceObserver from ‘fontfaceobserver’;
const echarts = require(‘echarts/lib/echarts’);
require(‘echarts/lib/component/tooltip’);
require(‘echarts/lib/component/legend’);
require(‘echarts/lib/chart/pie’);
import * as charts from ‘./charts’;
import axios from ‘axios’;
import Moment from ‘moment’;
1.3 主要功能块
1.3.1 预览功能
    //日报刷新
    view() {
        let ImageModule = require('docxtemplater-image-module-free');
        // 点击导出word
        let _this = this;
        // 读取并获得模板文件的二进制内容,本地的模板就放在public下面,然后直接写文件名就可以读取到
        //服务器的文件,就需要一个可以访问的地址,如:http:192.168.1.1:12034/doc/xxxxxxx.docx
        JSZipUtils.getBinaryContent('xxxxxxx.docx', function (error, content) {
            if (error) {
                throw error;
            }
            let opts = {};
            opts.centered = true;
            opts.fileType = 'docx';
            opts.getImage = function (chartId) {
                return _this.base64DataURLToArrayBuffer(chartId);
            };
            opts.getSize = function () { //设置预览和导出的echarts尺寸为650*350
                return [650, 350];
            };
            let imageModule = new ImageModule(opts);
            let zip = new PizZip(content);
            let doc = new docxtemplater();
            doc.attachModule(imageModule);
            doc.loadZip(zip);
            let urlList = [];
            //后端数据处理后形成的charts数据(多个图表的集合),其中chartsUrl是初始化echarts后,调用getDataURL方法得到的url链接
            //chartsUrl = myChart.getDataURL({pixelRatio: 2});
            _this.chartData.map((i, index) => {
                _this.$set(urlList, `img${i.type}`, i.chartsUrl);
            });
            doc.setData({
             //后台返回的文字字段信息 ,对应模板的字段,
             //示例:{electric:'全市供电最大负荷100000万千瓦,.........',eventList:[title:'700多名红军战士背靠背坐着牺牲了',hot:19697,index:1]}
                ..._this.fieldInfo,
                //echarts生成的url列表
                ...urlList,
                periodsNum
            });
            try {
                doc.render();
                // doc.render(_this.wordContentData).then(() => {
                // });
            } catch (error) {
                let e = {
                    message: error.message,
                    name: error.name,
                    stack: error.stack,
                    properties: error.properties
                };
                throw error;
            }
            _this.outFiles = doc.getZip().generate({
                type: 'blob',
                mimeType: 'application/vnd.openxmlformats-officedocument.wordprocessingml.document'
            });
            renderAsync(_this.outFiles, document.getElementById('dailyContent'));   //页面渲染
            _this.isAll = true;
            _this.getCommentsInfo('');//接口获取批注的信息
        });
    },
	// base64转arrayBuffer
    base64DataURLToArrayBuffer(dataURL) {
        const base64Regex = /^data:image\/(png|jpg|svg|svg\+xml);base64,/;
        if (!base64Regex.test(dataURL)) {
            return false;
        }
        const stringBase64 = dataURL.replace(base64Regex, '');
        let binaryString;
        if (typeof window !== 'undefined') {
            binaryString = window.atob(stringBase64);
        } else {
            binaryString = new Buffer(stringBase64, 'base64').toString('binary');
        }
        const len = binaryString.length;
        const bytes = new Uint8Array(len);
        for (let i = 0; i < len; i++) {
            const ascii = binaryString.charCodeAt(i);
            bytes[i] = ascii;
        }
        return bytes.buffer;
    },
1.3.2 下载功能
//导出
exportWord() {
    let month = new Date().getMonth() + 1;
    let date = new Date().getDate();
    saveAs(this.outFiles, `xxxxxx日报第${this.fieldInfo.num}期-${month}月${date}日.docx`);
},
1.3.3树形搜索和右侧批注生成
实际上是实现了类似ctrl+f的功能, 点击目录,在渲染好的数据里面, 查找关键字,用新的带颜色的标签替换掉原来的标签,这样就有了颜色,再使用scrollIntoView()方法跳转到搜索结果的第一个,同时请求批注接口,拿到批注后设置批注的位置与标颜色的关键字等高,
search(value, data) {
   let main = document.querySelector('.dailyContent'); //中间预览的容器
   let innerHTML = main.innerHTML;
   // 每次搜索之前都需要将em替换回来,不然就会出现em里面套em的情况而导致em数量一直叠加
   let emReg1 = new RegExp('', 'g');
   innerHTML = innerHTML.replace(emReg1, '');
   let emReg2 = new RegExp('', 'g');
   innerHTML = innerHTML.replace(emReg2, '');
   // 设置搜索背景色,同时添加class为ele
   if (value.label != '') {
       let reg = new RegExp(value.label, 'g');
       innerHTML = innerHTML.replace(reg, '' + value.label + '');
   }
   // 替换配置
   main.innerHTML = innerHTML;
   let ele = document.querySelector('.ele');
   //必须能拿到元素,才能调用scrollIntoView()方法,不然会报错
   if (ele) {
       ele.scrollIntoView(true);
       this.isSearch = true;
       document.documentElement.scrollTop -= 150; //scrollIntoView()方法后可能位置有偏差,根据情况做一些调整
       if (value.isLeaf) {//判断是不是子目录,子目录才有批注
           this.isAll = false;
           this.searchType = data.type;
           this.isAll = false;
           this.getCommentsInfo(this.searchType);
       }
       let comments = document.querySelector('.comments'); //获取批注的容器,设置容器的位置
       comments.style.top = ele.offsetTop + 280 + 'px';
   }
},
四、问题总结
1.关于模板
1.1 下载下来的word文字大小,字体,行间距等样式都完全是根据模板文件来的,所以说模板的样式要求很高,如果渲染的格式出问题,多半都是因为模板不规范。
1.2 模板的一些语法,必须要了解,主要有以下几种
-
循环渲染,对应的数据为数组 alarmList:[{title:‘xxxx’,description:‘xxxxxxx’}]

-
条件渲染 括号内#开头,/结尾,airQuailtyColorYellow的值只能为true或者false,true则渲染下面的内容,false则不渲染

2.echarts相关
2.1 echarts外部字体引入之后, 设置fontFamily后没有效果,因为渲染echarts的时候,字体文件可能还没有引入进来,我开始使用了document.fonts.ready.then(()=>{}) 判断加载完成再初始化echarts,发现没有作用,后面使用了监测字体是否加载完成的插件FontFaceObserver,等所有字体加载完成再执行初始化
let fontA = new FontFaceObserver('fzfs_GBK');
let fontB = new FontFaceObserver('TimesNewRoman');
Promise.all([fontA.load(), fontB.load()]).then(() => {
    this.initLineCharts();
});
2.2 折线图,柱状图,各种混合图label的数值重叠,简单点就设置字号,透明度,偏移。提供一种思路就是使用series中的labelLayout函数,判断同一x轴位置上,柱1与柱2的差值,大于或者等于0,即柱子更高的,label更靠上(返回的dx,dy代表了位置,dy为负数且越小,则label离柱子约远)
2.3 echarts横坐标的汉字和数字分开设置不同的字体,例如x轴为 01月01日,01月02日…,需要汉字为仿宋,数字为新罗马
axisLabel: {
    interval: 0,
    rich: {
      rich_Acenter: {
        color: '#000',
        fontFamily: 'fzfs_GBK',
        fontSize: 12,
      },
      rich_Bcenter: {
        color: 'rgba(89,89,89,1)',
        fontFamily: 'TimesNewRoman',
        fontSize: 12,
      },
    },
    formatter: function (params) {
      var arr = [];
      var tmp = '';
      for (var i = 0; i < params.length; i++) {
        if (params.charAt(i) >= '0' && params.charAt(i) <= '9') {
          tmp += params.charAt(i);
        } else {
          //三种情况,这里判断非空的情况
          if (tmp) {
            arr.push(tmp);
            tmp = '';
          }
        }
      }
      //最后一位索引是数字,需额外判断
      if (tmp) {
        arr.push(tmp);
        tmp = '';
      }
      return `{rich_Bcenter|${arr[0]}}` + `{rich_Acenter|月}` +`{rich_Bcenter|${arr[1]}}` + `{rich_Acenter|日}`
    },
  },
3.本地模板读取和服务器模板读取
JSZipUtils.getBinaryContent(‘xxxxxx.docx’,(error,content)=>{})
本地模板,只需要把文件放入public目录下
服务器模板,则需要一个可访问的服务器地址,可以打印回调函数的error信息,如果出现引入报错, 极有可能是文件格式不正确
4.代码执行的先后问题
很多时候,需要按顺序来执行代码,否则会出现很多拿不到数据,拿不到dom元素的情况,这里进入页面就自动生成预览,顺序为请求完所有的数据,载入字体后,初始化echarts,读取模板,添加模板数据,渲染页面,多使用Promise.all, $nextTick(),尽量避免使用定时器。
后期可能还会有模板拆分,历史预览和下载这些功能,遇到了问题再总结


