C# wpf 实现任意控件(包括窗口)更多拖动功能
系列文章目录
第一章 Grid内控件拖动
第二章 Canvas内控件拖动
第三章 任意控件拖动
第四章 窗口拖动
第五章 附加属性实现任意拖动
第六章 拓展更多拖动功能(本章)
文章目录
- 系列文章目录
- 前言
- 一、添加的功能
-
- 1、任意控件MoveTo
- 2、任意控件DragMove
- 3、边界限制
- 4、窗口最大化拖动还原
- 5、拖动事件
- 二、完整代码
- 三、使用示例
-
- 1、MoveTo
- 2、DragMove
- 3、边界限制
- 4、窗口最大化拖动还原
- 5、拖动事件
- 总结
前言
上一章我们以及实现了任意控件统一的拖动功能,以及能够方便的给任意控件添加拖动了。开发过程中发现还是有些功能可以继续拓展的,比如cs代码中移动控件、响应事件后触发拖动、限制拖动范围等功能。
一、添加的功能
在第五章基础上添加了如下功能。
1、任意控件MoveTo
这个功能相对简单,对不同类型的容器进行判断区分不同的移动逻辑即可。
代码示例如下:
/// 在拓展一个获取位置的方法,方便MoveTo使用
/// 2、任意控件DragMove
我们知道wpf的Window有DragMove功能,在鼠标左键按下事件中调用此方法就能实现拖动功能很方便。任意控件的DragMove也是可以实现的,我们需要使用第五章的DragMoveable对象结合手动触发事件来实现。
代码示例如下:
/// 3、边界限制
添加一个IsMoveInBounds附加属性,表示拖动范围是否在父控件内。
代码示例如下:
public static bool GetIsMoveInBounds(DependencyObject obj)
{
return (bool)obj.GetValue(IsMoveInBoundsProperty);
}
public static void SetIsMoveInBounds(DependencyObject obj, bool value)
{
obj.SetValue(IsMoveInBoundsProperty, value);
}
/// 在第五章 附加属性实现任意拖动的拖动逻辑中添加相应的限制功能,比如Canvas的示例如下:
var p = _parent as Canvas;
if (GetIsMoveInBounds(c))
//修正移动范围
{
    if (left < 0) left = 0;
    if (top < 0) top = 0;
    if (left + c.ActualWidth > p.ActualWidth) left = p.ActualWidth - c.ActualWidth;
    if (top + c.ActualHeight > p.ActualHeight) top = p.ActualHeight - c.ActualHeight;
}
4、窗口最大化拖动还原
Windows系统的窗口最大化拖动标题时会自动恢复为普通状态的窗口,实现无边框窗口后则失去了这个功能,需要自己实现,而且恢复普通状态的窗口的位置还有一定的逻辑。
代码示例如下:
if (window.WindowState == WindowState.Maximized)
//最大化时拖动逻辑
{
    //恢复为普通窗口
    window.WindowState = WindowState.Normal;
    double width = SystemParameters.PrimaryScreenWidth;//得到屏幕整体宽度
    double height = SystemParameters.PrimaryScreenHeight;//得到屏幕整体高度
    //根据鼠标的位置调整窗口位置,基本逻辑是横向为鼠标为中点,纵向为鼠标顶部,超出屏幕范围则修正到靠近的那一边。
}
5、拖动事件
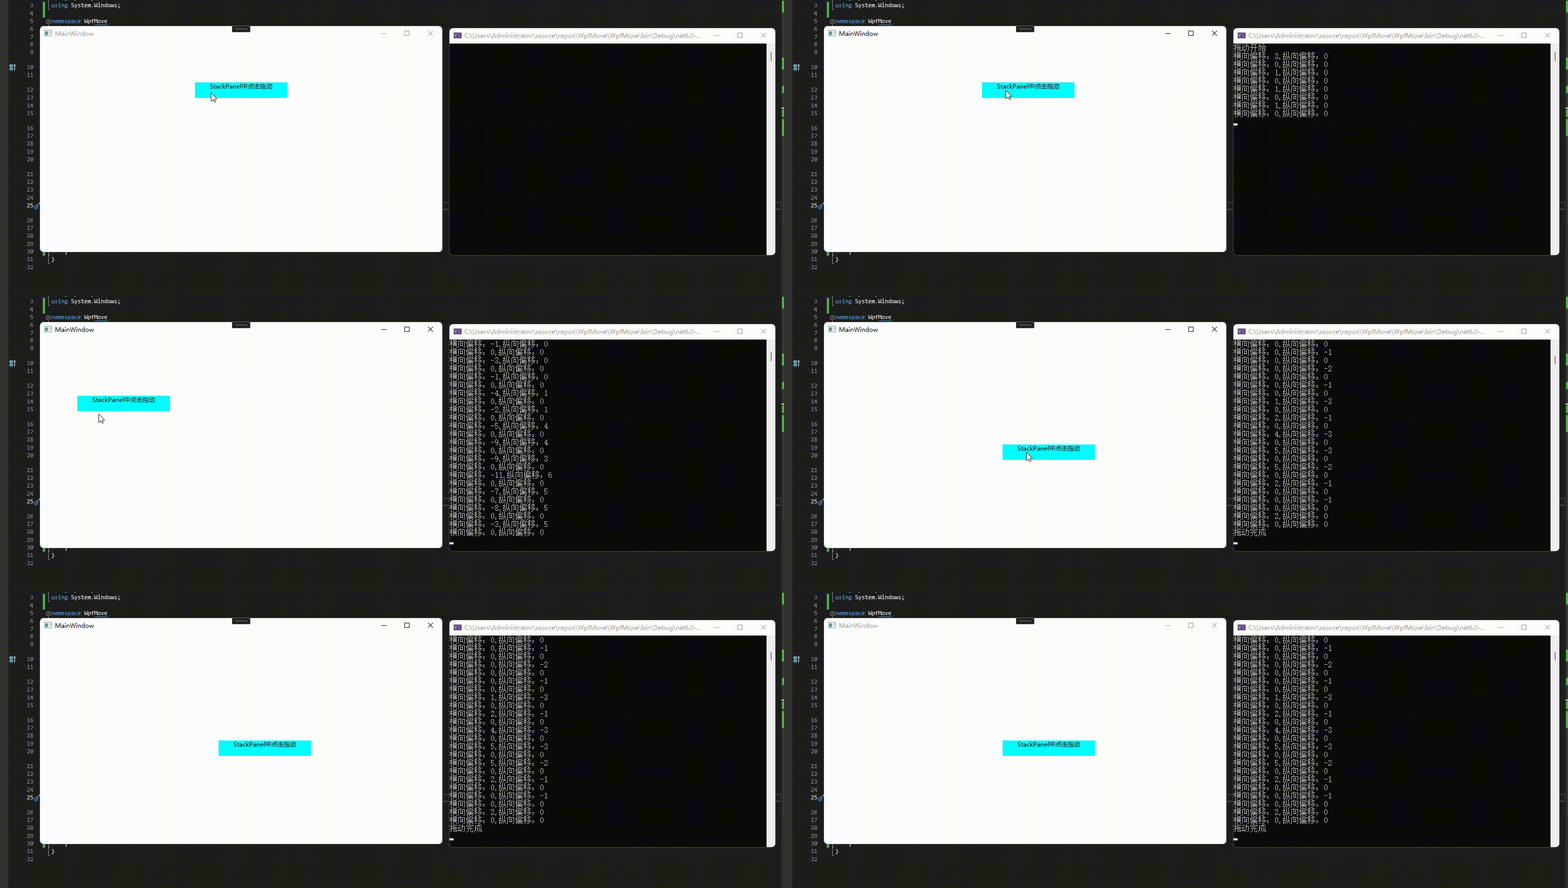
提供3个拖动事件,拖动结束、拖动变化、拖动结束。
代码示例如下:
/// 二、完整代码
vs2022 wpf .net 6.0 项目,包含了第五章的功能,不需要重复下载。
https://download.csdn.net/download/u013113678/88513646
三、使用示例
由于本章是第五章的拓展,基本功能可以参考第五章。
1、MoveTo
xaml
<Window x:Class="WpfMove.MainWindow"
        xmlns="http://schemas.microsoft.com/winfx/2006/xaml/presentation"
        xmlns:x="http://schemas.microsoft.com/winfx/2006/xaml"
        xmlns:d="http://schemas.microsoft.com/expression/blend/2008"
        xmlns:mc="http://schemas.openxmlformats.org/markup-compatibility/2006"
        xmlns:local="clr-namespace:WpfMove"
        mc:Ignorable="d"
        Title="MainWindow" Height="450" Width="800"
        >
    <Grid>
        <Button Width="180" Height="30" Click="Button_Click">Gird中点击按钮右移10Button>
        <StackPanel>
            <Button Width="180" Height="30" Click="Button_Click">StackPanel中点击按钮右移10Button>
        StackPanel>
        <Canvas>
            <Button Width="180" Height="30" Click="Button_Click">Canvas中点击按钮右移10Button>
        Canvas>
    Grid>
Window>
因为是拓展方法,所以获取到控件对象直接调用moveTo即可。
cs
using AC;
using System.Windows;
using System.Windows.Media;
namespace WpfMove
{
/// 2、DragMove
xaml
<Window x:Class="WpfMove.MainWindow"
        xmlns="http://schemas.microsoft.com/winfx/2006/xaml/presentation"
        xmlns:x="http://schemas.microsoft.com/winfx/2006/xaml"
        xmlns:d="http://schemas.microsoft.com/expression/blend/2008"
        xmlns:mc="http://schemas.openxmlformats.org/markup-compatibility/2006"
        xmlns:local="clr-namespace:WpfMove"
        mc:Ignorable="d"
        Title="MainWindow" Height="450" Width="800"
        >
    <Grid>
        <TextBlock Background="Aqua" TextAlignment="Center" Margin="0,80,0,0" Width="180" Height="30"  MouseDown="TextBlock_MouseDown" >Gird中点击拖动TextBlock>
        <StackPanel>
            <TextBlock Background="Aqua" TextAlignment="Center" Margin="0,80,0,0" Width="180" Height="30"  MouseDown="TextBlock_MouseDown" >StackPanel中点击拖动TextBlock>
        StackPanel>
        <Canvas >
            <TextBlock Background="Aqua" TextAlignment="Center" Margin="0,80,0,0" Width="180" Height="30"  MouseDown="TextBlock_MouseDown" >Canvas中点击拖动TextBlock>
        Canvas>
    Grid>
Window>
此方法也是拓展方法,在鼠标按下事件中任意控件都可以调用此方法,可以通过await等待拖动完成。
cs
using AC;
using System;
using System.Windows;
namespace WpfMove
{
/// 3、边界限制
通过附加属性IsMoveInBounds设置是否限制边界,默认为false。
xaml
<Window x:Class="WpfMove.MainWindow"
        xmlns="http://schemas.microsoft.com/winfx/2006/xaml/presentation"
        xmlns:x="http://schemas.microsoft.com/winfx/2006/xaml"
        xmlns:d="http://schemas.microsoft.com/expression/blend/2008"
        xmlns:mc="http://schemas.openxmlformats.org/markup-compatibility/2006"
        xmlns:local="clr-namespace:WpfMove"
         xmlns:ac="clr-namespace:AC"
        mc:Ignorable="d"
        Title="MainWindow" Height="450" Width="800"
        >
    <Grid>
        <TextBlock HorizontalAlignment="Left" Background="Aqua" TextAlignment="Center" Margin="0,80,0,0" Width="180" Height="60"  ac:Move.IsDragMoveable="True" ac:Move.IsMoveInBounds="True">拖动限制边界TextBlock>
        <TextBlock HorizontalAlignment="Right" Background="Aqua" TextAlignment="Center" Margin="0,80,0,0" Width="180" Height="60" ac:Move.IsDragMoveable="True" ac:Move.IsMoveInBounds="False">拖动不限制边界TextBlock>
    Grid>
Window>
4、窗口最大化拖动还原
内部实现已支持最大化拖动还原,只需要设置窗口可拖动即可,使用场景是无边框窗口自定义标题栏。
xaml
<Window x:Class="WpfMove.MainWindow"
        xmlns="http://schemas.microsoft.com/winfx/2006/xaml/presentation"
        xmlns:x="http://schemas.microsoft.com/winfx/2006/xaml"
        xmlns:d="http://schemas.microsoft.com/expression/blend/2008"
        xmlns:mc="http://schemas.openxmlformats.org/markup-compatibility/2006"
        xmlns:local="clr-namespace:WpfMove"
        xmlns:ac="clr-namespace:AC"
        mc:Ignorable="d"
        WindowStyle="None"
        ResizeMode="NoResize"
        WindowState="Normal"
        Title="MainWindow" Height="450" Width="800"
        x:Name="window"
        >
    <Grid>
        <Border VerticalAlignment="Top" Height="40" Background="#333333" ac:Move.DragMoveTarget="{Binding ElementName= window}"  MouseLeftButtonDown="Border_MouseLeftButtonDown">
            <TextBlock Margin="0,0,10,0" VerticalAlignment="Center" HorizontalAlignment="Right"  Foreground="White" Text="标题栏拖动窗口">TextBlock>
        Border>
    Grid>
Window>
cs
using System.Windows;
namespace WpfMove
{
/// 效果预览
5、拖动事件
xaml
<Window x:Class="WpfMove.MainWindow"
        xmlns="http://schemas.microsoft.com/winfx/2006/xaml/presentation"
        xmlns:x="http://schemas.microsoft.com/winfx/2006/xaml"
        xmlns:d="http://schemas.microsoft.com/expression/blend/2008"
        xmlns:mc="http://schemas.openxmlformats.org/markup-compatibility/2006"
        xmlns:local="clr-namespace:WpfMove"
         xmlns:ac="clr-namespace:AC"
        mc:Ignorable="d"
        Title="MainWindow" Height="450" Width="800"
        >
    <StackPanel>
        <TextBlock Background="Aqua"
                   TextAlignment="Center"
                   Margin="0,80,0,0" Width="180" Height="30"
                   ac:Move.IsDragMoveable="True"
                   ac:Move.DragMoveStarted="window_DragMoveStarted"
                   ac:Move.DragMoveCompleted="window_DragMoveCompleted"
                   ac:Move.DragMoveDelta="window_DragMoveDelta">StackPanel中点击拖动TextBlock>
    StackPanel>
Window>
cs
using AC;
using System;
using System.Windows;
namespace WpfMove
{
/// 总结
以上就是今天要讲的内容,拓展更多的拖动功能后使用变得更加方便了,灵活度也提高了。使用xmal或cs代码都能实现拖动,实现自定义标题栏也变得很简单,有了拖动事件也可以做一些撤销重做的功能。总的来说,本文的拖动功能一定程度可以作为通用的模块在项目中使用了。


