网站首页被篡改? 看我使用PhantomJS利器实现网站自动监控修改并截图发送企业微信预警
欢迎关注「WeiyiGeek」
设为「星标⭐」每天带你 基础入门 到 进阶实践 再到 放弃学习!
涉及 网络安全运维、应用开发、物联网IOT、学习路径 、个人感悟 等知识
“ 花开堪折直须折,莫待无花空折枝。 ”
文章目录:
-
0x00 前言初识
-
1.PhantomJS 介绍
-
2.参考来源
-
-
0x01 PhantomJS 安装
-
1.Windows
-
2.Linux
-
-
0x02 快速使用
-
1.牛刀小试
-
2.DOM 操作并获取元素属性
-
3.网页屏幕截图
-
4.网页站点请求
-
5.简单的Web服务
-
-
0x03 项目实践
-
1.使用Java+phantomjs实现站点截图捕获并将a标签链接标红。
-
2.监控网站主页变化并截图到企业微信预警
-
-
0x0n 入坑出坑
-
问题1.在Ubuntu 22.04中安装phantomjs时报
libproviders.so: cannot open shared object file:错误。
-
0x00 前言初识
1.PhantomJS 介绍
什么是PhantomJS?
Phantomjs(
/ˈfæntəm/js) 是一个基于WebKit库的无头(没有显示界面)的JavaScript API,即像在web浏览器上运行一样,所以标准的DOM脚本和CSS选择器工作正常,用于自动化Web浏览器操作,是一个免费开源的轻量级服务器解决方案。
它可以在Windows、macOS、Linux和FreeBSD上运行, 并且使用QtWebKit作为后端,它为各种web标准提供了快速的本地支持:DOM处理、CSS选择器、JSON、画布和SVG。
PhantomJS有什么用?
它可以用来测试动态内容, 比如 AJAX内容、截屏,以及转换为PDF和原型图,它也可以执行跨浏览器的JavaScript测试,可以模拟网络延迟、网页截屏、页面访问自动化以及捕获网络脚本的错误和警告等。
它不仅是个隐形的浏览器, 还提供了诸如CSS选择器、支持Web标准、DOM操作、JSON、HTML5、Canvas、SVG等,同时也提供了处理文件I/O的操作,从而使你可以向操作系统读写文件等。
简单的说, PhantomJS 适合执行各种页面自动化监控、测试任务等。
2.参考来源
-
官方地址: http://phantomjs.org/
-
PhantomJS GitHub:https://github.com/ariya/phantomjs/
-
PhantomJS官方API:http://phantomjs.org/api/
-
PhantomJS官方示例:http://phantomjs.org/examples/
0x01 PhantomJS 安装
描述: 我们知道 PhantomJS 它可以在 Windows、macOS、Linux和FreeBSD上运行,你可以参考官网中安装说明进行快速安装 (PS: 软件下载地址 https://phantomjs.org/download.html )。
下面会根据使用场景,从最常用的Windows 以及 Linux 系统发行版本里安装PhantomJS流程进行简单说明:
1.Windows
描述:首先我们需要下载 Windows 版本的 PhantomJS 压缩包 , 选择 Windows 运行的版本进行下载然后放在一个指定目录中,例如此处的F:\WeiyiGeek\Tools(建议加上环境变量);
# PowerShell 下载 Phantomjs-2.1.1-windows.zip 并解压
$InstallPath="F:\WeiyiGeek\Tools"
mkdir $InstallPath


$InstallUrl="https://bitbucket.org/ariya/phantomjs/downloads/phantomjs-2.1.1-windows.zip"
$down=New-Object "System.Net.WebClient"
$down.DownloadFile($InstallUrl,"${InstallPath}\phantomjs-2.1.1-windows.zip")
Expand-Archive -Path "${InstallPath}/phantomjs-2.1.1-windows.zip" -DestinationPath $InstallPath -Force


# PowerShell 设置 Phantomjs 的环境变量
$systempath = [System.Environment]::GetEnvironmentVariable("PATH","Machine")
$systempath = $systempath + ";" + $InstallPath + "\phantomjs-2.1.1-windows\bin"
[System.Environment]::setEnvironmentVariable("PATH",$systempath,"Machine")
验证安装:
# 方式1.命令行
phantomjs-2.1.1-windows\bin>phantomjs.exe -v
2.1.1

# 方式2.交互式
phantomjs
phantomjs> phantom.version
{
   "major": 2,
   "minor": 1,
   "patch": 1
}
2.Linux
此处演示在 CentOS7/Ubuntu x64位 (Linux 64-bit)系统中安装 phantomjs 流程,若是其他发行版也可参照安装。
温馨提示: It however still relies on Fontconfig (the package fontconfig or libfontconfig, depending on the distribution). The system must have GLIBCXX_3.4.9 and GLIBC_2.7.
安装脚本:
# 基础依赖软件安装
apt install jq bzip2 || yum install jq bzip2


# 由于其它仍然依赖 Fontconfig 我们还需安装如下依赖(包Fontconfig或libfontconfig,取决于发行版)
if [ -f /etc/redhat-release ]; then
  # 安装字体相关的依赖包并刷新字体缓存
  yum install fontconfig freetype2 -y
  yum install bitmap-fonts bitmap-fonts-cjk -y
  yum groupinstall "fonts" -y
  fc-cache
else
  # 安装系统字体相关工具
  sudo apt update
  sudo apt install -y fontconfig libfreetype6 libfreetype6-dev mkfontscale
  sudo apt-get install build-essential chrpath libssl-dev libxft-dev


  # 拷贝windows字体(C:\Windows\Fonts)至/usr/share/fonts/Windows-Fonts,
  mkdir /usr/share/fonts/Windows-Fonts
  chmod -R 644 /usr/share/fonts/Windows-Fonts && cd /usr/share/fonts/Windows-Fonts
  mkfontscale;mkfontdir;fc-cache
  ln -s /usr/share/fonts/Windows-Fonts /usr/lib/x86_64-linux-gnu/fonts
fi


# 安装解压
cd /tmp
wget https://bitbucket.org/ariya/phantomjs/downloads/phantomjs-2.1.1-linux-x86_64.tar.bz2
tar -jxvf phantomjs-2.1.1-linux-x86_64.tar.bz2
mv phantomjs-2.1.1-linux-x86_64/ /usr/local/src/phantomjs
ln -sf /usr/local/src/phantomjs/bin/phantomjs /usr/local/bin/phantomjs


# 安装测试
phantomjs -v
phantomjs /usr/local/src/phantomjs/examples/hello.js
0x02 快速使用
1.牛刀小试
下面来看一个简单示例, 它是参考整合 PhantomJS 官网 的演示代码,实现终端输出、命令行参数获取、请求指定url获取站点Dom相关信息以及站点任何控制台消息,与输出站点首页截图并保存为域名.png图片。
温馨提示: 下述演示代码都能在 https://github.com/WeiyiGeek/SecOpsDev/tree/master/AutomatedTesting/Web/phantomjs 找到
示例代码:
// hello-PhantomJS.js.js
// 参考地址: https://phantomjs.org/quick-start.html


// 输出文字字符到终端
console.log('Hello, world! PhantomJS Demo!');


// 可以通过创建网页对象来加载、分析和呈现网页。
var page = require('webpage').create(),
system = require('system'),
t, url;


// 传入命令行参数数量检测
if (system.args.length === 1 ) {
  console.log('Usage: hello-PhantomJS.js [some URL]');
  // 终止执行
  phantom.exit();
}
// 获取当前时间
t = Date.now();
// 获取命令行传入的参数
url = system.args[1];


// 使用onConsoleMessage回调显示来自网页的任何控制台消息,即站点console输出的信息。
page.onConsoleMessage = function(msg) {
  console.log('Console output : ' + msg);
};


// 请求访问站点
page.open(url, function(status) {
  if (status !== 'success') {
    console.log('FAIL to load the address : ' + url);
  } else {
    t = Date.now() - t;
    // 使用evaluate获取JS后Dom文档对象
    var title = page.evaluate(function() {
      return document.title;
    });
    console.log("----------------------------------------------")
    console.log("Status: " + status);
    console.log('Loading ' + url + ', Title ' + title );
    console.log('Loading time ' + t + ' msec');
    page.render(url.split("//")[1]+'.png');
  }


  // 终止执行
  phantom.exit();
});
执行结果:
phantomjs-2.1.1-windows\bin> CHCP 65001 // 将当前cmd窗口的当前代码页设置为utf-8
phantomjs-2.1.1-windows\bin> .\phantomjs.exe .\hello-PhantomJS.js https://weiyigeek.top
Hello, world! PhantomJS Demo!
Console output : 电脑
Console output : Welcome to WeiyiGeek'Index Site - [https://www.weiyigeek.top].
花开堪折直须折,莫待无花空折枝!
Console output : %c希望与各位志同道合的朋友一起学习交流,如文章有误请留下您宝贵的知识建议,或者通过邮箱【master#weiyigeek.top】联系我哟! color:white
Console output : %c专栏书写不易,如果您觉得这个专栏还不错的,请给这篇专栏 【点个赞、投个币、收个藏、关个注,转个发】(人间五大情),这将对我的肯定,谢谢支持!(๑′ᴗ‵๑) ❤!color:red
----------------------------------------------
Status: success
Loading https://weiyigeek.top, Title  WeiyiGeek|唯一极客-Geek-IT网络安全技术知识分享-主页站点
Loading time 684 msec
扩展了解
# 网页实例方法与事件
# Suppose you have an instance of the webpage:
var page = require('webpage').create();

# Functions
  page.childFramesCount
  page.childFramesName
  page.close
  page.currentFrameName
  page.deleteLater
  page.destroyed
  page.evaluate
  page.initialized
  page.injectJs
  page.javaScriptAlertSent
  page.javaScriptConsoleMessageSent
  page.loadFinished
  page.loadStarted
  page.openUrl
  page.release
  page.render
  page.resourceError
  page.resourceReceived
  page.resourceRequested
  page.uploadFile
  page.sendEvent
  page.setContent
  page.switchToChildFrame
  page.switchToMainFrame
  page.switchToParentFrame
  page.addCookie
  page.deleteCookie
  page.clearCookies

# Handlers/Callbacks
# List of all the page events:
  onInitialized
  onLoadStarted
  onLoadFinished
  onUrlChanged
  onNavigationRequested
  onRepaintRequested
  onResourceRequested
  onResourceReceived
  onResourceError
  onResourceTimeout
  onAlert
  onConsoleMessage
  onClosing
参考地址: https://phantomjs.org/api/webpage/
温馨提示: 更多的PhantomJS示例尽在 phantomjs-2.1.1-windows\examples 目录之中,文件说明可参考官方文档 (https://phantomjs.org/examples ),大家可以在开发时多多参考。
# Basic examples
  arguments.js shows the arguments passed to the script
  countdown.js prints a 10 second countdown
  echoToFile.js writes the command line arguments to a file
  fibo.js lists the first few numbers in the Fibonacci sequence
  hello.js displays the famous message
  module.js and universe.js demonstrate the use of module system
  outputEncoding.js displays a string in various encodings
  printenv.js displays the system’s environment variables
  scandir.js lists all files in a directory and its subdirectories
  sleepsort.js sorts integers and delays display depending on their values
  version.js prints out PhantomJS version number
  page_events.js prints out page events firing: useful to better grasp page.on* callbacks

# Rendering/rasterization
  colorwheel.js creates a color wheel using HTML5 canvas
  rasterize.js rasterizes a web page to image or PDF
  render_multi_url.js renders multiple web pages to images

# Page automation
  injectme.js injects itself into a web page context
  phantomwebintro.js uses jQuery to read .version element text from phantomjs.org
  unrandomize.js modifies a global object at page initialization
  waitfor.js waits until a test condition is true or a timeout occurs

# Network
  detectsniff.js detects if a web page sniffs the user agent
  loadspeed.js computes the loading speed of a web site
  netlog.js dumps all network requests and responses
  netsniff.js captures network traffic in HAR format
  post.js sends an HTTP POST request to a test server
  postserver.js starts a web server and sends an HTTP POST request to it
  server.js starts a web server and sends an HTTP GET request to it
  serverkeepalive.js starts a web server which answers in plain text
  simpleserver.js starts a web server which answers in HTML

Testing
  run-jasmine.js runs Jasmine based tests
  run-qunit.js runs QUnit based tests

Browser
  features.js detects browser features using modernizr.js
  useragent.js changes the browser’s user agent property
2.DOM 操作并获取元素属性
描述: 使用标准DOM API或jQuery等常用库访问网页并提取信息。
示例代码
// hello-page-automation.js
// DOM 操作,示例演示如何读取跳转后class为post-card-title的元素的textContent属性
// 可以通过创建网页对象来加载、分析和呈现网页。
var page = require('webpage').create(),
system = require('system'),
url,textContent;

// 检查传入命令行参数数量
if (system.args.length === 1 ) {
  console.log('Usage: hello-PhantomJS.js [some URL]');
  phantom.exit();
} else {
  // 获取命令行传入的参数
  url = system.args[1];
}

// 设置 请求的UserAgent
console.log('The default user agent is ' + page.settings.userAgent);
page.settings.userAgent = 'WeiyiGeekAgent';

// 请求访问站点
page.open(url, function(status) {
  console.log("----------------- 分隔线 -------------------------")
  console.log("Status: " + status);
  if (status !== 'success') {
    console.log('Unable to access site : ' + url);
  } else {
  // 渲染延迟200ms时间进行截图,等待网站渲染完成
  setTimeout(function() {
    // 使用evaluate获取JS后Dom文档对象
    textContent = page.evaluate(function() {
      return document.getElementsByClassName("post-card-title")[0].textContent ;
    });
    console.log('textContent :' + textContent );
    // console.log('page plainText : ' + page.plainText);
    page.render(url.split("//")[1]+'.png');
    // 终止执行
    phantom.exit();
  }, 2000);

  console.log('page Title : ' + page.title);
  console.log('page Url : ' + page.url);
  console.log('page Cookies :' + page.cookies[1].name + " : " + page.cookies[1].value);
  console.log('page ZoomFactor : ' + page.zoomFactor);
  console.log('page OfflineStoragePath : ' + page.offlineStoragePath);
  console.log('page LibraryPath : ' + page.libraryPath);

  // 从1.6版开始,您还可以使用page.includeJs将jQuery包含到页面中,如下所示:
  page.includeJs("https://blog.weiyigeek.top/js/jquery/2.1.0-jquery.min.js?v=1.6.6", function() {
    var Title =  page.evaluate(function() {
       // 模拟点击请求
      $("a")[10].click();
      // document.getElementsByTagName('a')[10].click()
       return document.title;
     });
    console.log("Blog Title : " + Title);
  });
  }
});
执行结果:
phantomjs-2.1.1-windows\bin>phantomjs.exe 1.page-automation.js https://weiyigeek.top
The default user agent is Mozilla/5.0 (Windows NT 6.2; WOW64) AppleWebKit/538.1 (KHTML, like Gecko) PhantomJS/2.1.1 Safari/538.1
----------------- 分隔线 -------------------------
Status: success
page Title :  WeiyiGeek|唯一极客-Geek-IT网络安全技术知识分享-主页站点
page Url : https://weiyigeek.top/
page Cookies :Hm_lvt_8bb888f4c802ff4cd2fdbc10d8ab7069 : 1673344341,1673344489,1673344525,1673344554
page ZoomFactor : 1
page OfflineStoragePath : C:/Users/WeiyiGeek/AppData/Local/Ofi Labs/PhantomJS
page LibraryPath : L:/DevOps/自动化测试/模拟浏览器访问/PhantomJS/phantomjs-2.1.1-windows/bin
Blog Title :  WeiyiGeek|唯一极客-Geek-IT网络安全技术知识分享-主页站点
textContent :唯一极客的学习之路汇总

# 通过nginx请求日志可以看到 userAgent 也发生变化了
IP - - [10/Jan/2023:17:56:16 +0800] "GET /2018/1-1-1.html HTTP/1.1" 200 16602 "https://weiyigeek.top/" "WeiyiGeekAgent" "-" rt=0.000 urt=-
IP - - [10/Jan/2023:17:56:17 +0800] "GET /search.xml HTTP/1.1" 200 30200 "https://blog.weiyigeek.top/2018/1-1-1.html" "WeiyiGeekAgent" "-" rt=0.000 urt=-
3.网页屏幕截图
描述: 由于PhantomJS使用的是WebKit,这是一个真正的布局和渲染引擎,它可以将网页捕获为屏幕截图, 因为PhantomJS可以在网页上呈现任何内容,所以它可以用来转换CSS样式的HTML内容,也可以转换SVG、图像和Canvas元素。
实际上在前面的案例中, 我们已经使用 PhantomJS 屏幕截图这一功能, 此处在深入讲解一下导出为pdf格式。
在 examples 子目录,还有一个脚本 rasterize.js 这表明更加完整呈现 PhantomJS 特征, 下述也罗列作者在使用中所遇到过的问题。
如何延迟截图,页面请求的资源,如图片、异步cgi、js等,返回的时间以及执行的长短都是不确定的,如果截图过早,可能很多空白区域,因此需要定时截图,在打开页面后,使用setTimeout来延迟截图
// 片段示例
window.setTimeout(function () {
  page.render("weiyigeek.top.png");
  phantom.exit();
}, 1000);
如何保证网页站点完整截图。
// 设置 viewPortSize 属性设置布局过程的视口大小。
// 在加载页面之前设置首选的初始大小非常有用,例如在“横向”和“纵向”之间进行选择。
page.viewportSize = {width: 1024,height: 720};


// 设置 clipRect 定义要光栅化的网页的矩形区域,若未设置剪切矩形 page.render 将截取处理整个网页。
page.clipRect = {
  top: 14,
  left: 3,
  width: 400,
  height: 300
};


// 设置 paperSize  属性定义呈现为PDF时网页的大小。
// Supported dimension units are: 'mm', 'cm', 'in', 'px'. No unit means 'px'.
page.paperSize = {
  width: '5in',
  height: '7in',
  margin: {
    top: '50px',
    left: '20px'
  }
};


// JS 原生方法获取当前页面尺寸
// 通过BOM方法操作滚动条
window.scrollTo(0,10000);
// 适应的高度
window.document.body.scrollTop = document.body.scrollHeight;
简单示例:
# 站点导出为PDF文件
phantomjs.exe ..\examples\rasterize.js https://blog.weiyigeek.top blog.weiyigeek.pdf


# 多站点导出为png图片
phantomjs.exe ..\examples\render_multi_url.js https://weiyigeek.top https://blog.weiyigeek.top
Rendered 'https://weiyigeek.top' at 'rendermulti-1.png'
Rendered 'https://blog.weiyigeek.top' at 'rendermulti-2.png'


# 站点多尺寸导出为png图片
phantomjs.exe ..\examples\responsive-screenshot.js https://blog.weiyigeek.top
Saving blog.weiyigeek.top/2023-1-11_09-39-25-297_320.png
Saving blog.weiyigeek.top/2023-1-11_09-39-26-934_480.png
Saving blog.weiyigeek.top/2023-1-11_09-39-27-816_768.png
Saving blog.weiyigeek.top/2023-1-11_09-39-28-852_1024.png
Saving blog.weiyigeek.top/2023-1-11_09-39-33-267_1200.png
4.网页站点请求
由于PhantomJS允许检查网络流量,因此它适合于对网络行为和性能进行各种分析,可以使用onResourceRequested和onResourceReceived嗅探所有资源请求和响应。脚本netlog.js中说明了记录每个请求和响应的一个非常简单的示例:
// 示例
var page = require('webpage').create();
page.onResourceRequested = function(request) {
  console.log('Request ' + JSON.stringify(request, undefined, 4));
};
page.onResourceReceived = function(response) {
  console.log('Receive ' + JSON.stringify(response, undefined, 4));
};
page.open(url);
简单示例:
# 以HAR格式捕获网络流量,并且可以导入到 har views 进行可视化查看
phantomjs.exe ..\examples\netsniff.js https://www.weiyigeek.top


# 输出站点请求等待、传输的时间
timings: {
  blocked: 0,
  dns: -1,
  connect: -1,
  send: 0,
  wait: startReply.time - request.time,
  receive: endReply.time - startReply.time,
  ssl: -1
}


# 转储所有网络请求和响应
phantomjs.exe ..\examples\netlog.js https://weiyigeek.top | more
requested: {
    "headers": [
        {
            "name": "Accept",
            "value": "text/html,application/xhtml+xml,application/xml;q=0.9,*/*;q=0.8"
        },
        {
            "name": "User-Agent",
            "value": "Mozilla/5.0 (Windows NT 6.2; WOW64) AppleWebKit/538.1 (KHTML, like Gecko) PhantomJS/2.1.1 Safari/538.1"
        }
    ],
    "id": 1,
    "method": "GET",
    "time": "2023-01-11T01:46:10.579Z",
    "url": "https://weiyigeek.top/"
}
received: {
    "body": "",
    "bodySize": 14489,
    "contentType": "text/html; charset=utf-8",
    "headers": [
        {
            "name": "Server",
            "value": "nginx"
        },
....
}
导入示例1生成的HAR到可视化viewer显示:

5.简单的Web服务
使用 PhantomJS 我们很容易实现一个 Web Server, 看到这里是不是感觉好强大,下面我们来实践看看。
"use strict";
var port, server, service,
system = require('system');
if (system.args.length !== 2) {
console.log('Usage: simpleserver.js ');
phantom.exit(1);
} else {
port = system.args[1];
// 注意,此处使用依赖 webserver API ,其使用方法请参考官网 API
server = require('webserver').create();
service = server.listen(port, function (request, response) {
console.log('Request at ' + new Date());
console.log(JSON.stringify(request, null, 4));
response.statusCode = 200;
response.headers = {
'Cache': 'no-cache',
'Content-Type': 'text/html'
};
response.write('');
response.write('');
response.write('Hello, world! ');
response.write('');
response.write('');
response.write('This is from PhantomJS web server.
');
response.write('Request data:
');
response.write('' + JSON.stringify(request, null, 4)+'
');
response.write('response data:
');
response.write('' + JSON.stringify(response, null, 4)+'
');
response.write('');
response.write('');
response.close();
});
if (service) {
console.log('Web server running on port ' + port);
} else {
console.log('Error: Could not create web server listening on port ' + port);
phantom.exit();
}
// 自己请求自己
var url = "http://localhost:" + port + "/foo/bar.php?asdf=true";
console.log("SENDING REQUEST TO:");
console.log(url);
page.open(url, function (status) {
if (status !== 'success') {
console.log('FAIL to load the address');
} else {
console.log("GOT REPLY FROM SERVER:");
console.log(page.content);
}
phantom.exit();
});
} 
0x03 项目实践
1.使用Java+phantomjs实现站点截图捕获并将a标签链接标红。
此处,在Windows平台下实践,当然Linux下执行也是没有问题的,你可以需要安装相应的java环境而已。
2.screen-capture.js 示例文件:
// # @Filename: 2.screen-capture.js
// # @Author: WeiyiGeek
// # @Description: 指定网页站点截取并生成pdf与png两种格式
// # @Create Time: 2023年1月11日 12:39:06
// # @Last Modified time: 2023年1月11日 12:39:09
// # @E-mail: [email protected]
// # @Blog: https://www.weiyigeek.top
// # @wechat: WeiyiGeeker
// # @Github: https://github.com/WeiyiGeek/SecOpsDev/AutomatedTesting/Web/phantomjs

var page = require('webpage').create(),
system = require('system'),
url,outputType,size,nowTime;

if( system.args.length == 1 ){
  console.log("Usage: screen-capture.js url [png|pdf] [paperwidth*paperheight|paperformat] [zoom]")
  console.log('  paper (pdf output) examples: "5in*7.5in", "10cm*20cm", "A4", "Letter"');
  console.log('  image (png/jpg output) examples: "1920px" entire page, window width 1920px');
  console.log('                                   "800px*600px" window, clipped to 800x600');
  phantom.exit();
}else{
  url = system.args[1];
  outputType = system.args[2];

  nowTime = Date.now();

  // 默认宽度与高度
  pageWidth = 1024;
  pageHeight = 720;
  page.viewportSize = { width: pageWidth, height: pageHeight };

  if (system.args.length > 3 && outputType === "pdf") {
    size = system.args[3].split('*');
    page.paperSize = size.length === 2 ? { width: size[0], height: size[1], margin: '0px' }
                                       : { format: 'A4', orientation: 'portrait', margin: '1cm' };
  } else if (system.args.length > 3 && system.args[3].substr(-2) === "px") {
    size = system.args[3].split('*');
    if (size.length === 2) {
      pageWidth = parseInt(size[0], 10);
      pageHeight = parseInt(size[1], 10);
      page.viewportSize = { width: pageWidth, height: pageHeight };
      // page.clipRect = { top: 0, left: 0, width: pageWidth, height: pageHeight };
      page.clipRect = { top: 0, left: 0, width: pageWidth };
    } else {
      console.log("size:", system.args[3]);
      pageWidth = parseInt(system.args[3], 10);
      pageHeight = parseInt(pageWidth * 3/4, 10); // it's as good an assumption as any
      console.log ("pageHeight:",pageHeight);
      page.viewportSize = { width: pageWidth, height: pageHeight };
    }
  }

  if (system.args.length > 4) {
    page.zoomFactor = system.args[4];
  }

  // 请求指定站点函数
  page.open(url, function (status){
  if (status != "success"){
    console.log('FAIL to load the address');
    phantom.exit();
  } else {
    // 请求站点目标页面上下文环境
    page.evaluate(function(){
      //滚动到底部
      window.scrollTo(0,document.body.scrollHeight);

      // DOM 操作给所有A标签加上一个边框
      window.setTimeout(function(){
        var plist = document.querySelectorAll("a");
        var len = plist.length;
        while(len)
        {
            len--;
            var el = plist[len];
            el.style.border = "1px solid red";
        }
      }, 2000);
  });

    window.setTimeout(function (){
      // 在本地生成截图以及PDF
      filename = url.split("//")[1]+"_"+nowTime+"."+outputType;
      page.render(filename);
      console.log("Output : " + filename);
      // 打印html内容
      // console.log(page.content);
      phantom.exit();
    }, 3000);
    };
  });
}
命令行执行:
> phantomjs.exe 2.screen-capture.js
Usage: screen-capture.js url [png|pdf|jpeg|bmp|ppm|gif] [paperwidth*paperheight|paperformat] [zoom]
  paper (pdf output) examples: "5in*7.5in", "10cm*20cm", "A4", "Letter"
  image (png/jpg output) examples: "1920px" entire page, window width 1920px
                                   "800px*600px" window, clipped to 800x600

> phantomjs.exe 2.screen-capture.js https://blog.weiyigeek.top/2018/1-1-1.html png 1024px*720px
Output : blog.weiyigeek.top/2018/1-1-1.html_1673407992804.png

> phantomjs.exe 2.screen-capture.js https://blog.weiyigeek.top/2018/1-1-1.html pdf 1024px*720px
Output : blog.weiyigeek.top/2018/1-1-1.html_1673408871418.pdf
此处使用java操作phantomjs的代码示例:
package top.weiyigeek.weixin;

import java.io.BufferedReader;
import java.io.IOException;
import java.io.InputStream;
import java.io.InputStreamReader;

/**
 * 类名:DownLoad
 * 包名:top.weiyigeek.weixin
 * 作者:
 * 时间:
 * 描述:TODO(这里用一句话描述这个类的作用)
 */
public class DynamicDownLoad {
    /**
     * 方法名:getSrcContent
     * 作者:
     * 创建时间:
     * 描述:根据传入的url,调用phantomjs进行下载,并返回源码信息
     * @param url
     * @return
     */
    public static String getSrcContent(String url, String type){
      //windows下phantomjs位置
      String path = "L:/DevOps/自动化测试/模拟浏览器访问/PhantomJS/phantomjs-2.1.1-windows/bin";
      Runtime rt = Runtime.getRuntime();
      Process process = null;
      try {
        process = rt.exec(path + "phantomjs.exe L:/example/2.screen-capture.js" + url.trim() + " " + type.trim());
      } catch (IOException e) {
        // TODO 这里写异常处理的代码
        e.printStackTrace();
      }
      InputStream is = process.getInputStream();
      BufferedReader br = new BufferedReader(new InputStreamReader(is));
      StringBuffer sbf = new StringBuffer();
      String tmp = "";
      try {
        while((tmp = br.readLine())!=null){
          sbf.append(tmp);
        }
      } catch (IOException e) {
        // TODO 这里写异常处理的代码
        e.printStackTrace();
      }
      return sbf.toString();
    }

    /**
     * 方法名:main
     * 作者:
     * 创建时间:
     * 描述:TODO (这里用一句话描述这个方法的作用)
     * @param args
     * @throws IOException
     */
    public static void main(String[] args){
      // TODO Auto-generated method stub
      String src = DynamicDownLoad.getSrcContent("https://weiyigeek.top","pdf","1024px*720px");
      System.out.println(src);
    }
}
补充:对于延迟截图,还是有个问题,就是无法监听ajax或者资源是否完整加载导致页面不全;解决方案 viewport设置一个比截图高度的矮,通过比较生产图片的高度来判断截取图片的结果
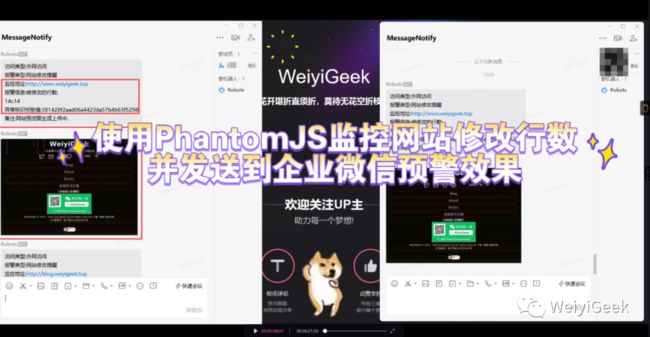
2.监控网站主页变化并截图到企业微信预警
好,下面来到了我们项目实践了,主要实现的功能是利用Shell脚本以及crontab定时任务以及 PhantomJS 来监控网站首页的变化,并以截图的方式通知给企业微信对应运维群,及时了解网站运行安全,防止网站主页被黑、被劫持的风险。
此处我是在CentOS7中实现的,安装方法请参考前面章节。
项目地址: https://github.com/WeiyiGeek/SecOpsDev/tree/master/AutomatedTesting/Web/phantomjs/Project/Shell
(PS: 文章中示例代码可能随着时间推移会有更新,建议小伙伴通过上面Github地址获取哟!)
项目脚本与PhantomJS脚本文件(均可在上述获得)
/GitProject/SecOpsDev1/AutomatedTesting/Web/phantomjs/Project/Shell
1.WebScreenCapture.sh  screen-capture.js

mkdir /usr/local/src/phantomjs/custom
cp screen-capture.js /usr/local/src/phantomjs/custom
# 注意,此处建议将 screen-capture.js 放在 /usr/local/src/phantomjs/custom 目录中
Shell 脚本 WebMonitorScreenCapture.sh
#!/bin/bash
## @Title: 使用phantomjs针对网站首页监控预与监控检测并进行企业微信预警
## @Author: WeiyiGeek
## @CreateTime: 2023年1月11日 15点34分
## @Blog: https://blog.weiyigeek.top
## @Version: 1.3
# set -e


# 监控目标站点配置文件
MONITORSITE=/tmp/target.txt
cat > ${MONITORSITE} <<'EOF'
https://www.weiyigeek.top
https://blog.weiyigeek.top
EOF


# 全局变量
# 请将此处修改为你企业微信机器人webhook地址
export WXMSGURL="https://qyapi.weixin.qq.com/cgi-bin/webhook/send?key=51648169-7638-43a4-97d6-dfd39b48ea23"
export NETTYPE="外网访问"
export HCMSG=""
export XKMSG=""
export ZHCXMSG=""
# 安装使用phantomjs时报 ` libproviders.so: cannot open shared object file:` 错误时需要取消如下注释。
# export OPENSSL_CONF=/dev/null


################################
# 名称: DependencyCheck
# 说明: 脚本运行依赖检测
################################
function DependencyCheck(){
  phantomjs -v > /dev/null 2>&1
  if [[ "$?" != "0" ]];then echo -e "\e[31m[Error] Phantomjs NotFound,Please Install this! \e[0m";exit 0;fi
  jq --version > /dev/null 2>&1
  if [[ "$?" != "0" ]];then echo -e "\e[31m[Error] Phantomjs jq,Please Install jq! \n$ yum install jq \e[0m";exit 0;fi
}


################################
# 名称: SendWXMsg
# 说明: 企业微信消息机器人消息发送
################################
function SendWXMsg(){
  if [[ "$1" == "text" ]];then
    #text 格式
    case $2 in
    "1")
        echo '{"msgtype":"text","text":{"mentioned_list":["@all"],"content":"访问类型:'${NETTYPE}'\n报警类型:'$3'\n监控地址:'${TARGETURL}'\n报警信息:'$4'"}}' > text.json
       ;;
    "2")
        echo '{"msgtype":"text","text":{"mentioned_list":["@all"],"content":"访问类型:'${NETTYPE}'\n报警类型:'$3'\n监控地址:'${TARGETURL}'\n报警信息:'$4'异常标识校验值:'$5'\n备注:网站预览图生成上传中."}}' > text.json
      ;;
    *)
        sleep 1
      ;;
    esac
    sed -i 's#_#\\n#g' text.json
    curl ${WXMSGURL} -X POST -H "Content-Type:application/json" [email protected]
  elif [[ "$1" == "image" ]];then
    #image 格式
    echo '{"msgtype":"image","image":{"base64":"'$2'","md5":"'$3'"}}' > data.json
    curl ${WXMSGURL} -X POST -H "Content-Type:application/json" [email protected]
  elif [[ "$1" == "markdown" ]];then
    #markdown 格式
    if [[ "$2" == "1" ]];then
      echo '{"msgtype":"markdown","markdown":{"content":"**'$3'**\n> 访问类型:'${NETTYPE}'访问\n> 应用状态信息:\n'$4'"}}' > markdown.json
      sed -i 's#_#\\n#g' markdown.json
    fi
     curl ${WXMSGURL} -X POST -H "Content-Type:application/json" [email protected]
  else
    sleep
  fi
}


################################
# 名称: TargetMD5
# 说明: 目标站点首页的MD5值生成
################################
function TargetMD5(){
  # 判断文件是否存在
  if [[ ! -d "${TARGETDIR}" ]];then echo "Create directory ${TARGETDIR}.....";mkdir -p $TARGETDIR; fi
  if [[ ! -f "${TARGETFILE}" ]]; then curl -m 15 ${TARGETURL} -o ${TARGETFILE}; fi
  export TARGETFILEMD5=$(md5sum ${TARGETFILE} | awk -F ' ' '{print $1}')
}


################################
# 名称: Record
# 说明: 网站首页指纹(md5值)比对以及网页截图
################################
function Record(){
   curl -m 20 ${TARGETURL} -o ${RECORDFILE}
   export RECORDFILEMD5="$(md5sum $_ | awk -F '  ' '{print $1}')"
   if [[ "${TARGETFILEMD5}MD5" != "${RECORDFILEMD5}MD5" ]]; then
      # 异常信息记录
      echo "${RECORDFILE}-${RECORDFILEMD5}" >> ${TARGETDIR}exception.log


      # 差异比对
      DIFFTEXT=$(diff --normal ${TARGETFILE} ${RECORDFILE} | egrep "^[0-9]" | tr '\n' '__' )


      # 使用 phantomjs 生成截图,注意此处 /usr/local/src/phantomjs/custom/screen-capture.js 路径
      /usr/local/bin/phantomjs //usr/local/src/phantomjs/custom/screen-capture.js ${TARGETURL} ${RECORDFILE}.png
      IMGMD5="$(md5sum ${RECORDFILE}.png| awk -F '  ' '{print $1}')"
      IMGBASE64="$(base64 -w 0 < ${RECORDFILE}.png)"


      # 信息发送
      SendWXMsg "text" "2" "网站修改提醒" "被修改的行数:\n${DIFFTEXT}" "${RECORDFILEMD5}"


      sleep 1


      # 网页截图发送 (外网发送)
      SendWXMsg "image" "${IMGBASE64}" "${IMGMD5}"
      cp -f ${RECORDFILE} ${TARGETFILE}


      # 发送警告次数
      RCOUNT=RCOUNT${FLAG}
      let ${RCOUNT}+=1
      export ${RCOUNT}=${!RCOUNT}
      if [[ ${!RCOUNT} -eq 1 ]];then
        cp -f ${RECORDFILE} ${TARGETFILE}
        export ${RCOUNT}=0
      fi
  fi
}


################################
# 名称: SiteMonitorCheck
# 说明: 网站访问异常检测
################################
function SiteMonitorCheck (){
    STATUS=$(curl -I -m 10 -s -o /dev/null -w "%{http_code}" ${TARGETURL} )
    if [[ $? -ne 0 ]];then STATUS="CLOSE";fi
    # 当系统故障关闭后只推送三次,然后恢复正常时候又重新计数
    COUNT=COUNT${FLAG}
    let ${COUNT}+=1
    if [[ "$STATUS" == "200" ]];then
      Record
    elif [[ "$STATUS" == "200" && ${!COUNT} -gt 2 ]];then
      export ${COUNT}=0
    elif [[ "$STATUS" == "302" ]];then
      local LOCATION=$(curl -I -m 10 -s  ${TARGETURL} | egrep "^Location" | tr -d '\r' | cut -d "/" -f 3)
      SendWXMsg "text" "1" "请求跳转异常地址" "_HTTP响应码:${STATUS}_跳转地址:${LOCATION}"
    elif [[ "$STATUS" == "CLOSE" && ${mcount} -le 2 ]];then
      SendWXMsg "text" "1" "访问异常" "外网无法访问该网站"
      export ${COUNT}=${!COUNT}
      continue
    else
      if [[ "${STATUS}" == "403" && "$(echo ${TARGETURL} | egrep -c "40081|30081") == '1'" ]];then
       Record
       continue
      else
        SendWXMsg "text" "1" "请求返回响应码异常" "HTTP响应码[${STATUS}]"
      fi
    fi
}


################################
# 名称: HealthCheck
# 说明: 网页站点外网访问检测
################################
function HealthCheck(){
  if [[ "$NETTYPE" == "外网" ]];then
    local CHECK=$(curl -m 15 -o /dev/null -s -w "DNS解析耗时: "%{time_namelookup}"s_重定向耗时: "%{time_redirect}"s_TCP连接耗时: "%{time_connect}"s_请求准备耗时: "%{time_pretransfer}"s_应用连接耗时: "%{time_appconnect}"s_传输耗时: "%{time_starttransfer}"s_下载速度: "%{speed_download}"byte/s_整体请求响应耗时: "%{time_total}"s" "${TARGETURL}")
    if [[ $? -eq 0 ]];then
      SendWXMsg "markdown" "1" "${NETTYPE}-检查网站连接状态" "__> ${CHECK}"
    else
      SendWXMsg "markdown" "1" "${NETTYPE}-检查网站连接状态" "巡检地址: ${TARGETURL}__> 巡检信息: 访问异常"
    fi
  else
    local CHECK=$(curl -m 10 -o /dev/null -s -w "%{http_code}" "${TARGETURL}")
    if [[ $? -ne 0 || "$CHECK" != "200" ]];then
      export HCMSG="${HCMSG}__> 巡检地址: ${TARGETURL}_巡检信息: 异常"
    else
      # export HCMSG="${HCMSG}__> 巡检地址: ${TARGETURL}_巡检信息: 正常"
      echo .
    fi
  fi
}


################################
# 名称: XKservice
# 说明: 指定应用监控埋点
################################
function XKservice(){
  if [[ "$NETTYPE" == "外网" ]];then
    local CHECK=$(echo $TARGETURL | egrep -c "xk")
    if [[  "$CHECK" == "1" ]];then
      curl -m 15 -s "${TARGETURL}/app/version" -o xk.json
      local STATUS=$(jq '"应用状态:"+(.code|tostring)+"_应用信息:"+(.msg|tostring)+"_当前应用版本:"+(.data.version)' xk.json  | tr -d '"')
      SendWXMsg "markdown" "1" "应用埋点监控" "__> ${STATUS}"
    fi
  else
    local CHECK=$(echo "${TARGETURL}" | egrep -c "8010|9010")
    if [[ "$CHECK" == "1" ]];then
      curl -m 15 -s "${TARGETURL}/app/version" -o xk.json
      local STATUS=$(jq -M '"_Status:"+(.code|tostring)+"_Msg:"+(.msg|tostring)+"_Version:"+(.data.version)' xk.json  | tr -d '"')
      export XKMSG="${XKMSG}__> 应用地址:${TARGETURL}_${STATUS}"
    fi
  fi
}


################################
# 名称: InnerAppServices
# 说明: 内部应用服务监控埋点
################################
function InnerAppServices(){
  if [[ "$(echo $TARGETURL| egrep -c '40081|30081')" == "1" ]];then
    curl -m 15 -s "${TARGETURL}/user/getVersion.htmls" -o innerApp.json
    STATUS=$(jq -M '"_Status:"+(.db|tostring)+"_Version:"+(.version|tostring)' innerApp.json | tr -d '"')
    export ZHCXMSG="${ZHCXMSG}__> 应用地址:${TARGETURL}_${STATUS}"
  fi
}


################################
# 名称: main
# 说明: 脚本主执行入口
# 参数: 无
# 返回值: 无
################################
function main(){
  # 依赖检测
  DependencyCheck


  # 目标监控
  for i in $(cat ${MONITORSITE});do
    CHECK=$(echo $i | egrep -c "^#")
    if [[ "$CHECK" == "1" ]];then continue;fi
    export TARGETURL=$i
    export URL=$(echo $i|cut -f 3 -d '/')
    export TARGETDIR="/var/log/WebScreenCapture/${URL}/"
    export TARGETFILE="${TARGETDIR}index.html"
    export RECORDFILE="${TARGETDIR}$(date +%Y%m%d%H%M%S)-index.html"


    # 目标MD5值
    TargetMD5


    if [[ "$1" == "H"  ]];then
      HealthCheck
      XKservice
      InnerAppServices
    else
      let FLAG+=1
      export FLAG=${FLAG}
      SiteMonitorCheck
    fi
  done


  # 指定应用执行完毕后
  if [[ "$1"  == "H" && "$NETTYPE" == "内网" ]];then
    if [[ "${#HCMSG}" != "0" ]];then
      SendWXMsg "markdown" "1" "${NETTYPE}-业务应用运行情况巡查" "${HCMSG}_检测时间:$(date +%Y-%m-%d~%H:%M:%S)"
    else
      SendWXMsg "markdown" "1" "${NETTYPE}-业务应用运行情况巡查" "所有被监控业务正常_检测时间:$(date +%Y-%m-%d~%H:%M:%S)"
    fi;


    if [[ "${#XKMSG}" != "0" ]];then
      SendWXMsg "markdown" "1" "${NETTYPE}-xk应用系统监控" "${XKMSG}_检测时间:$(date +%Y-%m-%d~%H:%M:%S)"
    fi


    if [[ "${#ZHCXMSG}" != "0" ]];then
      echo ${ZHCXKMSG}
      SendWXMsg "markdown" "1" "${NETTYPE}-zhcx应用系统监控" "${ZHCXMSG}_检测时间:$(date +%Y-%m-%d~%H:%M:%S)"
    fi
  fi
}


main $1
# export HCMSG=""
# export XKMSG=""
# export ZHCXMSG=""
export FLAG=0
脚本执行及其结果:
# 代码执行
chmod +x /1.WebScreenCapture.sh
./1.WebScreenCapture.sh

cd /var/log/WebScreenCapture/www.baidu.com
ls /var/log/WebScreenCapture/www.com
20230111172153-index.html  20230111172153-index.html.png  20230111173604-index.html  data.json  exception.log  index.html  text.json
补充扩展: 我们可以将该脚本加入到cron中定时每一分钟或3分钟执行一次监控。
$ crontab -e
# m h  dom mon dow   command
*/1 * * * * bash -c /tmp/1.WebScreenCapture.sh
温馨提示: 当然你也可以将脚本进行修改,支持钉钉机器人以及自己编写的webhook实现QQ或者微信预警。
至此完毕,完毕更多运维奇技淫巧,请关注 【WeiyiGeek】哟。
0x0n 入坑出坑
问题1.在Ubuntu 22.04中安装phantomjs时报 libproviders.so: cannot open shared object file: 错误。
-
错误信息:
$ phantomjs -v
Auto configuration failed
139744413173696:error:25066067:DSO support routines:DLFCN_LOAD:could not load the shared library:dso_dlfcn.c:185:filename(libproviders.so): libproviders.so: cannot open shared object file: No such file or directory
139744413173696:error:25070067:DSO support routines:DSO_load:could not load the shared library:dso_lib.c:244:
139744413173696:error:0E07506E:configuration file routines:MODULE_LOAD_DSO:error loading dso:conf_mod.c:285:module=providers, path=providers
139744413173696:error:0E076071:configuration file routines:MODULE_RUN:unknown module name:conf_mod.c:222:module=providers-
问题原因: 因为Ubuntu 22.04 使用新的 OpenSSL 版本 3.0.2 而不是旧的 OpenSSL 版本 1.1.1 ,这些 OpenSSL 版本不完全向后兼容,所以这就是为什么您在 PhantomJS 尝试自动配置 SSL/TLS 设置时看到此错误的原因。
openssl version
OpenSSL 3.0.2 15 Mar 2022 (Library: OpenSSL 3.0.2 15 Mar 2022)-
解决办法:
export OPENSSL_CONF=/dev/null
本文至此完毕,更多技术文章,尽情等待下篇好文!
文章书写不易,如果您觉得此篇文章还不错的朋友,请给这篇专栏 【点个赞、投个币、收个藏、关个注、转个发、留个言、赞个助】,这将对我的肯定,我将持续发布更多优质文章,谢谢!
原文地址: https://blog.weiyigeek.top/2020/6-29-264.html
更多企业运维实践、网络安全、系统运维、应用开发、物联网实战、全栈文章,尽在【 https://blog.weiyigeek.top 】站点,谢谢支持!
亲,文章都看完了,不关注一下吗?

如果此篇文章对你有帮助,请你将它分享给更多的人!
温馨提示: 由于作者水平有限,本章错漏缺点在所难免,希望读者批评指正,并请在文章末尾留下您宝贵的经验知识,联系邮箱地址 [email protected] 或者关注公众号 WeiyiGeek 联系我。
点击【"阅读原文"】获取更多有趣的知识!