利用IDEA 搭建springboot+mybatis+redis+lombok
利用IDEA 搭建springboot+mybatis+redis+lombok
springboot+mybatis+redis+lombok 框架搭建
前言:
最近学习了springboot+redis相关知识,利用闲暇时间搭建一个springboot+mybatis+redis+lombok集合起来的一个框架,希望大家可以多多指教。
开发工具:IDEA
必备条件:
1.java工作环境
2.maven
3.redis
以上3个是必备条件,如若本地环境不存在,请自行百度去安装、配置。现在开始我们今天的主题,框架的搭建:
1.建立springboot项目
搭建步骤:File——New——Project,然后出现如下图所示,我们选择Spring Initializr然后选择jdk,由于我本地配置了jdk11的版本,大家选择自己本地配置的就好,然后点击next进入下一步:

如下图所示,填写相关信息,选择jdk版本,点击next进入下一步:

如下图所示,选择本次搭建所使用的工具,然后maven会自动帮我们导入相对应的jar包,我们在这里暂时先只选择如下图所示的几个,后面在开发的工程中陆续进行添加,此时在进入下一步:

填写项目名称、工作空间路径,点击finish,本次项目搭建就完成了。

搭建好的springboot项目如下所示:

pom.xml文件内容:
            org.springframework.boot
            spring-boot-starter-data-redis


            org.springframework.boot
            spring-boot-starter-thymeleaf


            org.springframework.boot
            spring-boot-starter-web


            org.mybatis.spring.boot
            mybatis-spring-boot-starter
            2.0.1


            mysql
            mysql-connector-java
            runtime


            org.projectlombok
            lombok
            true


            org.springframework.boot
            spring-boot-starter-test
            test
编写一个测试类,测试我们本次springboot的项目搭建是否成功:
@RestController  //@RestController=@Controller+@ResponseBody
@RequestMapping("com/pass/demo")
public class HelloController {

    /**
     * 测试本次项目搭建是否成功
     * @return
     */
    @RequestMapping("hello")
    public String say(){
        return "hello world";
    }
}
注意事项:
搭建controller需要特别注意,controller与启动类不应该在同一级,否则要在启动类加扫描注解(本次不做示例):

进入DemoApplication启动类中进行启动测试,会发现报错,如下所示:
Description:

Failed to configure a DataSource: 'url' attribute is not specified and no embedded datasource could be configured.

Reason: Failed to determine a suitable driver class


Action:

Consider the following:
	If you want an embedded database (H2, HSQL or Derby), please put it on the classpath.
	If you have database settings to be loaded from a particular profile you may need to activate it (no profiles are currently active).
此报错是由于我们在搭建项目的时候选择了mysql以及mybatis这两个工具,maven帮我们生成了jar包,此时启动项目的时候找不到数据库的连接配置,故报此错误,故现在去配置数据库连接信息:
springboot 配置数据源可以使用yml文件和properties文件两种方式(yml中是以json的格式存在),两种方式如下,大家可以自行选择使用:
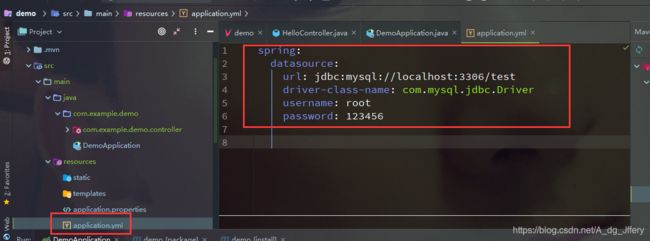
application.yml:
spring:
  datasource:
    url: jdbc:mysql://localhost:3306/test
    driver-class-name: com.mysql.jdbc.Driver
    username: root
    password: 123456
application.properties:
spring.datasource.url=jdbc:mysql://localhost:3306/test
spring.datasource.username=root
spring.datasource.password=123456
spring.datasource.driver-class-name=com.mysql.jdbc.Driver
此时我们在进行启动,发现项目启动成功。

访问测试类看看请求是否成功:
请求地址:localhost:8080/com/pass/demo/hello

当然,我们也可以自定义自己本地的IP地址以及端口号:
在application.yml文件中进行配置:
server:
  address: 127.0.0.1
  port: 8078
重启之后再次请求测试:
请求地址:127.0.0.1:8078/com/pass/demo/hello

在这里向大家推荐一个IDEA插件,主要用来进行cotroller接口测试,类似于postman工具,有兴趣的话可以进行安装使用。
参考地址为:RestService测试
2.mybatis框架的集成以及lombok的使用
在上面我们已经进行了一个简单的springboot项目的搭建,接下来我们进行mybatis的框架的集成:
mybatis相关配置文件(yml):
mybatis:
    type-aliases-package: com.example.demo.entity  # 注意:对应实体类的路径

  ## pagehelper分页插件
  pagehelper:
    helperDialect: mysql
    reasonable: true
    supportMethodsArguments: true
    offsetAsPageNum: true
    rowBoundsWithCount: true
    pageSizeZero: true
    params: pageNum=pageHelperStart;pageSize=pageHelperRows;

	## 连接池的配置
    filters: stat
    maxActive: 20
    initialSize: 1
    maxWait: 60000
    minIdle: 1
    timeBetweenEvictionRunsMillis: 60000
    minEvictableIdleTimeMillis: 300000
    validationQuery: select 'x'
    testWhileIdle: true
    testOnBorrow: false
    testOnReturn: false
    poolPreparedStatements: true
    maxOpenPreparedStatements: 20
建立实体类:
(快速生成实体类可参考更多大神的操作文档:快速生成实体类)
/**
 *
 * @Description: java类作用描述
 * @Author: xxx
 * @Date: xxxx
 * @UpdateRemark: 修改内容
 * @Version: 1.0
 *
 */
@Data
@EqualsAndHashCode
@AllArgsConstructor
@NoArgsConstructor
public class User {

  private String id;
  private String name;
  private long age;
  private String sex;

}
如上代码所示,本次实体类的创建使用了lombok,利用注解去生成get、set、无参构造、有参构造、重新equals等,省去了之前手写或快速生成的方式。(更多用法参见lombok教程:lombok官方教程)
创建dao类,本次使用注解方式进行数据库操作。
package com.example.demo.dao;

import com.example.demo.entrty.User;
import org.apache.ibatis.annotations.Insert;
import org.apache.ibatis.annotations.Select;
import org.springframework.stereotype.Repository;

import java.util.List;

/**
 *
 * @Description: java类作用描述
 * @Author: xxx
 * @Date: 2019/4/8 18:30
 * @UpdateRemark: 修改内容
 * @Version: 1.0
 *
 */
@Repository
public interface UserDao {

    /**
     * 查询出表中所有的人员
     * @return
     */
    @Select("select * from user ")
    List getAll();

    /**
     * 根据姓名查找
     * @param name
     * @return
     */
    @Select("select * from user where name = #{name} limit 5")
    User getUser(String name);

    /**
     * 添加一条数据
     * @param user
     */
    @Insert("insert into user values(#{id},#{name},#{age},#{sex}) ")
    void insert(User user);

    /**
     * 根据ID去更新
     * @param user
     */
    @Update("update user set name = #{name},age = #{age}, sex = #{sex} where id = #{id}")
    void update(User user);

    /**
     * 根据ID去删除一条信息
     * @param id
     */
    @Delete("delete from user where id = #{id}")
    void delete(String id);
}
创建service类:
package com.example.demo.service;

import com.example.demo.entrty.User;

import java.util.List;

public interface UserService {

    List getAllUser();

    User getUser(String name);

    void add(User user);

    void update(User user);

    void delete(String id);
}
service实现类(由于业务简单,本次搭建不进行事务管理的使用):
package com.example.demo.service.impl;

import com.example.demo.dao.UserDao;
import com.example.demo.entrty.User;
import com.example.demo.service.UserService;
import org.springframework.stereotype.Service;

import javax.annotation.Resource;
import java.util.List;

/**
 * @program: demo
 * @description: service实现类
 * @author: xxxx
 *
 * TODO
 * @create: 2019-04-08 18:50
 *
 * version: 1.0
 */
@Service
public class UserServiceImpl implements UserService {

    @Resource
    private UserDao userDao;

    @Override
    public List getAllUser() {
        List users = userDao.getAll();
        return users;
    }

    @Override
    public User getUser(String name) {
        User user = null;
        if(name != null && !"".equals(name)){
            user = userDao.getUser(name);
        }
        return user;
    }

    @Override
    public void add(User user) {
        userDao.insert(user);
    }

    @Override
    public void update(User user) {
        userDao.update(user);
    }

    @Override
    public void delete(String id) {
        userDao.delete(id);
    }
}
controller接口测试:
package com.example.demo.controller;

import com.example.demo.entrty.User;
import com.example.demo.service.UserService;
import org.springframework.web.bind.annotation.PathVariable;
import org.springframework.web.bind.annotation.RequestMapping;
import org.springframework.web.bind.annotation.RequestMethod;
import org.springframework.web.bind.annotation.RestController;

import javax.annotation.Resource;
import java.util.List;

/**
 * @program: demo
 * @description: 接口测试
 * @author: xxxx
 *
 * TODO
 * @create: 2019-04-08 19:01
 *
 * version: 1.0
 */
@RestController
@RequestMapping("com/pass/demo")
public class UserController {

    @Resource
    private UserService userService;

    @RequestMapping(value = "/user", method = RequestMethod.GET)
    public List getAll(){
        List user = userService.getAllUser();
        return user;
    }

    @RequestMapping(value = "/userName", method = RequestMethod.GET)
    public User getUser(String name){

        User user = null;
        if(name != null & !"".equals(name)){
            user = userService.getUser(name);
        }
        return user;
    }

    @RequestMapping(value = "user", method = RequestMethod.POST)
    public String add(User user){
        String message;
        try{
            userService.add(user);
            message = "success";
        }catch(Exception e) {
            e.printStackTrace();
            message = "fail";
        }
        return message;
    }

    @RequestMapping(value = "/user", method = RequestMethod.PUT)
    public String update(User user){
        String message;
        try{
            userService.update(user);
            message = "success";
        }catch(Exception e) {
            e.printStackTrace();
            message = "fail";
        }
        return message;
    }

    @RequestMapping(value = "/user", method = RequestMethod.DELETE)
    public String delete(String id){
        String message;
        try{
            userService.delete(id);
            message = "success";
        }catch(Exception e) {
            e.printStackTrace();
            message = "fail";
        }
        return message;
    }
}
到这里简单业务实现已经完毕,加下来测试springboot+mybatis的搭建是否成功。
请求地址:http://localhost:8078/com/pass/demo/userName?name=springBoot

其他请求路径如图所示(相信大家已经注意到了,本次开发请求方式遵循了restful接口的请求方式):

到这里,springBoot+mybatis+lombok 框架已经搭建成功了,接下来在集成redis。
3.redis的集成:
首先进行redis的连接配置:
application.yml:
#redis
  redis:
    #redis数据库名称  从0到15,默认为db0
    databases: 0
    #redis服务器名称
    host: 127.0.0.1
    #redis服务器密码
    password:
    #redis服务器连接端口号
    port: 6379
    #redis连接池设置
    lettuce:
      pool:
#        连接池最大连接数(使用负数表示没有限制) 默认8
        max-active: 8
#        连接池最大阻塞等待时间(使用负值表示没有限制) 默认-1
        max-wait: -1
#        连接池中最大空闲连接 默认8
        max-idle: 8
#        连接池中最小空闲连接 默认0
        min-idle: 0
    pool:
      maxTotal: 8
      maxWaitMillis: 1000
    timeout: 60000
引入相应的jar包:
		    redis.clients
		    jedis
创建测试方法:
@Test
    public void contextLoads() {
        Jedis jedis = new Jedis("localhost");
        System.out.println("连接成功");
        //查看服务是否运行
        System.out.println("服务正在运行: "+jedis.ping());
    }
接下来测试redis是否能连接成功:

如图所示,代表着redis连接成功(注意:本地必须安装redis客户端并启动才可以连接成功)。
创建RedisConfig:
package com.example.demo.springboot.redis;

import org.apache.ibatis.annotations.Mapper;
import org.springframework.beans.factory.annotation.Autowired;
import org.springframework.cache.annotation.CachingConfigurerSupport;
import org.springframework.cache.annotation.EnableCaching;
import org.springframework.context.annotation.Bean;
import org.springframework.context.annotation.Configuration;
import org.springframework.data.redis.connection.RedisConnectionFactory;
import org.springframework.data.redis.core.StringRedisTemplate;
import org.springframework.data.redis.listener.PatternTopic;
import org.springframework.data.redis.listener.RedisMessageListenerContainer;
import org.springframework.data.redis.listener.adapter.MessageListenerAdapter;

import java.util.concurrent.CountDownLatch;

/**
 * @program: SpringBootDemo
 * @description: Redis 设置类
 * @author: xxx
 * TODO
 * @create: 2019-04-01 19:53
 * version: 1.0
 */

@Configuration
@EnableCaching
@Mapper
public class RedisConfig extends CachingConfigurerSupport {

    @Bean
    RedisMessageListenerContainer container(RedisConnectionFactory connectionFactory,
                                            MessageListenerAdapter listenerAdapter) {

        RedisMessageListenerContainer container = new RedisMessageListenerContainer();
        container.setConnectionFactory(connectionFactory);
        container.addMessageListener(listenerAdapter, new PatternTopic("chat"));

        return container;
    }

    @Bean
    MessageListenerAdapter listenerAdapter(Receiver receiver) {
        return new MessageListenerAdapter(receiver, "receiveMessage");
    }

    @Bean
    Receiver receiver(CountDownLatch latch) {
        return new Receiver(latch);
    }

    @Bean
    CountDownLatch latch() {
        return new CountDownLatch(1);
    }

    @Bean
    StringRedisTemplate template(RedisConnectionFactory connectionFactory) {
        return new StringRedisTemplate(connectionFactory);
    }

    public class Receiver {

        private CountDownLatch latch;

        @Autowired
        public Receiver(CountDownLatch latch) {
            this.latch = latch;
        }

        public void receiveMessage(String message) {
            latch.countDown();
        }
    }
}
创建RedisService:
package com.example.demo.service;

import com.example.demo.entrty.User;
import org.springframework.cache.annotation.CacheEvict;
import org.springframework.cache.annotation.Cacheable;

public interface RedisService {

    /**
     * 根据ID查询一个Person对象
     * @param id
     * @return
     */
    @Cacheable(value="User", key="'User'+#id")
    User getUser(String id);

    /**
     * 根据ID删除一个Person对象
     * @param id
     * @return
     */
    @CacheEvict(value="User", key="'User'+#id",condition="#id!=1")
    String delete(String id);

    /**
     * 保存一个Person对象
     * @param User
     * @return
     */
    String save(User User);

}
创建RedisServiceImpl:
package com.example.demo.service.impl;

import com.example.demo.entrty.User;
import com.example.demo.service.RedisService;
import org.springframework.stereotype.Service;

/**
 * @program: demo
 * @description: xxx
 * @author: xxx
 *
 * TODO
 * @create: 2019-04-08 20:20
 *
 * version: 1.0
 */
 @Service
public class RedisServiceImpl implements RedisService {

    @Override
    public User getUser(String id) {
        System.out.println(id+"进入实现类");
        User User =
                new User(id, "redis", 23, "boy");
        return User;
    }

    @Override
    public String delete(String id) {
        System.out.println(id+"进入实现类删除数据");
        return "message";
    }

    @Override
    public String save(User User) {
        return null;
    }
}
创建测试类UserRedisController:
package com.example.demo.controller;

import com.example.demo.entrty.User;
import com.example.demo.service.RedisService;
import org.springframework.web.bind.annotation.RequestMapping;
import org.springframework.web.bind.annotation.RequestMethod;
import org.springframework.web.bind.annotation.RestController;

import javax.annotation.Resource;

/**
 * @program: demo
 * @description:
 * @author: xxxx
 *
 * TODO
 * @create: 2019-04-08 20:16
 *
 * version: 1.0
 */
@RestController
@RequestMapping("com/pass/test")
public class UserRedisController {

    @Resource
    private RedisService redisService;

    @RequestMapping(value = "/redis", method = RequestMethod.GET)
    public User getUser(){
        User User = redisService.getUser("00001");
        return User;
    }

    @RequestMapping(value = "/redis", method = RequestMethod.DELETE)
    public String deletePerson(){
        redisService.delete("00001");
        return "执行了删除";
    }

}
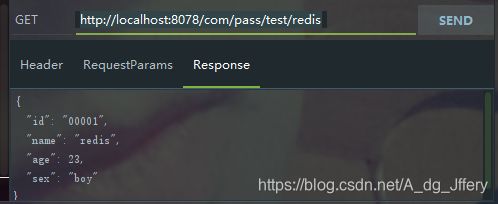
测试结果:
请求路径:http://localhost:8078/com/pass/test/redis
补充:
1.实体类进行序列化,否则会报异常:DefaultSerializer requires a Serializable payload but received an object of type

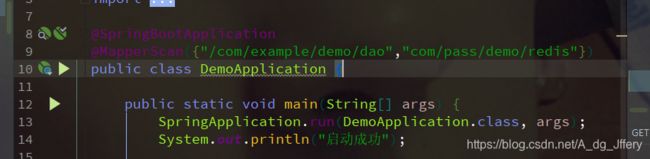
2.启动类加注解,扫描所有的对数据库或者redis操作的类:
@MapperScan({"/com/example/demo/dao",“com/pass/demo/redis”})
否则会报下面的异常信息:
Description:

A component required a bean of type 'com.example.demo.service.RedisService' that could not be found.


Action:

Consider defining a bean of type 'com.example.demo.service.RedisService' in your configuration.


Process finished with exit code 1
4.结束
到这里,我们的springBoot+myBatis+redis+lombok的框架就搭建好了,相信大家在写代码的过程中会发现,我们每次改动文件或者新增代码都要重新启动,在这里教大家一个热部署,配置好之后,IDEA会在我们开发的过程中检测我们的代码是否有变动,然后会自动进行编译启动。配置过程如下:
加入jar包即可,在pom.xml引入以下代码:
            org.springframework.boot
            spring-boot-devtools
            true


	                org.springframework.boot
	                spring-boot-maven-plugin


	                    true
本次文章到此结束,若有不对的地方,请大家多多指教,谢谢。