linux入门---线程池的模拟实现
目录标题
- 什么是线程池
- 线程的封装
-
- 准备工作
- 构造函数和析构函数
- start函数
- join函数
- threadname函数
- 完整代码
- 线程池的实现
-
- 准备工作
- 构造函数和析构函数
- push函数
- pop函数
- run函数
- 完整的代码
- 测试代码
什么是线程池
在实现线程池之前我们先了解一下什么是线程池,所谓的池大家可以理解为一次性申请和创建很多的东西然后将其保存起来等未来需要的时候就不需要再创建和申请了,直接从保存的地方拿就行了,在生活中我们也经常用到池化技术比如说去菜场里面买菜并不是只卖一顿的菜而是买好几天要吃的菜,因为这么做的话可以大幅度的减少去菜场所带来的时间消耗,那么在计算机中也是同样的道理比如说使用函数new向操作系统申请10字节的空间时,操作系统并不是真的从内存中给你现场申请10字节的空间,而是当前的进程早就提前申请好了一大堆空间,把这部分空间保存下来,一旦你再申请的话将该空间的一部分给你就行并不会立马跑到内存上进行申请,这样做可以有效的提高程序的效率,那么这就是一个池化技术,那么这里的线程池也是同样的道理,我们可以先创建多个线程并将其保存下来,然后再创建一个容器用来接收任务,一旦有任务了就自动唤醒对应的线程将其进行处理即可无需再次创建,比如说下面的图片:
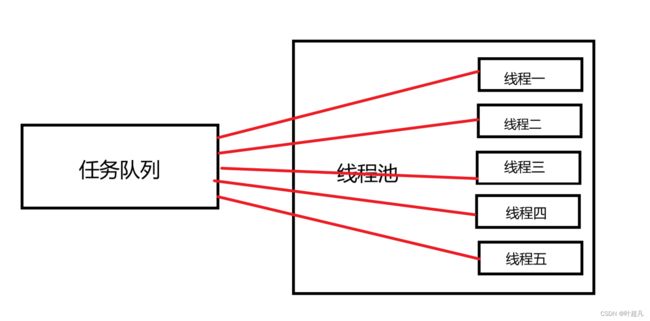
那么接下来我们将一步一步的实现线程池,首先来完成线程的封装。
线程的封装
准备工作
因为创建线程需要对应的执行函数和参数以及对应的pid_t变量,所以类中得有一个function对象和一个void*类型的指针和一个pid_td对象:
typedef std::function<void *(void *)> func_t;
 class Thread
{
 public:
 private:
     func_t func_;
     void *args_;
     pthread_t tid_;
 };
此外我们还希望该类能够有一个自己的名字,所以类中还有一个string的对象用来记录线程的名字,这里我们希望名字的形式为thread 1,thread 2…以此类推,所以我们在类中我们再添加一个静态的整形变量用来记录当前是创建的第几个线程,所以当前类的代码如下:
typedef std::function<void *(void *)> func_t;
 class Thread
{
 public:
 private:
     std::string name_;
     func_t func_;
     void *args_;
     pthread_t tid_;
     static int threadnum;
 };
 int Thread::threadnum = 1;
构造函数和析构函数
对于该类的设计我们是这样向的,创建类的时候并不创建对应的线程执行函数这个交给后面的start函数,构造函数要干的事情就是将该线程对应的名字创建好即可,那么这里创建一个char类型的数组,然后使用snprintf函数将对应的名字输入到这个数组里面,最后用这个数组的起始的地址构造string对象即可,那么这里的代码如下:
Thread()//构造函数初始化名字
{
    char namebuffer[num];//这里的num为全局变量后面会写
    snprintf(namebuffer, sizeof namebuffer, "thread-%d", threadnum++);
    name_ = namebuffer;
}
对于析构函数当前没有什么内容需要我们手动释放,所以析构函数什么都不用干:
~Thread()
{
    // do nothing
}
start函数
start函数干的事情就是使用pthread_start函数创建线程执行对应的函数,因为pthread_start函数需要调用对象以及函数的参数,所以strat函数需要两个参数,并将两个参数的值赋值给类中对应的对象:
void start(func_t func, void *args = nullptr)//start函数开始创建线程执行任务
{
    func_=func;
    args_=args;
}
然后我们就应该调用函数pthread_create来创建线程,这里本可以直接使用类内对象func_和args来完成线程的创建,但是我们这里另寻一路来带着大家回顾更多的知识,我们创建一个名为start_routine的类内函数,通过让pthread_create函数调用这个该来实现func_函数对象的调用
 void *start_routine(void *args)
{}
我们知道pthread_create函数对要调用的函数是有要求的,要求它只有一个参数并且函数的返回值和参数的类型都得是void*,但是类内函数有一个特点就是自动的隐藏了一个this指针,也就是说上面的start_routine函数看上去只有一个参数实际上他有两个,所以这是不符合pthread_create函数的要求的,那么这里的解决办法就是将该函数改成静态函数,这样就没有了this指针但是这种做法又带来了另外一个问题就是func_是类内的非静态对象,静态函数是没有资格调用他的,所以为了解决这个问题我们在pthread_create函数传递参数的时候就传递一个this指针过去,这样静态函数就可以通过这个this指针访问非静态的成员或者函数:
static void *start_routine(void *args)
{
    Thread *_this = static_cast<Thread *>(args);
}
void start(func_t func, void *args = nullptr)//start函数开始创建线程执行任务
{
    func_=func;
    args_=args;
    int n = pthread_create(&tid_, nullptr, start_routine, this);
    assert(n == 0);
    (void)n;
}
可是这里还存在一个问题func_对象是私有的,通过类对象是访问不到的,所以这里我们还得创建一个接口函数用来访问func_对象,比如说下面的代码:
void *callback()
{
	return func_(args_);
}//该函数调用类内的函数对象
然后就可以通过this指针调用这个callback函数调用func_对象:
void *callback()
{
	return func_(args_);
}//该函数调用类内的函数对象
static void *start_routine(void *args)
// 参数为指向该类对象的this指针所以可以访问到类内部的callback函数
{
    Thread *_this = static_cast<Thread *>(args);
    return _this->callback();
}
void start(func_t func, void *args = nullptr)//start函数开始创建线程执行任务
{
    func_=func;
    args_=args;
    int n = pthread_create(&tid_, nullptr, start_routine, this);
    assert(n == 0);
    (void)n;
}
那么这就是start函数的实现过程。
join函数
该函数的实现就非常的简单,直接调用pthread_join函数即可,然后创建一个变量记录一下返回值并判断返回值是否为0:
void join()
{
    int n = pthread_join(tid_, nullptr);
    assert(n == 0);
    (void)n;
}
threadname函数
该函数的作用就是返回线程的名字,所以该函数的实现就直接返回类内的string对象即可,那么这里的代码如下:
string threadname()
{
    return name_;
}
完整代码
#include 线程池的实现
准备工作
既然是线程池,那么肯定得有一个变量用来记录池内线程的个数,还得有一个数组用来存储创建出来的Thread对象的指针,因为线程要获取任务,所以我们还得添加一个队列用来存储待处理的任务,因为在获取数据和存放数据的过程中可能会遇到多线程所带来的线程安全问题所以得添加锁变量,又因为存放数据和获取数据的过程是互斥的所以这个锁变量只能有一个,那么当前的代码就如下:
template<class T>
class ThreadPool
{
public:

private:
    int _num;//表示线程池中线程的个数
    queue<T> _task_queue;//装载任务的队列
    vector<Thread*> _threads;//装载线程
    pthread_mutex_t _mutex;
    pthread_cond_t _cond;
};
构造函数和析构函数
构造函数只有一个参数用来表示当前的内存池有多少个线程并将该参数赋值给_num,然后在函数里面对条件变量和锁进行初始化,然后创建一个循环不断的创建Thread对象并将该对象的地址尾差到vector中
ThreadPool(int num=5)
:_num(num)
{
    pthread_mutex_init(&_mutex,nullptr);
    pthread_cond_init(&_cond,nullptr);
    //创建num个线程对象并将对象放到vector
    for(int i=0;i<num;i++)
    {
        _threads.push_back(new Thread());
    }
}
析构函数干的事情就是将条件变量和锁变量进行销毁,然后通过for循环将vector对象中指针指向的空间进行回收即可,那么这里的代码如下:
~ThreadPool()
{
    pthread_mutex_destroy(&_mutex);
    pthread_cond_destroy(&_cond);
    for(const auto& t:_threads)
    {
        delete t;
    }
}
push函数
该函数的作用就是往任务队列中查入数据,所以该函数需要一个const T&类型的参数:
void push(const T&in)
{
}
因为插入数据的过程可能会出现线程安全问题,所以函数的第一步就是先对其进行枷锁,然后调用队列中的push函数将参数插入到队列里面,此时的队列中肯定有数据,所以在此之后就使用pthread_cond_signal函数将条件变量上等待的线程进行唤醒最后解锁即可:
void push(const T&in)
{
    pthread_mutex_lock(&_mutex);
    _task_queue.push(in);
    pthread_cond_signal(&_cond);
    pthread_mutex_unlock(&_mutex);
}
pop函数
pop函数的作用是获取队列中的数据并删除,因为该函数是线程函数调用的,而多个线程在获取任务的时候要通过锁来保持互斥的关系,所以调用该函数的时候不用担心线程安全问题,所以在函数里面创建一个变量用来保存队列中的首元素数据并将其该数据删除,最后返回该变量即可:
T pop()
{
    T t=_task_queue.front();
    _task_queue.pop();
    return t;
}
run函数
run函数的功能就是将线程池中的每个线程都运行起来从队列中获取任务,那么这个时候就可以通过for循环的形式来调用Thread对象中的start函数来实现,因为start函数需要一个函数指针和一个参数,所以这里我们还得创建一个指定形式的函数,并且该函数还得是static类型
static void* handlerTask(void*args)
{}
在这个函数里面我们就可以实现从队列中获取任务并执行,所以该函数里面肯定得访问到类中的其他数据,所以我们传递给该函数的参数就是ThreadPool类型的this指针,但是这里我们还想实现一个功能就是在执行对应任务的时候想知道是哪个线程所执行的也就是知道对应线程的名字,所以按设想来说这里应该将对象的名字也传递给handlerTask函数,但是该函数只有一个参数传递了名字就传递不了this指针所以这里我们的做法就是再创建一个类,该类中有一个string对象用来存储名字和一个ThreadPool类型的指针用来访问类中的其他资源,那么这里的代码如下:
template<class T>
class ThreadPool;
template<class T>
class ThreadDate
{
public:
    ThreadPool<T>* threadpool;
    string name;
    ThreadDate(ThreadPool<T>*tp,const string& n)
    :name(n)
    ,threadpool(tp)
    {}
};
template<class T>
class ThreadPool
static void* handlerTask(void*args)
{}
public:
ThreadPool(int num=5)
:_num(num)
{
    pthread_mutex_init(&_mutex,nullptr);
    pthread_cond_init(&_cond,nullptr);
    //创建num个线程对象并将对象放到vector
    for(int i=0;i<num;i++)
    {
        _threads.push_back(new Thread());
    }
}
void run()
{}
~ThreadPool()
{
    pthread_mutex_destroy(&_mutex);
    pthread_cond_destroy(&_cond);
    for(const auto& t:_threads)
    {
        delete t;
    }
}
private:
    int _num;//表示线程池中线程的个数
    queue<T> _task_queue;//装载任务的队列
    vector<Thread*> _threads;//装载线程
    pthread_mutex_t _mutex;
    pthread_cond_t _cond;
};
那么在run函数里面要干的事情就是new一个ThreadDate对象,然后讲该对象的地址作为参数传递给start函数,并打印一句话用来表明当前的线程已经运转起来了:
void run()
{
    //这个函数就是将每个线程都启动
    for(const auto&t:_threads)
    {
        ThreadDate<T>*td = new ThreadDate<T>(this,t->threadname());
        t->start(handlerTask,td);
        cout<< t->threadname() << " start... " <<endl;
    }
}
虽然handlerTask函数拥有了this指针,但是锁变量和条件变量等等都是私有的外界是无法访问到的,所以这里还得添加一些接口函数用来访问这些成员变量:
void lockQueue() { pthread_mutex_lock(&_mutex); }//对锁上锁
void unlockQueue() { pthread_mutex_unlock(&_mutex); }//对锁进行解锁
bool isQueueEmpty() { return _task_queue.empty(); }//判断当前的队列是否为空
void threadWait() { pthread_cond_wait(&_cond, &_mutex); }//把线程放到条件变量上进行等待
有了这些函数之后handlerTask函数就可以实现了,首先将参数的类型进行转换然后使用lockQueue函数进行枷锁,枷锁成功之后就创建一个循环使用isQueueEmpty函数来判断当前的队列中是否有任务,如果没有的话就使用threadWait函数将该线程挂起
static void* handlerTask(void*args)
    //因为该函数是静态成员函数所以无法访问类中的分静态成员函数所以得传递this指针。
    //所以这里要么提供一些访问成员变量的接口要么提供一些功能的函数。
{
   ThreadDate<T>* td=static_cast<ThreadDate<T>*>(args);
   while(true)
   {
       td->threadpool->lockQueue();
       while(td->threadpool->isQueueEmpty())
       {
           td->threadpool->threadWait();
       }
}
while循环结束就表明当前的队列存在数据,所以此时就可以通过 td中的成员变量访问到pop函数从而获取到队列中的任务,因为任务的执行并不会收到多线程之间的影响,所以得到任务之后就可以使用unlockQueue函数进行解锁,然后执行任务并打印执行之后的结果,最外层的while循环结束之后就可以使用delete销毁td指针指向的对象并返回nullptr:
static void* handlerTask(void*args)
 //因为该函数是静态成员函数所以无法访问类中的分静态成员函数所以得传递this指针。
 //所以这里要么提供一些访问成员变量的接口要么提供一些功能的函数。
 {
     ThreadDate<T>* td=static_cast<ThreadDate<T>*>(args);
     while(true)
     {
         td->threadpool->lockQueue();
         while(td->threadpool->isQueueEmpty())
         {
             td->threadpool->threadWait();
         }
         T t=td->threadpool->pop();
         td->threadpool->unlockQueue();
         string result=t();
         cout<<td->name<<" 处理了任务 "<<t.toTaskString()<<" 处理的结果为:"<<result<<endl;
     }
     delete td;
     return nullptr;
 }
完整的代码
#include测试代码
我们可以用下面的代码来进行测试:
#include代码的运行结果如下:
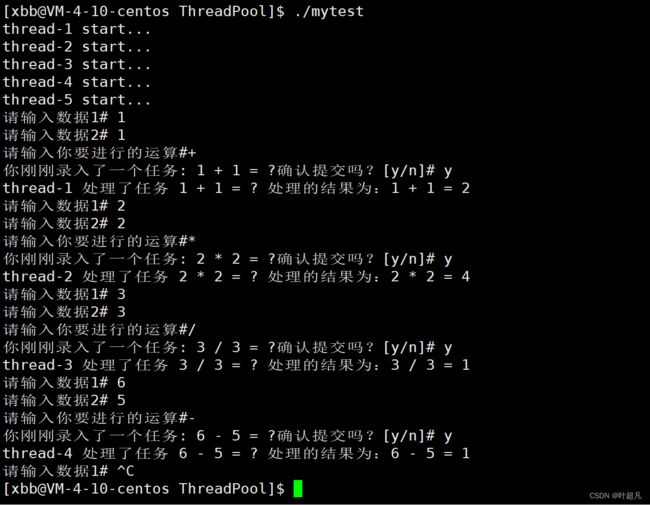
可以看到符合我们的预期那么这就是实现的过程。