Ansible playbook自动化运维工具详解
Ansible playbook自动化运维工具详解
- 一、playbook的相关知识
-
- 1.1、playbook 的简介
- 1.2、playbook的 各部分组成
- 二、基础的playbook剧本编写实例
- 三、 playbook的定义、引用变量
-
- 3.1、基础变量的定义与引用
- 3.2、引用fact信息中的变量
- 四、playbook中的when条件判断和变量循环使用
-
- 4.1、when条件判断
- 4.2、变量循环
- 五、Templates 模块
-
- cd /etc/ansible #在ansible的所在目录中创建该项目的目录 mkdir apache vim apache.yaml
- vim nginx.yaml
- vim test1.yaml
- vim test2.yaml
- vim test3.yaml
- vim test3.yaml
- 4.2 变量循环 (1)with_item 单循环输出 vim test4.yaml
- vim test4.yaml
- (2) with_list 每组列表一起循环的输出
- (3) with_together 同一列表位置数据组合输出的循环
- (4) with_nested 列表数据循环匹配的循环(根据列表个数定义有多少层的循环)
- 五、Templates 模块
- 六、Tags
-
- 6.1 单标签的使用
- 6.2、多标签的运用
- 6.3、通用标签always的运用
一、playbook的相关知识
1.1、playbook 的简介
- playbook是 一个不同于使用Ansible命令行执行方式的模式,其功能更强大灵活。
- 简单来说,playbook是一个非常简单的配置管理和多主机部署系统,不同于任何已经存在的模式,可作为一个适合部署复杂应用程序的基础。
- Playbook可以定制配置,可以按照指定的操作步骤有序执行,支持同步和异步方式。我们完成一个任务,例如安装部署一个httpd服务,我们需要多个模块(一个模块也可以称之为task)提供功能来完成。
- 而playbook就是组织多个task的容器,他的实质就是一个文件,有着特定的组织格式,它采用的语法格式是YAML(Yet Another Markup Language)。
1.2、playbook的 各部分组成
- Tasks:任务,即通过 task 调用 ansible 的模板将多个操作组织在一个 playbook 中运行
- Variables:变量
- Templates:模板
- Handlers:处理器,当changed状态条件满足时,(notify)触发执行的操作
- Roles:角色
二、基础的playbook剧本编写实例
playbook中运用的模块就是ansible中的模块,就像docker-compose一样将docker操作容器的指令归纳为一个yaml文件,开启运行yaml中的指令模块就能按照预设计的方向去完成。
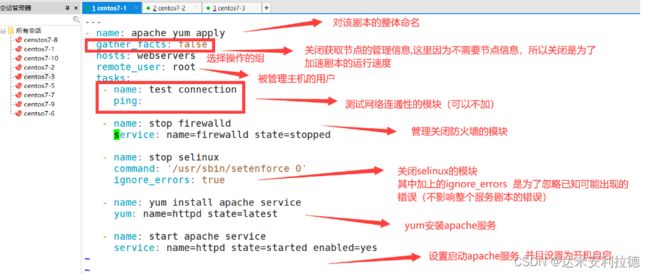
实例1:playbook编写 apache的yum安装部署剧本
剧本编写实现的需求:对Ansible管理的所有的webservers组的成员,yum安装最新版本的apache服务软件,并进行相应环境的调整,确保webservers的apache服务能够正常运行并设置开机自启
cd /etc/ansible    #在ansible的所在目录中创建该项目的目录
mkdir apache
vim apache.yaml
---
- name: apache yum apply
  gather_facts: false
  hosts: webservers
  remote_user: root
  tasks:
   - name: test connection
     ping:

   - name: stop firewalld
     service: name=firewalld state=stopped

   - name: stop selinux
     command: '/usr/sbin/setenforce 0'
     ignore_errors: true

   - name: yum install apache service
     yum: name=httpd state=latest

   - name: start apache service
     service: name=httpd state=started enabled=yes
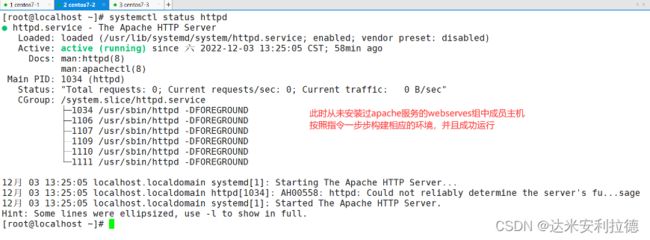
运行剧本的方法:
//运行playbook
ansible-playbook apache.yaml


//补充参数:
-k(–ask-pass):用来交互输入ssh密码
-K(-ask-become-pass):用来交互输入sudo密码
-u:指定用户
ansible-playbook apache.yaml --syntax-check    #检查yaml文件的语法是否正确
ansible-playbook apache.yaml --list-task       #检查tasks任务
ansible-playbook apache.yaml --list-hosts      #检查生效的主机
ansible-playbook apache.yaml --start-at-task='install httpd'     #指定从某个task开始运行

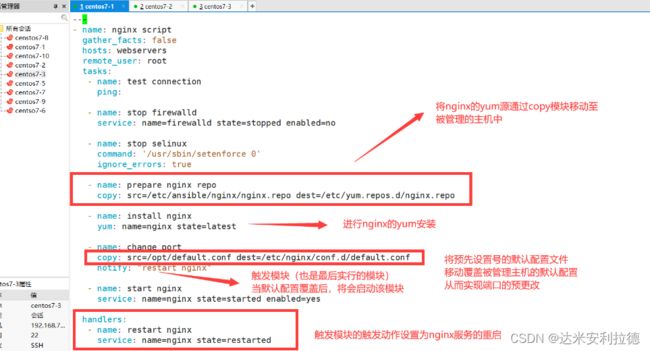
实例2:playbook编写nginx 的yum安装并且能修改其监听端口的剧本
需求:通过yum安装nginx服务,并且能够控制被管理的主机的服务的开启,按照预设的配置在运行时的端口。
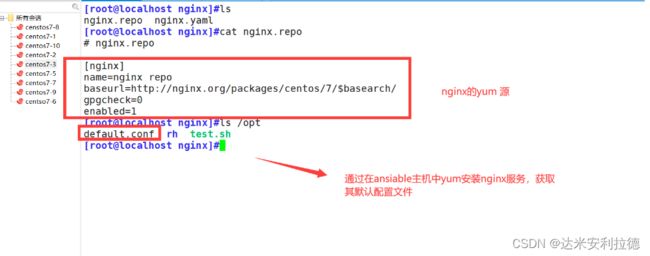
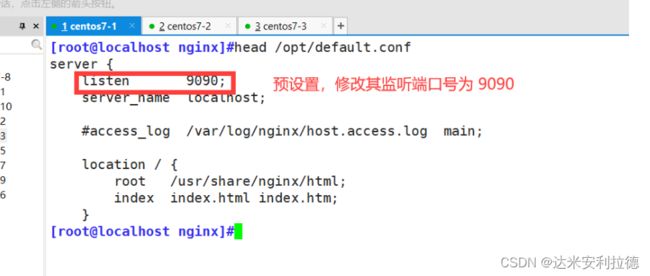
在编写剧本前,需要准备相应的两个文件,一个为nginx的yum源。一个为相对应的主配置文件,在主配置文件中修改其端口,在将该配置移至被管理主机中,作为运行启动时的默认配置
剧本编写:
mkdir /etc/ansible/nginx

vim nginx.yaml
---
- name: nginx script
  gather_facts: false
  hosts: webservers
  remote_user: root
  tasks:
   - name: test connection
     ping:

   - name: stop firewalld
     service: name=firewalld state=stopped enabled=no

   - name: stop selinux
     command: '/usr/sbin/setenforce 0'
     ignore_errors: true

   - name: prepare nginx repo
     copy: src=/etc/ansible/nginx/nginx.repo dest=/etc/yum.repos.d/nginx.repo

   - name: install nginx
     yum: name=nginx state=latest

   - name: change port
     copy: src=/opt/default.conf dest=/etc/nginx/conf.d/default.conf
     notify: "restart nginx"

   - name: start nginx
     service: name=nginx state=started enabled=yes

  handlers:
   - name: restart nginx
     service: name=nginx state=restarted
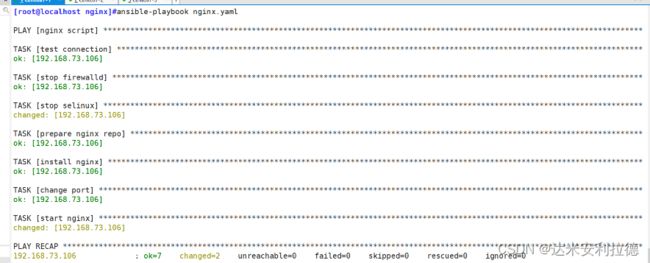
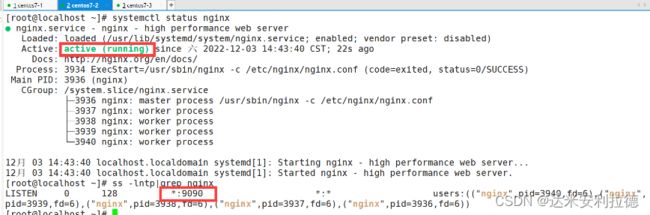
运行结果:
三、 playbook的定义、引用变量
3.1、基础变量的定义与引用
在yaml文件中,我们可以在初始配置的模块中用var去定义变量的存在,变量的格式为key:value,以此来确定该变量在剧本中的存在
vim test1.yaml
---
- name: this is a play for testing variables
  hosts: dbservers
  remote_user: root
  vars:
   filename: abc.txt
  tasks:
   - name: touch a test file
     file: path=/opt/{{filename}} state=touch


ansible-playbook test1.yaml


3.2、引用fact信息中的变量
首先我们知道  使用 ansible 组  -m setup   可以收集该组中所有的节点信息 ,

所以setup中fact'信息,有时候会剧本编写中需要,而fact的信息也是可以通过变量的方式进行调用
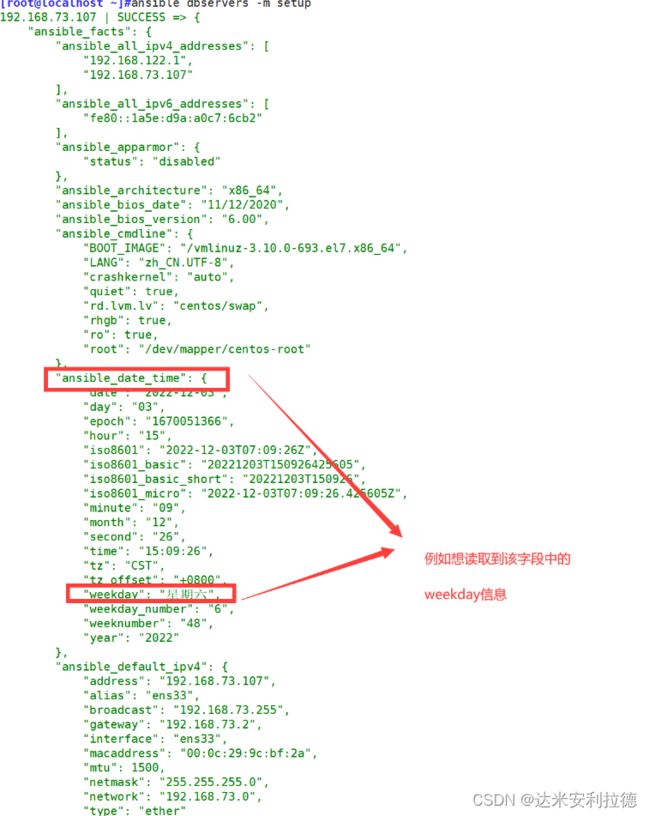
剧本编写:
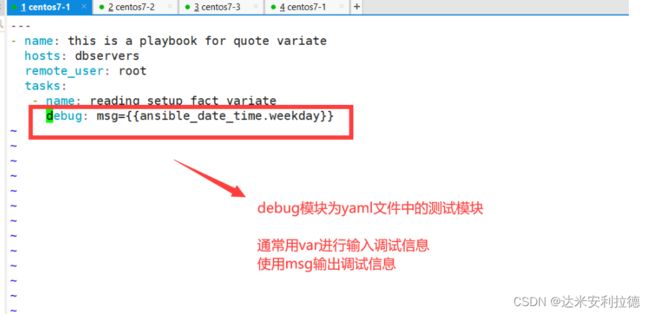
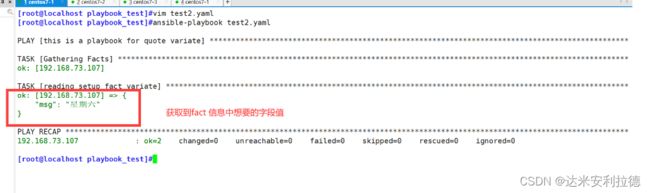
vim test2.yaml
---
- name: this is a playbook for quote variate
  hosts: dbservers
  remote_user: root
  tasks:
   - name: reading setup fact variate
     debug: msg={{ansible_date_time.weekday}}
~
运行的结果:
四、playbook中的when条件判断和变量循环使用
4.1、when条件判断
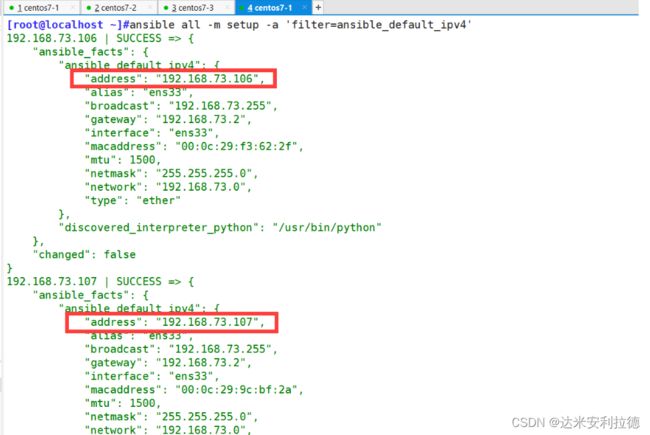
#选用filter=ansible_default_ipv4中的address作为when条件进行测试
ansible all -m setup -a 'filter=ansible_default_ipv4'
测试剧本编写:
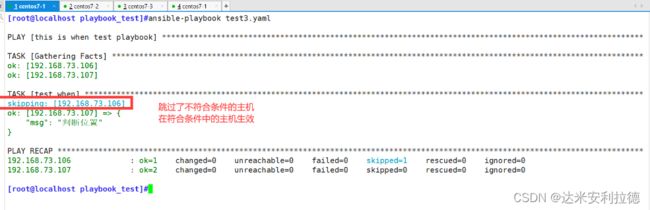
vim test3.yaml
---
- name: this is when test playbook
  hosts: all
  remote_user: root
  tasks:
   - name: test when
     debug: msg='判断位置'
     when: ansible_default_ipv4.address == "192.168.73.107"


ansible-playbook test3.yaml
4.2、变量循环
with_item 单循环输出
vim test4.yaml
---
- name: item test
  hosts: dbservers
  remote_user: root
  gather_facts: no
  tasks:
   - debug:
       msg: "{{item}}"
     with_items: [a, b, c, d]

ansible-playbook test4.yaml

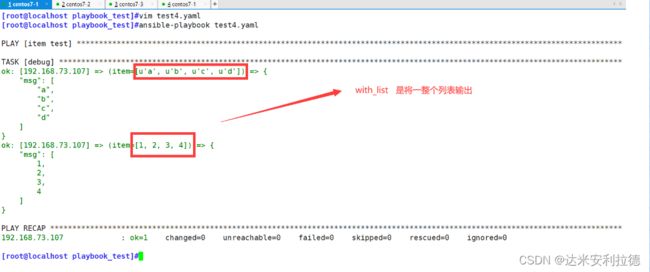
with_list 每组列表一起循环的输出
---
- name: item test
  hosts: dbservers
  remote_user: root
  gather_facts: no
  tasks:
   - debug:
       msg: "{{item}}"
     with_list:
      - [a, b, c, d]
      - [1 ,2, 3, 4]
~
~
with_together 同一列表位置数据组合输出的循环
---
- name: item test
  hosts: dbservers
  remote_user: root
  gather_facts: no
  tasks:
   - debug:
       msg: "{{item}}"
     with_together:
      - [a, b, c, d]
      - [1 ,2, 3, 4]
~

with_nested 列表数据循环匹配的循环(根据列表个数定义有多少层的循环)
---
- name: item test
  hosts: dbservers
  remote_user: root
  gather_facts: no
  tasks:
   - debug:
       msg: "{{item}}"
     with_nested:
      - [a, b, c, d]
      - [1 ,2, 3, 4]
~

四种迭代循环方式的总结
-
whith_items: {{item}}会把所有的列表展开进行遍历输出,with_flattened也可以替代with_items
-
with_list: {{item}}会把每个列表当作一个整体输出。如果每个列表中只有一个值,则效果与with items一致。loop也可以替代ith
-
with_together: {{item}}引用时会把每个列表相同位置的值对齐合并后输出
-
with nested:{ {item}}引用时会把每个列表的值两两组合循环输出
五、Templates 模块
linux自动化运维
同时被 2 个专栏收录
8 篇文章1 订阅
订阅专栏
Linux软件使用
10 篇文章1 订阅
订阅专栏
内容预知
目录
内容预知
1.playbook的相关知识
1.1 playbook 的简介
1.2 playbook的 各部分组成
- 基础的playbook剧本编写实例
实例1:playbook编写 apache的yum安装部署剧本
实例2:playbook编写nginx 的yum安装并且能修改其监听端口的剧本
- playbook的定义、引用变量
3.1 基础变量的定义与引用
3.2 引用fact信息中的变量
- playbook中的when条件判断和变量循环使用
4.1 when条件判断
4.2 变量循环
(1)with_item 单循环输出
(2) with_list 每组列表一起循环的输出
(3) with_together 同一列表位置数据组合输出的循环
(4) with_nested 列表数据循环匹配的循环(根据列表个数定义有多少层的循环)
四种迭代循环方式的总结
- Templates 模块
(1)先准备一个以 .j2 为后缀的 template 模板文件,设置引用的变量
(2) 修改主机清单文件,使用主机变量定义一个变量名相同,而值不同的变量
(3) 编写 playbook
- Tags
6.1 单标签的使用
6.2 多标签的运用
6.3 通用标签always的运用
- roles
1.playbook的相关知识
1.1 playbook 的简介
playbook是 一个不同于使用Ansible命令行执行方式的模式,其功能更强大灵活。简单来说,playbook是一个非常简单的配置管理和多主机部署系统,不同于任何已经存在的模式,可作为一个适合部署复杂应用程序的基础。Playbook可以定制配置,可以按照指定的操作步骤有序执行,支持同步和异步方式。我们完成一个任务,例如安装部署一个httpd服务,我们需要多个模块(一个模块也可以称之为task)提供功能来完成。而playbook就是组织多个task的容器,他的实质就是一个文件,有着特定的组织格式,它采用的语法格式是YAML(Yet Another Markup Language)。
对于YAML文件格式的编写,我在之前的博客就有所介绍:
【云原生】Docker-compose单机容器集群编排_站在这别动,我去给你买橘子的博客-CSDN博客
https://blog.csdn.net/qq_62462797/article/details/128052363?spm=1001.2014.3001.5501
1.2 playbook的 各部分组成
(1)Tasks:任务,即通过 task 调用 ansible 的模板将多个操作组织在一个 playbook 中运行
(2)Variables:变量
(3)Templates:模板
(4)Handlers:处理器,当changed状态条件满足时,(notify)触发执行的操作
(5)Roles:角色
- 基础的playbook剧本编写实例
playbook中运用的模块就是ansible中的模块,就像docker-compose一样将docker操作容器的指令归纳为一个yaml文件,开启运行yaml中的指令模块就能按照预设计的方向去完成。
实例1:playbook编写 apache的yum安装部署剧本
剧本编写实现的需求:对Ansible管理的所有的webservers组的成员,yum安装最新版本的apache服务软件,并进行相应环境的调整,确保webservers的apache服务能够正常运行并设置开机自启
cd /etc/ansible #在ansible的所在目录中创建该项目的目录
mkdir apache
vim apache.yaml
- name: apache yum apply
gather_facts: false
hosts: webservers
remote_user: root
tasks:-
name: test connection
ping: -
name: stop firewalld
service: name=firewalld state=stopped -
name: stop selinux
command: ‘/usr/sbin/setenforce 0’
ignore_errors: true -
name: yum install apache service
yum: name=httpd state=latest -
name: start apache service
service: name=httpd state=started enabled=yes
-
运行剧本的方法:
//运行playbook
ansible-playbook apache.yaml
//补充参数:
-k(–ask-pass):用来交互输入ssh密码
-K(-ask-become-pass):用来交互输入sudo密码
-u:指定用户
ansible-playbook apache.yaml --syntax-check #检查yaml文件的语法是否正确
ansible-playbook apache.yaml --list-task #检查tasks任务
ansible-playbook apache.yaml --list-hosts #检查生效的主机
ansible-playbook apache.yaml --start-at-task=‘install httpd’ #指定从某个task开始运行
实例2:playbook编写nginx 的yum安装并且能修改其监听端口的剧本
需求:通过yum安装nginx服务,并且能够控制被管理的主机的服务的开启,按照预设的配置在运行时的端口。
在编写剧本前,需要准备相应的两个文件,一个为nginx的yum源。一个为相对应的主配置文件,在主配置文件中修改其端口,在将该配置移至被管理主机中,作为运行启动时的默认配置
剧本编写:
mkdir /etc/ansible/nginx
vim nginx.yaml
-
name: nginx script
gather_facts: false
hosts: webservers
remote_user: root
tasks:-
name: test connection
ping: -
name: stop firewalld
service: name=firewalld state=stopped enabled=no -
name: stop selinux
command: ‘/usr/sbin/setenforce 0’
ignore_errors: true -
name: prepare nginx repo
copy: src=/etc/ansible/nginx/nginx.repo dest=/etc/yum.repos.d/nginx.repo -
name: install nginx
yum: name=nginx state=latest -
name: change port
copy: src=/opt/default.conf dest=/etc/nginx/conf.d/default.conf
notify: “restart nginx” -
name: start nginx
service: name=nginx state=started enabled=yes
handlers:
- name: restart nginx
service: name=nginx state=restarted
-
运行结果:
- playbook的定义、引用变量
3.1 基础变量的定义与引用
在yaml文件中,我们可以在初始配置的模块中用var去定义变量的存在,变量的格式为key:value,以此来确定该变量在剧本中的存在
vim test1.yaml
- name: this is a play for testing variables
hosts: dbservers
remote_user: root
vars:
filename: abc.txt
tasks:- name: touch a test file
file: path=/opt/{{filename}} state=touch
- name: touch a test file
ansible-playbook test1.yaml
3.2 引用fact信息中的变量
首先我们知道 使用 ansible 组 -m setup 可以收集该组中所有的节点信息 ,
所以setup中fact’信息,有时候会剧本编写中需要,而fact的信息也是可以通过变量的方式进行调用
剧本编写:
vim test2.yaml
- name: this is a playbook for quote variate
hosts: dbservers
remote_user: root
tasks:- name: reading setup fact variate
debug: msg={{ansible_date_time.weekday}}
~
- name: reading setup fact variate
运行的结果:
- playbook中的when条件判断和变量循环使用
4.1 when条件判断
#选用filter=ansible_default_ipv4中的address作为when条件进行测试
ansible all -m setup -a ‘filter=ansible_default_ipv4’
测试剧本编写:
vim test3.yaml
- name: this is when test playbook
hosts: all
remote_user: root
tasks:- name: test when
debug: msg=‘判断位置’
when: ansible_default_ipv4.address == “192.168.73.107”
- name: test when
ansible-playbook test3.yaml
除此之外 when条件还可以通过 !=(不等于条件来进行判断)
vim test3.yaml
- name: this is when test playbook
hosts: all
remote_user: root
tasks:- name: test when
debug: msg=‘判断位置’
when: ansible_default_ipv4.address != “192.168.73.107”
ansible-playbook test3.yaml
- name: test when
4.2 变量循环
(1)with_item 单循环输出
vim test4.yaml
- name: item test
hosts: dbservers
remote_user: root
gather_facts: no
tasks:- debug:
msg: “{{item}}”
with_items: [a, b, c, d]
- debug:
ansible-playbook test4.yaml
当列表为两个时。with_item的输出方式:
vim test4.yaml
- name: item test
hosts: dbservers
remote_user: root
gather_facts: no
tasks:- debug:
msg: “{{item}}”
with_items:- [a, b, c, d]
- [1 ,2, 3, 4]
ansible-playbook test4.yaml
- debug:
(2) with_list 每组列表一起循环的输出
- name: item test
hosts: dbservers
remote_user: root
gather_facts: no
tasks:- debug:
msg: “{{item}}”
with_list:- [a, b, c, d]
- [1 ,2, 3, 4]
~
~
- debug:
(3) with_together 同一列表位置数据组合输出的循环
- name: item test
hosts: dbservers
remote_user: root
gather_facts: no
tasks:- debug:
msg: “{{item}}”
with_together:- [a, b, c, d]
- [1 ,2, 3, 4]
~
- debug:
- name: item test
hosts: dbservers
remote_user: root
gather_facts: no
tasks:- debug:
msg: “{{item}}”
with_together:- [a, b, c, d]
- [1 ,2, 3, 4]
- [A, B, C]
- debug:
(4) with_nested 列表数据循环匹配的循环(根据列表个数定义有多少层的循环)
- name: item test
hosts: dbservers
remote_user: root
gather_facts: no
tasks:- debug:
msg: “{{item}}”
with_nested:- [a, b, c, d]
- [1 ,2, 3, 4]
~
- debug:
四种迭代循环方式的总结
whith_items: {{item}}会把所有的列表展开进行遍历输出,with_flattened也可以替代with_items
with_list: {{item}}会把每个列表当作一个整体输出。如果每个列表中只有一个值,则效果与with items一致。loop也可以替代ith
with_together: {{item}}引用时会把每个列表相同位置的值对齐合并后输出
with nested:{ {item}}引用时会把每个列表的值两两组合循环输出
五、Templates 模块
-
Jinja是基于Python的模板引擎。Template类是Jinja的一个重要组件,可以看作是一个编译过的模板文件,用来产生目标文本,传递Python的变量给模板去替换模板中的标记。
-
本次我们以改变apche的配置文件为例,来展现Templates模块的运用
先准备一个以 .j2 为后缀的 template 模板文件,设置引用的变量
#如果没有相关的httpd的配置文件,可以先yum按住一个httpd的服务,取其主配置文件
cp /etc/httpd/conf/httpd.conf /opt/httpd.conf.j2

vim /opt/httpd.conf.j2
Listen {{http_port}}				#42行,修改
ServerName {{server_name}}			#95行,修改
DocumentRoot "{{root_dir}}"          #119行,修改
修改主机清单文件,使用主机变量定义一个变量名相同,而值不同的变量
vim /etc/ansible/hosts
[webservers]
192.168.73.106 http_port=192.168.73.106:80 server_name=www.test1.com:80 root_dir=/etc/httpd/htdocs

[dbservers]
192.168.73.107 http_port=192.168.73.107:80 server_name=www.test2.com:80 root_dir=/etc/httpd/htdocs
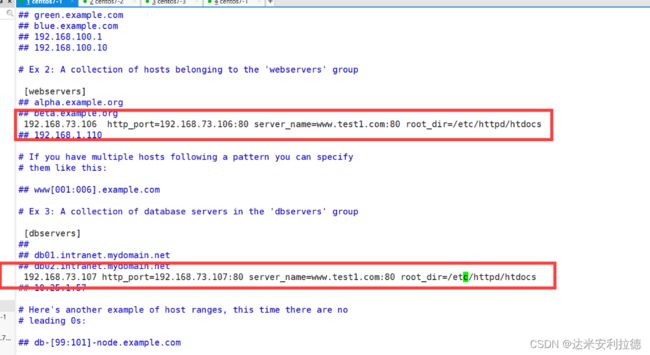
此外如果没有做DNS解析域名,还需要对主机名进行映射 :
vim /etc/hosts

192.168.73.106 www.test1.com
192.168.73.107 www.test2.com
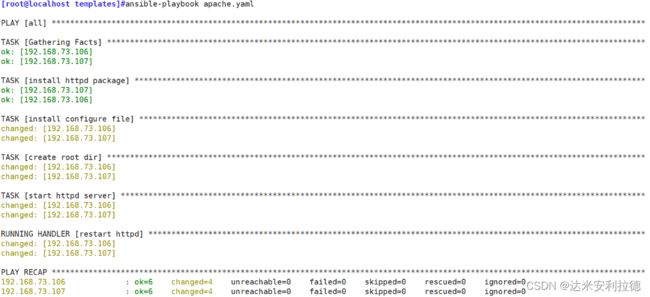
编写 playbook
mkdir /etc/ansible/templates
vim apache.yaml
---
- hosts: all
remote_user: root
vars:
- package: httpd
- service: httpd
tasks:
- name: install httpd package
yum: name={{package}} state=latest
- name: install configure file
template: src=/opt/httpd.conf.j2 dest=/etc/httpd/conf/httpd.conf
notify:
- restart httpd
- name: create root dir
file: path=/etc/httpd/htdocs state=directory
- name: start httpd server
service: name={{service}} enabled=true state=started
handlers:
- name: restart httpd
service: name={{service}} state=restarted
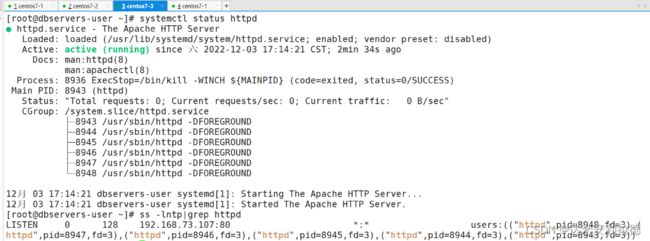
ansiable-playbook apache.yaml

六、Tags
- 可以在一个playbook中为某个或某些任务定义“标签”,在执行此playbook时通过ansible-playbook命令使用–tags选项能实现仅运行指定的tasks。
- playbook还提供了一个特殊的tags为always。作用就是当使用always作为tags的task时,无论执行哪一个tags时,定义有always的tags都会执行。
6.1 单标签的使用
vim test1.yaml
---
- name: this is a play for testing variables
hosts: dbservers
remote_user: root
vars:
filename: abc.txt
tasks:
- name: position 1
debug:
msg: 'ls /opt'
tags:
- only
- name: position 2
debug:
msg: 'ls /mnt'
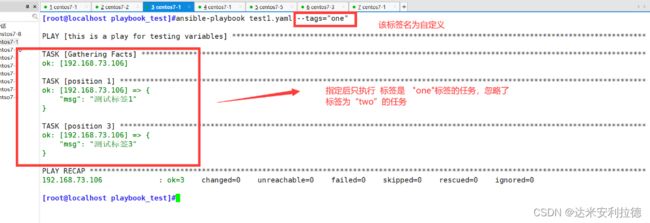
ansible-playbook test1.yaml --tags="only"

6.2、多标签的运用
---
- name: this is a play for testing variables
  hosts: dbservers
  remote_user: root
  vars:
   filename: abc.txt
  tasks:
   - name: position 1
     debug:
       msg: '测试标签1'
     tags:
      - one
   - name: position 2
     debug:
       msg: '测试标签2'
     tags:
      - two

   - name: position 3
     debug:
       msg: '测试标签3'
     tags:
      - one
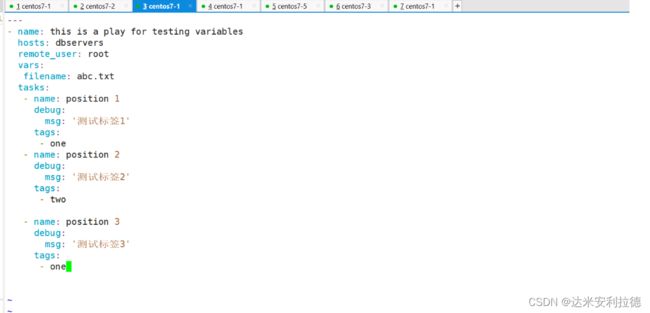
执行结果:
6.3、通用标签always的运用
---
- name: this is a play for testing variables
  hosts: dbservers
  remote_user: root
  vars:
   filename: abc.txt
  tasks:
   - name: position 1
     debug:
       msg: '测试标签1'
     tags:
      - one
   - name: position 2
     debug:
       msg: '测试通用标签always'
     tags:
      - always

   - name: position 3
     debug:
       msg: '测试标签3'
     tags:
      - one
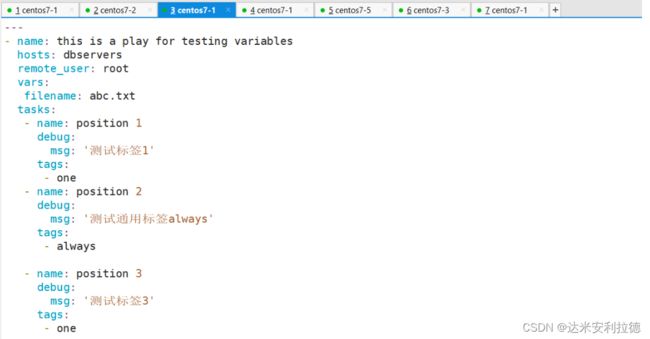
执行结果:
