Nginx的安装
Nginx的安装
Windows下Nginx的安装
1、下载nginx
下载稳定版本:
http://nginx.org/en/download.html
直接下载 nginx-1.20.0.zip :
http://nginx.org/download/nginx-1.20.0.zip
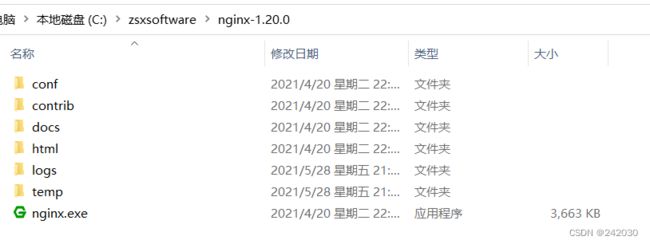
下载后解压,解压后如下:
2、启动Nginx
有很多种方法启动nginx
(1)、直接双击nginx.exe,双击后一个黑色的弹窗一闪而过
(2)、打开cmd命令窗口,切换到nginx解压目录下,输入命令 nginx.exe 或者 start nginx ,回车即可
3、检查Nginx是否启动成功
直接在浏览器地址栏输入网址 http://localhost:80,回车,出现以下页面说明启动成功。
也可以在cmd命令窗口输入命令 tasklist /fi "imagename eq nginx.exe" ,出现如下结果说明启动成功
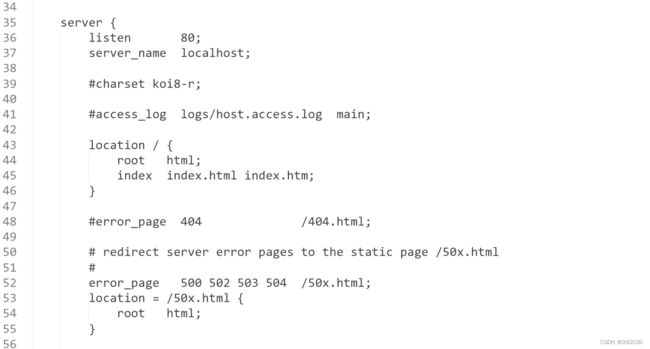
nginx的配置文件是conf目录下的nginx.conf,默认配置的nginx监听的端口为80,如果80端口被占用可以修改
为未被占用的端口即可
检查80端口是否被占用的命令是: netstat -ano | findstr 0.0.0.0:80 或 netstat -ano | findstr
"80"
当我们修改了nginx的配置文件nginx.conf 时,不需要关闭nginx后重新启动nginx,只需要执行命令 nginx -s
reload 即可让改动生效。
4、关闭Nginx
如果使用cmd命令窗口启动nginx,关闭cmd窗口是不能结束nginx进程的,可使用两种方法关闭nginx
(1)、输入nginx命令 nginx -s stop(快速停止nginx) 或 nginx -s quit(完整有序的停止nginx)
(2)、使用taskkill: taskkill /f /t /im nginx.exe
5、使用Nginx代理服务器做负载均衡
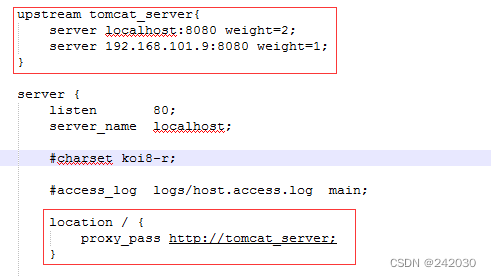
我们可以修改nginx的配置文件nginx.conf 达到访问nginx代理服务器时跳转到指定服务器的目的,即通过
proxy_pass 配置请求转发地址,即当我们依然输入http://localhost:80 时,请求会跳转到我们配置的服务
器:
同理,我们可以配置多个目标服务器,当一台服务器出现故障时,nginx能将请求自动转向另一台服务器,例如配
置如下:
当服务器 localhost:8080 挂掉时,nginx能将请求自动转向服务器 192.168.101.9:8080 。上面还加了一个weight
属性,此属性表示各服务器被访问到的权重,weight越高被访问到的几率越高。
6、Nginx配置静态资源
将静态资源(如jpg|png|css|js等)放在如下配置的C:\zsxsoftware\nginx-1.20.0\static目录下,然后在
nginx配置文件中做如下配置(注意:静态资源配置只能放在 location / 中)。
location / {
            root   C:\\zsxsoftware\\nginx-1.20.0\\static;
            index  index.html index.htm;
        }
浏览器中访问 http://localhost/shop/show.png
Linux下Nginx的安装
下面的操作是以Centos7为例
1、下载软件
http://nginx.org/
这里选择 nginx-1.12.2.tar.gz
2、安装nginx相关依赖
gcc
pcre
openssl
zlib
2.1 安装openssl、zlib、gcc依赖
yum -y install make zlib zlib-devel gcc-c++ libtool openssl openssl-devel
2.2 安装pcre依赖
第一步 联网下载pcre压缩文件依赖
wget http://downloads.sourceforge.net/project/pcre/pcre/8.37/pcre-8.37.tar.gz
也可以提前下载好pcre-8.37.tar.gz
第二步 解压压缩文件
tar –xvf pcre-8.37.tar.gz
第三步进入解压后的目录pcre-8.37执行
./configure
完成后,在pcre-8.37目录下执行make,最后执行make install
make && make install
使用 pcre-config --version验证是否安装成功
[root@zsx pcre-8.37]# pcre-config --version
8.37
3、安装Nginx
① 下载nginx
$ wget -c https://nginx.org/download/nginx-1.12.2.tar.gz
也可以提前下载nginx-1.12.2.tar.gz
② 依然是直接命令:
$ tar -zxvf nginx-1.12.2.tar.gz
$ cd nginx-1.12.2
③ 配置:
其实在 nginx-1.12.0 版本中你就不需要去配置相关东西,默认就可以了。当然,如果你要自己配置目录也是可以
的。
1.使用默认配置
$ ./configure
2.自定义配置(不推荐)
$ ./configure \
--prefix=/usr/local/nginx \
--conf-path=/usr/local/nginx/conf/nginx.conf \
--pid-path=/usr/local/nginx/conf/nginx.pid \
--lock-path=/var/lock/nginx.lock \
--error-log-path=/var/log/nginx/error.log \
--http-log-path=/var/log/nginx/access.log \
--with-http_gzip_static_module \
--http-client-body-temp-path=/var/temp/nginx/client \
--http-proxy-temp-path=/var/temp/nginx/proxy \
--http-fastcgi-temp-path=/var/temp/nginx/fastcgi \
--http-uwsgi-temp-path=/var/temp/nginx/uwsgi \
--http-scgi-temp-path=/var/temp/nginx/scgi
注:将临时文件目录指定为/var/temp/nginx,需要在/var下创建temp及nginx目录
④ 编辑安装
$ make && make install
查看版本号(使用nginx操作命令前提条件:必须进入nginx的目录/usr/local/nginx/sbin)
$ ./nginx -v
[root@zsx sbin]# ./nginx -v
nginx version: nginx/1.12.2
查找安装路径:
$ whereis nginx
[root@zsx sbin]# whereis nginx
nginx: /usr/local/nginx /usr/local/nginx/sbin/nginx.old /usr/local/nginx/sbin/nginx
⑤ 启动,停止nginx
$ cd /usr/local/nginx/sbin/
$ ./nginx  # 启动
$ ./nginx -s stop  # 关闭
$ ./nginx -s quit  #
$ ./nginx -s reload # 重启,改了配置文件后可以重启
查询nginx进程:
$ ps aux|grep nginx
[root@zsx sbin]# ps -ef | grep nginx
root      73742      1  0 10:04 ?        00:00:00 nginx: master process ./nginx
root      73744  73742  0 10:04 ?        00:00:00 nginx: worker process
root      73751  36158  0 10:04 pts/0    00:00:00 grep --color=auto nginx
启动成功后,在浏览器可以看到欢迎页面。
如果出现问题可能是80端口没有开放。
在windows系统中访问linux中nginx,默认不能访问的,因为防火墙问题
(1)关闭防火墙
(2)开放访问的端口号,80端口
查看开放的端口号
firewall-cmd --list-all
设置开放的端口号
firewall-cmd --add-service=http –permanent
firewall-cmd --add-port=80/tcp --permanent
重启防火墙
firewall-cmd --reload


