Spring Boot与Spring中的数据缓存Cache支持与实战(附源码)
创作不易 觉得有帮助请点赞关注收藏
我们知道内存的读取速度远大于硬盘的读取速度,当需要重复的获取相同数据时,一次一次的请求数据库或者远程服务,导致在数据库查询或者远程方法调用上小号大量的时间,最终导致程序性能降低,这就是数据缓存要解决的问题(学过计算机组成原理或者操作系统的同学们应该比较熟悉)
一、Spring缓存支持
Spring框架定义了org.springframework.cache CacheManager和org.springframework.cache.Cache接口来统一不同的缓存技术
CacheManager常用方法如下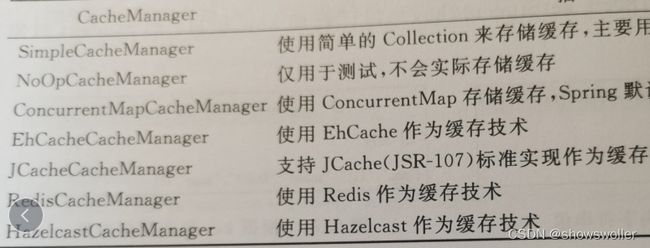
1:@Cacheable
该注解可以标记在一个方法上,也可以标记在一个类上,当标记在一个方法上时表示该方法是支持缓存的,当标记在一个类上时则表示该类所有的方法都是支持缓存的。对于一个支持缓存的方法,在方法执行前,Spring先检查缓存中是否存在方法返回的数据,如果存在则直接返回缓存数据,如果不存在,则调用方法并将方法返回值存入缓存
2:@CacheEvict
该注解用来标注在需要清楚缓存元素的方法或类上,当标记在一个类上时,表示其中所有方法的执行都会触发缓存的清除操作
3:@CachePut
该注解也可以声明一个方法支持缓存功能
4:Caching
该注解可以在一个方法或类上同时指定多个Spring Cache相关的注解
5:CacheConfig
该注解作用在类上可以设置当前缓存的一些公共设置
二、Spring Boot缓存支持
1:创建基于spring-voot-starter-cache 和spring-boot-starter-data-jpa依赖的Spring BootWeb应用
2:配置application.properties文件 代码如下
server.servlet.context-path=/ch6_10
###
##数据源信息配置
###
#数据库地址
spring.datasource.url=jdbc:mysql://localhost:3306/springbootjpa?characterEncoding=utf8
#数据库用户名
spring.datasource.username=root
#数据库密码
spring.datasource.password=root
#数据库驱动
spring.datasource.driver-class-name=com.mysql.jdbc.Driver
####
#JPA持久化配置
####
#指定数据库类型
spring.jpa.database=MYSQL
#指定是否在日志中显示SQL语句
spring.jpa.show-sql=true
#指定自动创建、更新数据库表等配置,update表示如果数据库中存在持久化类对应的表就不创建,不存在就创建对应的表
spring.jpa.hibernate.ddl-auto=update
#让控制器输出的JSON字符串格式更美观
spring.jackson.serialization.indent-output=true
3:修改pom.xml文件 添加mysql依赖
-

4.0.0


-

org.springframework.boot

spring-boot-starter-parent

2.1.8.RELEASE


com.ch

ch6_10

0.0.1-SNAPSHOT

ch6_10

Demo project for Spring Boot


-

11


-


-

org.springframework.boot

spring-boot-starter-cache


-

org.springframework.boot

spring-boot-starter-data-jpa


-

org.springframework.boot

spring-boot-starter-web


-

mysql

mysql-connector-java

5.1.45


-

org.springframework.boot

spring-boot-starter-test

test


-


-


-

org.springframework.boot

spring-boot-maven-plugin
4:创建持久化实体类
代码如下
package com.ch.ch6_10.entity;
import java.io.Serializable;
import javax.persistence.Entity;
import javax.persistence.GeneratedValue;
import javax.persistence.GenerationType;
import javax.persistence.Id;
import javax.persistence.Table;
import com.fasterxml.jackson.annotation.JsonIgnoreProperties;
@Entity
@Table(name = "student_table")
@JsonIgnoreProperties(value = {"hibernateLazyInitializer"})
public class Student implements Serializable{
	private static final long serialVersionUID = 1L;
	@Id
	@GeneratedValue(strategy = GenerationType.IDENTITY)
	private int id;//主键
	private String sno;
	private String sname;
	private String ssex;
	public Student() {
		super();
	}
	public Student(int id, String sno, String sname, String ssex) {
		super();
		this.id = id;
		this.sno = sno;
		this.sname = sname;
		this.ssex = ssex;
	}
	public int getId() {
		return id;
	}
	public void setId(int id) {
		this.id = id;
	}
	public String getSno() {
		return sno;
	}
	public void setSno(String sno) {
		this.sno = sno;
	}
	public String getSname() {
		return sname;
	}
	public void setSname(String sname) {
		this.sname = sname;
	}
	public String getSsex() {
		return ssex;
	}
	public void setSsex(String ssex) {
		this.ssex = ssex;
	}
}
5:创建数据访问接口
package com.ch.ch6_10.repository;
import org.springframework.data.jpa.repository.JpaRepository;
import com.ch.ch6_10.entity.Student;
public interface StudentRepository extends JpaRepository{

}
6:创建业务层 包括一个接口和一个实现类
接口代码如下
package com.ch.ch6_10.service;
import com.ch.ch6_10.entity.Student;
public interface StudentService {
	public Student saveStudent(Student student);
	public void deleteCache(Student student);
	public Student selectOneStudent(Integer id);
}
实现类代码如下
package com.ch.ch6_10.service;
import org.springframework.beans.factory.annotation.Autowired;
import org.springframework.cache.annotation.CacheEvict;
import org.springframework.cache.annotation.CachePut;
import org.springframework.cache.annotation.Cacheable;
import org.springframework.stereotype.Service;
import com.ch.ch6_10.entity.Student;
import com.ch.ch6_10.repository.StudentRepository;
@Service
public class StudentServiceImpl implements StudentService{
	@Autowired
	private StudentRepository studentRepository;
	@Override
	@CachePut(value = "student", key="#student.id")
	public Student saveStudent(Student student) {
		Student s = studentRepository.save(student);
		System.out.println("为key=" + student.getId() + "数据做了缓存");
		return s;
	}
	@Override
	@CacheEvict(value = "student", key="#student.id")
	public void deleteCache(Student student) {
		System.out.println("删除了key=" + student.getId() + "的数据缓存");
	}
	@Override
	@Cacheable(value = "student")
	public Student selectOneStudent(Integer id) {
		Student s = studentRepository.getOne(id);
		System.out.println("为key=" + id + "数据做了缓存");
		return s;
	}
}
7:创建控制器层
package com.ch.ch6_10.controller;
import org.springframework.beans.factory.annotation.Autowired;
import org.springframework.web.bind.annotation.RequestMapping;
import org.springframework.web.bind.annotation.RestController;
import com.ch.ch6_10.entity.Student;
import com.ch.ch6_10.service.StudentService;
@RestController
public class TestCacheController {
	@Autowired
	private StudentService studentService;
	@RequestMapping("/savePut")
	public Student save(Student student) {
		return studentService.saveStudent(student);
	}
	@RequestMapping("/selectAble")
	public Student select(Integer id) {
		return studentService.selectOneStudent(id);
	}
	@RequestMapping("/deleteEvict")
	public String deleteCache(Student student) {
		studentService.deleteCache(student);
		return "ok";
	}
}
8:在主类中开启缓存支持
package com.ch.ch6_10;
import org.springframework.boot.SpringApplication;
import org.springframework.boot.autoconfigure.SpringBootApplication;
import org.springframework.cache.annotation.EnableCaching;
@EnableCaching
@SpringBootApplication
public class Ch610Application {
	public static void main(String[] args) {
		SpringApplication.run(Ch610Application.class, args);
	}
}