vue 构建单页应用_使用Vue.js构建单页时间跟踪应用程序,第二部分
vue 构建单页应用
One of my favorite things about Vue.js is how approachable it is. We can simply drop the library into an existing project, create a Vue instance with an element or ID of our choosing as a selector, and we're all set to add reactivity to the page. This simplicity is great and comes in handy if we just want to use a few of Vue's features, but there's actually a lot more we can do with the library that some people may not be aware of.
关于Vue.js,我最喜欢的事情之一是它的可访问性。 我们可以简单地将库放到现有项目中,创建一个Vue实例,该实例具有我们选择的元素或ID作为选择器,并且我们都准备向页面添加React性。 如果我们只想使用Vue的一些功能,那么这种简单性就很好用,并且派上用场,但是实际上,我们可以对库做更多的事情,有些人可能并不知道。
Surrounding the core Vue.js library is a rich ecosystem of tools and plugins that allow us to create full single page applications. Vue also offers full support for ES2015 and comes with its own file type: the .vue component, which is great because it allows us to have our template, scripts, and styles all in the same file. While some might say that this could be cumbersome and file sizes could get huge, I would argue that the number of clicks and amount of mental bandwidth (even if small) that we save by using this kind of format makes it quite valuable.
Vue.js核心库周围是丰富的工具和插件生态系统,可让我们创建完整的单页应用程序。 Vue还提供对ES2015的全面支持,并带有其自己的文件类型: .vue组件,这很棒,因为它允许我们将模板,脚本和样式都放在同一文件中。 尽管有些人可能会说这可能很麻烦并且文件大小可能会很大,但我认为使用这种格式可以节省点击次数和精神带宽(即使很小)也很有价值。
This is the second in a series of articles that will cover how to build a single page app with Vue.js.
这是一系列文章的第二篇,该系列文章将介绍如何使用Vue.js构建单页应用程序。
We're going to use several libraries and plugins from the Vue ecosystem to:
我们将使用Vue生态系统中的几个库和插件来:
- Create a Node.js backend so we can see how to work with data from a remote source 创建一个Node.js后端,以便我们可以看到如何使用远程源中的数据
- Implement single page app routing 实施单页应用程序路由
- Implement HTTP calls to our Node.js backend 对我们的Node.js后端实施HTTP调用
- Add unidirectional data flow 添加单向数据流
- Use the aforementioned
.vuefile type to have our templates, scripts, and styles all in one spot 使用上述.vue文件类型可将我们的模板,脚本和样式集中在一起
我们要建造什么? (What are we going to build?)
I thought it might be interesting to revist the time tracker app tutorial from last year. In that tutorial, we built a (slightly feature lacking) time tracker with Angular 1.x and Laravel 5. Creating a similar app with Vue.js and Node should be a good way to contrast the two stacks if you're interested in that kind of thing.
我认为,回顾去年的时间跟踪器应用程序教程可能很有趣。 在该教程中,我们使用Angular 1.x和Laravel 5构建了一个(略有功能缺失)时间跟踪器。如果您对此感兴趣,则使用Vue.js和Node创建类似的应用程序应该是对比这两个堆栈的好方法。之类的事情。
Heads up though: the app we're going to build is going to be pretty simplisitic as far as tracking time goes. That's because we want to focus more on how all the pieces of a Vue.js app fit together and less on making a real-world time tracker.
但请注意 :就跟踪时间而言,我们将要构建的应用程序将非常简单。 这是因为我们想更多地关注Vue.js应用程序的各个部分如何组合在一起,而不是关注制作真实的时间跟踪器。
So let's get to work--you'll be logging your hours like a champ in no time.
因此,让我们开始工作吧!您将像冠军一样记录自己的时间。
Note: This is part 2. Be sure to read part 1, the introduction to this tutorial series
注意:这是第2部分。请务必阅读第1部分,该系列教程的简介。
- Build a Single Page Time Tracking App with Vue.js: Introduction 使用Vue.js构建单页时间跟踪应用程序:简介
安装 ( Installation )
The app we build will use Webpack for module bundling, preprocessing, and hot module reloading. If you're not familiar with Webpack, it basically gives us a way to automatically string together and then serve our various bits of JavaScript from a single file. This is great for production because it means we don't need to worry about making multiple HTTP requests for our various component files. But there's more than that going on here: we need Webpack so that we can have our .vue files handled properly. Without a loader to convert the files to proper JavaScript, HTML, and CSS, the browser won't be able to understand what's going on. However, with the appropriate Webpack loaders in place, the .vue files get converted to something the browser can understand.
我们构建的应用程序将使用Webpack进行模块捆绑,预处理和热模块重新加载。 如果您不熟悉Webpack,它基本上为我们提供了一种方法,该方法可以自动将字符串串在一起,然后从单个文件中提供各种JavaScript。 这对生产非常有用,因为这意味着我们无需担心会为我们的各种组件文件发出多个HTTP请求。 但是,这里还有很多事情要做:我们需要Webpack,以便我们可以正确处理.vue文件。 如果没有加载程序将文件转换为正确JavaScript,HTML和CSS,浏览器将无法理解正在发生的事情。 但是,安装适当的Webpack加载程序后, .vue文件将转换为浏览器可以理解的文件。
Hot module reloading is a powerful feature that gives us a lot of convenience, and it's available to us out of the box with Vue. Normally when we refresh the page after making a change to our code, all of the application's state is lost. This can be a pain when we're working on a part of the app that requires us to be a few clicks deep or otherwise have some kind of state be active. With hot module reloading, the code that we change is swapped in automatically and our state is preserved.
热模块重装是一项强大的功能,为我们提供了很多便利,并且Vue开箱即用。 通常,当我们在更改代码后刷新页面时,所有应用程序的状态都会丢失。 当我们正在处理应用程序的一部分时,这可能会很痛苦,因为这需要我们单击几下,否则必须处于某种状态。 通过热模块重新加载,我们更改的代码将自动交换并保留我们的状态。
Vue also makes CSS preprocessing available to us automatically, so we can choose to write LESS or SASS instead of plain CSS if we like.
Vue还自动向我们提供CSS预处理,因此,如果愿意,我们可以选择编写LESS或SASS而不是普通CSS。
It used to be the case that we had to install a bunch of dependencies from npm to get a proper Webpack setup, but thankfully we now have the option of using vue-cli. This is a great addition to the Vue ecosystem because it means we no longer need to scaffold our projects by hand, but rather can have them generated for us very quickly.
过去,必须从npm安装一堆依赖项才能获得正确的Webpack设置,但值得庆幸的是,我们现在可以选择使用vue-cli 。 这是Vue生态系统的重要补充,因为这意味着我们不再需要手工搭建项目,而可以为我们快速生成它们。
First, install vue-cli.
首先,安装vue-cli 。
npm install -g vue-cliThen create a new webpack project and install the dependencies for it.
然后创建一个新的webpack项目并webpack安装依赖项。
vue init webpack vue-time-trackercd vue-time-tracker
npm install
The generated app comes with a command that lets us run the application with hot module reloading.
生成的应用程序带有一个命令,该命令使我们可以通过热模块重新加载来运行该应用程序。
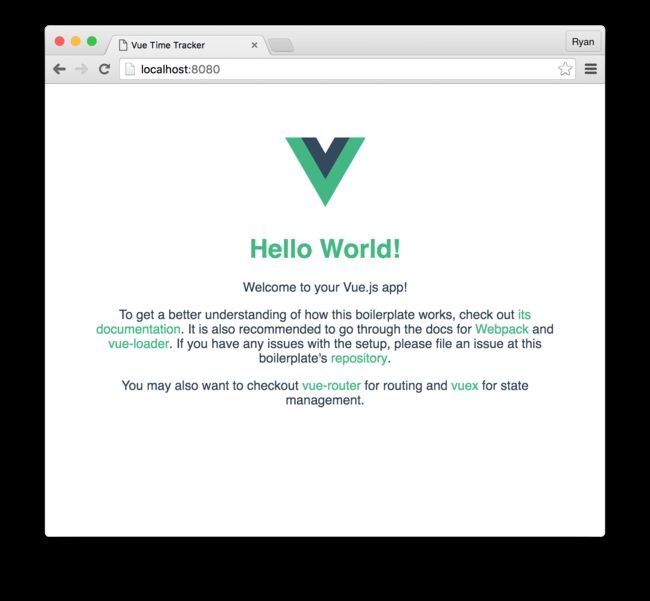
npm run devThis command is an alias for node build/dev-server.js, and is found in package.json on the scripts object. The dev-server.js file that gets run is basically what makes Webpack do its thing. That is, it configures all of the Webpack pieces, parses and compiles all the project files, and serves everything up to be viewed in the browser. We can take a look at localhost:8080 to see the starter app.
该命令是node build/dev-server.js的别名,可以在scripts对象上的package.json找到。 运行Web的dev-server.js文件基本上就是使Webpack发挥作用的原因。 也就是说,它配置了所有Webpack片段,解析并编译了所有项目文件,并提供了所有内容以供在浏览器中查看。 我们可以看看localhost:8080来查看入门应用程序。
Everything is scaffolded, but we're actually going to need a couple more dependencies for our time tracker app. We need a way to set up routing and make XHR requests, and for that we can use some additional libraries from the Vue ecosystem.
一切都是脚手架,但是我们的时间跟踪器应用实际上需要更多的依赖。 我们需要一种方法来设置路由并发出XHR请求,为此,我们可以使用Vue生态系统中的一些其他库。
npm install vue-resource vue-router --save最初设定 ( Initial Setup )
Taking a look at the app file, we can see that the src directory root has an App.vue file and a main.js file. It's the main.js file that is the starting point where things get kicked off. Inside that file, we're importing both Vue and App, and then creating a new Vue instance on the body element. While this is fine if we don't want to use any routing, we're going to need to change things up a bit to support the setup we want.
看一下应用程序文件,我们可以看到src目录根目录有一个App.vue文件和一个main.js文件。 这是main.js文件,它是一切开始的起点。 在该文件中,我们同时导入Vue和App ,然后在body元素上创建一个新的Vue实例。 如果我们不想使用任何路由,这很好,但是我们将需要进行一些改动以支持所需的设置。
// src/main.js

import Vue from 'vue'
import App from './App.vue'
import Hello from './components/Hello.vue'

import VueRouter from 'vue-router'
import VueResource from 'vue-resource'

// We want to apply VueResource and VueRouter
// to our Vue instance
Vue.use(VueResource)
Vue.use(VueRouter)

const router = new VueRouter()

// Pointing routes to the components they should use
router.map({
  '/hello': {
    component: Hello
  }
})

// Any invalid route will redirect to home
router.redirect({
  '*': '/hello'
})

router.start(App, '#app')
To support this new setup, we just need to wrap the index.html within a div.
为了支持此新设置,我们只需要将div中的index.html中。
  <div id="app">
    <app>app>

  div>
Our application now supports routing, and if we refresh, we see that the default /hello route is reached which displays the same message as before.
我们的应用程序现在支持路由,如果刷新,我们会看到已达到默认的/hello路由,该路由显示与以前相同的消息。
The initial setup is done, now let's get on to creating our own components!
初始设置已完成,现在让我们继续创建自己的组件!
创建主视图 ( Creating the Home View )
Let's kick things off here by applying a navigation bar to the app. But first, we'll need to add Bootstrap for some styling. A quick way to do this is to grab the CSS from Bootstrap's CDN.
让我们通过在应用程序中应用导航栏来开始事情。 但是首先,我们需要添加Bootstrap进行某些样式设置。 一种快速的方法是从Bootstrap的CDN中获取CSS。
<head>
    <meta charset="utf-8">
    <title>Vue Time Trackertitle>
    <link rel="stylesheet" href="https://maxcdn.bootstrapcdn.com/bootstrap/3.3.6/css/bootstrap.min.css">
  head>
The best place for the navbar is our App.vue file, so let's edit it to have a new template. At the same time, we can get rid of the script and style sections that are there right now.
导航栏的最佳位置是我们的App.vue文件,因此让我们对其进行编辑以具有新模板。 同时,我们可以摆脱目前存在的script和style部分。
// src/App.vue

<template>
  <div id="wrapper">
    <nav class="navbar navbar-default">
      <div class="container">
        <a class="navbar-brand" href="#">
          <i class="glyphicon glyphicon-time"></i>
          Vue Time Tracker
        </a>
        <ul class="nav navbar-nav">
          <li><a v-link="'/home'">Home</a></li>
          <li><a v-link="'/time-entries'">Time Entries</a></li>
        </ul>
      </div>
    </nav>
    <div class="container">
      <div class="col-sm-3">

      </div>
      <div class="col-sm-9">
        <router-view></router-view>
      </div>
    </div>
  </div>
</template>
In addition to the navigation bar, we've also got a container for the rest of the application. There's a smaller div that will be used for our sidebar, and a larger one that will show other components through the router-view tag. Just in the same way that other frameworks, such as AngularJS, will display partial content through a special tag, vue-router does this as well through router-view.
除了导航栏之外,我们还为该应用程序的其余部分提供了一个容器。 我们的侧边栏将使用一个较小的div ,而较大的一个将通过router-view标签显示其他组件。 就像其他框架(例如AngularJS)将通过特殊标记显示部分内容一样, vue-router也可以通过router-view来显示部分内容。
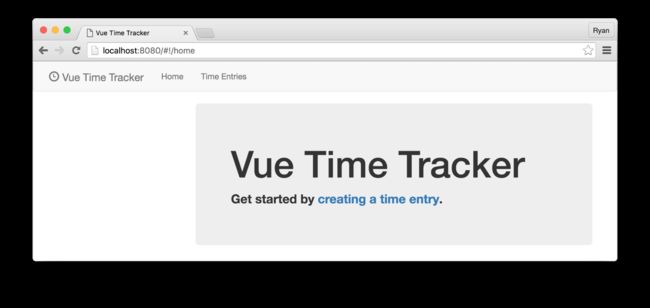
The Home component for our app really just needs to show a simple message. Let's create a new file called Home.vue and give it a template with that message.
我们应用程序的Home组件实际上只需要显示一条简单消息。 让我们创建一个名为Home.vue的新文件,并为其提供带有该消息的模板。
// src/components/Home.vue

<template>
  <div class="jumbotron">
    <h1>Vue Time Tracker</h1>
    <p>
      <strong>
        Get started by <a v-link="'/time-entries'">creating a time entry</a>.
      </strong>
    </p>
  </div>
</template>
We also need to tell the router about this new component in App.vue by importing it and mapping it. This is an easy change because essentially all we need to do here is replace Hello with Home and we're good to go.
我们还需要通过导入和映射将App.vue的新组件告知路由器。 这是一个简单的更改,因为从本质上讲,我们要做的就是用Home代替Hello ,我们很高兴。
So what's going on with that blank space in the App component? Well, we'll later have a sidebar going in there which will display the value for the sum of all of our time entries, but first we need to create some. For that, we'll need to get started on components which let users log and display individual entries.
那么App组件中的空白怎么办? 好吧,我们稍后将在其中添加一个sidebar ,该sidebar将显示所有时间条目之和的值,但首先我们需要创建一些。 为此,我们需要开始使用允许用户记录和显示各个条目的组件。
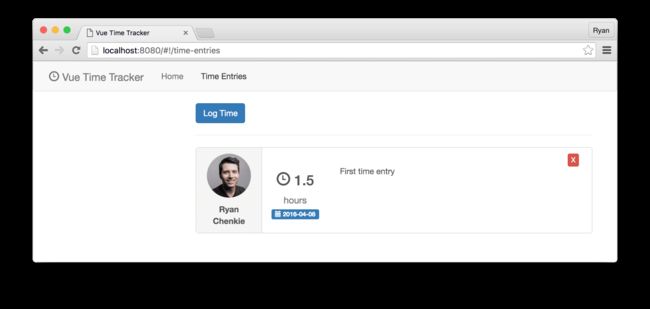
创建时间条目组件 ( Creating the Time Entries Component )
Here's the plan: we'll make a component that lists out existing time entries, called TimeEntries, and then another one for entering new time entries, called LogTime. We'll add a link from TimeEntries to LogTime so the user can jump to the spot for adding new time entries quickly. The TimeEntries component is going to be a little large, so let's approach the template, script, and style sections separately. Keep in mind that all of these parts will go in the same file in the end, but we'll split them out here.
这是计划:我们将制作一个列出现有时间条目的组件,称为TimeEntries ,然后列出另一个用于输入新时间条目的LogTime 。 我们将添加一个从TimeEntries到LogTime的链接,以便用户可以跳到该地点以快速添加新的时间条目。 TimeEntries组件将有些大,所以让我们分别处理模板,脚本和样式部分。 请记住,所有这些部分最后都将放在同一文件中,但是我们将在这里将它们分开。
Note: The data that is used in this template hasn't been set up yet, but we'll do that afterward.
注意:此模板中使用的数据尚未设置,但我们稍后将进行设置。
// src/components/TimeEntries.vue

<template>
  <div>
    <button
      v-if="$route.path !== '/time-entries/log-time'"
      v-link="'/time-entries/log-time'"
      class="btn btn-primary">
      Log Time
    </button>

    <div v-if="$route.path === '/time-entries/log-time'">
      <h3>Log Time</h3>
    </div>

    <hr>

    <router-view></router-view>

    <div class="time-entries">
      <p v-if="!timeEntries.length"><strong>No time entries yet</strong></p>

      <div class="list-group">

        <a class="list-group-item" v-for="timeEntry in timeEntries">
          <div class="row">

            <div class="col-sm-2 user-details">
              <img :src="timeEntry.user.image" class="avatar img-circle img-responsive" />
              <p class="text-center">
                <strong>
                  {{ timeEntry.user.firstName }}
                  {{ timeEntry.user.lastName }}
                </strong>
              </p>
            </div>

            <div class="col-sm-2 text-center time-block">
              <h3 class="list-group-item-text total-time">
                <i class="glyphicon glyphicon-time"></i>
                {{ timeEntry.totalTime }}
              </h3>
              <p class="label label-primary text-center">
                <i class="glyphicon glyphicon-calendar"></i>
                {{ timeEntry.date }}
              </p>
            </div>

            <div class="col-sm-7 comment-section">
              <p>{{ timeEntry.comment }}</p>
            </div>

            <div class="col-sm-1">
              <button
                class="btn btn-xs btn-danger delete-button"
                @click="deleteTimeEntry(timeEntry)">
                X
              </button>
            </div>

          </div>
        </a>

      </div>
    </div>
  </div>
</template>
Let's take a look at the Vue.js-specific items in the template to get a feel for what's going on. The first one we encounter is a v-if on both the Log Time button and an h3 that says "Log Time". The v-if is checking where we are in our routing, and we're saying that we don't want the button to be displayed if the route we're currently at is /time-entries/log-time.
让我们看一下模板中特定于Vue.js的项,以了解发生了什么。 我们遇到的第一个是Log Log按钮上的v-if和一个显示“ Log Time”的h3 。 v-if正在检查我们在路由中的位置,如果我们当前所在的路由是/time-entries/log-time ,则表示不希望显示该按钮。
We're going to create the LogTime component later and we'll see how this all fits together at that point, but essentially once we're at this route, we don't want to show the button for navigating to it. The same goes for the "Log Time" h3, but in reverse. We've also got a v-link in the button at the top, which we've actually seen previously. This directive is from vue-router and will instruct the router to go to the /time-entries/log-time route when clicked.
稍后我们将创建LogTime组件,然后我们将了解如何将它们全部组合在一起,但是从本质LogTime ,一旦到达此路线,我们就不想显示用于导航到它的按钮。 “ Log Time” h3 ,但是相反。 在顶部的按钮中,我们也有一个v-link ,我们之前实际上已经看到过。 该指令来自vue-router ,它将指示路由器在单击时转到/time-entries/log-time路由。
The next thing we see is another router-view below the hr tag, and this is because we'll be registering a sub-route for logging time entries. Essentially we're nesting one route within another, so the LogTime component will be two levels deep. This is the cool thing about routing--we can just keep putting router-view elements in our templates, and as long as we register a component for them, they will keep nesting further down.
我们接下来看到的是hr标记下的另一个router-view ,这是因为我们将注册一个子路由来记录时间条目。 本质上,我们将一条路由嵌套在另一LogTime ,因此LogTime组件将深两层。 这是关于路由的很酷的事情-我们可以继续将router-view元素放在模板中,并且只要我们为它们注册一个组件,它们就将继续嵌套。
The first p tag we see has a v-if condition on it which checks for whether an array called timeEntries has anything in it. If it's empty, a message indicating so will be displayed. Next we get to our first repeater. The form for Vue.js repeaters is v-for="alias in collection", which is very similar to the pattern we see in other frameworks.
我们看到的第一个p标签具有v-if条件,该条件检查名为timeEntries的数组中是否包含任何内容。 如果为空,将显示一条消息指示。 接下来,我们进入第一个中继器。 Vue.js中继器的形式是v-for="alias in collection" ,与我们在其他框架中看到的模式非常相似。
If you're unfamiliar with repeaters, what this does is loops over an array and outputs some HTML for each item in the array, starting with the HTML element that the repeat statement is placed on, up to the element that closes it.
如果您不熟悉中继器,那么它将循环遍历一个数组并为该数组中的每个项目输出一些HTML,从放置重复语句HTML元素开始直到关闭它的元素。
We're using a new syntax shorthand in the img tag for binding the user's profile picture to the src attribute. Using the colon is the same as doing v-bind and saves us a few keystrokes. By binding the image URL to the src attribute like we are, we don't need to template it out with the curly braces. Rather, the binding gets evaluated and resolves to the URL provided in our data (which we'll see below).
我们在img标签中使用了一种新的语法缩写,用于将用户的个人资料图片绑定到src属性。 使用冒号与进行v-bind相同,并节省了一些按键操作。 通过像我们一样将图像URL绑定到src属性,我们不需要使用花括号将其模板化。 相反,绑定将被评估并解析为我们数据中提供的URL(我们将在下面看到)。
We're templating out the information for the time entry throughout the rest of the template, and near the end we have a button that uses another of Vue's shorthands--@click. This binds a click event to the button element which calls the deleteTimeEntry method (which we've yet to create), passing in the currently iterated-over time entry.
我们将在整个模板的其余部分中对时间输入的信息进行模板化,并且在结尾处附近有一个按钮,该按钮使用了Vue的另一种速记方式- @click 。 这deleteTimeEntry click事件绑定到按钮元素,该按钮元素调用deleteTimeEntry方法(我们尚未创建),并传入当前迭代的时间条目。
Next, let's put in the script.
接下来,让我们放入脚本。
// src/components/TimeEntries.vue

<script>
  export default {
    data () {
      // We want to start with an existing time entry
      let existingEntry = {
        user: {
          firstName: 'Ryan',
          lastName: 'Chenkie',
          email: '[email protected]',
          image: 'https://1.gravatar.com/avatar/7f4ec37467f2f7db6fffc7b4d2cc8dc2?s=250'
        },
        comment: 'First time entry',
        totalTime: 1.5,
        date: '2016-04-08'
      }
      return {
        // Start out with the existing entry
        // by placing it in the array
        timeEntries: [existingEntry]
      }
    },
    methods: {
      deleteTimeEntry (timeEntry) {
        // Get the index of the clicked time entry and splice it out
        let index = this.timeEntries.indexOf(timeEntry)
        if (window.confirm('Are you sure you want to delete this time entry?')) {
          this.timeEntries.splice(index, 1)
          this.$dispatch('deleteTime', timeEntry)
        }
      }
    },
    events: {
      timeUpdate (timeEntry) {
        this.timeEntries.push(timeEntry)
        return true
      }
    }
  }
</script>
We're starting out with one time entry that has a user object, as well as a comment, totalTime value, and date. The method for deleting time entries is fairly simple--we're just looking for the index of the clicked time entry in the array and then splicing it out. Remember that we're just working with local data in this part of the tutorial series, but in later installments we'll see how to work with remote data that is persisted to a database. We're also calling $dispatch as part of the delete method. We'll see more on this later, but essentially what we want to do here is dispatch an event with the data that we deleted so we can listen for it in other components. This will come into play when we get to coding the sidebar.
我们首先从一个具有user对象, comment , totalTime值和date时间条目开始。 删除时间条目的方法非常简单-我们只是在数组中查找单击的时间条目的索引,然后将其拼接出来。 请记住,在本系列教程的这一部分中,我们仅使用本地数据,但是在以后的文章中,我们将看到如何使用持久化到数据库的远程数据。 我们还将$dispatch称为delete方法的一部分。 稍后我们将详细介绍,但是本质上我们要在此执行的是使用删除的数据调度事件,以便我们可以在其他组件中侦听该事件。 当我们开始对侧栏进行编码时,这将起作用。
Finally, we've got a timeUpdate method on the events key. This method is going to come into play when we make the LogTime component and is what will be emitted when the user saves a time entry. When that happens, a timeEntry object will come through and be pushed onto the timeEntries array in this component. This is how we will be facilitating communication between different components for now.
最后,在events键上有一个timeUpdate方法。 当我们制作LogTime组件时,此方法将发挥作用,当用户保存时间条目时将发出此方法。 发生这种情况时,一个timeEntry对象将通过并被推送到此组件中的timeEntries数组上。 这就是我们现在将促进不同组件之间的通信的方式。
Let's not forget some simple styles for this component.
让我们不要忘记此组件的一些简单样式。
// src/components/TimeEntries.vue

<style>
  .avatar {
    height: 75px;
    margin: 0 auto;
    margin-top: 10px;
    margin-bottom: 10px;
  }
  .user-details {
    background-color: #f5f5f5;
    border-right: 1px solid #ddd;
    margin: -10px 0;
  }
  .time-block {
    padding: 10px;
  }
  .comment-section {
    padding: 20px;
  }
</style>
We just need to add routing for this component to main.js and we'll be able to see it in the browser.
我们只需要将此组件的路由添加到main.js ,就可以在浏览器中看到它。
// src/main.js

import TimeEntries from './components/TimeEntries.vue'

...

router.map({
  '/home': {
    component: Home
  },
  '/time-entries': {
    component: TimeEntries
  }
})

...
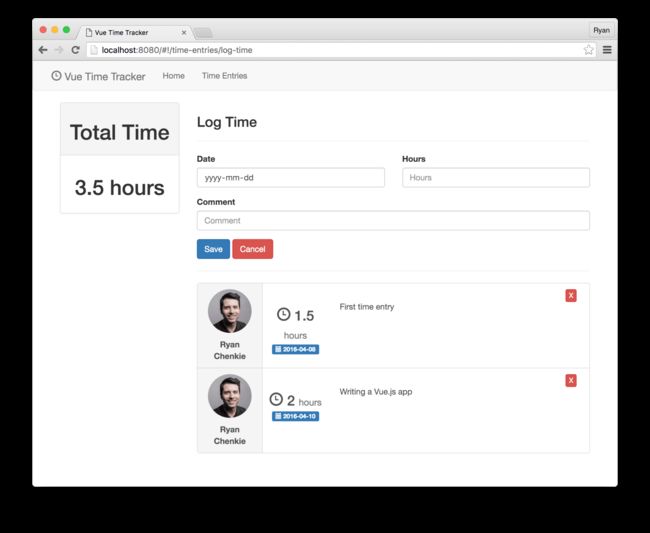
创建日志时间组件 ( Creating the Log Time Component )
Next we need a component that provides a screen for the user to log time entries. This one is a bit smaller, so let's take a look at the whole file all at once.
接下来,我们需要一个组件,该组件为用户提供了用于记录时间条目的屏幕。 这个文件有点小,所以让我们一次查看整个文件。
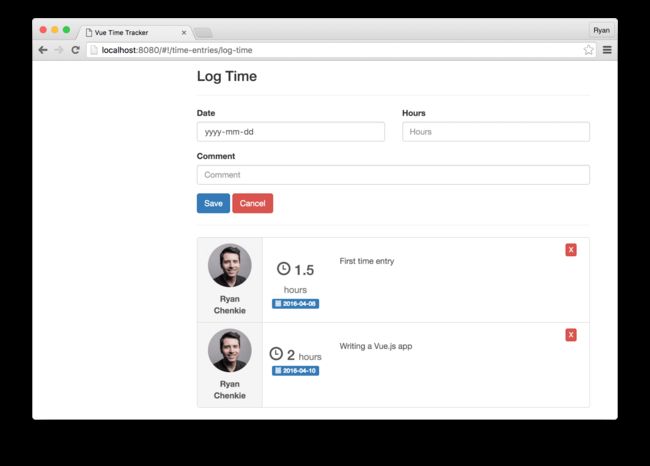
// src/components/LogTime.vue

<template>
  <div class="form-horizontal">
    <div class="form-group">
      <div class="col-sm-6">
        <label>Date</label>
        <input
          type="date"
          class="form-control"
          v-model="timeEntry.date"
          placeholder="Date"
        />
      </div>
      <div class="col-sm-6">
        <label>Hours</label>
        <input
          type="number"
          class="form-control"
          v-model="timeEntry.totalTime"
          placeholder="Hours"
        />
      </div>
    </div>
    <div class="form-group">
      <div class="col-sm-12">
        <label>Comment</label>
        <input
          type="text"
          class="form-control"
          v-model="timeEntry.comment"
          placeholder="Comment"
        />
      </div>
    </div>
    <button class="btn btn-primary" @click="save()">Save</button>
    <button v-link="'/time-entries'" class="btn btn-danger">Cancel</button>
    <hr>
  </div>

</template>

<script>
  export default {
    data () {
      return {
        // We default the user object on
        // the timeEntry to have some user details
        timeEntry: {
          user: {
            firstName: 'Ryan',
            lastName: 'Chenkie',
            email: '[email protected]',
            image: 'https://1.gravatar.com/avatar/7f4ec37467f2f7db6fffc7b4d2cc8dc2?s=250&d=retro&r=g'
          }
        }
      }
    },
    methods: {
      save () {
        let timeEntry = this.timeEntry
        // We dispatch the timeEntry so it can be pushed
        // onto the timeEntries array in the parent component
        this.$dispatch('timeUpdate', timeEntry)
        this.timeEntry = {}
      }
    }
  }
</script>
We've got input elements in place for the user to enter a date, number of hours, and a comment for a new time entry. In the data() function, we're initializing the timeEntry model with some data for the user so that we can have a name and profile photo. There's an obvious limitation with this simple app: it's only really good for one user. That's by design at this stage though, and we'll adapt the application to multiple users with login in a later installment.
我们已经准备好了输入元素,以便用户输入日期,小时数和新时间条目的注释。 在data()函数中,我们使用一些用于用户的数据初始化timeEntry模型,以便我们可以拥有名称和个人资料照片。 这个简单的应用程序有一个明显的局限性:它仅对一个用户真正有用。 不过,这是在现阶段设计的,我们将在以后的分期付款中使该应用程序适合多个用户。
We've got a single method in this component called save which takes the object that has the user's input and dispatches it out of the component with $dispatch. Now in our other components we can listen for the dispatched timeUpdate event and grab the timeEntry object that comes through with it. So why are we doing this? So that we can have some method of communicating data between our components. Since data for a given component is scoped to it, we need some mechanism to communicate from that component to the outside world. This method works well enough, but can get messy when our app grows and needs to communicate a lot of data between many components. We'll see how to fix this by using Vuex for state management later on in the series. We've already got our event listener set up on the TimeEntriescomponent, so when we save a new entry, we can see it get added to the list.
我们在该组件中有一个名为save方法,该方法采用具有用户输入的对象,并使用$dispatch将其分派出组件。 现在,在我们的其他组件中,我们可以侦听调度的timeUpdate事件,并获取它附带的timeEntry对象。 那我们为什么要这样做呢? 这样我们就可以采用某种方法在组件之间传递数据。 由于给定组件的数据受其范围限制,因此我们需要某种机制从该组件与外界进行通信。 这种方法效果很好,但是当我们的应用程序增长并且需要在许多组件之间传递大量数据时,可能会变得混乱。 在本系列的后面部分,我们将看到如何使用Vuex进行状态管理来解决此问题。 我们已经在TimeEntries组件上设置了事件侦听器,因此当我们保存新条目时,我们可以看到它已添加到列表中。
We need to add the LogTime component as a sub-route of TimeEntries in our router configuration. By doing this, the router will know that LogTime is a child of TimeEntries, and the appropriate URI structure will be generated when we navigate to it.
我们需要在路由器配置中将LogTime组件添加为TimeEntries的子路由。 这样,路由器将知道LogTime是TimeEntries的子级,并且当我们导航到它时,将生成适当的URI结构。
// src/main.js

import LogTime from './components/LogTime.vue'

...

router.map({
  '/home': {
    component: Home
  },
  '/time-entries': {
    component: TimeEntries,
    subRoutes: {
      '/log-time': {
        component: LogTime
      }
    }
  }
})

...
创建补充工具栏组件 ( Creating the Sidebar Component )
We're almost done for the first part of this series. The only thing left to do now is to add a Sidebar component which will hold the total number of hours for all of our time entries. Before we code the actual component, we need to make some adjustments to App.vue so that we can handle the data that is dispatched from the LogTime component when new entries are saved, and from the TimeEntries component when they are deleted.
在本系列的第一部分中,我们已经差不多完成了。 现在剩下要做的唯一一件事就是添加一个Sidebar组件,该组件将保存我们所有时间条目的总小时数。 在对实际组件进行编码之前,我们需要对App.vue进行一些调整,以便我们可以处理保存新条目时从LogTime组件分发的数据,以及删除它们时从TimeEntries组件分发的数据。
First, place the sidebar element into the template.
首先,将sidebar元素放入模板中。
// src/App.vue

  ...

  <div class="container">
    <div class="col-sm-3">
      <sidebar :time="totalTime"></sidebar>
    </div>
    <div class="col-sm-9">
      <router-view></router-view>
    </div>
  </div>

  ...
We've got a property binding on sidebar called time that points to totalTime. By binding the property in this way, we'll be able to pick it up in the actual Sidebar component as a prop. If you've used React at all, passing properties into elements in this way will no doubt feel familiar.
我们在sidebar上有一个名为time的属性绑定,该属性指向totalTime 。 通过以这种方式绑定属性,我们将能够在实际的Sidebar组件中将其作为prop拾取。 如果您完全使用过React,以这种方式将属性传递到元素中无疑会感到很熟悉。
We need some logic to calculate the values to pass down in the time property.
我们需要一些逻辑来计算要传递给time属性的值。
<script>
  import Sidebar from './components/Sidebar.vue'

  export default {
    components: { 'sidebar': Sidebar },
    data () {
      return {
        // Start with the same value as our
        // first time entry. Hard-coded for now
        // because we'll use a different approach
        // in the next article anyway
        totalTime: 1.5
      }
    },
    events: {
      // Increment the totalTime value based on the new
      // time entry that is dispatched up
      timeUpdate (timeEntry) {
        this.totalTime += parseFloat(timeEntry.totalTime)
      },
      // Decrement totalTime when a time entry is deleted
      deleteTime (timeEntry) {
        this.totalTime -= parseFloat(timeEntry.totalTime)
      }
    }
  }
</script>
First we import the Sidebar component (which we'll create next) and then we initialize the totalTime property with the value from our hard-coded time entry. This obviously isn't a very robust way of picking up that initial value, but we'll just leave it like this for now because things will change when we modify the app to consume remote data in the next article anyway. We're listening for two events: timeUpdate and deleteTime. Then we're simply incrementing and decrementing totalTime based on the values that come through from the data in those events.
首先,我们导入Sidebar组件(接下来将创建),然后使用硬编码时间条目中的值初始化totalTime属性。 显然,这不是一种获取初始值的非常可靠的方法,但是我们现在就这样保留它,因为无论如何在下一篇文章中修改应用程序以使用远程数据时,情况将会改变。 我们正在侦听两个事件: timeUpdate和deleteTime 。 然后,我们只是基于这些事件中数据传来的值来递增和递减totalTime 。
With that in place, we can create the actual Sidebar.vue component.
有了这个,我们可以创建实际的Sidebar.vue组件。
<template>
  <div class="panel panel-default">
    <div class="panel-heading">
      <h1 class="text-center">Total Time</h1>
    </div>

    <div class="panel-body">
      <h1 class="text-center">{{ time }} hours</h1>
    </div>

  </div>
</template>

<script>
  export default {
    props: ['time']
  }
</script>
The props array is where we can specify any properties that we want to use which are passed into the component, and here we are getting the time prop which is placed on the sidebar element in App.vue. The template simply prints out the total number of hours.
在props数组中,我们可以指定要传递给组件的任何要使用的属性,在这里,我们获得了放置在App.vue的sidebar元素上的time prop。 该模板仅打印出总小时数。
结语 ( Wrapping Up )
There we have it! We've created the most basic of time tracking apps that will really never be very useful in the real world. However, we were able to get a good sense of how to build a full single page application with Vue.js, and that's the name of the game for this series. We've now got a solid foundation for how to use Vue components to build a SPA, and with that knowledge in place, we can move on to more complex concepts.
到了! 我们创建了最基本的时间跟踪应用程序,这些应用程序在现实世界中永远不会非常有用。 但是,我们能够很好地了解如何使用Vue.js构建完整的单页应用程序,这就是本系列游戏的名称。 现在,我们已经为如何使用Vue组件构建SPA奠定了坚实的基础,有了这些知识,我们就可以继续研究更复杂的概念。
The Vue.js ecosystem is maturing all the time and Evan is constantly introducing additions and improvements to it, including new tooling and additional plugins. Vue.js and its associated libraries really do make it easy to develop single page apps with modern JavaScript, and the component system with .vue files is great to work with because the template, scripts, and styles for a given component are nicely encapsulated.
Vue.js生态系统一直在日趋成熟,而Evan不断对其进行补充和改进,包括新工具和附加插件。 Vue.js及其关联库的确确实使使用现代JavaScript开发单页应用程序变得容易,并且具有.vue文件的组件系统非常适合使用,因为给定组件的模板,脚本和样式已很好地封装了。
This is the first article in our series on building a SPA with Vue.js. Stay tuned for the next one where we'll build the backend for this app and see how we can use vue-resource to work with remote data.
这是我们关于使用Vue.js构建SPA的系列文章中的第一篇。 请继续关注下一个,我们将为该应用程序构建后端,并了解如何使用vue-resource处理远程数据。
给我留言 ( Drop Me a Line )
If you’d like to get more tutorials on modern technologies like Vue.js, feel free to head over to my website and signup for my mailing list. You should say hi on Twitter—I’d love to hear about what you’re working on!
如果您想获得有关Vue.js等现代技术的更多教程,请随时访问我的网站并注册我的邮件列表 。 您应该在Twitter上打个招呼-我很想知道您在做什么!
翻译自: https://scotch.io/tutorials/build-a-single-page-time-tracking-app-with-vue-js-part-ii
vue 构建单页应用