GoFrame系列:6、Swagger使用总结
GoFrame系列:6、Swagger使用总结
文章目录
- GoFrame系列:6、Swagger使用总结
-
- 1. swagger简述
- 2. GF框架使用swagger流程
- 3. 示例
-
- 3.1 GET示例
- 3.2 POST示例
- 3.3 其它
- 4. 最后
1. swagger简述
swagger接口文档主要用于前后端的接口定义。Golang的swagger文档通过注释的形式编写到api层的代码中,使得接口文档可以随着代码一起维护,降低代码与文档不一致的风险,并通过gf-cli工具生成:swagger API文档生成。
2. GF框架使用swagger流程
-
简单学习swagger语法,golang插件库swag:https://github.com/swaggo/swag
有中文文档,基本上有什么问题查询也比较方便
-
安装gf工具:https://github.com/gogf/gf-cli/tags(根据系统下载后安装即可)
-
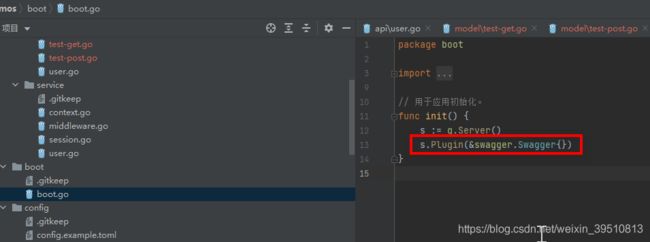
swagger生成,
gf swagger --pack,参考:https://goframe.org/pages/viewpage.action?pageId=3672020 -
插件注册:https://github.com/gogf/swagger,参考:https://goframe.org/pages/viewpage.action?pageId=3672020
- 查看swagger文档:随后可以启动程序访问查看
swagger接口文档页面:http://127.0.0.1:8199/swagger(看你设置的服务ip和端口是多少)
3. 示例
这里举一个GET的和一个POST的示例(一般GET方法根据请求,服务端提供数据response返回;POST方法则一般服务端获取前端传递的request参数,然后根据处理结果返回response,所以主要是通过GET和POST看一下请求和返回参数如何定义),这里使用常见的json格式传递数据:
3.1 GET示例
在mode中添加test-get.go:
package model

type TestInfo struct {
	Param1 string `v:"required#参数1不能为空"` //测试参数1
	Param2 string `v:"required#参数2不能为空"`  //测试参数2
}
在api中添加test-get.go:
package api

import (
	"github.com/gogf/gf-demos/library/response"
	"github.com/gogf/gf/net/ghttp"
)

var TestGet = new(testGetApi)

type testGetApi struct{}

// @summary 获取参数信息
// @tags    测试Get方法接口
// @produce json
// @router  /test/test-get [GET]
// @success 200 {object} response.JsonResponse{data=model.TestInfo} "运行结果"
func (a *testGetApi) TestGet(r *ghttp.Request) {
	response.JsonExit(r, 0, "ok")
}
由于我们只是测试swagger文档的生成,因此,暂时先不管service和dao的部分,这两部分也只是服务实现和数据操作的部分,暂时不是我们这里的重点,先不去管。
然后在router中router.go添加:
group.ALL("/testGet", api.TestGet)
之后在命令行运行:
admin@LS2-R910CQQT MINGW64 /d/code/gf-demos (master)
$ gf swagger --pack
2021-08-06 16:18:07.909 producing swagger files...
2021-08-06 16:18:08.536 done!
2021-08-06 16:18:08.537 gf pack swagger packed/swagger.go -n packed
path 'packed/swagger.go' is not empty, files might be overwrote, continue? [y/n]: y
2021-08-06 16:18:10.519 done!
然后启动服务:go run main.go,之后在浏览器根据服务地址和端口,然后添加swagger进行访问,一般为:127.0.0.1:8199/swagger
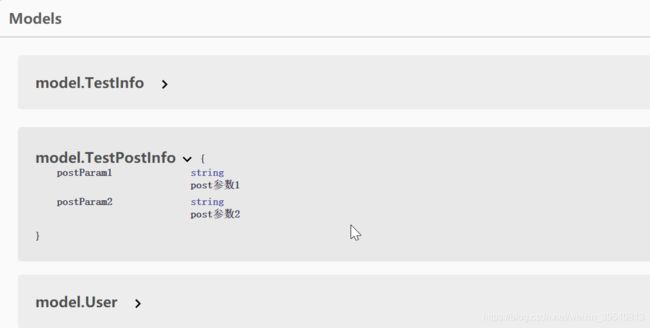
然后查看对应的接口和Models数据:

接口:

Models描述:

3.2 POST示例
在module中创建test-post.go:
package model

type TestPostInfo struct {
	PostParam1 string `v:"required#post参数1不能为空"` //post参数1
	PostParam2 string `v:"required#post参数2不能为空"` //post参数2
}
在api中添加test-post.go:
package api

import (
	"github.com/gogf/gf-demos/app/model"
	"github.com/gogf/gf-demos/library/response"
	"github.com/gogf/gf/net/ghttp"
)

var TestPost = new(testPostApi)

type testPostApi struct{}

// @summary 测试POST请求接口
// @tags    测试POST请求服务
// @produce json
// @Accept  json
// @param   data body model.TestPostInfo true "测试post请求参数"
// @router  /test/testPost [POST]
// @success 200 {object} response.JsonResponse "执行结果"
func (a *testPostApi) TestPost(r *ghttp.Request) {
	var (
		data *model.TestPostInfo
	)
	if err := r.ParseForm(&data); err != nil {
		response.JsonExit(r, 1, err.Error())
	} else {
		response.JsonExit(r, 0, "ok")
	}
}
添加router:
group.ALL("/testPost", api.TestPost)
生成swagger:gf swagger --pack
编译并运行服务:go run main.go
在swagger地址下查看接口:

查看Models:
3.3 其它
关于其中param和success等的设置具体看这里:https://github.com/swaggo/swag/blob/master/README_zh-CN.md,然后根据需求修改即可,我上面举了常用的json格式收发。
| param | 用空格分隔的参数。param name,param type,data type,is mandatory?,comment attribute(optional) |
|---|---|
param type包括:query、path、header、body、formData,我上面使用了application/json格式作为参数,因此使用body。
4. 最后
文档很重要,特别前后端交互这种接口文档,实际上当设计定义好这些接口后,再接着开发思路也会比较清晰。