Linux 系统软件安装
服务器安装软件
- 前言
-
- 1、云服务器环境
- 2、Virtual Box 安装与配置
-
- 2-1 VirtualBox 下载
- 2-2 虚拟机安装 CentOS
- 2-3 创建虚拟系统
- 2-4 进行相关配置
- 2-5 CentOS 与主机共享目录
- 一、安装 nodejs
-
- 1、使用 yum 源安装
- 2、使用二进制文件安装
- 二、pm2 守护进程
-
- 1、pm2 简介
- 2、安装 pm2
- 3、pm2 常用命令
- 4、pm2 配置文件
- 三、安装 Nginx
-
- 1、使用 yum 源安装
- 2、配置 Nginx
- 四、安装 MySQL
-
- 1、使用 yum 源安装
- 2、获取MySQL源安装
- 五、安装 MongoDB
-
- 1、下载 MongoDB
- 2、安装 MongoDB
- 六、安装 git
-
- 1、使用 yum 源安装
- 2、设置免密更新
- 七、安装 JDK
-
- 1、使用 yum 源安装
- 2、使用压缩包的方式安装
- 3、卸载 JDK
- 八、安装 Tomcat
-
- 1、使用压缩包的方式安装
- 2、
- 九、安装 Redis
-
- 1、下载
- 2、解压并安装
- 十、安装 Python
-
- 1、yum 源安装 Python3
- 总结
前言
1、云服务器环境
- 在我们购买到一台云服务器之后,通常需要安装一些常用软件,本文将介绍一些软件的常用安装方式及配置
- 在进行安装软件之前,我们需要做一些准备工作
- 首先是检测 yum 源是否可用,如果出现如下图则表明 yum 源可用
[root@VM-0-10-centos ~]# yum list
- 然后更新 yum 源(推荐使用 update)
yum -y update:升级所有包同时也升级软件和系统内核;
yum -y upgrade:只升级所有包,不升级软件和系统内核
[root@VM-0-10-centos ~]# yum update -y
- 然后就可以开始安装软件了
2、Virtual Box 安装与配置
2-1 VirtualBox 下载
- 下载地址:https://www.virtualbox.org/wiki/Downloads
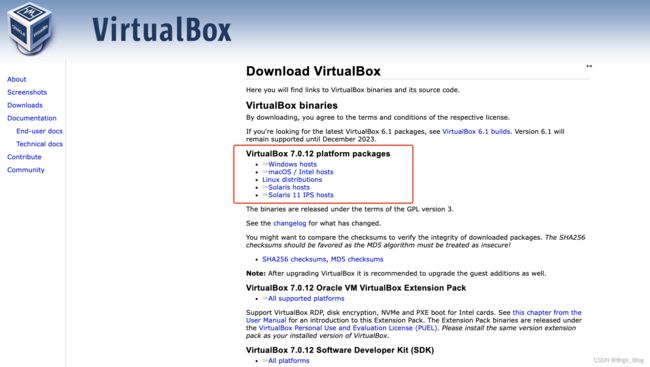
- 双击安装软件:这里是双击 .pkg 文件

- 然后按照提示不断下一步即可

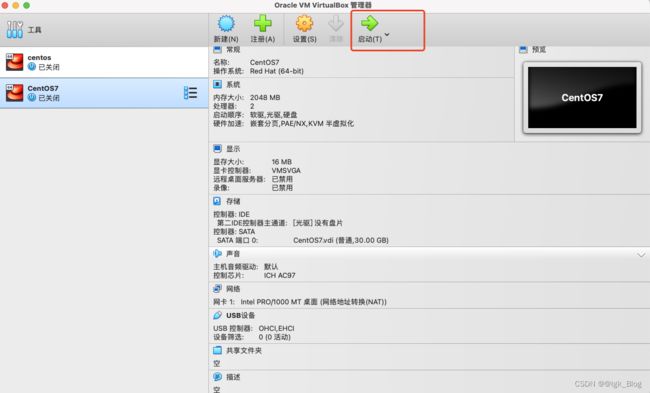
- 打开软件之后的界面如下(我这里是已经有一个系统了)
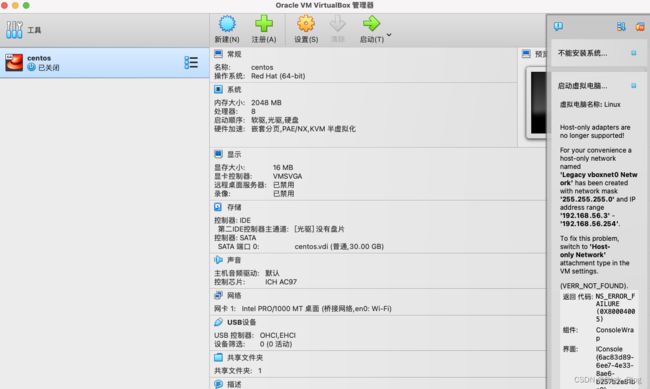
2-2 虚拟机安装 CentOS
- 可以使用国内的镜像下载:http://mirrors.163.com/centos/7/isos/x86_64/

- 阿里镜像源:https://mirrors.aliyun.com/centos/7.9.2009/isos/x86_64/?spm=a2c6h.25603864.0.0.2d55f5ad3aMnIz

- 下载好后将CentOS镜像放到某个目录下
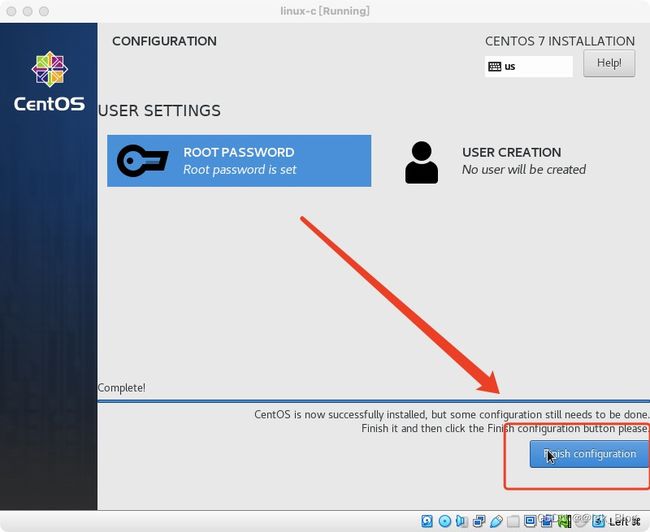
2-3 创建虚拟系统
-
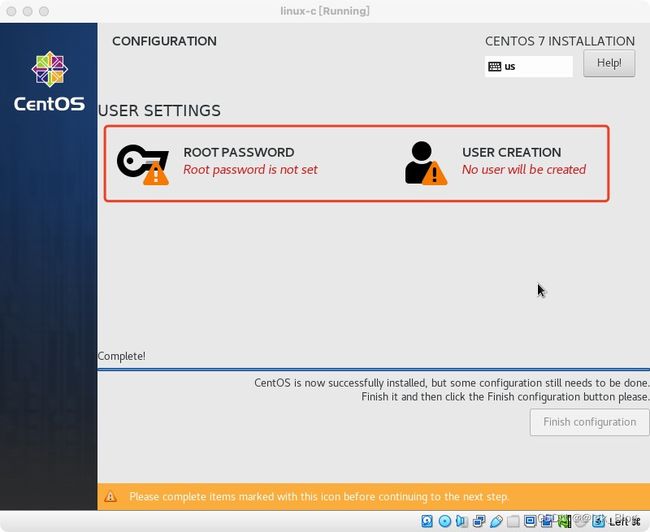
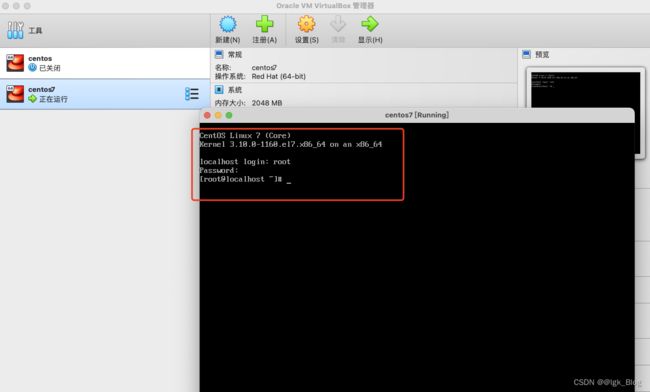
输入用户名和密码:root/root
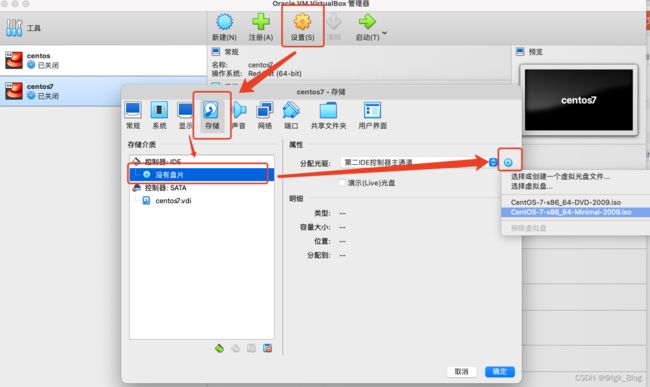
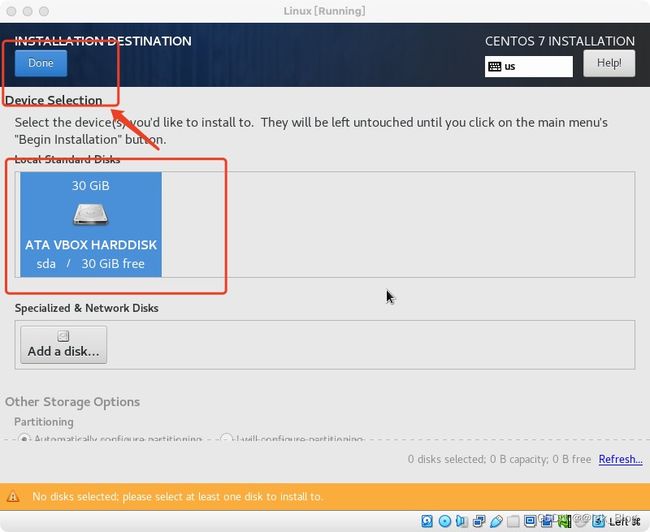
-
进入选择界面
-
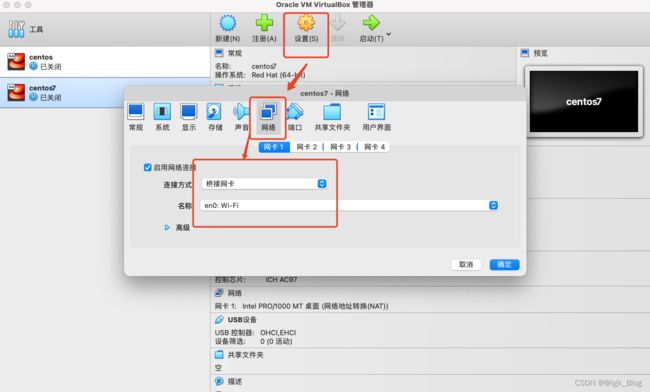
关闭 CentOS 系统,到设置配置网络连接
-
重启系统
2-4 进行相关配置
- 配置 DNS 解析
// 使用 vi 编辑器打开 DNS 解析文件
vi /etc/resolv.conf

// 在文件中配置如下信息(这个是电信的DNS)
nameserver 114.114.114.114
- 编辑网络信息
// 使用 vi 编辑器打开网络配置文件
// /etc/sysconfig/network-scripts/ifcfg-xx
// xx 一般是 enp0s3
vi /etc/sysconfig/network-scripts/ifcfg-enp0s3

// 将 ONBOOT=no 改为 ONBOOT=yes 并保存
ONBOOT=yes
- 重启网络服务
// 重启网络服务
service network restart
- 查看 IP 地址
// 查看IP地址
ip addr
- 更新 yum 管理工具
yum update
- 安装网络查看工具,方便使用常用的命令如:ifconfig
yum install net-tools
替换默认源:
- 源信息地址:http://mirrors.163.com/.help/centos.html
- 首先备份/etc/yum.repos.d/CentOS-Base.repo
mv /etc/yum.repos.d/CentOS-Base.repo /etc/yum.repos.d/CentOS-Base.repo.backup
- 下载对应版本repo文件, 放入/etc/yum.repos.d/。下载地址:http://mirrors.163.com/.help/CentOS7-Base-163.repo
- 或者使用 curl 获取
// 使用 curl 获取
curl http://mirrors.163.com/.help/CentOS7-Base-163.repo -o CentOS7-Base-163.repo
- 运行以下命令生成缓存
// 清空
yum clean all

// 生成缓存
yum makecache
- 安装 wget
yum install wget
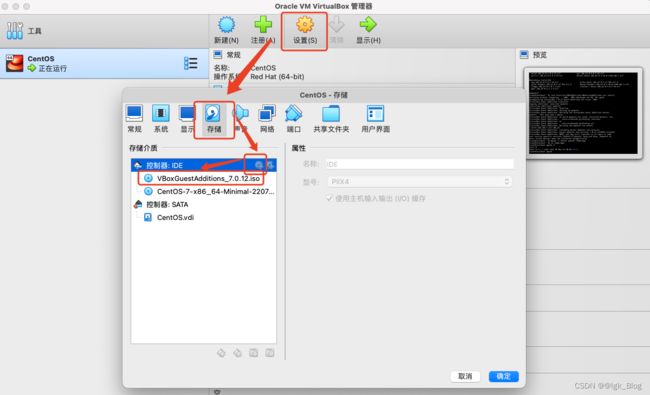
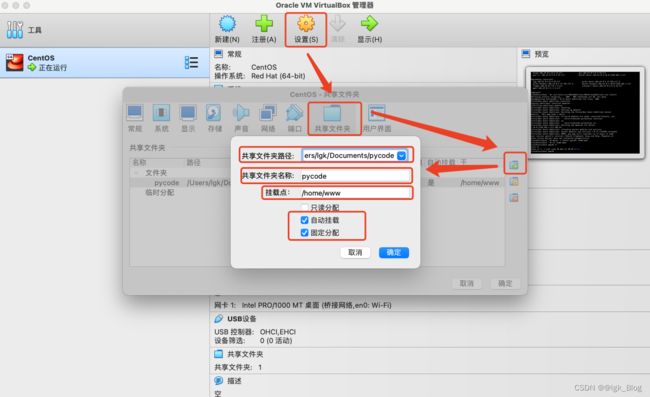
2-5 CentOS 与主机共享目录
// 增强
mkdir /mnt/cdrom

mount /dev/cdrom /mnt/cdrom

cp -r /mnt/cdrom /usr/local/src/VBoxAdditions

yum install -y gcc gcc-devel gcc-c++ gcc-c++-devel make kernel kernel-devel bzip2

/usr/local/src/VBoxAdditions/VBoxLinuxAdditions.run install

// 启用共享文件夹
mkdir /home/www
// mount -t vboxsf 共享的目录对应的名称 共享到虚拟机的目录
mount -t vboxsf pycode /home/www
一、安装 nodejs
1、使用 yum 源安装
- 安装 nodejs
[root@VM-0-10-centos ~]# yum install -y nodejs
- 查看 node 和 npm 版本
[root@VM-0-10-centos ~]# node -v
v10.24.0
[root@VM-0-10-centos ~]# npm -v
6.14.11
[root@VM-0-10-centos ~]#
- 安装 cnpm,cnpm 可以更快下载 npm 安装包
[root@VM-0-10-centos ~]# npm install -g cnpm --registry=https://registry.npm.taobao.org
- 查看 cnpm 的安装路径
[root@VM-0-10-centos ~]# which cnpm
/usr/local/bin/cnpm
[root@VM-0-10-centos ~]#
- 查看 cnpm 版本号
[root@VM-0-10-centos ~]# cnpm -v
cnpm@7.1.0 (/usr/local/lib/node_modules/cnpm/lib/parse_argv.js)
npm@6.14.15 (/usr/local/lib/node_modules/cnpm/node_modules/npm/lib/npm.js)
node@10.24.0 (/usr/bin/node)
npminstall@5.3.1 (/usr/local/lib/node_modules/cnpm/node_modules/npminstall/lib/index.js)
prefix=/usr/local
linux x64 4.18.0-305.3.1.el8.x86_64
registry=https://registry.npmmirror.com
[root@VM-0-10-centos ~]#
2、使用二进制文件安装
- 待补充!!!
二、pm2 守护进程
1、pm2 简介
- pm2 是一个守护进程管理器,它可以帮助你保持应用一直 online
- nodejs 是没有守护进程的,一旦出现报错,是不会自己重启项目
- 一般使用 npm 进行安装(yum 源没有 pm2 安装包)
2、安装 pm2
- 安装 pm2
[root@VM-0-10-centos ~]# npm install -g pm2
// 或者
[root@VM-0-10-centos ~]# cnpm install -g pm2
- 验证是否安装成功
[root@VM-0-10-centos ~]# pm2 -v
5.1.2
[root@VM-0-10-centos ~]#
3、pm2 常用命令
- pm2 start:启动应用程序
同 nodejs 类似,启动某个程序时先进入到该程序所在目录
// 启动 app.js 程序
[root@VM-0-10-centos ~]# pm2 start app.js

// 启动应用程序并命名为 "app"
[root@VM-0-10-centos ~]# pm2 start app.js --name="app"
[root@VM-0-10-centos ~]# pm2 start app.js --name app

// 当文件变化时自动重启应用
[root@VM-0-10-centos ~]# pm2 start app.js --watch

// 启动 bash 脚本文件
[root@VM-0-10-centos ~]# pm2 start upload.sh

// 启动多个进程
// -i 2 表示启动 2 个名为 app 的 node 进程
// i 是 instance 实例
pm2 start app.js --name app -i 2
// max 表示 pm2 将自动检测可用 CPU 的核数并允许尽可能多的进程
pm2 start app.js --name app -i max
- pm2 启动 TS 文件
// pm2 启动 TS 文件
pm2 start --interpreter ./node_modules/.bin/ts-node app.ts

pm2 start --interpreter ./node_modules/.bin/ts-node app.ts --name app -i 2 --watch
- pm2 stop:停止应用程序
// 停止 id 为 0 的进程
[root@VM-0-10-centos ~]# pm2 stop 0

// 停止所有进程
[root@VM-0-10-centos ~]# pm2 stop [all]
- pm2 restart:重启应用程序
// 重启进程 ID为 0 的进程
[root@VM-0-10-centos ~]# pm2 restart 0

// 重启所有进程
[root@VM-0-10-centos ~]# pm2 restart [all]
- pm2 delete:删除应用程序
// 删除进程 ID为 0 的进程
[root@VM-0-10-centos ~]# pm2 delete 0

// 删除所有进程
// 进程删除后无法重启再用
[root@VM-0-10-centos ~]# pm2 restart [all]
- pm2 list:查看守护进程的列表
[root@VM-0-10-centos ~]# pm2 list
- pm2 monit:查看资源消耗
// 查看资源消耗情况
[root@VM-0-10-centos ~]# pm2 monit
- pm2 log:查看日志
// 查看所有日志
[root@VM-0-10-centos ~]# pm2 log
// 显示指定应用程序的日志
[root@VM-0-10-centos ~]# pm2 log [app-name]
- pm2 flush:清空所有日志文件
[root@VM-0-10-centos ~]# pm2 flush
- pm2 show:显示应用程序所有信息
// 显示应用程序所有信息
[root@VM-0-10-centos ~]# pm2 show [app-name]
- pm2 info:查看启动进程信息
// 查看进程ID为 0 的进程信息
[root@VM-0-10-centos ~]# pm2 info 0
4、pm2 配置文件
- 默认的 pm2 配置文件名为:ecosystem.config.js
module.exports = {
    apps: [{
        name: 'app',
        script: './src/app.ts',
        watch: true,
        ignore_watch: ['logs', 'node_modules'],
        out_file: 'logs/out/out.log',
        error_file: 'logs/error/error.log',
        interpreter: './node_modules/.bin/ts-node',
        instance: 3,
        autorestart: true,
        exec_mode: 'cluster',
        env: {
            NODE_ENV: 'prod',
            port: '3001'
        }
    }]
}
三、安装 Nginx
1、使用 yum 源安装
- 安装 nginx
[root@VM-0-10-centos ~]# yum install -y nginx
- 查看 nginx 版本
[root@VM-0-10-centos ~]# nginx -v
nginx version: nginx/1.14.1
[root@VM-0-10-centos ~]#
- 启动 nginx
[root@VM-0-10-centos ~]# nginx
- 停止 nginx
[root@VM-0-10-centos ~]# nginx -s stop
- 重启 nginx
[root@VM-0-10-centos ~]# nginx -s reload

// 或者
[root@VM-0-10-centos ~]# systemctl restart nginx
2、配置 Nginx
- 进入 /home/front 目录,并创建 nginx 目录,然后在该目录下新建一个 nginx.conf 文件
[root@VM-0-10-centos /]# cd /home/front/
[root@VM-0-10-centos front]# mkdir nginx
[root@VM-0-10-centos front]# ll
总用量 4
drwxr-xr-x 2 root root 4096 12月  4 10:59 nginx
[root@VM-0-10-centos front]# cd nginx/
[root@VM-0-10-centos nginx]# touch nginx.conf
[root@VM-0-10-centos nginx]# ll
总用量 0
-rw-r--r-- 1 root root 0 12月  4 10:59 nginx.conf
[root@VM-0-10-centos nginx]#
- 找到主配置文件
我的主配置文件在:/etc/nginx/nginx.conf
[root@VM-0-10-centos nginx]# cd /etc/nginx/
[root@VM-0-10-centos nginx]# ll
总用量 76
-rw-r--r-- 1 root root 2469 10月  8 2019 nginx.conf
-rw-r--r-- 1 root root 2656 10月  8 2019 nginx.conf.default
- 进入主配置文件中修改 nginx.conf 文件中的配置信息
1、 将 user 指定为 root;
2、指定 Nginx 错误时日志文件路径(修改好后记得去创建对应的目录与文件名)以及注释调 pid 那行
3、指定根路径为:root /home/front; 及 index index.html index.htm;
4、主配置文件需要合并 /home/nginx/nginx.conf; 文件
# For more information on configuration, see:
#   * Official English Documentation: http://nginx.org/en/docs/
#   * Official Russian Documentation: http://nginx.org/ru/docs/

### 1、指定 user 为 root
user root;
worker_processes auto;
### 2、指定nginx错误时日志文件路径
error_log /home/nginx/logs/error.log;
# pid /run/nginx.pid;

# Load dynamic modules. See /usr/share/doc/nginx/README.dynamic.
include /usr/share/nginx/modules/*.conf;

events {
    worker_connections 1024;
}

http {
    log_format  main  '$remote_addr - $remote_user [$time_local] "$request" '
                      '$status $body_bytes_sent "$http_referer" '
                      '"$http_user_agent" "$http_x_forwarded_for"';

    access_log  /var/log/nginx/access.log  main;

    sendfile            on;
    tcp_nopush          on;
    tcp_nodelay         on;
    keepalive_timeout   65;
    types_hash_max_size 2048;

    include             /etc/nginx/mime.types;
    default_type        application/octet-stream;

    # Load modular configuration files from the /etc/nginx/conf.d directory.
    # See http://nginx.org/en/docs/ngx_core_module.html#include
    # for more information.
    include /etc/nginx/conf.d/*.conf;
### 3、指定根路径为:root /home/front; 及 index index.html index.htm;
    server {
       listen       80 default_server;
       listen       [::]:80 default_server;
       server_name  _;
       # root         /usr/share/nginx/html;
       root         /home/front;
       index  index.html index.htm;

        # Load configuration files for the default server block.
        include /etc/nginx/default.d/*.conf;

        # location / {
        # }

        error_page 404 /404.html;
            location = /40x.html {
        }

        error_page 500 502 503 504 /50x.html;
            location = /50x.html {
        }
    }

# Settings for a TLS enabled server.
#
#    server {
#        listen       443 ssl http2 default_server;
#        listen       [::]:443 ssl http2 default_server;
#        server_name  _;
#        root         /usr/share/nginx/html;
#
#        ssl_certificate "/etc/pki/nginx/server.crt";
#        ssl_certificate_key "/etc/pki/nginx/private/server.key";
#        ssl_session_cache shared:SSL:1m;
#        ssl_session_timeout  10m;
#        ssl_ciphers PROFILE=SYSTEM;
#        ssl_prefer_server_ciphers on;
#
#        # Load configuration files for the default server block.
#        include /etc/nginx/default.d/*.conf;
#
#        location / {
#        }
#
#        error_page 404 /404.html;
#            location = /40x.html {
#        }
#
#        error_page 500 502 503 504 /50x.html;
#            location = /50x.html {
#        }
#    }
### 4、 主配置文件需要合并/home/nginx/nginx.conf文件
     include /home/nginx/*.conf;
}
- 进入 /home/nginx 目录下,创建 logs 目录及 error.log 文件
[root@VM-0-10-centos nginx]# cd /home/nginx/
[root@VM-0-10-centos nginx]# mkdir logs
[root@VM-0-10-centos nginx]# cd logs
[root@VM-0-10-centos logs]# touch error.log
[root@VM-0-10-centos logs]# ll
总用量 4
-rw-r--r-- 1 root root 2390 12月  4 13:44 error.log
[root@VM-0-10-centos logs]#
- 然后在 /home/nginx/nginx.conf 中写入一些内容
[root@VM-0-10-centos logs]# cd ../
[root@VM-0-10-centos nginx]# ll
总用量 8
drwxr-xr-x 2 root root 4096 12月  4 11:52 logs
-rw-r--r-- 1 root root  231 12月  4 11:43 nginx.conf
[root@VM-0-10-centos nginx]# vi nginx.conf
### 子配置文件
server {
  listen 80;
  server_name localhost;
  root /home/front;
  # autoindex on;
  add_header Cache-Control "no-cache, must-revalidate";

  location / {
    add_header Access-Control-Allow-Origin *;
  }
}
- 检查配置文件是否成功,显示如下则表明成功
[root@VM-0-10-centos front]# nginx -t
nginx: the configuration file /etc/nginx/nginx.conf syntax is ok
nginx: configuration file /etc/nginx/nginx.conf test is successful
[root@VM-0-10-centos front]#
- ⚠️注意:如果检查配置文件成功但重启 Nginx 出现如下错误
nginx: [error] invalid PID number "" in "/run/nginx.pid"
需要执行如下代码
// /etc/nginx/nginx.conf 是主配置文件
[root@VM-0-10-centos front]# nginx -c /etc/nginx/nginx.conf
// 然后重启
[root@VM-0-10-centos front]# nginx -s reload
如果还不成功,查看 Nginx 进程,然后关闭 nginx 进程再重启 nginx
[root@VM-0-10-centos front]# ps -ef|grep nginx
root      978504       1  0 14:14 ?        00:00:00 nginx: master process nginx
root      990563  978504  0 14:20 ?        00:00:00 nginx: worker process
root     1014622  852386  0 14:31 pts/0    00:00:00 grep --color=auto nginx
[root@VM-0-10-centos front]# sudo kill -quit 978504
- 在 front 目录下添加一个 index.html 文件并写入下列代码,在浏览器访问服务器公网IP显示如下图则表明配置成功
<!DOCTYPE html>
<html lang="en">

<head>
  <meta charset="UTF-8">
  <meta http-equiv="X-UA-Compatible" content="IE=edge">
  <meta name="viewport" content="width=device-width, initial-scale=1.0">
  <title>Document</title>
</head>

<body>
  <h1>Hello World!</h1>
</body>

</html>
四、安装 MySQL
1、使用 yum 源安装
- 安装 MySQL8.0
// 注意:我们要安装的是 MySQL 服务端
// 如果输入的是 mysql,则只会安装客户端
[root@VM-0-10-centos home]# yum install mysql-server
- 安装完成后,输入 mysql -u root -p 显示 MySQL 没有启动
完毕!
[root@VM-0-10-centos home]# mysql -u root -p
Enter password:
ERROR 2002 (HY000): Can't connect to local MySQL server through socket '/var/lib/mysql/mysql.sock' (2)
[root@VM-0-10-centos home]#
- 检查 MySQL 状态
[root@VM-0-10-centos home]# service mysqld status
Redirecting to /bin/systemctl status mysqld.service
● mysqld.service - MySQL 8.0 database server
   Loaded: loaded (/usr/lib/systemd/system/mysqld.service; disabled; vendor preset: disabled)
   Active: inactive (dead)
[root@VM-0-10-centos home]#
- 启动 MySQL
[root@VM-0-10-centos home]# service mysqld restart
Redirecting to /bin/systemctl restart mysqld.service
[root@VM-0-10-centos home]#
- 重新登录,不用输入密码直接回车
[root@VM-0-10-centos home]# mysql -u root -p
Enter password:
Welcome to the MySQL monitor.  Commands end with ; or \g.
Your MySQL connection id is 8
Server version: 8.0.26 Source distribution

Copyright (c) 2000, 2021, Oracle and/or its affiliates.

Oracle is a registered trademark of Oracle Corporation and/or its
affiliates. Other names may be trademarks of their respective
owners.

Type 'help;' or '\h' for help. Type '\c' to clear the current input statement.

mysql>
- 如果登陆不成功且说需要密码,则表明 MySQL 在初始化的时候给了默认密码,可以到 log 日志中去找
[root@VM-0-10-centos home]# cat /var/log/mysqld.log |grep password
- 复制默认密码后,重新登录
[root@VM-0-10-centos home]# mysql -u root -p
- 查看数据库,如果显示:You must reset your password using ALTER USER …
[root@VM-0-10-centos home]# show databsaes;
- 那就重置密码:密码必须有字母、数字、字符
- 所设置的密码是 MySQL 登陆密码
mysql> alter user 'root'@'localhost' identified by '设置密码示例:test123123.';
- 再重新使用设置的密码登录
- 查看数据库
mysql> show databases;
+--------------------+
| Database           |
+--------------------+
| information_schema |
| mysql              |
| performance_schema |
| sys                |
+--------------------+
4 rows in set (0.01 sec)

mysql>
- 在使用 Navicat 连接测试数据库时,可能会报错:Test Failed 1130 - Host ‘服务器IP’ is not allowed to connect to this MySQL server
- 可以使用命令行的方式(登录状态)输入下列命令
// 使用数据库
mysql> use mysql;
Reading table information for completion of table and column names
You can turn off this feature to get a quicker startup with -A

Database changed

// % 是通配符,表示匹配所有IP
// 使用 mysql_native_password 插件进行验证(与 v8.0 之前的不同了)
// 密码可以使用原来的,也可以设置简单的 123456
mysql> create user 'root'@'%' identified with mysql_native_password by 'lgk123123';
Query OK, 0 rows affected (0.01 sec)

// 赋予所有权限给 'root'@'%'
mysql> grant all privileges on *.* to 'root'@'%';
Query OK, 0 rows affected (0.01 sec)

// 使设置生效
mysql> flush privileges;
Query OK, 0 rows affected (0.00 sec)

// 退出 MySQL
mysql> exit;
- 查看 MySQL 版本号
[root@VM-0-10-centos home]# mysql --version
mysql  Ver 8.0.26 for Linux on x86_64 (Source distribution)
[root@VM-0-10-centos home]#
2、获取MySQL源安装
- CentOS 默认安装 MariaDB 数据库
- 安装 MySQL 之前先删除 MariaDB 数据库
yum remove mariadb-libs.x86_64
- 切换到 /tmp 目录下,用 wget 下载 MySQL 源
wget https://repo.mysql.com/mysql57-community-release-el7-8.noarch.rpm
- 安装 MySQL
yum localinstall mysql57-community-release-el7-8.noarch.rpm
- 更新密钥
rpm --import https://repo.mysql.com/RPM-GPG-KEY-mysql-2022
- 安装 MySQL Server
yum install mysql-community-server
- 启动 MySQL 服务
service mysqld start
- 获取默认密码
cat /var/log/mysqld.log | grep "password"
- 登陆数据库
mysql -uroot -p
- 查看密码校验规则
show variables like 'validate_password%';
- 修改校验规则
set global validate_password_length=6;
set global validate_password_mixed_case_count=0;
set global validate_special_char_count=0;
......
- 刷新校验规则
flush privileges;
- 修改密码
alter user 'root'@'localhost' identified by '123456';
五、安装 MongoDB
1、下载 MongoDB
- MpngoDB 官网地址:https://www.mongodb.com/try/download/community
- 如图显示点击 Download 下载

- 将下载的 MongoDB 文件上传到服务器上
[root@VM-0-10-centos home]# cd resources/
[root@VM-0-10-centos resources]# ll
总用量 70384
-rw-r--r-- 1 root root 72072638 12月  4 16:24 mongodb-linux-x86_64-rhel80-4.4.10.tgz
[root@VM-0-10-centos resources]#
2、安装 MongoDB
- 解压 resources 下的 mongodb-linux-x86_64-rhel80-4.4.10.tgz 文件
[root@VM-0-10-centos resources]# tar -zxvf mongodb-linux-x86_64-rhel80-4.4.10.tgz
[root@VM-0-10-centos resources]# ll
总用量 70388
drwxr-xr-x 3 root root     4096 12月  4 16:26 mongodb-linux-x86_64-rhel80-4.4.10
-rw-r--r-- 1 root root 72072638 12月  4 16:24 mongodb-linux-x86_64-rhel80-4.4.10.tgz
[root@VM-0-10-centos resources]#
- 进入 /usr/local 下创建 mongodb 目录
[root@VM-0-10-centos resources]# cd /usr/local/
[root@VM-0-10-centos local]# mkdir mongodb
[root@VM-0-10-centos local]# ll
总用量 48
drwxr-xr-x.  2 root root 4096 12月  4 09:40 bin
drwxr-xr-x.  2 root root 4096 6月  22 13:06 etc
drwxr-xr-x.  2 root root 4096 6月  22 13:06 games
drwxr-xr-x.  2 root root 4096 6月  22 13:06 include
drwxr-xr-x.  4 root root 4096 12月  4 09:14 lib
drwxr-xr-x.  4 root root 4096 6月  22 13:06 lib64
drwxr-xr-x.  2 root root 4096 6月  22 13:06 libexec
drwxr-xr-x   2 root root 4096 12月  4 16:29 mongodb
drwxr-xr-x  16 root root 4096 12月  3 20:54 qcloud
drwxr-xr-x.  2 root root 4096 6月  22 13:06 sbin
drwxr-xr-x.  5 root root 4096 6月  22 13:06 share
drwxr-xr-x.  2 root root 4096 6月  22 13:06 src
srwxrwxrwx   1 root root    0 12月  3 20:54 yd.socket.server
[root@VM-0-10-centos local]#
- 将解压后的 mongodb-linux-x86_64-rhel80-4.4.10 下的所有文件移到新建的 /usr/local/mongodb 目录下
[root@VM-0-10-centos mongodb-linux-x86_64-rhel80-4.4.10]# cp -r bin/ /usr/local/mongodb/
[root@VM-0-10-centos mongodb-linux-x86_64-rhel80-4.4.10]# cp -r LICENSE-Community.txt /usr/local/mongodb/
[root@VM-0-10-centos mongodb-linux-x86_64-rhel80-4.4.10]# cp -r MPL-2 /usr/local/mongodb/
[root@VM-0-10-centos mongodb-linux-x86_64-rhel80-4.4.10]# cp -r README /usr/local/mongodb/
[root@VM-0-10-centos mongodb-linux-x86_64-rhel80-4.4.10]# cp -r THIRD-PARTY-NOTICES /usr/local/mongodb/
[root@VM-0-10-centos mongodb-linux-x86_64-rhel80-4.4.10]# cd /usr/local/mongodb/
[root@VM-0-10-centos mongodb]# ll
总用量 136
drwxr-xr-x 2 root root  4096 12月  4 16:38 bin
-rw-r--r-- 1 root root 30608 12月  4 16:39 LICENSE-Community.txt
-rw-r--r-- 1 root root 16726 12月  4 16:39 MPL-2
-rw-r--r-- 1 root root  1977 12月  4 16:39 README
-rw-r--r-- 1 root root 75685 12月  4 16:40 THIRD-PARTY-NOTICES
[root@VM-0-10-centos mongodb]#
- 将 mongodb 下 bin目录的可执行文件添加到 PATH 路径中
[root@VM-0-10-centos mongodb]# export PATH=/usr/local/mongodb/bin:$PATH
[root@VM-0-10-centos mongodb]#
- 启动前在 mongodb 目录下创建两个目录
// 数据存储目录
[root@VM-0-10-centos mongodb]# mkdir data
// 日志文件目录
[root@VM-0-10-centos mongodb]# mkdir logs
[root@VM-0-10-centos mongodb]# cd logs/
// 在 logs 目录下创建 mongod.log 文件用于存储日志
[root@VM-0-10-centos logs]# touch mongod.log
[root@VM-0-10-centos logs]#
- 设置当前用户对这两个目录有读写权限
[root@VM-0-10-centos logs]# sudo chown `whoami` /usr/local/mongodb/data
[root@VM-0-10-centos logs]# sudo chown `whoami` /usr/local/mongodb/logs/mongod.log
[root@VM-0-10-centos logs]#
- 启动 MongoDB 服务
[root@VM-0-10-centos logs]# mongod --dbpath /usr/local/mongodb/data --logpath /usr/local/mongodb/logs/mongod.log --fork
- 打开 /usr/local/mongodb/logs/mongod.log 文件如果看到如下类似信息则表明启动成功
[root@VM-0-10-centos logs]# tail -10f /usr/local/mongodb/logs/mongod.log
{"t":{"$date":"2021-12-04T16:57:52.197+08:00"},"s":"I",  "c":"FTDC",     "id":20625,   "ctx":"initandlisten","msg":"Initializing full-time diagnostic data capture","attr":{"dataDirectory":"/usr/local/mongodb/data/diagnostic.data"}}
{"t":{"$date":"2021-12-04T16:58:52.158+08:00"},"s":"I",  "c":"STORAGE",  "id":22430,   "ctx":"WTCheckpointThread","msg":"WiredTiger message","attr":{"message":"[1638608332:158320][1324308:0x7f8b7f2aa700], WT_SESSION.checkpoint: [WT_VERB_CHECKPOINT_PROGRESS] saving checkpoint snapshot min: 34, snapshot max: 34 snapshot count: 0, oldest timestamp: (0, 0) , meta checkpoint timestamp: (0, 0) base write gen: 1"}}
- 输入 mongo 就可以进入 MongoDB 数据库了
[root@VM-0-10-centos logs]# mongo
MongoDB shell version v4.4.10
connecting to: mongodb://127.0.0.1:27017/?compressors=disabled&gssapiServiceName=mongodb
Implicit session: session { "id" : UUID("c469261f-dcd0-4f6c-a27a-3fc97c4d4f4c") }
MongoDB server version: 4.4.10
Welcome to the MongoDB shell.
For interactive help, type "help".
For more comprehensive documentation, see
        https://docs.mongodb.com/
Questions? Try the MongoDB Developer Community Forums
        https://community.mongodb.com
---
- 查看数据库
> show databases;
admin   0.000GB
config  0.000GB
local   0.000GB
>
六、安装 git
1、使用 yum 源安装
- 安装 git
[root@VM-0-10-centos resources]# yum -y install git
- 查看 git 版本
完毕!
[root@VM-0-10-centos resources]# git --version
git version 2.27.0
[root@VM-0-10-centos resources]#
- 如果 git 版本较低,可以对 git 版本进行升级(上述安装的版本已经较新,可以忽略下列步骤)
- 首先 remove 掉 yum 源上的 git
[root@VM-0-10-centos resources]# yum remove git
- 然后用 yum 源安装 git 的依赖
[root@VM-0-10-centos resources]# yum install -y curl-devel expat-devel gettext-devel openssl-devel zlib-devel

// 通过源码编译的方式再安装 git
[root@VM-0-10-centos resources]# yum install - y gcc perl-ExtUtils-MakeMaker

[root@VM-0-10-centos resources]# yum install -y tcl build-essential tk gettext
- 通过 wget 指令下载 git 最新的版本
[root@VM-0-10-centos resources]# wget https://github.com/git/git/archive/v2.27.0.tar.gz
- 解压
[root@VM-0-10-centos resources]# tar -zxvf v2.27.0.tar.gz
- 进入源码目录下
[root@VM-0-10-centos resources]# cd git-2.27.0
- 使用 make 编译源码
// 编译时指定安装后的可执行文件位于哪
[root@VM-0-10-centos git-2.27.0]# make prefix=/usr/local/git all
- 编译完成后进行安装
[root@VM-0-10-centos git-2.27.0]# make prefix=/usr/local/git install
- 执行 git 指令不成功,进入 /usr/local/git/bin 查看
- 制作软连接
// 进入 /usr/bin
[root@VM-0-10-centos git-2.27.0]# cd /usr/bin

// 制作软连接
[root@VM-0-10-centos bin]# ln -s /usr/local/git/bin/git git
- 然后就可以执行 git 指令
[root@VM-0-10-centos resources]# git --version
git version 2.27.0
[root@VM-0-10-centos resources]#
2、设置免密更新
- 通过 ssh 做免密登录
// 通过 ssh-keygen 生成免密登录的密钥
// 通过 -C 属性去填写 git 仓库的用户名
ssh-keygen -t rsa -C “1910184628@qq.com”

// 点击三次回车将密钥生成

// 将密钥打印在终端上面
cat ~/.ssh/id_rsa.pub

// 复制密钥后进入 Gitee 仓库 “我的设置”添加密钥

// 将密钥粘贴到密钥内容上
- 将密钥添加到用户设置的好处:对该用户的所有项目都可以免密 clone,不用在每个项目上点“仓库设置”单独设置
- 进入刚才创建的 back-resources 目录下再来 git clone 下载代码
git clone git@gitee.com:lgk2021/项目名.git
- 更新代码
// 进入要更新源码的目录下,执行
git pull
七、安装 JDK
1、使用 yum 源安装
- 检查 yum 源中是否有 Java 安装包(出现下图则表明存在 Java 安装包)
[root@VM-0-2-centos /]# yum list java*
- 开始安装 JDK1.8
[root@VM-0-2-centos local]# yum install -y java-1.8.0-openjdk.x86_64

// 或者
// 第二种会将很多的东西都安装,如果第一种不成功再考虑第二种方式
[root@VM-0-2-centos /]# yum install -y java-1.8.0-openjdk*
- 检查并验证是否安装成功
[root@VM-0-2-centos /]# java -version
openjdk version "1.8.0_312"
OpenJDK Runtime Environment (build 1.8.0_312-b07)
OpenJDK 64-Bit Server VM (build 25.312-b07, mixed mode)
[root@VM-0-2-centos /]#
2、使用压缩包的方式安装
- 将压缩包上传到 Linux 系统上(我的放在 /home 目录下)
[root@VM-0-2-centos /]# cd /home/
[root@VM-0-2-centos home]# ll
总用量 199204
-rw-r--r-- 1 root root 188743215 12月 18 13:56 jdk-13.0.1_linux-x64_bin.tar.gz
[root@VM-0-2-centos home]#
- 解压文件
[root@VM-0-2-centos home]# tar -zxvf jdk-13.0.1_linux-x64_bin.tar.gz
[root@VM-0-2-centos home]# ll
总用量 199208
drwxr-xr-x 9 root root      4096 12月 18 15:34 jdk-13.0.1
-rw-r--r-- 1 root root 188743215 12月 18 13:56 jdk-13.0.1_linux-x64_bin.tar.gz
[root@VM-0-2-centos home]#
- 将解压后的文件移到 /usr/local/ 目录下
[root@VM-0-2-centos home]# mv jdk-13.0.1/ /usr/local/
[root@VM-0-2-centos home]# ll
总用量 199204
-rw-r--r-- 1 root root 188743215 12月 18 13:56 jdk-13.0.1_linux-x64_bin.tar.gz
[root@VM-0-2-centos home]# cd /usr/local/
- 进入 /usr/local/ 目录,并查看是否存在
[root@VM-0-2-centos home]# cd /usr/local/
[root@VM-0-2-centos local]# ll
总用量 56
drwxr-xr-x.  2 root root 4096 11月  3 2020 bin
drwxr-xr-x.  2 root root 4096 11月  3 2020 etc
drwxr-xr-x.  2 root root 4096 11月  3 2020 games
drwxr-xr-x.  2 root root 4096 11月  3 2020 include
drwxr-xr-x   9 root root 4096 12月 18 15:34 jdk-13.0.1

[root@VM-0-2-centos local]#
- 配置环境变量
- 打开配置文件
[root@VM-0-2-centos local]# vi ~/.bash_profile
- 配置信息如下
JAVA_HOME=/usr/local/jdk-13.0.1
PATH=$JAVA_HOME/bin:$PATH
- 整个配置文件如下(配置完成记得保存)
# .bash_profile

# Get the aliases and functions
if [ -f ~/.bashrc ]; then
        . ~/.bashrc
fi

# User specific environment and startup programs

PATH=$PATH:$HOME/bin

JAVA_HOME=/usr/local/jdk-13.0.1
PATH=$JAVA_HOME/bin:$PATH

export PATH
~
- 执行如下命令使配置文件生效
[root@VM-0-2-centos local]# source ~/.bash_profile
- 检查并验证是否安装成功
[root@VM-0-2-centos local]# java -version
java version "13.0.1" 2019-10-15
Java(TM) SE Runtime Environment (build 13.0.1+9)
Java HotSpot(TM) 64-Bit Server VM (build 13.0.1+9, mixed mode, sharing)
[root@VM-0-2-centos local]#
3、卸载 JDK
- 查看是否安装过 JDK
- 分别执行下列命令,如果有如下图的输出信息,则表明安装过
[root@VM-0-2-centos /]# rpm -qa|grep java
[root@VM-0-2-centos /]# rpm -qa|grep jdk
[root@VM-0-2-centos /]# rpm -qa|grep gcj
- 批量卸载安装过的 JDK
[root@VM-0-2-centos /]# rpm -qa | grep java | xargs rpm -e --nodeps
- 如果是使用 yum 源安装的,可以执行如下命令卸载
[root@VM-0-2-centos /]# yum -y remove java-1.8.0-openjdk*
- 如果是使用压缩包的方式安装,可以直接到安装目录下删除对应的安装包即可;同时到配置文件中删除对应的配置;然后刷新配置文件
[root@VM-0-2-centos local]# vi ~/.bash_profile
# .bash_profile

# Get the aliases and functions
if [ -f ~/.bashrc ]; then
        . ~/.bashrc
fi

# User specific environment and startup programs

PATH=$PATH:$HOME/bin

# JAVA_HOME=/usr/local/jdk-13.0.1
# PATH=$JAVA_HOME/bin:$PATH

export PATH
~
[root@VM-0-2-centos local]# source ~/.bash_profile
- 检查是否卸载成功
[root@VM-0-2-centos /]# java -version
-bash: /usr/bin/java: 没有那个文件或目录
[root@VM-0-2-centos /]#
八、安装 Tomcat
1、使用压缩包的方式安装
- 将压缩包上传到 Linux 系统上(我的放在 /home 目录下)
[root@VM-0-2-centos /]# cd /home/
[root@VM-0-2-centos home]# ll
总用量 193664
-rw-r--r-- 1 root root   9552281 12月 18 16:11 apache-tomcat-8.5.31.tar.gz
-rw-r--r-- 1 root root 188743215 12月 18 13:56 jdk-13.0.1_linux-x64_bin.tar.gz
[root@VM-0-2-centos home]#
- 解压文件
[root@VM-0-2-centos home]# tar -zxvf apache-tomcat-8.5.31.tar.gz
[root@VM-0-2-centos home]# ll
总用量 193668
drwxr-xr-x 9 root root      4096 12月 18 16:12 apache-tomcat-8.5.31
-rw-r--r-- 1 root root   9552281 12月 18 16:11 apache-tomcat-8.5.31.tar.gz
-rw-r--r-- 1 root root 188743215 12月 18 13:56 jdk-13.0.1_linux-x64_bin.tar.gz
[root@VM-0-2-centos home]#
- 将解压后的文件移到 /usr/local/ 目录下
[root@VM-0-2-centos home]# mv apache-tomcat-8.5.31 /usr/local/
[root@VM-0-2-centos home]# ll
总用量 193664
-rw-r--r-- 1 root root   9552281 12月 18 16:11 apache-tomcat-8.5.31.tar.gz
-rw-r--r-- 1 root root 188743215 12月 18 13:56 jdk-13.0.1_linux-x64_bin.tar.gz
[root@VM-0-2-centos home]#
- 进入 /usr/local/ 目录,并查看是否存在
[root@VM-0-2-centos home]# cd /usr/local/
[root@VM-0-2-centos local]# ll
总用量 60
drwxr-xr-x   9 root root 4096 12月 18 16:12 apache-tomcat-8.5.31
drwxr-xr-x.  2 root root 4096 11月  3 2020 bin
drwxr-xr-x.  2 root root 4096 11月  3 2020 etc
drwxr-xr-x.  2 root root 4096 11月  3 2020 games
drwxr-xr-x.  2 root root 4096 11月  3 2020 include
drwxr-xr-x   9 root root 4096 12月 18 15:34 jdk-13.0.1

[root@VM-0-2-centos local]#
- 进入 /usr/local/apache-tomcat-8.5.31/bin 目录下
[root@VM-0-2-centos local]# cd apache-tomcat-8.5.31/bin/
[root@VM-0-2-centos bin]# ll
总用量 836
-rw-r----- 1 root root  34985 4月  28 2018 bootstrap.jar
-rw-r----- 1 root root  15900 4月  28 2018 catalina.bat
-rwxr-x--- 1 root root  23463 4月  28 2018 catalina.sh
-rw-r----- 1 root root   1664 4月  28 2018 catalina-tasks.xml
-rw-r----- 1 root root  25145 4月  28 2018 commons-daemon.jar
-rw-r----- 1 root root 207125 4月  28 2018 commons-daemon-native.tar.gz
-rw-r----- 1 root root   2040 4月  28 2018 configtest.bat
-rwxr-x--- 1 root root   1922 4月  28 2018 configtest.sh
-rwxr-x--- 1 root root   8509 4月  28 2018 daemon.sh
-rw-r----- 1 root root   2091 4月  28 2018 digest.bat
-rwxr-x--- 1 root root   1965 4月  28 2018 digest.sh
-rw-r----- 1 root root   3574 4月  28 2018 setclasspath.bat
-rwxr-x--- 1 root root   3680 4月  28 2018 setclasspath.sh
-rw-r----- 1 root root   2020 4月  28 2018 shutdown.bat
-rwxr-x--- 1 root root   1902 4月  28 2018 shutdown.sh
-rw-r----- 1 root root   2022 4月  28 2018 startup.bat
-rwxr-x--- 1 root root   1904 4月  28 2018 startup.sh
-rw-r----- 1 root root  49336 4月  28 2018 tomcat-juli.jar
-rw-r----- 1 root root 405109 4月  28 2018 tomcat-native.tar.gz
-rw-r----- 1 root root   4574 4月  28 2018 tool-wrapper.bat
-rwxr-x--- 1 root root   5483 4月  28 2018 tool-wrapper.sh
-rw-r----- 1 root root   2026 4月  28 2018 version.bat
-rwxr-x--- 1 root root   1908 4月  28 2018 version.sh
[root@VM-0-2-centos bin]#
- 启动 Tomcat:执行 ./startup.sh 命令
[root@VM-0-2-centos bin]# ./startup.sh
Using CATALINA_BASE:   /usr/local/apache-tomcat-8.5.31
Using CATALINA_HOME:   /usr/local/apache-tomcat-8.5.31
Using CATALINA_TMPDIR: /usr/local/apache-tomcat-8.5.31/temp
Using JRE_HOME:        /usr/local/jdk-13.0.1
Using CLASSPATH:       /usr/local/apache-tomcat-8.5.31/bin/bootstrap.jar:/usr/local/apache-tomcat-8.5.31/bin/tomcat-juli.jar
Tomcat started.
[root@VM-0-2-centos bin]#
- 检查 Tomcat 是否安装成功
- 在浏览器输入:http://服务器公网IP:8080 进行访问,出现下图证明 Tomcat 安装成功

- ⚠️注意
如果使用云服务器访问不成功,原因可能是没有放开端口号,可以到云服务器设置安全组;
如果使用虚拟机访问不成功,原因可能是没有关闭防火墙,开放/关闭防火墙的方式如下:
(1)永久性生效,重启不会复原
开启:chkconfig iptables on
关闭:chkconfig iptables off
(2)即时生效,重启后复原
开启:service iptables on
关闭:service iptables off
2、
九、安装 Redis
1、下载
2、解压并安装
tar -zxvf redis-7.0.5.tar.gz -C ./
- 进入 redis 解压后的目录下使用 make 对 redis 源码进行编译
make
[root@VM-0-10-centos redis-7.0.5]# ln -s /opt/redis-7.0.5/src/redis-server /usr/local/bin
[root@VM-0-10-centos redis-7.0.5]# ln -s /opt/redis-7.0.5/src/redis-cli /usr/local/bin/
- 修改 redis 核心配置文件
// 通过 vi 命令打开 redis.conf 配置文件
[root@VM-0-10-centos redis-7.0.5]# vi redis.conf

// 通过 :set nu 命令显示文本行数
// 通过 / daemonize 搜索 daemonize 并将其值改为 yes
// daemonize 是用来指定 redis 是否要用守护线程的方式启动
// 当使用 yes 时,redis 会在后台一直运行,直到手动 kill 该进程
// 当使用 no 时,关闭当前 redis 启动界面或者 exit 强制退出或关闭 Shell 都会导致 redis 进程退出
daemonize yes

// 将 bind 127.0.0.1 改成 bind 0.0.0.0
// 因为默认的 127.0.0.1 redis 服务器只能被本机访问
bind 0.0.0.0 -::1

// 关闭保护模式,允许客户端访问
pertected-mode no

// 增加连接 redis 服务器需要的认证密码
requirepass 123456
十、安装 Python
1、yum 源安装 Python3
- CentOS7 默认安装有 Python2.x
// 查看 python 版本
[root@localhost ~]# python --version
Python 2.7.5
[root@localhost ~]#
- 安装 Python3
// 安装 Python3
[root@localhost ~]# yum install python3
- 查看是否安装成功
[root@localhost ~]# python3 --version
Python 3.6.8
[root@localhost ~]#
安装 Virtualenv:
- Virtualenv是一个Python工具,用于创建隔离的Python环境。它允许用户为每个Python项目创建独立的运行环境,避免不同项目之间的依赖冲突
- 安装 virtualenv
// 或者 pip
[root@localhost ~]# pip3 install virtualenv
- 查看安装的路径
[root@localhost ~]# virtualenv --version
virtualenv 20.17.1 from /usr/local/lib/python3.6/site-packages/virtualenv/__init__.py
[root@localhost ~]# find / -name virtualenv
/usr/local/bin/virtualenv
/usr/local/lib/python3.6/site-packages/virtualenv
- 创建软连接
[root@localhost ~]# ln -s /usr/local/lib/python3.6/site-packages/virtualenv /usr/bin/virtualenv
- 创建虚拟环境
// venv 是虚拟环境名称,路径和名称自定义
[root@localhost ~]# virtualenv -p /usr/bin/python3 venv
- 激活虚拟环境
[root@localhost venv]# which python
/usr/bin/python
[root@localhost venv]# which python3
/usr/bin/python3
[root@localhost ~]# source v_env/bin/activate
[root@localhost ~]#
(v_env) [root@localhost ~]# which python
/root/v_env/bin/python
(v_env) [root@localhost ~]# which python3
/root/v_env/bin/python3
(v_env) [root@localhost ~]#


