GEM5教程: 使用 gem5 运行 PARSEC 基准测试
Intro
本文内容
使用 gem5 运行 PARSEC 基准测试。full system 全系统模拟,包括gem5模拟一个计算机架构运行ubuntu,在gem5模拟的ubuntu里运行parsec基准测试,并且将模拟机的运行结果和performance记录下来。
具体内容:本文是官方PARSEC教程的具体执行实现与踩坑,并且附上细节诠释与代码解读。 例如教程中十分模糊的物理机与虚拟机,文件位置,本文给出了详细的说明以便运行。
本文覆盖并解释了官方教程的近乎所有步骤:https://gem5art.readthedocs.io/en/latest/tutorials/parsec-tutorial.html。建议对照着阅读。
0. 编译gem5 与下载,文件系统结构
基于gem5的研究大多需要更改源代码重新编译,因此确认系统环境没问题后,每一个项目内最好有各自对应的调整编译好的gem5,同时,官方教程给的代码与命令行有很多相对路径是固定的,因此最好保持和教程一致的文件结构,并且在相应位置编译gem5。
1. 设置环境
物理机的ubuntu上,找到一个空位置,新建一个文件夹,叫做parsec-tests, 并且在转化为git 存储库。并且添加远程托管位置
mkdir parsec-tests
cd parsec-tests
git init
git remote add origin https://your-remote-add/parsec-tests.git
这里git库的生成的部分不是必要的,只是为了方便版本管理和跟踪更改。新建一个文件夹就行了,愿意的话再去搞git,嫌麻烦就不管git。我建的文件夹叫parse-202208,没有转化git。
即我的命令行是:
mkdir parsec-202208
cd parsec-202208
新建虚拟环境。 教程中用的virtualenv, 我用的conda。不用虚拟环境亦可。
virtualenv -p python3 venv
source venv/bin/activate
然后安装gem5art. gem5art 是一个附加的类似脚本自动化和数据存储的东西,没有gem5art也能跑gem5,手动重复输命令行和手动指定输出路径即可,教程中用了gem5art,因此我们也照用。实际上gem5art会给这个教程引入很多困难。 让我们也用gem5art一步步走下去吧。
pip install gem5art-artifact gem5art-run gem5art-tasks
2. build gem5
这里官方教程甩了个链接出来 https://www.gem5.org/documentation/gem5art/tutorials/npb-tutorial##Building-gem5。 我觉得build gem5 和se 模拟应该是基本的,信息也给的比较全,应该是看这篇文章之前就有编译好gem5并且跑了一些简单的例子了,因此build gem5 在这篇blog中是默认已经搞定的基础部分。
3. 创建磁盘映像 create disk image
首先创建一个磁盘映像文件夹,我们将在其中保存所有磁盘映像相关文件。这个路径是在物理机的/parsec-202208。
mkdir disk-image
然后进入 disk-image下,新建两个文件夹,叫做parsec-benchmark和shared
cd disk-image
mkdir shared
mkdir parsec
进入parsec-benchmark文件夹,clone git库
cd disk-image/parsec-benchmark
git clone https://github.com/darchr/parsec-benchmark.git
这里cd … 命令行太简单了,教程里没有给出,自行退出来回到/parsec路径下新建各种sh/json文件。
新建一个文件parsec-install.sh,一个post-installation.sh, parsec.json,runscript.sh。
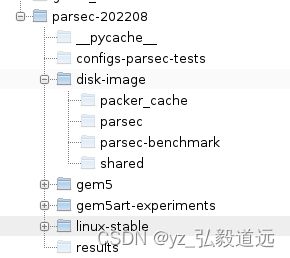
文件路径如下。文本内容下面一起给出。其中run_parsec.py本节未提到, 下一小节才会创建。

1以下是parsec-install.sh内容 它将在磁盘映像内执行(一旦构建完成)并将在磁盘映像上安装 PARSEC
# install build-essential (gcc and g++ included) and gfortran
#Compile PARSEC
cd /home/gem5/
su gem5
echo "12345" | sudo -S apt update

# Allowing services to restart while updating some
# libraries.
sudo apt install -y debconf-utils
sudo debconf-get-selections | grep restart-without-asking > libs.txt
sed -i 's/false/true/g' libs.txt
while read line; do echo $line | sudo debconf-set-selections; done < libs.txt
sudo rm libs.txt
##

# Installing packages needed to build PARSEC
sudo apt install -y build-essential
sudo apt install -y m4
sudo apt install -y git
sudo apt install -y python
sudo apt install -y python-dev
sudo apt install -y gettext
sudo apt install -y libx11-dev
sudo apt install -y libxext-dev
sudo apt install -y xorg-dev
sudo apt install -y unzip
sudo apt install -y texinfo
sudo apt install -y freeglut3-dev
##

# Building PARSEC

echo "12345" | sudo -S chown gem5 -R parsec-benchmark/
echo "12345" | sudo -S chgrp gem5 -R parsec-benchmark/
cd parsec-benchmark
./install.sh
./get-inputs
cd ..
echo "12345" | sudo -S chown gem5 -R parsec-benchmark/
echo "12345" | sudo -S chgrp gem5 -R parsec-benchmark/
##
2以下是post-installation.sh内容 这个 post-installation.sh 脚本(这是在磁盘映像上安装 Ubuntu 后运行的脚本)安装 m5 并将 runscript.sh 的内容复制到 .bashrc。
#!/bin/bash
echo 'Post Installation Started'

mv /home/gem5/[email protected] /lib/systemd/system/

mv /home/gem5/m5 /sbin
ln -s /sbin/m5 /sbin/gem5
# copy and run outside (host) script after booting
cat /home/gem5/runscript.sh >> /root/.bashrc

echo 'Post Installation Done'
3我们需要在 runscript.sh 中添加我们想要在系统启动后立即执行的内容。在 parsec/ 中创建 runscript.sh 并向其中添加以下行: runscript.sh 使用 m5 readfile 读取脚本的内容,这是 gem5 将脚本从主机系统传递到模拟系统的方式。然后将执行传递的脚本,并负责运行基准测试,我们将在稍后进行更多研究。
#!/bin/sh

m5 readfile > script.sh
if [ -s script.sh ]; then
    # if the file is not empty, execute it
    chmod +x script.sh
    ./script.sh
    m5 exit
fi
# otherwise, drop to the terminal
4 最后,parsec.json是我们的主要 .json 配置文件。此文件的配置程序和变量部分配置需要传输到磁盘的文件以及其他内容,例如磁盘映像的名称。 添加以下内容:
{
"builders":
[
{
"type": "qemu",
"format": "raw",
"accelerator": "kvm",
"boot_command":
[
"{{ user `boot_command_prefix` }}",
"debian-installer={{ user `locale` }} auto locale={{ user `locale` }} kbd-chooser/method=us ",
"file=/floppy/{{ user `preseed` }} ",
"fb=false debconf/frontend=noninteractive ",
"hostname={{ user `hostname` }} ",
"/install/vmlinuz noapic ",
"initrd=/install/initrd.gz ",
"keyboard-configuration/modelcode=SKIP keyboard-configuration/layout=USA ",
"keyboard-configuration/variant=USA console-setup/ask_detect=false ",
"passwd/user-fullname={{ user `ssh_fullname` }} ",
"passwd/user-password={{ user `ssh_password` }} ",
"passwd/user-password-again={{ user `ssh_password` }} ",
"passwd/username={{ user `ssh_username` }} ",
"-- "
],
"cpus": "{{ user `vm_cpus`}}",
"disk_size": "{{ user `image_size` }}",
"floppy_files":
[
"shared/{{ user `preseed` }}"
],
"headless": "{{ user `headless` }}",
"http_directory": "shared/",
"iso_checksum": "{{ user `iso_checksum` }}",
"iso_checksum_type": "{{ user `iso_checksum_type` }}",
"iso_urls": [ "{{ user `iso_url` }}" ],
"memory": "{{ user `vm_memory`}}",
"output_directory": "parsec/{{ user `image_name` }}-image",
"qemuargs":
[
[ "-cpu", "host" ],
[ "-display", "none" ]
],
"qemu_binary":"/usr/bin/qemu-system-x86_64",
"shutdown_command": "echo '{{ user `ssh_password` }}'|sudo -S shutdown -P now",
"ssh_password": "{{ user `ssh_password` }}",
"ssh_username": "{{ user `ssh_username` }}",
"ssh_wait_timeout": "60m",
"vm_name": "{{ user `image_name` }}"
}
],
"provisioners":
[
{
"type": "file",
"source": "../gem5/util/m5/m5",
"destination": "/home/gem5/"
},
{
"type": "file",
"source": "shared/[email protected]",
"destination": "/home/gem5/"
},
{
"type": "file",
"source": "parsec/runscript.sh",
"destination": "/home/gem5/"
},
{
"type": "file",
"source": "parsec/parsec-benchmark/",
"destination": "/home/gem5/"
},
{
"type": "shell",
"execute_command": "echo '{{ user `ssh_password` }}' | {{.Vars}} sudo -E -S bash '{{.Path}}'",
"scripts":
[
"parsce/post-installation.sh",
"parsec/parsec-install.sh"
]
}
],
"variables":
{
"boot_command_prefix": "" 接下来,在磁盘映像文件夹中下载打包程序(如果尚未下载):
}
cd disk-image/
wget https://releases.hashicorp.com/packer/1.4.3/packer_1.4.3_linux_amd64.zip
unzip packer_1.4.3_linux_amd64.zip
}
现在,要在 disk-image 文件夹中构建磁盘映像,请运行以下validate 和build代码。
./packer validate parsec/parsec.json
./packer build parsec/parsec.json
}
这里相当于用packer生成了一个系统镜像,需要安装有qemu. 如果有问题需要跳转到磁盘映像的这个链接:https://www.gem5.org/documentation/gem5art/main/disks。 packer生成的是一个打打文件,如图24gb

同时shared文件夹下还得有两个文件,教程里给出了下载链接。

我直接贴出来供复制:
文件preseed.cfg:
# This preseed file is adapted from the official example from
# https://www.debian.org/releases/stable/example-preseed.txt

# Choosing keyboard layout
d-i debian-installer/locale string en_US
d-i console-setup/ask_detect boolean false
d-i keyboard-configuration/xkb-keymap select us

# Choosing network interface
d-i netcfg/choose_interface select auto

# Assigning hostname and domain
d-i netcfg/get_hostname string gem5-host
d-i netcfg/get_domain string gem5-domain

d-i netcfg/wireless_wep string

# https://unix.stackexchange.com/q/216348
# The above link says there's no way to not to set a mirror
# Should choose a local minor
d-i mirror/country string manual
d-i mirror/http/hostname string archive.ubuntu.com
d-i mirror/http/directory string /ubuntu
d-i mirror/http/proxy string

# Setting up `root` password
d-i passwd/root-login boolean false

# Creating a normal user account. This account has sudo permission.
d-i passwd/user-fullname string gem5
d-i passwd/username string gem5
d-i passwd/user-password password 12345
d-i passwd/user-password-again password 12345
d-i user-setup/allow-password-weak boolean true

# No home folder encryption
d-i user-setup/encrypt-home boolean false

# Choosing the clock timezone
d-i clock-setup/utc boolean true
d-i time/zone string US/Eastern
d-i clock-setup/ntp boolean true

# Choosing partition scheme
# This setting should result in MBR
# gem5 doesn't work with logical volumes
d-i partman-auto/method string regular
d-i partman-lvm/device_remove_lvm boolean true
d-i partman-md/device_remove_md boolean true
d-i partman-lvm/confirm boolean true
d-i partman-lvm/confirm_nooverwrite boolean true

# Ignoring an option to set the home folder in another partition
d-i partman-auto/choose_recipe select atomic

# Finishing disk partition settings
d-i partman-md/confirm boolean true
d-i partman-partitioning/confirm_write_new_label boolean true
d-i partman/choose_partition select finish
d-i partman/confirm boolean true
d-i partman/confirm_nooverwrite boolean true

# Installing standard packages and ubuntu-server packages
# More details about ubuntu standard packages:
# https://packages.ubuntu.com/bionic/ubuntu-standard
# More details about ubuntu-server packages:
# https://packages.ubuntu.com/bionic/ubuntu-server
tasksel tasksel/first multiselect standard, ubuntu-server

# openssh-server is required for communicating with Packer
# build-essential has standard compiling tools, could be removed
d-i pkgsel/include string openssh-server build-essential
# No package upgrade
d-i pkgsel/upgrade select none

# Updating packages automatically is unnecessary
d-i pkgsel/update-policy select none

# Choosing not to report installed software to some servers
popularity-contest popularity-contest/participate boolean false

# Installing grub
d-i grub-installer/only_debian boolean true

# Specifying which partition to boot
d-i grub-installer/bootdev  string /dev/sda

# Install to the above partition
d-i grub-installer/bootdev  string default

# Answering the prompt saying the installation is finished
d-i finish-install/reboot_in_progress note

# Answering the prompt saying no bootloader is installed
# This will appear if grub is not installed
nobootloader nobootloader/confirmation_common note
#  SPDX-License-Identifier: LGPL-2.1+
#
#  This file is part of systemd.
#
#  systemd is free software; you can redistribute it and/or modify it
#  under the terms of the GNU Lesser General Public License as published by
#  the Free Software Foundation; either version 2.1 of the License, or
#  (at your option) any later version.

[Unit]
Description=Serial Getty on %I
Documentation=man:agetty(8) man:systemd-getty-generator(8)
Documentation=http://0pointer.de/blog/projects/serial-console.html
BindsTo=dev-%i.device
After=dev-%i.device systemd-user-sessions.service plymouth-quit-wait.service getty-pre.target
After=rc-local.service

# If additional gettys are spawned during boot then we should make
# sure that this is synchronized before getty.target, even though
# getty.target didn't actually pull it in.
Before=getty.target
IgnoreOnIsolate=yes

# IgnoreOnIsolate causes issues with sulogin, if someone isolates
# rescue.target or starts rescue.service from multi-user.target or
# graphical.target.
Conflicts=rescue.service
Before=rescue.service

[Service]
# The '-o' option value tells agetty to replace 'login' arguments with an
# option to preserve environment (-p), followed by '--' for safety, and then
# the entered username.
ExecStart=-/sbin/agetty --autologin root --keep-baud 115200,38400,9600 %I $TERM
Type=idle
Restart=always
UtmpIdentifier=%I
TTYPath=/dev/%I
TTYReset=yes
TTYVHangup=yes
KillMode=process
IgnoreSIGPIPE=no
SendSIGHUP=yes

[Install]
WantedBy=getty.target
编译linux内核
这里教程只给出了一个链接跳转。 按照此处(npbhttps://www.gem5.org/documentation/gem5art/tutorials/npb-tutorial##Compiling-the-linux-kernel )的说明编译您的 linux 内核 。
但是这个npb的教程包含了很多内容,不止是编译内核,而且文件结构也变成了npb教程的。 本文依照跳转后的内容,给出关于parsec教程结构下编译内核的详细步骤。
0首先可以不用自己编译,直接下载,省去下面这些步骤!省去下面这些步骤!省去下面这些步骤!http://dist.gem5.org/dist/v21-2/kernels/x86/static/vmlinux-4.19.83 下载后是编译好的vmlinux-4.19.83.
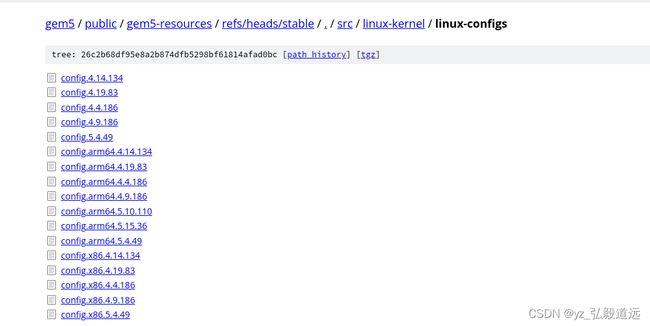
1要自己编译的话,先下载linux配置文件,放在parsec-202208下,即和disk-image 同级。链接https://gem5.googlesource.com/public/gem5-resources/+/refs/heads/stable/src/linux-kernel/linux-configs/ 给出,点开链接如下

这里我们下载config.4.19.83. 如果选择其他版本,下面代码中的–branch v4.19.83也对应更改。以下命令行为是clone一个文件夹叫linux,改名为linux-stable,进入linux-stable。
git clone --branch v4.19.83 --depth 1 https://git.kernel.org/pub/scm/linux/kernel/git/stable/linux.git
mv linux linux-stable
cd linux-stable
然后在物理机刚刚进入的linux-stable目录下,将上一级目录,即parsec-202208内,刚刚下的配置文件config.4.19.83复制进来,并且编译。编译完生成的文件名是vmlinux。 这个名不太好分辨版本,所以我们用cp命令复制并重命名为vmlinux-4.19.83.
cp ../config.4.19.83 .config
make -j8
cp vmlinux vmlinux-4.19.83
gem5 运行脚本
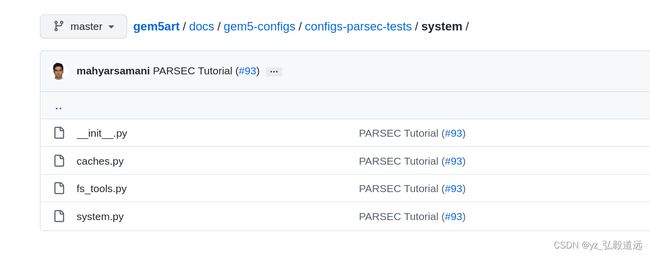
接下来,我们需要添加 gem5 运行脚本。我们将在名为 configs-parsec-tests 的文件夹中执行此操作。从这里(https://github.com/darchr/gem5art-experiments/blob/master/gem5-configs/configs-parsec-tests/run_parsec.py)获取名为 run_parsec.py 的运行脚本,并从这里(https://github.com/darchr/gem5art/tree/master/docs/gem5-configs/configs-parsec-tests/system)获取其他系统配置文件 。
链接点开后,其他系统文件如下github截图。

这些文件放置的路径如下,左边是文件结构,右边是system文件夹内的目录。

run_parsec.py 放置路径如下,位于左边的configs-parsec-tests目录下。configs-parsec-tests目录下有run_parsc.py和system文件夹。

运行脚本 (run_parsec.py) 采用以下参数:
kernel:编译后的内核用于仿真
磁盘:用于模拟的构建磁盘映像
cpu:要使用的 cpu 模型(例如 kvm 或 atomic)
基准:要运行的 PARSEC 工作负载(例如 blackscholes、bodytrack、facesim 等)
num_cpus:要模拟的并行cpu数量
数据库和 Celery 服务器
要创建数据库并启动 celery 服务器,请按照此处(前文提到的npb教程链接,再复制一遍:https://www.gem5.org/documentation/gem5art/tutorials/npb-tutorial##Compiling-the-linux-kernel)的说明进行操作。
这里十分复杂,引入了很乱的东西。
parsece 教程里没有本节数据库和celery的东西,npb教程里提到了:
1 安装rabbitma sever
apt-get install rabbitmq-server
2 如果尚未运行/创建,您可以使用以下命令创建数据库. 其中docker run 是docker的相关使用,27017是mongo的默认端口,路径是存放数据库的,可以随便找个地方建个文件夹叫celerydb202208.
`docker run -p 27017:27017 -v <absolute path to the created directory>:/data/db --name mongo-<some tag> -d mongo`
该路径下会有生成一堆文件,可以用pymongo读取。大致的文件如下。

建好之后输入对应的doceker sudo docker ps -a 命令查看。
sudo docker ps -a
输出结果显示有一个叫mongo-20220830的容器,这个名字是自己取的,避免都叫mongo没法辨认。
CONTAINER ID   IMAGE         COMMAND                  CREATED       STATUS                     PORTS                                           NAMES
ccadbe217cd4   mongo         "docker-entrypoint.s…"   4 weeks ago   Exited (255) 2 weeks ago   0.0.0.0:27017->27017/tcp, :::27017->27017/tcp   mongo-20220830
如果关闭后下次使用这个docker容器,就不是docker run了,而是sudo docker start启动
(base) ➜  ~ sudo docker start mongo-20220830
#输出结果如下
mongo-20220830
sudo docker ps -a 查看运行的状态,status里会有变化,显示正在运行中了
(base) ➜  ~ sudo docker ps -a
CONTAINER ID   IMAGE         COMMAND                  CREATED       STATUS                   PORTS                                           NAMES
ccadbe217cd4   mongo         "docker-entrypoint.s…"   4 weeks ago   Up 2 minutes             0.0.0.0:27017->27017/tcp, :::27017->27017/tcp   mongo-20220830
现在,使用以下命令运行 celery 服务器:
#下面一行是官方教程的代码,number of workers这里直接改为数字就行
#celery -E -A gem5art.tasks.celery worker --autoscale=[number of workers],0
#以下可以复制粘贴,12可以改为你的逻辑核心数例如4或者16. -E 被删除,因为添加-E会报错。celery --help里也没有-E的选项,推测可能版本不同。
celery -A gem5art.tasks.celery worker --autoscale=12,0
输出的结果如下。 这个命令行会一直占用并且如果开始运行gem5的task的时候,会有显示输出。
(base) ➜  ~ celery  -A  gem5art.tasks.celery worker --autoscale=12,0

 -------------- celery@yzlui v5.1.2 (sun-harmonics)
--- ***** -----
-- ******* ---- Linux-5.4.0-125-generic-x86_64-with-debian-bullseye-sid 2022-09-28 11:42:19
- *** --- * ---
- ** ---------- [config]
- ** ---------- .> app:         gem5:0x7f168b507190
- ** ---------- .> transport:   amqp://guest:**@localhost:5672//
- ** ---------- .> results:     rpc://
- *** --- * --- .> concurrency: {min=0, max=12} (prefork)
-- ******* ---- .> task events: OFF (enable -E to monitor tasks in this worker)
--- ***** -----
 -------------- [queues]
                .> celery           exchange=celery(direct) key=celery
在物理机新开一个命令行窗口。在parsec-202208目录下启动 python3 launch_test.py。
会在之前的窗口输出一些结果,这里是抱了一些错,正常不会报错,会创建一些文件并输出一堆txt文件,里面会有仿真的各种信息。

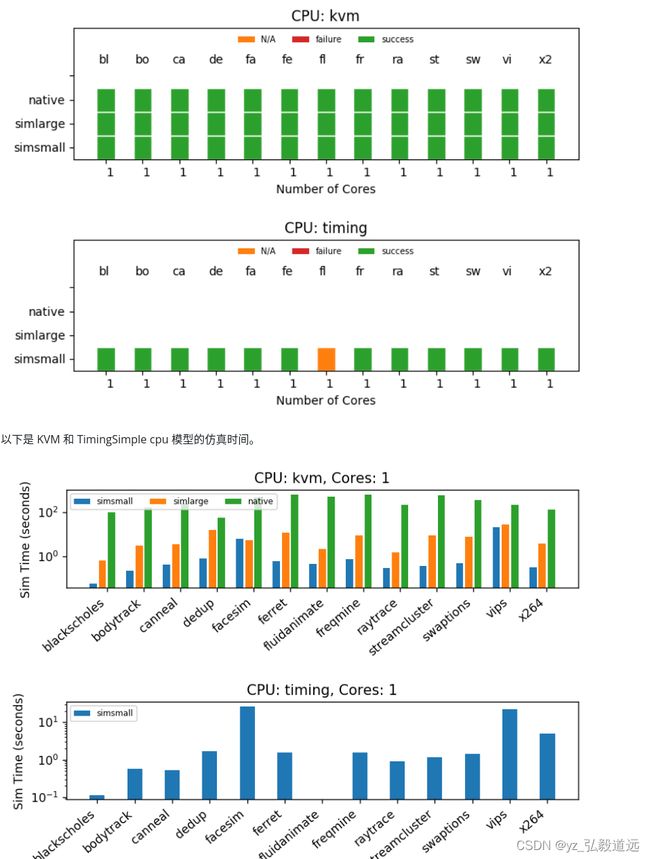
最后生成的各种txt信息,手动读取并且画图就是教程的最后的结果。GEM5并不能自带画图或者生成图,只能生成txt文件自己读取plot成类似下面的图。

