Android 解决CameraView叠加2个以上滤镜拍照黑屏的BUG (一)
1. 前言
这段时间,在使用 natario1/CameraView 来实现带滤镜的预览、拍照、录像功能。
由于CameraView封装的比较到位,在项目前期,的确为我们节省了不少时间。
但随着项目持续深入,对于CameraView的使用进入深水区,逐渐出现满足不了我们需求的情况。
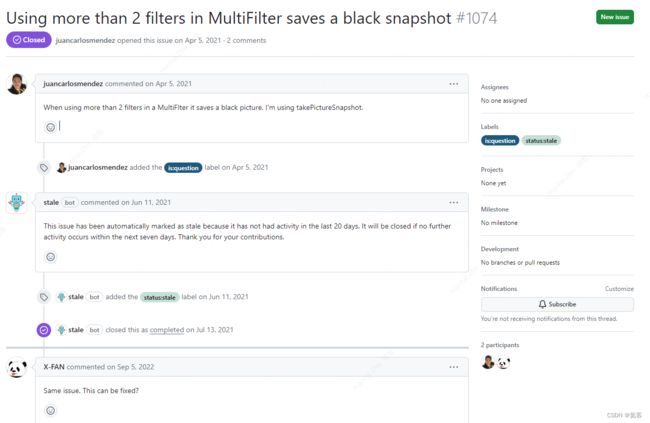
特别是对于使用MultiFilter,叠加2个滤镜拍照是正常的,叠加2个以上滤镜拍照,预览时正常,拍出的照片就会全黑。
Github中的issues中,也有不少提这个BUG的,但是作者一直没有修复该问题。
那要怎么办呢 ? 项目迫切地需要实现相关功能,只能自己硬着头皮去看它的源码,尝试性地去解决这个问题。
好在功夫不负有心人,花费数个工作日后,这个问题终于被我解决了。
而这篇文章就是来记录,该如何解决的这个BUG。
2. 复现BUG
首先,我们来明确CameraView滤镜是如何调用的,同时也让我们明确当遇到该问题时的代码大致情况,来复现下这个BUG。
2.1 前置操作
新建一个Android项目,Activity设为横屏,确保添加好相机相关权限,并申请权限后,依赖CameraView的依赖库
implementation("com.otaliastudios:cameraview:2.7.2")
2.2 编写XML布局
<FrameLayout xmlns:android="http://schemas.android.com/apk/res/android"
    xmlns:app="http://schemas.android.com/apk/res-auto"
    xmlns:tools="http://schemas.android.com/tools"
    android:layout_width="match_parent"
    android:layout_height="match_parent"
    android:orientation="vertical"
    tools:context=".MyMainActivity">

    <com.otaliastudios.cameraview.CameraView
        android:id="@+id/camera_view"
        android:layout_width="match_parent"
        android:layout_height="match_parent"
        app:cameraFacing="front"
        app:cameraEngine="camera2"
        app:cameraExperimental="true"
        app:cameraMode="video" />

    <ImageView
        android:id="@+id/img"
        android:layout_width="300dp"
        android:layout_height="200dp" />

    <Button
        android:id="@+id/btn_take_picture"
        android:layout_gravity="right|bottom"
        android:layout_width="wrap_content"
        android:layout_height="wrap_content"
        android:layout_margin="16dp"
        android:text="拍照" />

FrameLayout>
2.3 初始化CameraView并添加滤镜
binding.cameraView.setLifecycleOwner(this)
val multiFilter = MultiFilter()

val contrastFilter = ContrastFilter()
contrastFilter.contrast = 1.05F
multiFilter.addFilter(contrastFilter)

val brightnessFilter = Filters.BRIGHTNESS.newInstance() as BrightnessFilter
brightnessFilter.brightness = 1.2F
multiFilter.addFilter(brightnessFilter)

val saturationFilter = Filters.SATURATION.newInstance() as SaturationFilter
saturationFilter.saturation = 1F
multiFilter.addFilter(saturationFilter)

binding.cameraView.filter = multiFilter
2.4 进行拍照
binding.btnTakePicture.setOnClickListener {
	//带滤镜拍照
    binding.cameraView.takePictureSnapshot()
}

binding.cameraView.addCameraListener(object : CameraListener() {
    override fun onPictureTaken(result: PictureResult) {
        super.onPictureTaken(result)
        //拍照回调
        val bitmap = BitmapFactory.decodeByteArray(result.data, 0, result.data.size)
        bitmap?.also {
            runOnUiThread {
                Toast.makeText(this@Test2Activity, "拍照成功", Toast.LENGTH_SHORT).show()
                //将Bitmap设置到ImageView上
                binding.img.setImageBitmap(it)
            }
            val file = getNewImageFile()
            //保存图片到指定目录
            ImageUtils.save(it, file, Bitmap.CompressFormat.JPEG)
        }
    }
})
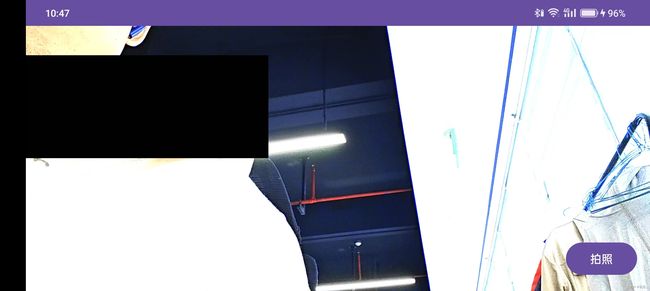
2.5 运行程序
运行程序,点击拍照,我们就可以复现这个BUG了 : 左上角的图片是拍照后全黑的效果。
3. takePictureSnapshot源码解析
接下来,我们来分析下CameraView带滤镜拍照的流程。
3.1 takePictureSnapshot
分析的起点从cameraView.takePictureSnapshot()这个带滤镜拍照的API开始。
public void takePictureSnapshot() {
    PictureResult.Stub stub = new PictureResult.Stub();
    mCameraEngine.takePictureSnapshot(stub);
}
PictureResult.Stub stub是一个参数封装类,用来传递配置参数
public static class Stub {
    Stub() {}
    public boolean isSnapshot;
    public Location location;
    public int rotation;
    public Size size;
    public Facing facing;
    public byte[] data;
    public PictureFormat format;
}
这里我们主要来看mCameraEngine.takePictureSnapshot,具体实现是在CameraBaseEngine中的takePictureSnapshot()方法中。
这里给stub赋值了一些参数,然后调用了onTakePictureSnapshot()
public /* final */ void takePictureSnapshot(final @NonNull PictureResult.Stub stub) {
    // Save boolean before scheduling! See how Camera2Engine calls this with a temp value.
    final boolean metering = mPictureSnapshotMetering;
    getOrchestrator().scheduleStateful("take picture snapshot", CameraState.BIND,
            new Runnable() {
        @Override
        public void run() {
            LOG.i("takePictureSnapshot:", "running. isTakingPicture:", isTakingPicture());
            if (isTakingPicture()) return;
            stub.location = mLocation;
            stub.isSnapshot = true;
            stub.facing = mFacing;
            stub.format = PictureFormat.JPEG;
            // Leave the other parameters to subclasses.
            //noinspection ConstantConditions
            AspectRatio ratio = AspectRatio.of(getPreviewSurfaceSize(Reference.OUTPUT));
            onTakePictureSnapshot(stub, ratio, metering);
        }
    });
}
3.2 onTakePictureSnapshot
onTakePictureSnapshot是个接口中的方法,具体实现有Camera1Engine和Camera2Engine,由于我们使用的是Camera2,所以这里直接来看Camera2Engine。
@Override
protected void onTakePictureSnapshot(@NonNull final PictureResult.Stub stub,
                                     @NonNull final AspectRatio outputRatio,
                                     boolean doMetering) {
    //...省略不重要代码...

    // stub.size is not the real size: it will be cropped to the given ratio stub.
    // rotation will be set to 0 - we rotate the texture instead.
    stub.size = getUncroppedSnapshotSize(Reference.OUTPUT);
    stub.rotation = getAngles().offset(Reference.VIEW, Reference.OUTPUT, Axis.ABSOLUTE);
    mPictureRecorder = new Snapshot2PictureRecorder(stub, this,
            (RendererCameraPreview) mPreview, outputRatio);
    mPictureRecorder.take();
}
这里实际就是调用了mPictureRecorder.take(),mPictureRecorder是一个PictureRecorder接口,具体实现有Snapshot1PictureRecorder、Snapshot2PictureRecorder、SnapshotPictureRecorder等
这里我们用的是Camera2,所以来看Snapshot2PictureRecorder
public void take() {
    //...省略不重要代码...

	super.take();
}
而Snapshot2PictureRecorder是继承自Snapshot2PictureRecorder,也就是说Snapshot2PictureRecorder最终调用的是SnapshotPictureRecorder
3.3 SnapshotPictureRecorder.take
来看SnapshotPictureRecorder的take(),这里注册了RendererFrameCallback,并在onRendererFrame()回调方法中,移除了RendererFrameCallback,并调用onRendererFrame()
public void take() {
    mPreview.addRendererFrameCallback(new RendererFrameCallback() {

        @RendererThread
        public void onRendererTextureCreated(int textureId) {
            SnapshotGlPictureRecorder.this.onRendererTextureCreated(textureId);
        }

        @RendererThread
        @Override
        public void onRendererFilterChanged(@NonNull Filter filter) {
            SnapshotGlPictureRecorder.this.onRendererFilterChanged(filter);
        }

        @RendererThread
        @Override
        public void onRendererFrame(@NonNull SurfaceTexture surfaceTexture,
                                    int rotation, float scaleX, float scaleY) {
            mPreview.removeRendererFrameCallback(this);
            SnapshotGlPictureRecorder.this.onRendererFrame(surfaceTexture,
                    rotation, scaleX, scaleY);
        }

    });
}
onRendererFrame()最终调用的是takeFrame()
protected void onRendererFrame(@NonNull final SurfaceTexture surfaceTexture,
                             final int rotation,
                             final float scaleX,
                             final float scaleY) {
    final EGLContext eglContext = EGL14.eglGetCurrentContext();
    WorkerHandler.execute(new Runnable() {
        @Override
        public void run() {
            takeFrame(surfaceTexture, rotation, scaleX, scaleY, eglContext);
        }
    });
}
而takeFrame()就是拍照部分的核心代码所在了
3.4 带滤镜拍照核心代码
SnapshotGlPictureRecorder中的takeFrame()就是带滤镜拍照的核心代码了,这里先贴出代码,下一篇文章我们会再来详细分析。
protected void takeFrame(@NonNull SurfaceTexture surfaceTexture,
                         int rotation,
                         float scaleX,
                         float scaleY,
                         @NonNull EGLContext eglContext) {

    // 0. EGL window will need an output.
    // We create a fake one as explained in javadocs.
    final int fakeOutputTextureId = 9999;
    SurfaceTexture fakeOutputSurface = new SurfaceTexture(fakeOutputTextureId);
    fakeOutputSurface.setDefaultBufferSize(mResult.size.getWidth(), mResult.size.getHeight());

    // 1. Create an EGL surface
    final EglCore core = new EglCore(eglContext, EglCore.FLAG_RECORDABLE);
    final EglSurface eglSurface = new EglWindowSurface(core, fakeOutputSurface);
    eglSurface.makeCurrent();
    final float[] transform = mTextureDrawer.getTextureTransform();

    // 2. Apply preview transformations
    surfaceTexture.getTransformMatrix(transform);
    float scaleTranslX = (1F - scaleX) / 2F;
    float scaleTranslY = (1F - scaleY) / 2F;
    Matrix.translateM(transform, 0, scaleTranslX, scaleTranslY, 0);
    Matrix.scaleM(transform, 0, scaleX, scaleY, 1);

    // 3. Apply rotation and flip
    // If this doesn't work, rotate "rotation" before scaling, like GlCameraPreview does.
    Matrix.translateM(transform, 0, 0.5F, 0.5F, 0); // Go back to 0,0
    Matrix.rotateM(transform, 0, rotation + mResult.rotation, 0, 0, 1); // Rotate to OUTPUT
    Matrix.scaleM(transform, 0, 1, -1, 1); // Vertical flip because we'll use glReadPixels
    Matrix.translateM(transform, 0, -0.5F, -0.5F, 0); // Go back to old position

    // 4. Do pretty much the same for overlays
    if (mHasOverlay) {
        // 1. First we must draw on the texture and get latest image
        mOverlayDrawer.draw(Overlay.Target.PICTURE_SNAPSHOT);

        // 2. Then we can apply the transformations
        Matrix.translateM(mOverlayDrawer.getTransform(), 0, 0.5F, 0.5F, 0);
        Matrix.rotateM(mOverlayDrawer.getTransform(), 0, mResult.rotation, 0, 0, 1);
        Matrix.scaleM(mOverlayDrawer.getTransform(), 0, 1, -1, 1); // Vertical flip because we'll use glReadPixels
        Matrix.translateM(mOverlayDrawer.getTransform(), 0, -0.5F, -0.5F, 0);
    }
    mResult.rotation = 0;

    // 5. Draw and save
    long timestampUs = surfaceTexture.getTimestamp() / 1000L;
    LOG.i("takeFrame:", "timestampUs:", timestampUs);
    mTextureDrawer.draw(timestampUs);
    if (mHasOverlay) mOverlayDrawer.render(timestampUs);
    mResult.data = eglSurface.toByteArray(Bitmap.CompressFormat.JPEG);

    // 6. Cleanup
    eglSurface.release();
    mTextureDrawer.release();
    fakeOutputSurface.release();
    if (mHasOverlay) mOverlayDrawer.release();
    core.release();
    dispatchResult();
}
4. 其他
4.1 解决CameraView滤镜黑屏系列
Android 解决CameraView叠加2个以上滤镜拍照黑屏的BUG (一)_氦客的博客-CSDN博客
Android 解决CameraView叠加2个以上滤镜拍照黑屏的BUG (二)_氦客的博客-CSDN博客
Android 解决CameraView叠加2个以上滤镜拍照黑屏的BUG (三)_氦客的博客-CSDN博客
4.2 Android Camera2 系列
更多Camera2相关文章,请看
十分钟实现 Android Camera2 相机预览_氦客的博客-CSDN博客
十分钟实现 Android Camera2 相机拍照_氦客的博客-CSDN博客
十分钟实现 Android Camera2 视频录制_氦客的博客-CSDN博客
4.3 Android 相机相关文章
Android 使用CameraX实现预览/拍照/录制视频/图片分析/对焦/缩放/切换摄像头等操作_氦客的博客-CSDN博客
Android 从零开发一个简易的相机App_android开发简易app_氦客的博客-CSDN博客
Android 使用Camera1实现相机预览、拍照、录像_android 相机预览_氦客的博客-CSDN博客