mysql8.0linux更新版本,Mysql 8.0.24版本升级测试(linux)
上一篇文章针对windows 8.0.24版本的升级进行测试,详情请见:MYSQL数据库升级测试(老库新库并行在一个主机上),本次在Linux下进行测试,仍然是新安装一套mysql 8.0.24,两套互不影响,通过导入导出的方式进行升级。
先说一下老版本:8.0.18
再说一下新版本:8.0.24,本月才出的新版本。
一、查看老版本号
[mysql@eoms01 bin]$ ./mysql -V
./mysql Ver 8.0.18 for Linux on x86_64 (MySQL Community Server - GPL)
二、安装新版本数据库
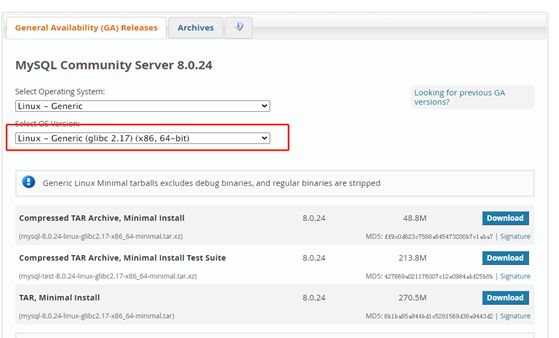
(1)下载mysql版本
首先查看glabc版本
ldd --version
[mysql@eoms01 mysql]$ ldd --version
ldd (GNU libc) 2.17
Copyright (C) 2012 Free Software Foundation, Inc.
This is free software; see the source for copying conditions. There is NO
warranty; not even for MERCHANTABILITY or FITNESS FOR A PARTICULAR PURPOSE.
Written by Roland McGrath and Ulrich Drepper.
[mysql@eoms01 mysql]$
注意下载对应glibc版本:
下载:mysql-8.0.24-linux-glibc2.17-x86_64-minimal.tar.xz并上传到/home/mysql目录并解压。
解压后文件名有些长mv一下:
mv:mv mysql-8.0.24-linux-glibc2.17-x86_64-minimal mysql8024,注意,因为是测试,都安装到/home/mysql下,一般情况下建议单独的目录,这个目录下,可能还有旧版本,在文件夹中带上版本号,便于识别。
(2)安装新版本
1、修改mysql用户环境变量
仍然把数据库安装在mysql用户下,只是路径不同:
将:
export PATH=$PATH:/home/mysql/mysql/bin:/home/mysql/mysql/lib
修改为:
export PATH=$PATH:/home/mysql/mysql8024/bin:/home/mysql/mysqli8024/lib
2、从老数据库拷贝一个新配置文件
cp /etc/my.cnf ./mysql8024/,配置my.cnf文件,主要是根目录、数据根目录、port等信息需要修改:
basedir = /home/mysql/mysql8024
datadir = /u01/mysql8024
socket = /u01/mysql8024/mysql.sock
log-error = /home/mysql/mysql8024/error.log
pid-file = /home/mysql/mysql8024/mysql.pid
tmpdir = /tmp
port = 3308
3、初始化数据库
mysqld --defaults-file=/home/mysql/mysql8024/my.cnf --initialize
注意,一定要到my.cnf的路径
注意看error日志,该日志路径在my.cnf下有定义:
2021-04-27T02:38:34.582549Z 0 [System] [MY-013169] [Server] /home/mysql/mysql8024/bin/mysqld (mysqld 8.0.24) initializing of server in progress as process 10590
2021-04-27T02:38:34.599839Z 1 [System] [MY-013576] [InnoDB] InnoDB initialization has started.
2021-04-27T02:38:35.633484Z 1 [System] [MY-013577] [InnoDB] InnoDB initialization has ended.
2021-04-27T02:38:38.172651Z 6 [Note] [MY-010454] [Server] A temporary password is generated for root@localhost: adk,Qju9r+Ts
日志中说明了密码。
4、进入数据库
(1)首先运行:mysqld_safe,启动数据库
查看error日志,找到sock文件位置:
2021-04-27T02:54:46.079805Z 0 [System] [MY-013602] [Server] Channel mysql_main configured to support TLS. Encrypted connections are now supported for this channel.
2021-04-27T02:54:46.160092Z 0 [System] [MY-010931] [Server] /home/mysql/mysql8024/bin/mysqld: ready for connections. Version: '8.0.24' socket: '/u01/mysql8024/mysql.sock' port: 3308 MySQL Community Server - GPL.
(2)进入数据库
[mysql@eoms01 bin]$ mysql --socket=/u01/mysql8024/mysql.sock -P 3308 -u root -p
Enter password:
Welcome to the MySQL monitor. Commands end with ; or \g.
Your MySQL connection id is 12
Server version: 8.0.24
Copyright (c) 2000, 2021, Oracle and/or its affiliates.
Oracle is a registered trademark of Oracle Corporation and/or its
affiliates. Other names may be trademarks of their respective
owners.
Type 'help;' or '\h' for help. Type '\c' to clear the current input statement.
mysql>
mysql> show databases;
ERROR 1820 (HY000): You must reset your password using ALTER USER statement before executing this statement.
mysql --socket=/u01/mysql8024/mysql.sock -P 3308 -u root -p 一定要指定端口号。
(3)修改密码
[mysql@eoms01 bin]$ mysql --socket=/u01/mysql8024/mysql.sock -P 3308 -u root -p
Enter password:
Welcome to the MySQL monitor. Commands end with ; or \g.
Your MySQL connection id is 14
Server version: 8.0.24
Copyright (c) 2000, 2021, Oracle and/or its affiliates.
Oracle is a registered trademark of Oracle Corporation and/or its
affiliates. Other names may be trademarks of their respective
owners.
Type 'help;' or '\h' for help. Type '\c' to clear the current input statement.
mysql> ALTER USER 'root'@'localhost' IDENTIFIED WITH mysql_native_password BY 't
'> xtp_2020';
Query OK, 0 rows affected (0.00 sec)
mysql> :
mysql> use mysql
Reading table information for completion of table and column names
You can turn off this feature to get a quicker startup with -A
Database changed
mysql>
update user set host = '%' where user = 'root';
ALTER USER 'root'@'%' IDENTIFIED WITH mysql_native_password BY 'txtp_2020';
mysql> FLUSH PRIVILEGES;
(4)重启新版本数据库
停止:
mysqladmin --socket=/u01/mysql8024/mysql.sock -P 3308 -u root -p shutdown
启动:
mysqld --defaults-file=/home/mysql/mysql8024/my.cnf &
三、数据迁移
1、导出数据库(连接3306端口到老数据)
导出一个库:
mysqldump --socket=/u01/mysql/mysql.sock -P3306 -uroot -p --databases ftco lining>/home/mysql/ftco.sql
导出多个库:
mysqldump --socket=/u01/mysql/mysql.sock -P3306 -uroot -p --databases ftco lining>/home/mysql/ftco.sql
执行:
[mysql@eoms01 ~]$ mysqldump --socket=/u01/mysql/mysql.sock -P3306 -uroot -p --databases ftco lining>/home/mysql/ftco.sql
Enter password:
[mysql@eoms01 ~]$
导出什么都不提示,静静等着结束。
2、导入到数据库(连接3308端口)
[mysql@eoms01 mysql8024]$ mysql --socket=/u01/mysql8024/mysql.sock -P3306 -u root -p < /home/mysql/ftco.sql
Enter password:
[mysql@eoms01 mysql8024]$ ls -lrt
3、查看导入情况
[mysql@eoms01 mysql8024]$ mysql --socket=/u01/mysql8024/mysql.sock -P 3308 -u root -p
Enter password:
Welcome to the MySQL monitor. Commands end with ; or \g.
Your MySQL connection id is 15
Server version: 8.0.24 MySQL Community Server - GPL
Copyright (c) 2000, 2021, Oracle and/or its affiliates.
Oracle is a registered trademark of Oracle Corporation and/or its
affiliates. Other names may be trademarks of their respective
owners.
Type 'help;' or '\h' for help. Type '\c' to clear the current input statement.
mysql> show databases;
+--------------------+
| Database |
+--------------------+
| ftco |
| information_schema |
| lining |
| mysql |
| performance_schema |
| sys |
+--------------------+
6 rows in set (0.00 sec)
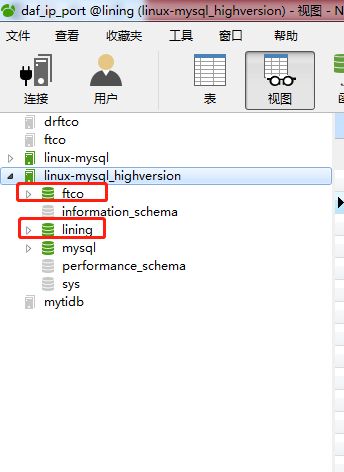
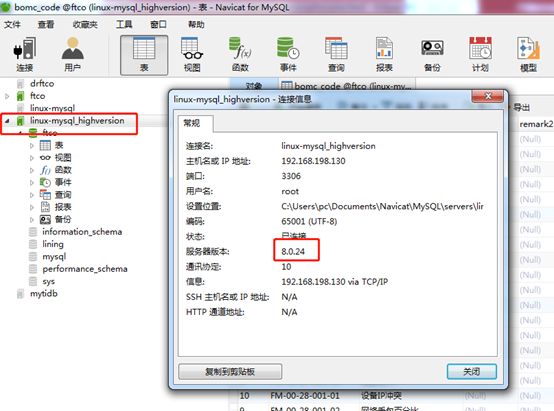
通过Navicat查看比对数据比较方便。
四、处理用户及权限(建用户要放在导入数据之前,否则导入数据时会报错)
Mysql数据库用户在数据库之上,与数据库是多对多关系,因此用户可以在输入导入后在再
在新库上创建SQL:
CREATE USER ‘user’@’%’ IDENTIFIED BY ‘yourpasswd’;
注意,这只是个示例,用户的作用域一定要定义好,否则导入数据时容易报错。
在老库上上将用户权限全部捞出:
SELECT CONCAT(‘SHOW GRANTS FOR ‘’’, user, ‘’’@’’’, host, ‘’’;’) AS query FROM mysql.user;
在老库执行对应用户的SHOW GRANTS FOR命令,获取详细权限,然后在老数据库赋权即可。
五、停止老库,新库修改端口为3306
1、停止老库
老库一般是通过系统服务启动的,可以通过服务先关闭:
[root@eoms01 ~]# service mysql stop
Shutting down MySQL.... SUCCESS!
[root@eoms01 ~]# ps -ef|grep mysql
root 25556 25468 0 13:12 pts/0 00:00:00 su - mysql
mysql 25557 25556 0 13:12 pts/0 00:00:00 -bash
root 65372 51942 0 14:20 pts/3 00:00:00 su - mysql
mysql 65374 65372 0 14:20 pts/3 00:00:00 -bash
mysql 66553 1 0 14:22 ? 00:00:12 mysqld --defaults-file=/home/mysql/mysql8024/my.cnf
root 70836 70720 0 14:47 pts/3 00:00:00 grep --color=auto mysql
关闭后,可以看到老版本的已经关闭,只有mysql8024新版本的在运行。
2、停止新库
不小心用root操作了,应该用mysql用户操作:
[root@eoms01 ~]# mysqladmin --socket=/u01/mysql8024/mysql.sock -P 3308 -u root -p shutdown
Enter password:
[root@eoms01 ~]# ps -ef|grep mysql
root 25556 25468 0 13:12 pts/0 00:00:00 su - mysql
mysql 25557 25556 0 13:12 pts/0 00:00:00 -bash
root 65372 51942 0 14:20 pts/3 00:00:00 su - mysql
mysql 65374 65372 0 14:20 pts/3 00:00:00 -bash
root 72148 70720 0 14:54 pts/3 00:00:00 grep --color=auto mysql
3、修改配置
第一步:将老库的路径变更(也可不变更,变更后防止误启动):
mv mysql mysql8018
第二步:
备份旧库的my.cnf
[root@eoms01 etc]# cp /etc/my.cnf /home/mysql/mysql8.0.18
将新库的cnf拷贝到/etc下面
[root@eoms01 etc]# cp /home/mysql/mysql/my.cnf /etc/my.cnf
cp: overwrite ‘/etc/my.cnf’? y
[root@eoms01 etc]#
将端口修改为3306,之前是3308.
六、启动新数据库(新库已改为3306端口)
[root@eoms01 ~]# service mysql start
Starting MySQL… SUCCESS!
[root@eoms01 ~]#
连接数据库查看:
启动工程,数据库升级完成。


