flink-1.11-Standalone模式启动源码解读之Master启动
前面我们分析了Standalone模式下执行start-cluster.sh脚本后的一系列脚本执行流程,最后一步是执行flink-daemon.sh脚本,
在该脚本中会执行对应的java类,其中JobManager对应的类是StandaloneSessionClusterEntrypoint,下面我们就跟着源码看看Standalone session模式下Master是如何启动的。
首先看下main方法的代码
从main我们大概可以看出启动的一个大概流程。首先是获取环境配置与用户的特定配置,然后将配置加载进Configuration这个类中,实例化一个StandaloneSessionClusterEntrypoint,将配置传入,然后调用父类ClusterEntrypoint的静态方法runClusterEntrypoint启动。
public static void main(String[] args) {
		// startup checks and logging
		//打印有关环境的信息
		EnvironmentInformation.logEnvironmentInfo(LOG, StandaloneSessionClusterEntrypoint.class.getSimpleName(), args);
		//注册一些信号处理
		SignalHandler.register(LOG);
		//安装安全关闭的钩子
		JvmShutdownSafeguard.installAsShutdownHook(LOG);

		EntrypointClusterConfiguration entrypointClusterConfiguration = null;
		final CommandLineParser commandLineParser = new CommandLineParser<>(new EntrypointClusterConfigurationParserFactory());

		try {
			//对传入的参数进行解析
			//内部通过EntrypointClusterConfigurationParserFactory解析配置文件,返回EntrypointClusterConfiguration为ClusterConfiguration的子类
			entrypointClusterConfiguration = commandLineParser.parse(args);
		} catch (FlinkParseException e) {
			LOG.error("Could not parse command line arguments {}.", args, e);
			commandLineParser.printHelp(StandaloneSessionClusterEntrypoint.class.getSimpleName());
			System.exit(1);
		}

		Configuration configuration = loadConfiguration(entrypointClusterConfiguration);

		//创建了StandaloneSessionClusterEntrypoint
		StandaloneSessionClusterEntrypoint entrypoint = new StandaloneSessionClusterEntrypoint(configuration);

		//启动集群的entrypoint。
		//这个方法接受的是父类ClusterEntrypoint,可想而知其他几种启动方式也是通过这个方法。
		ClusterEntrypoint.runClusterEntrypoint(entrypoint);
	}
我们跟进loadConfiguration这个方法看看,对配置还进行了什么操作
protected static Configuration loadConfiguration(EntrypointClusterConfiguration entrypointClusterConfiguration) {
		//获取前面XXXParserFactory解析得到的dynamicProperties(Properties)转化为Configuration
		final Configuration dynamicProperties = ConfigurationUtils.createConfiguration(entrypointClusterConfiguration.getDynamicProperties());
		//将配置文件(通过传入配置文件地址得到flink-conf.yaml配置信息)和动态配置的内容结合,返回一个新的Configuration
		final Configuration configuration = GlobalConfiguration.loadConfiguration(entrypointClusterConfiguration.getConfigDir(), dynamicProperties);

		final int restPort = entrypointClusterConfiguration.getRestPort();
		//设置Rest Port端口
		if (restPort >= 0) {
			configuration.setInteger(RestOptions.PORT, restPort);
		}

		final String hostname = entrypointClusterConfiguration.getHostname();

		if (hostname != null) {
			configuration.setString(JobManagerOptions.ADDRESS, hostname);
		}

		return configuration;
	}
这个是调用了父类ClusterEntrypoint的静态方法。从源码我们可以看到,原来我们前面获取的配置其实是动态配置,在这个方法内部通过一个静态方法GlobalConfiguration.loadConfiguration()将flink静态配置文件的地址和动态传入,返回一个统一的configuration配置,最后在设置供外部调用的rest端口和Jobmanager的hostname。
接着继续回到main方法上来,拿到配置之后接下来就是启动JobManager的相关组件。首先实例化一个StandaloneSessionClusterEntrypoint,将配置传入,最终调用的是父类ClusterEntrypoint的构造方法
protected ClusterEntrypoint(Configuration configuration) {
		this.configuration = generateClusterConfiguration(configuration);
		this.terminationFuture = new CompletableFuture<>();
		/**
		所谓 shutdown hook 就是已经初始化但尚未开始执行的线程对象。在Runtime 注册后,如果JVM要停止前,
		这些 shutdown hook 便开始执行。也就是在你的程序结束前,执行一些清理工作,尤其是没有用户界面的程序。
		这些 shutdown hook 都是些线程对象,因此,你的清理工作要写在 run() 里。

		这里钩子的作用就是执行所有service的关闭方法。

		以下几种场景会被调用:
		1.程序正常退出
		2.使用System.exit()
		3.终端使用Ctrl+C触发的中断
		4.系统关闭
		5.OutOfMemory宕机
		6.使用Kill pid命令干掉进程(注:在使用kill -9 pid时,是不会被调用的)
		*/
		shutDownHook = ShutdownHookUtil.addShutdownHook(this::cleanupDirectories, getClass().getSimpleName(), LOG);
	}
构造方法主要做的就是获取配置然后添加程序退出的钩子。然后就是main方法的最后关键一步,也是最复杂的,调用静态方法ClusterEntrypoint.runClusterEntrypoint(entrypoint),将上面实例化的StandaloneSessionClusterEntrypoint传入,这个方法接受的是父类ClusterEntrypoint,可想而知其他几种启动方式也是通过这个方法,跟进去一探究竟。
public static void runClusterEntrypoint(ClusterEntrypoint clusterEntrypoint) {

		final String clusterEntrypointName = clusterEntrypoint.getClass().getSimpleName();
		try {
			//原先这个方法是直接在上层ClusterEntrypoint实现类的main方法最后一步调用。
			//新版这里做了优化
			clusterEntrypoint.startCluster();
		} catch (ClusterEntrypointException e) {
			LOG.error(String.format("Could not start cluster entrypoint %s.", clusterEntrypointName), e);
			System.exit(STARTUP_FAILURE_RETURN_CODE);
		}

		clusterEntrypoint.getTerminationFuture().whenComplete((applicationStatus, throwable) -> {
			final int returnCode;

			if (throwable != null) {
				returnCode = RUNTIME_FAILURE_RETURN_CODE;
			} else {
				returnCode = applicationStatus.processExitCode();
			}

			LOG.info("Terminating cluster entrypoint process {} with exit code {}.", clusterEntrypointName, returnCode, throwable);
			System.exit(returnCode);
		});
	}
跟进来之后发现关键一步调用了startCluster()方法,看这霸气的名字就知道我们要找的就是你,然后注册一些钩子方法。
public void startCluster() throws ClusterEntrypointException {
		LOG.info("Starting {}.", getClass().getSimpleName());

		try {
			//新版支持提供通用的插件机制
			PluginManager pluginManager = PluginUtils.createPluginManagerFromRootFolder(configuration);
			//配置文件系统
			configureFileSystems(configuration, pluginManager);

			//配置安全相关配置
			SecurityContext securityContext = installSecurityContext(configuration);

			securityContext.runSecured((Callable) () -> {
				//关键方法,通过一个线程执行runCluster方法
				runCluster(configuration, pluginManager);

				return null;
			});
		} catch (Throwable t) {
			final Throwable strippedThrowable = ExceptionUtils.stripException(t, UndeclaredThrowableException.class);

			try {
				// clean up any partial state
				shutDownAsync(
					ApplicationStatus.FAILED,
					ExceptionUtils.stringifyException(strippedThrowable),
					false).get(INITIALIZATION_SHUTDOWN_TIMEOUT.toMilliseconds(), TimeUnit.MILLISECONDS);
			} catch (InterruptedException | ExecutionException | TimeoutException e) {
				strippedThrowable.addSuppressed(e);
			}

			throw new ClusterEntrypointException(
				String.format("Failed to initialize the cluster entrypoint %s.", getClass().getSimpleName()),
				strippedThrowable);
		}
	}
首先调用方法configureFileSystems(configuration, pluginManager),这个方法主要作用就是初始化一些共享的配置参数,其中PluginManager是新版才加入的,是一个可选的插件管理器,用于初始化作为插件提供的文件系统。然后是配置安全相关配置,通过SecurityContext(实际是NoOpSecurityContext,无需登录操作来简单的运行一个线程)以安全的方式运行一个线程来启动集群,线程中执行的方法就是runCluster。
private void runCluster(Configuration configuration, PluginManager pluginManager) throws Exception {
		synchronized (lock) {
			//初始化服务,如JM的Akka RPC服务,HA服务,心跳检查服务,metric service
			initializeServices(configuration, pluginManager);

			// write host information into configuration
			// 将jobmanager地址写入配置
			configuration.setString(JobManagerOptions.ADDRESS, commonRpcService.getAddress());
			configuration.setInteger(JobManagerOptions.PORT, commonRpcService.getPort());

			//调用子类的实现方法,创建DispatcherResourceManagerComponentFactory,内部包含了对应的RestEndpointFactory,如果是Standalone则为SessionRestEndpointFactory
			final DispatcherResourceManagerComponentFactory dispatcherResourceManagerComponentFactory = createDispatcherResourceManagerComponentFactory(configuration);

			//启动关键组件:Dispatcher和ResourceManager。
			//Dispatcher:负责接收用户提供的作业,并且负责为这个新提交的作业拉起一个新的JobManager服务
			//ResourceManager负责资源的管理,在整个Flink集群中只有一个ResourceManager,资源相关的内容都由这个服务负责
			clusterComponent = dispatcherResourceManagerComponentFactory.create(
				configuration,
				ioExecutor,
				commonRpcService,
				haServices,
				blobServer,
				heartbeatServices,
				metricRegistry,
				archivedExecutionGraphStore,
				new RpcMetricQueryServiceRetriever(metricRegistry.getMetricQueryServiceRpcService()),
				this);

			//集群关闭时的回调
			clusterComponent.getShutDownFuture().whenComplete(
				(ApplicationStatus applicationStatus, Throwable throwable) -> {
					if (throwable != null) {
						shutDownAsync(
							ApplicationStatus.UNKNOWN,
							ExceptionUtils.stringifyException(throwable),
							false);
					} else {
						// This is the general shutdown path. If a separate more specific shutdown was
						// already triggered, this will do nothing
						shutDownAsync(
							applicationStatus,
							null,
							true);
					}
				});
		}
	}
这个方法主要是做两件事情:
1.initializeServices()初始化相关服务
2.dispatcherResourceManagerComponentFactory.create()启动Dispatcher和ResourceManager服务。
这也印证了Master中含有多个组件,其中Dispatcher和ResourceManager就是其中的两个。首先来看看initializeServices
/**
	上述流程涉及到服务有:
	RpcService: 创建一个 rpc 服务;
	HighAvailabilityServices: HA service 相关的实现,它的作用有很多,比如:处理 ResourceManager 的 leader 选举、JobManager leader 的选举等;
	BlobServer: 主要管理一些大文件的上传等,比如用户作业的 jar 包、TM 上传 log 文件等(Blob 是指二进制大对象也就是英文 Binary Large Object 的缩写);
	HeartbeatServices: 初始化一个心跳服务;
	MetricRegistryImpl: metrics 相关的服务;
	ArchivedExecutionGraphStore: 存储 execution graph 的服务,默认有两种实现,MemoryArchivedExecutionGraphStore 主要是在内存中缓存,FileArchivedExecutionGraphStore 会持久化到文件系统,也会在内存中缓存。
	这些服务都会在前面第二步创建 DispatcherResourceManagerComponent 对象时使用到。
	*/
	protected void initializeServices(Configuration configuration, PluginManager pluginManager) throws Exception {

		LOG.info("Initializing cluster services.");

		synchronized (lock) {
			//创建RPC服务
			commonRpcService = AkkaRpcServiceUtils.createRemoteRpcService(
				configuration,
				configuration.getString(JobManagerOptions.ADDRESS),
				getRPCPortRange(configuration),
				configuration.getString(JobManagerOptions.BIND_HOST),
				configuration.getOptional(JobManagerOptions.RPC_BIND_PORT));

			// update the configuration used to create the high availability services
			//更新用于创建高可用服务的配置(之前设置的端口可能是个range)
			configuration.setString(JobManagerOptions.ADDRESS, commonRpcService.getAddress());
			configuration.setInteger(JobManagerOptions.PORT, commonRpcService.getPort());

			//创建用于IO的线程池
			ioExecutor = Executors.newFixedThreadPool(
				ClusterEntrypointUtils.getPoolSize(configuration),
				new ExecutorThreadFactory("cluster-io"));
			//HA service(跟用户配置有关,可以是NONE,Zookeeper,也可以是自定义类)
			haServices = createHaServices(configuration, ioExecutor);
			//初始化blobServer并启动
			//这个类实现了BLOB服务器。BLOB服务器负责侦听传入的请求,并生成处理这些请求的线程。此外,它负责创建目录结构来存储blob或临时缓存它们。
			//比如:比如用户作业的 jar 包、TM 上传 log 文件等(Blob 是指二进制大对象也就是英文 Binary Large Object 的缩写)
			blobServer = new BlobServer(configuration, haServices.createBlobStore());
			blobServer.start();
			//heartbeat service
			heartbeatServices = createHeartbeatServices(configuration);
			//metrics reporter
			metricRegistry = createMetricRegistry(configuration, pluginManager);

			//创建了一个Flink内部的metrics rpc service
			final RpcService metricQueryServiceRpcService = MetricUtils.startRemoteMetricsRpcService(configuration, commonRpcService.getAddress());
			//启动metrice Query服务
			metricRegistry.startQueryService(metricQueryServiceRpcService, null);

			final String hostname = RpcUtils.getHostname(commonRpcService);

			processMetricGroup = MetricUtils.instantiateProcessMetricGroup(
				metricRegistry,
				hostname,
				ConfigurationUtils.getSystemResourceMetricsProbingInterval(configuration));

			//存储将存档的执行图写到磁盘,并将最近使用的执行图保存在内存缓存中,以便更快地提供服务。此外,存储的执行图会定期清理
			archivedExecutionGraphStore = createSerializableExecutionGraphStore(configuration, commonRpcService.getScheduledExecutor());
		}
	}
可以看到上面初始化了许多服务,具体包括
1.RpcService:Rpc服务
2.HighAvailabilityServices:HA Service相关的实现,主要用来处理ResourceManager和JobManager的leader选举等。
3.BlobServer:主要管理一些大文件上传,如用户上传的jar包,TM上传的log文件等(Blob是指二进制大对象,也就是Binary Large Object的缩写);
4.HeartbeatServices:心跳服务
5.MetricQueryServiceRpcService:metrics相关的服务,如metrics查询的RPC服务
6.ArchivedExecutionGraphStore:存储execution graph的服务,JM有一个重要的功能就是将client上传的job graph转化为execution graph。默认有两种实现
文件缓存和内存缓存。以上这些服务在后面创建Dispatcher,ResourceManager时都会用到。

初始化相关服务之后,生成了一个工厂类DispatcherResourceManagerComponentFactory,该工厂类用于创建Dispatcher和ResourceManager组件。
    /**
	Master 中的两个重要服务就是在这里初始化并启动的。
	注意:他们都支持HA模式,所以在启动的过程中会有选主的过程
	*/
	@Override
	public DispatcherResourceManagerComponent create(
			Configuration configuration,
			Executor ioExecutor,
			RpcService rpcService,
			HighAvailabilityServices highAvailabilityServices,
			BlobServer blobServer,
			HeartbeatServices heartbeatServices,
			MetricRegistry metricRegistry,
			ArchivedExecutionGraphStore archivedExecutionGraphStore,
			MetricQueryServiceRetriever metricQueryServiceRetriever,
			FatalErrorHandler fatalErrorHandler) throws Exception {

		LeaderRetrievalService dispatcherLeaderRetrievalService = null;
		LeaderRetrievalService resourceManagerRetrievalService = null;
		WebMonitorEndpoint webMonitorEndpoint = null;
		ResourceManager resourceManager = null;
		DispatcherRunner dispatcherRunner = null;

		try {
			//用于Dispatcher leader选举
			dispatcherLeaderRetrievalService = highAvailabilityServices.getDispatcherLeaderRetriever();
			//用于Resource Manager leader选举
			resourceManagerRetrievalService = highAvailabilityServices.getResourceManagerLeaderRetriever();
			//Dispatcher的Gateway
			final LeaderGatewayRetriever dispatcherGatewayRetriever = new RpcGatewayRetriever<>(
				rpcService,
				DispatcherGateway.class,
				DispatcherId::fromUuid,
				10,
				Time.milliseconds(50L));
			//ResourceManager的Gateway
			final LeaderGatewayRetriever resourceManagerGatewayRetriever = new RpcGatewayRetriever<>(
				rpcService,
				ResourceManagerGateway.class,
				ResourceManagerId::fromUuid,
				10,
				Time.milliseconds(50L));

			//主要用于前端的调用
			final ScheduledExecutorService executor = WebMonitorEndpoint.createExecutorService(
				configuration.getInteger(RestOptions.SERVER_NUM_THREADS),
				configuration.getInteger(RestOptions.SERVER_THREAD_PRIORITY),
				"DispatcherRestEndpoint");

			//metrics Fetcher
			final long updateInterval = configuration.getLong(MetricOptions.METRIC_FETCHER_UPDATE_INTERVAL);
			final MetricFetcher metricFetcher = updateInterval == 0
				? VoidMetricFetcher.INSTANCE
				: MetricFetcherImpl.fromConfiguration(
					configuration,
					metricQueryServiceRetriever,
					dispatcherGatewayRetriever,
					executor);

			//创建各项rest请求端点
			//具体的话有两个实现类JobClusterEntrypoint和SessionClusterEntrypoint
			webMonitorEndpoint = restEndpointFactory.createRestEndpoint(
				configuration,
				dispatcherGatewayRetriever,
				resourceManagerGatewayRetriever,
				blobServer,
				executor,
				metricFetcher,
				highAvailabilityServices.getClusterRestEndpointLeaderElectionService(),
				fatalErrorHandler);

			//启动webMonitorEndpoint
			log.debug("Starting Dispatcher REST endpoint.");
			webMonitorEndpoint.start();

			final String hostname = RpcUtils.getHostname(rpcService);

			//Standalone下这里的resourceManagerFactory是StandaloneResourceManagerFactory,创建的ResourceManager是StandaloneResourceManager
			resourceManager = resourceManagerFactory.createResourceManager(
				configuration,
				ResourceID.generate(),
				rpcService,
				highAvailabilityServices,
				heartbeatServices,
				fatalErrorHandler,
				new ClusterInformation(hostname, blobServer.getPort()),
				webMonitorEndpoint.getRestBaseUrl(),
				metricRegistry,
				hostname);

			final HistoryServerArchivist historyServerArchivist = HistoryServerArchivist.createHistoryServerArchivist(configuration, webMonitorEndpoint, ioExecutor);

			final PartialDispatcherServices partialDispatcherServices = new PartialDispatcherServices(
				configuration,
				highAvailabilityServices,
				resourceManagerGatewayRetriever,
				blobServer,
				heartbeatServices,
				() -> MetricUtils.instantiateJobManagerMetricGroup(metricRegistry, hostname),
				archivedExecutionGraphStore,
				fatalErrorHandler,
				historyServerArchivist,
				metricRegistry.getMetricQueryServiceGatewayRpcAddress());

			//旧版这里先启动ResourceManager后启动dispatcher

			//创建Dispatcher这里返回的是DispatcherRunnerLeaderElectionLifecycleManager
			//启动Dispatcher,旧版这里通过dispatcher.start()启动
			log.debug("Starting Dispatcher.");
			dispatcherRunner = dispatcherRunnerFactory.createDispatcherRunner(
				highAvailabilityServices.getDispatcherLeaderElectionService(),
				fatalErrorHandler,
				new HaServicesJobGraphStoreFactory(highAvailabilityServices),
				ioExecutor,
				rpcService,
				partialDispatcherServices);

			//启动ResourceManager
			log.debug("Starting ResourceManager.");
			resourceManager.start();

			resourceManagerRetrievalService.start(resourceManagerGatewayRetriever);
			dispatcherLeaderRetrievalService.start(dispatcherGatewayRetriever);

			return new DispatcherResourceManagerComponent(
				dispatcherRunner,
				resourceManager,
				dispatcherLeaderRetrievalService,
				resourceManagerRetrievalService,
				webMonitorEndpoint);

		} catch (Exception exception) {
			// clean up all started components
			//出现异常则清除所有已启动的组件
			if (dispatcherLeaderRetrievalService != null) {
				try {
					dispatcherLeaderRetrievalService.stop();
				} catch (Exception e) {
					exception = ExceptionUtils.firstOrSuppressed(e, exception);
				}
			}

			if (resourceManagerRetrievalService != null) {
				try {
					resourceManagerRetrievalService.stop();
				} catch (Exception e) {
					exception = ExceptionUtils.firstOrSuppressed(e, exception);
				}
			}

			final Collection> terminationFutures = new ArrayList<>(3);

			if (webMonitorEndpoint != null) {
				terminationFutures.add(webMonitorEndpoint.closeAsync());
			}

			if (resourceManager != null) {
				terminationFutures.add(resourceManager.closeAsync());
			}

			if (dispatcherRunner != null) {
				terminationFutures.add(dispatcherRunner.closeAsync());
			}

			final FutureUtils.ConjunctFuture terminationFuture = FutureUtils.completeAll(terminationFutures);

			try {
				terminationFuture.get();
			} catch (Exception e) {
				exception = ExceptionUtils.firstOrSuppressed(e, exception);
			}

			throw new FlinkException("Could not create the DispatcherResourceManagerComponent.", exception);
		}
	}
从源码我们可以看到Dispatcher对外提供的Rest接口是通过webMonitorEndpoint来启动的,紧接着启动Dispatcher和ResourceManager,并且在最后启动他们的HA服务。在这里我们没有仔细的跟进Dispatcher和ResourceManager的启动,他们是如何选主的,对外又提供些什么功能,我们放在下篇仔细的解读。
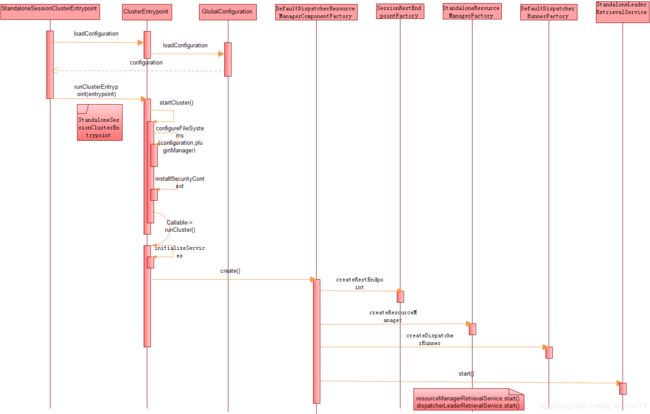
整体流程我们大概梳理完了,用一张图总结一下:
微信公众号:喜讯Xicent