一次显著的接口性能优化,从10s优化到0.9s
最近在登录项目后台的时候,发现当我输入账号和密码后,竟然就卡在了 Loading 页面。。

加载了10S才进后台
等了足足 10S 才进去后台!

通过 F12,打开 Network 网络请求一看,竟然是因为有两个接口返回的数据太慢了,最慢的一个接口竟然耗时 7 秒!

初始化接口花了7S
通过查看接口的实现代码可以看到,init 接口其实是做仪表盘的数据展示的,需要从 博客表、评论表、用户表 以及 用户访问表 中查询数据进行展示。
@ApiOperation(value = "首页初始化数据", notes = "首页初始化数据", response = String.class)
@RequestMapping(value = "/init", method = RequestMethod.GET)
public String init() {
    Map map = new HashMap<>(Constants.NUM_FOUR);
    map.put(SysConf.BLOG_COUNT, blogService.getBlogCount(EStatus.ENABLE));
    CommentVO commentVO = new CommentVO();
    map.put(SysConf.COMMENT_COUNT, commentService.getCommentCount(commentVO));
    map.put(SysConf.USER_COUNT, userService.getUserCount(EStatus.ENABLE));
    map.put(SysConf.VISIT_COUNT, webVisitService.getWebVisitCount());
    return ResultUtil.result(SysConf.SUCCESS, map);
}
如果要一步步分析是哪里比较慢的话,最简单的方法,就是查看每个方法的具体实现,然后对源码进行分析找出具体的问题。
今天,我们就从另外一个角度来解决这个慢查询问题~
如果有认真看过蘑菇博客的系统架构图的小伙伴,应该在上方看到有数据库 SQL 性能监控 Druid 连接池。。
什么是连接池?
连接池的诞生是因为数据库连接是一种资源,而用户在使用该资源的时候必须先创建,但是创建的过程存在比较大的时间和空间花销。
如果每次在执行数据库操作的时候,都需要先创建连接,使用,关闭连接的话,这个过程必然是效率比较低下的。
对于刚刚学习 MySQL 操作的同学来说,下面的这些模板代码简直是初学者的噩梦,原来陌溪在学 JDBC 连接数据库的时候,这些模板代码都默写了好几遍~
public class TEST {

    // JDBC 驱动名 及数据库 URL
    static String JDBC_DRIVER = "com.mysql.jdbc.Driver";
    static String DB_URL = "jdbc:mysql://localhost:3306/webcourse";

    // 数据库的用户名与密码,需要根据自己的设置
    static String USER = "root";
    static String PASS = "121314";

    public static void main(String[] args) throws Exception {
        Connection conn = null;
        Statement stmt = null;
        try {
            // 注册 JDBC 驱动
            // 把Driver类装载进jvm
            Class.forName("com.mysql.jdbc.Driver");

            // 打开链接
            System.out.println("连接数据库...");
            conn = (Connection) DriverManager.getConnection(DB_URL, USER, PASS);

            // 执行查询
            System.out.println(" 实例化Statement对...");
            stmt = (Statement) conn.createStatement();
            String sql = "SELECT * FROM bbs";
            ResultSet rs = stmt.executeQuery(sql);

            while (rs.next()) {
                // 通过字段检索
                int id = rs.getInt("id");
                String name = rs.getString("name");
                String content = rs.getString("content");
                // 输出数据
                System.out.print("ID: " + id);
                System.out.print(",姓名: " + name);
                System.out.print(",内容: " + content);
                System.out.print("\n");
            }

            // 完成后关闭
            rs.close();
            stmt.close();
            conn.close();
        } catch (SQLException se) {
            // 处理 JDBC 错误
            se.printStackTrace();
        } catch (Exception e) {
            // 处理 Class.forName 错误
            e.printStackTrace();
        } finally {
            // 关闭资源
            if (stmt != null)
                stmt.close();
            if (conn != null)
                conn.close();
        }
        System.out.println("测试结束");
    }
}
因此,在实际的开发过程中,是会考虑在数据库操作前,先提前创建并维护一批的数据库连接对象,当我们需要使用的时候,就从这批对象中获取一个连接,用完之后再返还,通过这一系列的操作,从而避免了不必要的时间开销,从而提高了运行效率,这种技术在 JDBC 中被称为连接池技术(Connection Pool)
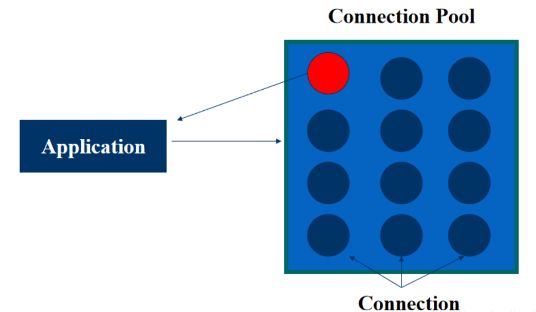
连接池
Druid 连接池
Druid 连接池是阿里巴巴开源的数据库连接池项目。Druid连接池为监控而生,内置强大的监控功能,监控特性不影响性能。功能强大,能防 SQL 注入,被誉为:Java 语言中最好的数据库连接池。
Github:https://github.com/alibaba/druid
目前比较常见的连接池技术包含
-
C3P0
-
BDCP
-
Tomcat-JDBC
-
Druid
通过下图的的竞品对比,Druid 连接池在性能、监控、诊断、安全、扩展性这些方面远远超出竞品。
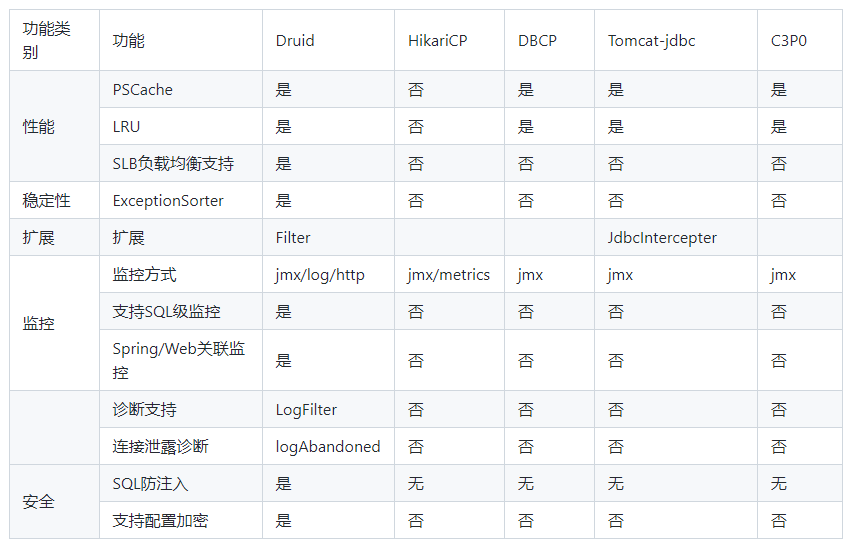
连接池对比
如何使用Druid监控
Druid 连接池最初就是为监控系统采集 JDBC 运行信息而生的,Druid 连接池内置了一个监控页面,提供了非常完备的监控信息,可以快速诊断系统的瓶颈。
好了,经过上述的一顿铺垫,相信小伙伴们对 Druid 连接池已经有一定的了解了,下面我们就通过 Druid 的监控,来看看蘑菇存在的 SQL 性能问题
通过在后端端口加上 /druid/index.html 即可打开 Druid 的内置的监控页面
http://localhost:8601/druid/index.html
此时输入账号和密码:admin 123456 (密码是可以配置的,后面在集成的时候可以看到)
这个时候,会进入到 Druid Monitor 的主页,这里能够查看到对应版本、驱动,以及 Java 版本
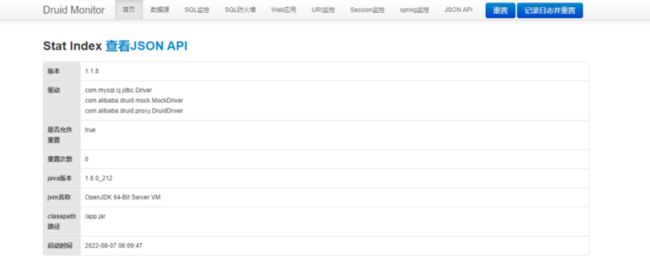
Druid监控首页
切换到数据源的 Tab 页面,能够看到我们配置的数据库连接池的各个参数

数据库连接池参数
下面,我们切换到 SQL 监控,是可以看到目前运行的所有 SQL 的执行情况,按时间排序即可看到,最慢的 SQL 执行时间到达了 8S

SQL监控页面
我们点击左侧的 SQL 语句,即可看到完整的 SQL 详情页,这里面记录了几个关键的信息,包括:慢SQL语句、执行耗时、发生时间、SQL 参数

慢SQL详情
其实这个 SQL 对应的就是 init 中,用来查询用户 UV 的,即从日志表中查看有多少用户访问了蘑菇
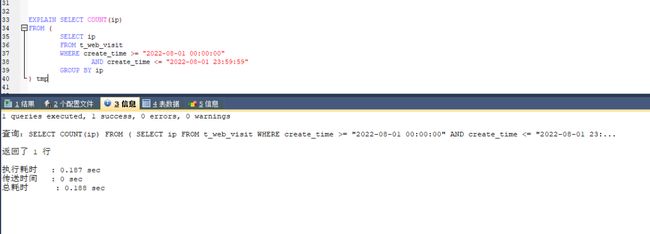
SELECT COUNT(ip)
FROM (
    SELECT ip
    FROM t_web_visit
    WHERE create_time >= "2022-08-08 00:00:00"
        AND create_time <= "2022-08-08 23:59:59"
    GROUP BY ip
) tmp
我们把 SQL 复制到 SQLyog 执行,好家伙,这次执行花了 10 S

复制SQL到SQLyog执行
上面 SQL 脚本的思路,其实是就是查询出单天内不同的 ip,但是用到了 group by 进行分组去重,最后统计 ip 的次数
我们可以针对上面的 SQL 进行优化,使用 SQL 内置的 DISTINCT() 函数进行去重
SELECT COUNT(DISTINCT(ip)) FROM t_web_visit WHERE create_time >= "2022-08-08 00:00:00" AND create_time <= "2022-08-08 23:59:59";
优化后的 SQL,可以看到执行时间已经从原来的 10 S -> 0.57 S
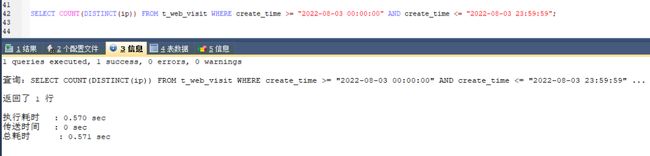
优化后的SQL执行
我们通过 explain 再次查看该 SQL 的索引执行情况
EXPLAIN SELECT COUNT(DISTINCT(ip)) FROM t_web_visit WHERE create_time >= "2022-08-03 00:00:00" AND create_time <= "2022-08-03 23:59:59";
通过输出结果可以看到,该语句没有走索引,进行了全表的扫描,同时查询了 658559 行数据
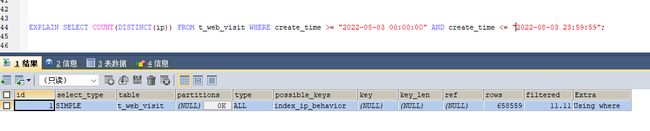
explain查看索引使用情况
我们分析这次查询参数,主要是使用了 create_time 进行范围查询,可以接着对查询进行优化,给 create_time 新增索引
ALTER TABLE t_web_visit ADD INDEX _create_time( `create_time` );
再次执行第一条 SQL 语句,可以看到查询时间有了大幅度的提升,直接从原来的 10S -> 0.18S
添加索引后的第一条SQL执行
在看第二条 SQL,时间也有了很大的提升,从 0.57 S -> 0.046 S

添加索引后的第二条SQL执行
最后通过 explain 分析 SQL,可以看到,优化后的 SQL ,使用了 create_time 索引,只需要查询 871 条数据

查看索引使用情况
优化后的 SQL 后,我们再打开蘑菇后台页面,可以看到页面从原来的 10S 变成了 0.9S~

优化后,首页打开时间
下面,让我们一起来看看如何给自己的网站,集成 Druid 连接池,用来检测网站 SQL 性能吧~
SpringBoot如何集成Druid?
首先,需要添加依赖,在 pom.xml 文件中加入
    com.alibaba
    druid
    1.1.8
然后在 application.yml 中,添加配置
#spring
spring:
  # DATABASE CONFIG
  datasource:
    username: root
    password: root
    url: jdbc:mysql://localhost:3306/mogu_blog_business?useUnicode=true&allowMultiQueries=true&characterEncoding=utf-8&zeroDateTimeBehavior=convertToNull&transformedBitIsBoolean=true&useSSL=false&serverTimezone=Asia/Shanghai
    driver-class-name: com.mysql.cj.jdbc.Driver
    type: com.alibaba.druid.pool.DruidDataSource

    # 初始化大小,最小,最大
    initialSize: 20
    minIdle: 5
    maxActive: 200
    #连接等待超时时间
    maxWait: 60000
    #配置隔多久进行一次检测(检测可以关闭的空闲连接)
    timeBetweenEvictionRunsMillis: 60000
    #配置连接在池中的最小生存时间
    minEvictableIdleTimeMillis: 300000
    validationQuery: SELECT 1 FROM DUAL
    dbcp:
      remove-abandoned: true
      #泄露的连接可以被删除的超时时间(秒),该值应设置为应用程序查询可能执行的最长时间
      remove-abandoned-timeout: 180
    testWhileIdle: true
    testOnBorrow: false
    testOnReturn: false
    poolPreparedStatements: true
    #配置监控统计拦截的filters,去掉后监控界面sql无法统计,'wall'用于防火墙
    filters: stat,wall,log4j
    maxPoolPreparedStatementPerConnectionSize: 20
    useGlobalDataSourceStat: true
    connectionProperties: druid.stat.mergeSql=true;druid.stat.slowSqlMillis=500
在创建配置 DruidConfig.java,创建 DataSource 数据源,同时配置监控页面的登录账号和密码
@Slf4j
@Configuration
public class DruidConfig {
    @Value("${spring.datasource.url}")
    private String dbUrl;
    @Value("${spring.datasource.username}")
    private String username;
    @Value("${spring.datasource.password}")
    private String password;
    @Value("${spring.datasource.driver-class-name}")
    private String driverClassName;
    @Value("${spring.datasource.initialSize}")
    private int initialSize;
    @Value("${spring.datasource.minIdle}")
    private int minIdle;
    @Value("${spring.datasource.maxActive}")
    private int maxActive;
    @Value("${spring.datasource.maxWait}")
    private int maxWait;
    @Value("${spring.datasource.timeBetweenEvictionRunsMillis}")
    private int timeBetweenEvictionRunsMillis;
    @Value("${spring.datasource.minEvictableIdleTimeMillis}")
    private int minEvictableIdleTimeMillis;
    @Value("${spring.datasource.validationQuery}")
    private String validationQuery;
    @Value("${spring.datasource.testWhileIdle}")
    private boolean testWhileIdle;
    @Value("${spring.datasource.testOnBorrow}")
    private boolean testOnBorrow;
    @Value("${spring.datasource.testOnReturn}")
    private boolean testOnReturn;
    @Value("${spring.datasource.poolPreparedStatements}")
    private boolean poolPreparedStatements;
    @Value("${spring.datasource.maxPoolPreparedStatementPerConnectionSize}")
    private int maxPoolPreparedStatementPerConnectionSize;
    @Value("${spring.datasource.filters}")
    private String filters;
    @Value("{spring.datasource.connectionProperties}")
    private String connectionProperties;

    /**
     * 声明其为Bean实例
     * 在同样的DataSource中,首先使用被标注的DataSource
     *
     * @return
     */
    @Bean
    @Primary
    public DataSource dataSource() {
        DruidDataSource datasource = new DruidDataSource();
        datasource.setUrl(this.dbUrl);
        datasource.setUsername(username);
        datasource.setPassword(password);
        datasource.setDriverClassName(driverClassName);
        // configuration
        datasource.setInitialSize(initialSize);
        datasource.setMinIdle(minIdle);
        datasource.setMaxActive(maxActive);
        datasource.setMaxWait(maxWait);
        datasource.setTimeBetweenEvictionRunsMillis(timeBetweenEvictionRunsMillis);
        datasource.setMinEvictableIdleTimeMillis(minEvictableIdleTimeMillis);
        datasource.setValidationQuery(validationQuery);
        datasource.setTestWhileIdle(testWhileIdle);
        datasource.setTestOnBorrow(testOnBorrow);
        datasource.setTestOnReturn(testOnReturn);
        datasource.setPoolPreparedStatements(poolPreparedStatements);
        datasource.setMaxPoolPreparedStatementPerConnectionSize(maxPoolPreparedStatementPerConnectionSize);
        try {
            /**
             * 加入过滤
             */
            List filterList = new ArrayList<>();
            filterList.add(wallFilter());
            datasource.setProxyFilters(filterList);

            datasource.setFilters(filters);
        } catch (SQLException e) {
            log.error("druid configuration initialization filter");
        }
        datasource.setConnectionProperties(connectionProperties);

        return datasource;
    }

    /**
     * 配置一个管理后台的Servlet
     */
    @Bean
    public ServletRegistrationBean statViewServlet() {
        ServletRegistrationBean bean = new ServletRegistrationBean(new StatViewServlet(), "/druid/*");
        Map initParams = new HashMap<>(Constants.NUM_TWO);

        initParams.put("loginUsername", "admin");
        initParams.put("loginPassword", " ");
        //默认就是允许所有访问
        initParams.put("allow", "");

        bean.setInitParameters(initParams);
        return bean;
    }

    /**
     * 配置一个web监控的filter
     *
     * @return
     */
    @Bean
    public FilterRegistrationBean webStatFilter() {
        FilterRegistrationBean bean = new FilterRegistrationBean();
        bean.setFilter(new WebStatFilter());
        Map initParams = new HashMap<>(Constants.NUM_ONE);
        initParams.put("exclusions", "*.vue,*.js,*.gif,*.jpg,*.bmp,*.png,*.css,*.ico,/druid/*");
        bean.setInitParameters(initParams);
        bean.setUrlPatterns(Arrays.asList("/*"));
        return bean;
    }


    @Bean
    public WallFilter wallFilter() {
        WallFilter wallFilter = new WallFilter();
        WallConfig config = new WallConfig();
        //允许一次执行多条语句
        config.setMultiStatementAllow(true);
        //允许非基本语句的其他语句
        config.setNoneBaseStatementAllow(true);
        wallFilter.setConfig(config);
        return wallFilter;
    }

}