【三】SpringBoot开发WebService接口
SpringBoot开发WebService接口
一、服务端开发
1、引入依赖
        <dependency>
            <groupId>org.springframework.bootgroupId>
            <artifactId>spring-boot-starter-web-servicesartifactId>
        dependency>


        <dependency>
            <groupId>org.apache.cxfgroupId>
            <artifactId>cxf-rt-frontend-jaxwsartifactId>
            <version>3.2.0version>
        dependency>
        <dependency>
            <groupId>org.apache.cxfgroupId>
            <artifactId>cxf-rt-transports-httpartifactId>
            <version>3.2.0version>
        dependency>
        <dependency>
            <groupId>org.apache.cxfgroupId>
            <artifactId>cxf-coreartifactId>
            <version>3.3.5version>
        dependency>
        <dependency>
            <groupId>org.apache.cxfgroupId>
            <artifactId>cxf-rt-transports-httpartifactId>
            <version>3.2.4version>
        dependency>
2、创建接口BlogService
package com.webserver.myb.service;

import org.springframework.stereotype.Component;

import javax.jws.WebMethod;
import javax.jws.WebParam;
import javax.jws.WebService;

/**
 * @Author mengyb
 * @description TODO
 * @Date 2023/1/28 10:12
 * @Version 1.0
 */
@WebService(name = "MybBlog",  // 与接口中指定的name一致
targetNamespace = "http://blogService.service.myb.blog.com", // 与接口中的命名空间一致,一般是接口的包名倒
)
public interface BlogService {

    @WebMethod
    public String send(@WebParam(name = "username") String username);

    @WebMethod
    public String message(@WebParam(name = "message") String message);

}
3、实现BlogService 接口
package com.webserver.myb.service.imppl;

import com.webserver.myb.service.BlogService;
import org.springframework.stereotype.Component;

import javax.jws.WebService;

/**
 * @Author mengyb
 * @description TODO
 * @Date 2023/1/28 10:15
 * @Version 1.0
 */
@Component
@WebService(name = "MybBlog",  // 与接口中指定的name一致
targetNamespace = "http://blogService.service.myb.blog.com", // 与接口中的命名空间一致,一般是接口的包名倒
        endpointInterface = "com.webserver.myb.service.BlogService"// 接口地址
)
public class BlogServiceImpl implements BlogService {
    @Override
    public String send(String username) {
        if ("zhangsan".equals(username)) {
            return "张三";
        }
        return "李四,王五";
    }

    @Override
    public String message(String message) {
        return "====Hello ====WebServer===" + message;
    }
}
4、创建WebService配置文件
package com.webserver.myb.config;

import com.webserver.myb.service.BlogService;
import com.webserver.myb.service.imppl.BlogServiceImpl;
import org.springframework.beans.factory.annotation.Autowired;
import org.springframework.context.annotation.Configuration;

import org.apache.cxf.Bus;
import org.apache.cxf.bus.spring.SpringBus;
import org.apache.cxf.jaxws.EndpointImpl;
import org.apache.cxf.transport.servlet.CXFServlet;
import org.springframework.boot.web.servlet.ServletRegistrationBean;
import org.springframework.context.annotation.Bean;
import org.springframework.context.annotation.Configuration;

import javax.xml.ws.Endpoint;
/**
 * @Author mengyb
 * @description TODO
 * @Date 2023/1/28 10:17
 * @Version 1.0
 */
@Configuration
public class CxfConfig {

    @Autowired
    private BlogService blogService;

    @Bean
    public ServletRegistrationBean disServlet() {
        ServletRegistrationBean servletRegistrationBean = new ServletRegistrationBean(new CXFServlet(), "/webService/*");
        return servletRegistrationBean;
    }
    @Bean(name = Bus.DEFAULT_BUS_ID)
    public SpringBus springBus() {
        return new SpringBus();
    }
    @Bean
    public Endpoint endpoint() {
        EndpointImpl endpoint = new EndpointImpl(springBus(), blogService);
        endpoint.publish("/ws/api");
        System.out.println("服务发布成功!地址为:http://localhost:8080/webService/ws/api?wsdl");
        return endpoint;
    }
}
5、启动项目
访问url: http://localhost:8080/webService?wsdl

访问url: http://localhost:8080/webService/ws/api?wsdl

【注】以上可以看到接口的相关信息,表示接口发布成功。
二、开发WebService客户端
1、导入依赖
        <dependency>
            <groupId>org.apache.cxfgroupId>
            <artifactId>cxf-rt-frontend-jaxwsartifactId>
            <version>3.0.1version>
        dependency>
2、生成客户端代码
2.1、使用idea在命令窗口,在指定的目录下使用命令:
(生成客户端代码方式不唯一,看个人喜好)
// wsimport命令是jdk提供的,作用是根据使用说明书生成客户端代码,wsimport只支持SOAP1.1客户端的生成
wsimport -keep -extension http://localhost:8080/webService/ws/api?wsdl
wsimport常用参数
-d:默认参数,用于生成.class文件
-s:生成.java文件
-p:指定生成java文件的包名,不指定则为WSDL说明书中namespace值得倒写
如下图所示

3、测试客户端
3.1、第一种方法
public static void main(String[] args) throws MalformedURLException {
        BlogServiceImplService service = new BlogServiceImplService();
        MybBlog mybBlogPort = service.getMybBlogPort();
        String message = mybBlogPort.message("你好啊,2023年");
        System.out.println("当前接受到的信息为----" + message);

        String lisi = mybBlogPort.send("lisi");
        System.out.println(lisi);
    }
3.2、第二种方法
封装客户端请求ClientUtil
package com.webserver.customer.utils;

import org.apache.cxf.endpoint.Client;
import org.apache.cxf.jaxws.endpoint.dynamic.JaxWsDynamicClientFactory;

/**
 * @Author mengyb
 * @description TODO
 * @Date 2023/1/28 11:08
 * @Version 1.0
 */
public class ClientUtil {

    public static String callWebSV(String url, String methodName, String... params) throws Exception {
        JaxWsDynamicClientFactory dcf = JaxWsDynamicClientFactory.newInstance();
        Client client = dcf.createClient(url);
        Object[] objects;
        // invoke("方法名",参数1,参数2,参数3....);
        objects = client.invoke(methodName, params);
        return objects[0].toString();
    }
}
测试方法
    public static void main(String[] args) {
        System.out.println("======开始调用webservice接口=====");
        String url = "http://localhost:8080/webService/ws/api?wsdl";
        String methodName = "send";
        String result="";
        try {
            result= ClientUtil.callWebSV(url, methodName, "lisi");
        } catch (Exception e) {
            e.printStackTrace();
        }
        System.out.println("结果集为---" + result);
    }
三、说明
1、对接口的wsdl文档解析
一个WSDL文档通常包含8个重要的元素,即definitions、types、import、message、portType、operation、binding、service元素。这些元素嵌套在definitions元素中,definitions是WSDL文档的根元素。
WSDL 服务进行交互的基本元素: Types(消息类型):数据类型定义的容器,它使用某种类型系统(如 XSD)。
Message(消息):通信数据的抽象类型化定义,它由一个或者多个 part 组成。 Part:消息参数
PortType(端口类型):特定端口类型的具体协议和数据格式规范。,它由一个或者多个 Operation组成。
Operation(操作):对服务所支持的操作进行抽象描述,WSDL定义了四种操作:
1.单向(one-way):端点接受信息;
3.要求-响应(solicit-response):端点发送消息,然后接受相关消息;
4.通知(notification[2] ):端点发送消息。
Binding:特定端口类型的具体协议和数据格式规范。
Port:定义为绑定和网络地址组合的单个端点。
Service:相关端口的集合,包括其关联的接口、操作、消息等。
外层结构里面也可能有多层结构。
2、Types
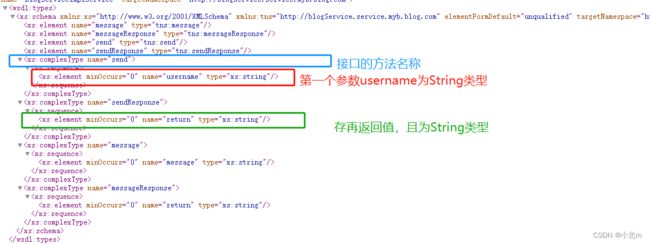
types元素作为一个容器,用于定义xml模式内置类型中没有描述的各种数据类型。当声明消息部分的有效时,消息定义使用了types元素中定义的数据类型和元素。
例如上面的例子:
    该部分定义了两个元素,send和sendResponse

    send:定义了一个复杂类型,用于操作的参数传入。并指明了参数的数据类型。

    sendResponse:定义了一个复杂类型,包含了一个简单的字符串,用于描述操作的返回值,并指明返回结果数据类型。
3、import
import元素可以在当前的WSDL文档中使用其他WSDL文档中指定的命名空间中的元素。
通常用于模块化WSDL文档。
必须有namespace属性和location属性:
1.namespace属性:值必须与正导入的WSDL文档中生命的targetNameSpace相匹配。
2.location属性:必须执行一个实际的WSDL文档,并且该文档不能为空
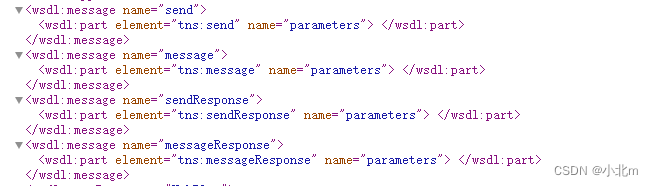
4、message
message元素描述了Web服务使用消息的有效负载。message元素可以描述输出或者接受消息的有效负载。还可以描述SOAP文件头和错误detail元素的内容。定义message元素的方式取决于使用RPC样式还是文档样式的消息传递。
在文本中的message元素的定义,本文档使用了采用文档样式的消息传递:
5、portType
portType元素定义了Web服务的抽象接口。该接口有点类似Java的接口,都是定义了一个抽象类型和方法,没有定义实现。在WSDL中,portType元素是由binding和service元素来实现的,这两个元素用来说明Web服务实现使用的Internet协议、编码方案、以及Internet地址。
6、binding
binding元素将portType映射到一组具体协议(SOAP和HTTP),消息传递样式、编码样式。通常binding元素与协议转悠的元素和在一起使用。
7、service 和 port
service元素包含一个或者多个port元素,其中每个port元素表示一个不同的Web服务。port元素将URL赋给一个特定的binding,甚至可以使两个或者多个port元素将不同的URL赋值给相同的binding。