Gitlab安装与配置
Gitlab安装
为什么选择使用gitlab呢?对于学生时代的编码,都使用拷贝重命名来备份代码(当时我是这样搞的),可以说是苦不堪言。好多大一点的公司,使用SVN管理代码,因为SVN早于git普及。而且使用简单。
从项目计划和源代码管理到CI/CD和监控,GitLab是整个DevOps生命周期的单一应用。只有GitLab允许并行的DevOpes,使得软件生命周期200%更快。
這里的CI/CD其实指的是持续集成(CI)和持续交付(CD)。有关CI/CD不在这里展开讨论。本文主要介绍Gitlab的安装。
- 该文章参考gitlab官网https://about.gitlab.com/install/#centos-8
1. 安装和配置必要的依赖项
在CentOS 8(和RedHat 8)上,以下命令还将在系统防火墙中打开HTTP,HTTPS和SSH访问。
sudo dnf install -y curl policycoreutils openssh-server perl
sudo systemctl enable sshd
*s*udo systemctl start sshd
# Check if opening the firewall is needed with: sudo systemctl status firewalld
sudo firewall-cmd --permanent --add-service=http
sudo firewall-cmd --permanent --add-service=https
sudo systemctl reload firewalld
安装Postfix以发送通知电子邮件。
sudo dnf install postfix
sudo systemctl enable postfix
sudo systemctl start postfix
2. 添加GitLab软件包存储库并安装软件包
添加GitLab软件包存储库。
curl https://packages.gitlab.com/install/repositories/gitlab/gitlab-ee/script.rpm.sh | sudo bash
安装gitlab。
sudo EXTERNAL_URL="http://192.168.1.10" dnf install -y gitlab-ee
- 修改gitlab保存文件目录
Gitlab安装后,默认存储位置在“/var/opt/gitlab/git-data/repositories”,但是一般情况该位置”/var”没有单独挂载分区,并且根目录分区并不宽裕,这里建议挂载独立的硬盘或者新分区。如在”(”/dev/sda”)上分出200G(/dev/sda1)挂载到” /data/gitlab”目录下用作gitlab存储数据。在配置文件“/etc/gitlab/gitlab.rb” 找到git_data_dir,在下面添加:
git_data_dir "/data/gitlab"
- 配置gitlab
sudo gitlab-ctl reconfigure
至此,gitlab安装完成。第一次访问默认用户名为root,登录后需要先修改root的密码。
- 管理gitlab的命令
sudo gitlab-ctl stop
sudo gitlab-ctl start
sudo gitlab-ctl restart
- 防火墙的简单命令
1、启动防火墙: systemctl start firewalld

2、禁用防火墙: systemctl stop firewalld

3、设置开机启动: systemctl enable firewalld

4、停止并禁用开机启动: systemctl disable firewalld

5、重启防火墙: firewall-cmd --reload

6、查看状态: systemctl status firewalld
3. postfix配置
使用如下命令确定postfix是启动状态,看到 Active: active (running)说明,已经启动了
[ xxx@xxx ~]systemctl status postfix

Last login: Tue Jun 22 08:53:42 2021 from 192.168.81.4
-bash: export: `/etc/profile': not a valid identifier
[wuxilong@localhost ~]$
[wuxilong@localhost ~]$ systemctl status postfix
● postfix.service - Postfix Mail Transport Agent
   Loaded: loaded (/usr/lib/systemd/system/postfix.service; enabled; vendor preset: disabled)
   Active: active (running) since Tue 2021-06-15 12:37:21 CST; 1 weeks 1 days ago
  Process: 1216 ExecStart=/usr/sbin/postfix start (code=exited, status=0/SUCCESS)
  Process: 1213 ExecStartPre=/usr/libexec/postfix/chroot-update (code=exited, status=0/SUCCESS)
  Process: 1178 ExecStartPre=/usr/libexec/postfix/aliasesdb (code=exited, status=0/SUCCESS)
 Main PID: 1494 (master)
    Tasks: 4 (limit: 177243)
   Memory: 20.0M
   CGroup: /system.slice/postfix.service
           ├─  1494 /usr/libexec/postfix/master -w
           ├─  1496 qmgr -l -t unix -u
           ├─ 36537 tlsmgr -l -t unix -u
           └─227329 pickup -l -t unix -u
gitlab 持续集成
1. 安装
安装gitlab的人相信已经对持续集成有了足够的认识,gitlab带有CI/CD功能。有关CI/CD这里不做讨论。
-
安装GitLab-CI
这个不用安装了,装好GitLab就自带了
-
安装GitLab-Runner
在centOS上安装gitlab-ci-multi-runner
# 下载 sudo curl -L --output /usr/local/bin/gitlab-runner https://gitlab-runner-downloads.s3.amazonaws.com/latest/binaries/gitlab-runner-linux-amd64 # 添加可执行权限 sudo chmod +x /usr/local/bin/gitlab-runner # 创建用户,这里使用isp用户(可以忽略) sudo useradd --comment 'GitLab Runner' --create-home xxx --shell /bin/bash # 为runner添加用户和工作目录 sudo gitlab-runner install --user=xxx --working-directory=/home/xxx sudo gitlab-runner start -
修改ci日志大小
sudo vim /etc/gitlab-runner/config.toml # 添加大小限制 [[runners]] output_limit = 40960 # 40M # 重启runner sudo gitlab-runner restart -
添加gitrunner失败
- 重命名
sudo mv /etc/systemd/system/gitlab-runner.service /etc/systemd/system/gitlab-runner.service.bak- 重新添加
sudo gitlab-runner install --user=my-user --working-directory=/home/my-user- 删除备份文件
sudo rm /etc/systemd/system/gitlab-runner.service.bak
2. 配置
-
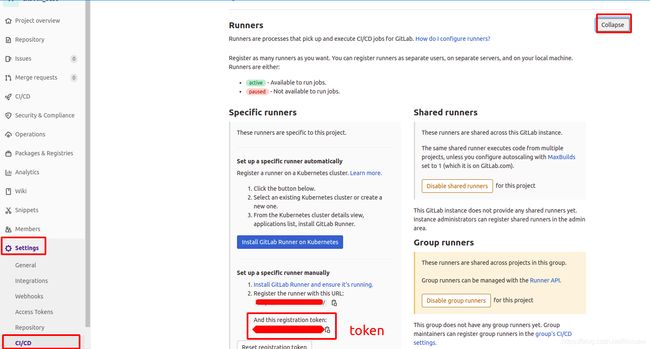
进入后台注册runner
sudo gitlab-runner register --url http://192.168.1.10/ --registration-token $REGISTRATION_TOKEN -
配置CI
在本地的git仓库中创建”.gitlab-ci.yml”脚本,该ci脚本控制runner完成持续集成。
如下实例功能:合并master分支后同步到svn(该工程是git-svn工程)。
stages:
    - deploy
deploy:
    stage: deploy
    script:
        - cd /home/xxx/project/xxx
        - git fetch
        - git rebase --autostash
        - git svn rebase
        - git svn dcommit
        - cd -
    only:
        - master
    tags:
        - isp_base

