负载均衡ribbon和声明式服务调用Feign
负载均衡ribbon和声明式服务调用Feign
一、负载均衡ribbon
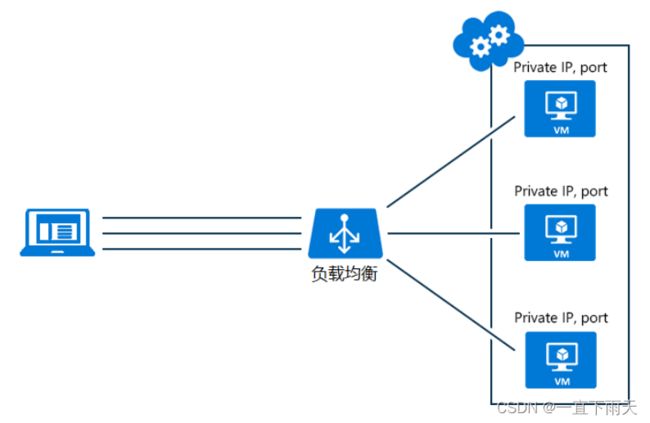
1.1.什么是负载均衡
通俗的讲,负载均衡就是将负载(工作任务,访问请求)进行分摊到多个操作单元(服务器,组件)上进行执行。
1.2.自定义实现负载均衡
1.2.1.创建服务提供者
创建ribbon_provider-1和ribbon_provider-2模块
- 创建UserController类
package com.bjpowernode.controller;

import com.bjpowernode.pojo.User;
import com.bjpowernode.service.UserService;
import org.springframework.beans.factory.annotation.Autowired;
import org.springframework.web.bind.annotation.PathVariable;
import org.springframework.web.bind.annotation.RequestMapping;
import org.springframework.web.bind.annotation.RestController;

@RestController  //将方法返回的对象直接在浏览器上展示成json格式
@RequestMapping("/provider")  //处理请求映射地址
public class UserController {

    @Autowired
    private UserService userService;

    @RequestMapping("/getUserById/{id}")
    //@PathVariable 接收请求路径中占位符的值
    public User getUserById(@PathVariable Integer id) {
        return userService.getUserById(id);
    }
}
- 创建UserService接口
package com.bjpowernode.service;

import com.bjpowernode.pojo.User;

public interface UserService {
    User getUserById(Integer id);
}
- 创建UserServiceImpl类
package com.bjpowernode.service;

import com.bjpowernode.pojo.User;
import org.springframework.stereotype.Service;

@Service //将类自动注入到spring容器中
public class UserServiceImpl implements UserService{

    @Override //将方法放到接口中
    public User getUserById(Integer id) {
        return new User(id, "一直下雨天1", 24);
    }
}
- 创建RibbonProviderApp1启动类
package com.bjpowernode;

import org.springframework.boot.SpringApplication;
import org.springframework.boot.autoconfigure.SpringBootApplication;
import org.springframework.cloud.client.discovery.EnableDiscoveryClient;

@SpringBootApplication
@EnableDiscoveryClient  //注册自己并发现其他服务
public class RibbonProviderApp1 {
    public static void main(String[] args) {
        SpringApplication.run(RibbonProviderApp1.class, args);
    }
}
- application.yml
server:
  port: 8090
spring:
  cloud:
    nacos:
      discovery:
        server-addr: 192.168.19.132 #注册中心的地址
  application:
    name: ribbon-provider #注册到nacos的服务名
注:ribbon_provider-2模块与ribbon_provider-1模块基本相似,只有些许不同,目的是为了区分两个模块。以下是ribbon_provider-2模块部分代码
- 创建UserServiceImpl类
package com.bjpowernode.service;

import com.bjpowernode.pojo.User;
import org.springframework.stereotype.Service;

@Service //将类自动注入到spring容器中
public class UserServiceImpl implements UserService{

    @Override //将方法放到接口中
    public User getUserById(Integer id) {
        return new User(id, "一直下雨天2", 24);
    }
}
- 创建RibbonProviderApp2启动类
package com.bjpowernode;

import org.springframework.boot.SpringApplication;
import org.springframework.boot.autoconfigure.SpringBootApplication;
import org.springframework.cloud.client.discovery.EnableDiscoveryClient;

@SpringBootApplication
@EnableDiscoveryClient  //注册自己并发现其他服务
public class RibbonProviderApp2 {
    public static void main(String[] args) {
        SpringApplication.run(RibbonProviderApp2.class, args);
    }
}
- application.yml
server:
  port: 8091
spring:
  cloud:
    nacos:
      discovery:
        server-addr: 192.168.19.132 #注册中心的地址
  application:
    name: ribbon-provider #注册到nacos的服务名
1.2.2.创建服务消费者
- 创建ribbon_consumer模块
- 创建BeanConfig类
package com.bjpowernode.config;

import org.springframework.context.annotation.Bean;
import org.springframework.context.annotation.Configuration;
import org.springframework.web.client.RestTemplate;

/**
 * 1.告诉spring这个一个配置类,相当于spring的xml配置文件
 * 2.被@Configuration 注解的类,会被cglib代理进行增强
 * 3.@Configuration类允许通过调用同一类中的其它@Bean方法来定义bean之间的依赖关系,保证@Bean的对象作用域收到控制,避免多例
 */
@Configuration
public class BeanConfig {
    /**
     *  @Bean注解用于告诉方法,产生一个Bean对象,然后这个Bean对象交给Spring管理
     */
    //RestTemplate 是spring提供的一个工具类,作用是发送restful请求
    @Bean
    public RestTemplate restTemplate(){
        return new RestTemplate();
    }
}
- 创建UserController类
package com.bjpowernode.controller;

import com.bjpowernode.pojo.User;
import org.springframework.beans.factory.annotation.Autowired;
import org.springframework.cloud.client.ServiceInstance;
import org.springframework.cloud.client.discovery.DiscoveryClient;
import org.springframework.web.bind.annotation.PathVariable;
import org.springframework.web.bind.annotation.RequestMapping;
import org.springframework.web.bind.annotation.RequestMethod;
import org.springframework.web.bind.annotation.RestController;
import org.springframework.web.client.RestTemplate;

import java.util.List;
import java.util.Random;

@RestController
@RequestMapping(value = "/consumer")
public class ConsumerController {

	@Autowired
	private RestTemplate restTemplate;

	@Autowired
	private DiscoveryClient discoveryClient;

	private int currentIndex;

	@RequestMapping(value="/getUserById/{id}")
	public User getUserById(@PathVariable Integer id){
		List<ServiceInstance> serviceList =
            				discoveryClient.getInstances("ribbon-provider");

		//随机方式获得服务
		//int currentIndex = new Random().nextInt(serviceList.size());
		//轮询方式获得服务
		currentIndex = (currentIndex + 1) % serviceList.size();

		ServiceInstance instance = serviceList.get(currentIndex);
		String serviceUrl = instance.getHost() + ":" + instance.getPort();
        System.out.println("serviceUrl:"+serviceUrl);
		String url = "http://"+serviceUrl+"/provider/getUserById/"+id;
		return restTemplate.getForObject(url, User.class);
	}
}
- 创建RibbonConsumerApp启动类
package com.bjpowernode;

import org.springframework.boot.SpringApplication;
import org.springframework.boot.autoconfigure.SpringBootApplication;
import org.springframework.cloud.client.discovery.EnableDiscoveryClient;

@SpringBootApplication
@EnableDiscoveryClient  //注册自己并发现其他服务
public class RibbonConsumerApp {

    public static void main(String[] args) {
        SpringApplication.run(RibbonConsumerApp.class, args);
    }
}
- 创建application.yml
server:
  port: 80
spring:
  cloud:
    nacos:
      discovery:
        server-addr: 192.168.19.132:8848 #注册中心的地址
        namespace: test
        group: nacos_group
  application:
    name: ribbon-consumer #注册到nacos的服务名
1.2.3.测试
分别使用轮询和随机策略调用服务提供者:
1.3Ribbon介绍
1.3.1什么是Ribbon
- Spring Cloud Ribbon是基于Netflix Ribbon实现的一套客户端负载均衡的工具。
- 我们不需要去引入ribbon的依赖,因为在nacos里面已经集成了ribbon的依赖:
- Ribbon默认提供 很多种负载均衡算法,例如轮询、随机 等等。
1.3.2负载均衡策略
负载均衡接口:com.netflix.loadbalancer.IRule
1.3.2.1随机策略
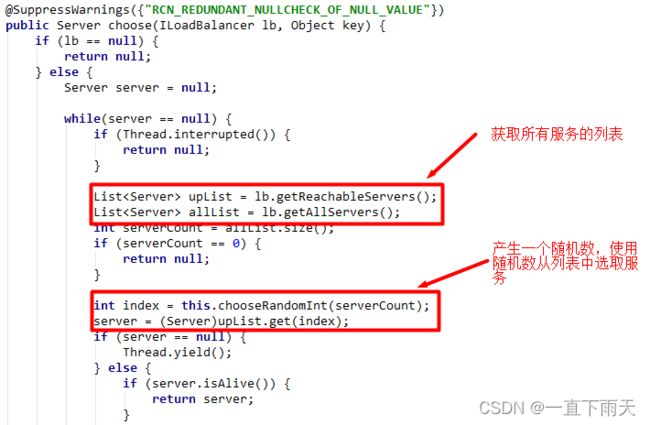
com.netflix.loadbalancer.RandomRule:该策略实现了从服务清单中随机选择一个服务实例的功能。
1.3.2.2轮询策略
com.netflix.loadbalancer.RoundRobinRule:该策略实现按照线性轮询的方式依次选择实例的功能。具体实现如下,在循环中增加了一个count计数变量,该变量会在每次轮询之后累加并求余服务总数
1.4基于ribbon实现负载均衡
1.4.1.修改ribbon_consumer
- ConfigBean类
package com.bjpowernode.config;

import com.netflix.loadbalancer.IRule;
import com.netflix.loadbalancer.RandomRule;
import org.springframework.cloud.client.loadbalancer.LoadBalanced;
import org.springframework.context.annotation.Bean;
import org.springframework.context.annotation.Configuration;
import org.springframework.web.client.RestTemplate;

/**
 * 1.告诉spring这个一个配置类,相当于spring的xml配置文件
 * 2.被@Configuration 注解的类,会被cglib代理进行增强
 * 3.@Configuration类允许通过调用同一类中的其它@Bean方法来定义bean之间的依赖关系,保证@Bean的对象作用域收到控制,避免多例
 */
@Configuration
public class BeanConfig {
    /**
     *  @Bean注解用于告诉方法,产生一个Bean对象,然后这个Bean对象交给Spring管理
     */
    /**
     *在RestTemplate上添加@LoadBalanced后,ribbon会给RestTemplate的请求添加拦截器
     * 在拦截器中根据serverId获取List,然后再使用ribbon的负载均衡算法从List获取一个service
     * 最后再把serviceId换成ip和端口号
     */
    //RestTemplate 是spring提供的一个工具类,作用是发送restful请求
    @Bean
    @LoadBalanced  //开启ribbon负载均衡,默认是轮询策略
    public RestTemplate restTemplate(){
        return new RestTemplate();
    }

    //随机策略
    @Bean
    public IRule iRule(){
        return new RandomRule();
    }
}
- UserController类
package com.bjpowernode.controller;

import com.bjpowernode.pojo.User;
import org.springframework.beans.factory.annotation.Autowired;
import org.springframework.cloud.client.ServiceInstance;
import org.springframework.cloud.client.discovery.DiscoveryClient;
import org.springframework.web.bind.annotation.PathVariable;
import org.springframework.web.bind.annotation.RequestMapping;
import org.springframework.web.bind.annotation.RestController;
import org.springframework.web.client.RestTemplate;

import java.util.List;
import java.util.Random;

@RestController
@RequestMapping("/consumer")
public class UserController {

    @Autowired
    private RestTemplate restTemplate;

    //springcloud提供的工具类,作用:发现服务
    @Autowired
    private DiscoveryClient discoveryClient;

    private int currentIndex;

    @RequestMapping("/getUserById/{id}")
    public User getUerById(@PathVariable Integer id){
        //获取多个服务端
        //List instanceList = discoveryClient.getInstances("ribbon-provider");

        //随机策略
        //int currentIndex = new Random().nextInt(instanceList.size());

        //轮询策略
        //instanceList.size() 集合长度 = 2
        //currentIndex = (currentIndex + 1) % instanceList.size();

        随机获取一个服务端
        //轮询获取服务端
        //ServiceInstance instance = instanceList.get(currentIndex);

        //String url = "http://"+ instance.getHost() +":"+ instance.getPort() +"/provider/getUserById/" + id;

        //缺点:2、不能实现负载均衡
        String url = "http://ribbon-provider/provider/getUserById/" + id;
        return restTemplate.getForObject(url,User.class);
    }
}
1.4.2测试
分别使用轮询和随机策略调用服务提供者
1.5总结
1、开启负载均衡
@Bean
@LoadBalanced //开启ribbon负载均衡,默认是轮询策略
public RestTemplate restTemplate(){
    return new RestTemplate();
}
2、指定算法
@Bean
public IRule iRule(){
   return new RandomRule();
}
3、发送请求
restTemplate.getForObject("http://serverId/url", User.class);
二、声明式服务调用Feign
2.1.背景
当我们通过RestTemplate调用其它服务的API时,所需要的参数须在请求的URL中进行拼接,如果参数少的话或许我们还可以忍受,一旦有多个参数的话,这时拼接请求字符串就会效率低下,并且显得好傻。
那么有没有更好的解决方案呢?答案是确定的有,Netflix已经为我们提供了一个框架:Feign。
2.2.Feign概述
Feign是Spring Cloud提供的声明式、模板化的HTTP客户端, 它使得调用远程服务就像调用本地服务一样简单,只需要创建一个接口并添加一个注解即可。
Spring Cloud集成Feign并对其进行了增强,使Feign支持了Spring MVC注解;Feign默认集成了Ribbon,所以Fegin默认就实现了负载均衡的效果。
2.3.Feign入门
2.3.1.创建服务提供者
创建feign_provider模块,拷贝ribbon_provider_1模块即可,只有application.xml需要修改些许。
application.xml
server:
  port: 8090
spring:
  cloud:
    nacos:
      discovery:
        server-addr: 192.168.19.132 #注册中心的地址
  application:
    name: feign-provider #注册到nacos的服务名
2.3.2.创建feign接口
- 创建feign_interface模块
- 创建UserFeign接口
package com.bjpowernode.feign;

import com.bjpowernode.pojo.User;
import org.springframework.cloud.openfeign.FeignClient;
import org.springframework.web.bind.annotation.PathVariable;
import org.springframework.web.bind.annotation.RequestMapping;

//问题1.feign的运行原理
//调用服务端
@FeignClient("feign-provider")
@RequestMapping("/provider")  //处理请求映射地址
public interface UserFeign {

    @RequestMapping("/getUserById/{id}")
    //@PathVariable 接收请求路径中占位符的值
    public User getUserById(@PathVariable("id") Integer id); //问题2. ?必须("id")

}
- pom.xml
<project xmlns="http://maven.apache.org/POM/4.0.0"
         xmlns:xsi="http://www.w3.org/2001/XMLSchema-instance"
         xsi:schemaLocation="http://maven.apache.org/POM/4.0.0 http://maven.apache.org/xsd/maven-4.0.0.xsd">
    <parent>
        <artifactId>springcloud_parentartifactId>
        <groupId>com.bjpowernodegroupId>
        <version>1.0-SNAPSHOTversion>
    parent>
    <modelVersion>4.0.0modelVersion>

    <artifactId>feign_interfaceartifactId>

    <properties>
        <maven.compiler.source>8maven.compiler.source>
        <maven.compiler.target>8maven.compiler.target>
    properties>

    <dependencies>
        <dependency>
            <groupId>org.springframework.cloudgroupId>
            <artifactId>spring-cloud-starter-openfeignartifactId>
        dependency>
        <dependency>
            <groupId>com.bjpowernodegroupId>
            <artifactId>springcloud_commonartifactId>
            <version>1.0-SNAPSHOTversion>
        dependency>
    dependencies>
project>
注:这里需要添加一个模块springcloud_common
- 创建springcloud_common模块
- 创建User类
package com.bjpowernode.pojo;

public class User {
    private Integer id;
    private String name;
    private Integer age;

    public User() {
    }

    public User(Integer id, String name, Integer age) {
        this.id = id;
        this.name = name;
        this.age = age;
    }

    public Integer getId() {
        return id;
    }

    public void setId(Integer id) {
        this.id = id;
    }

    public String getName() {
        return name;
    }

    public void setName(String name) {
        this.name = name;
    }

    public Integer getAge() {
        return age;
    }

    public void setAge(Integer age) {
        this.age = age;
    }
}
2.3.3.创建服务消费者
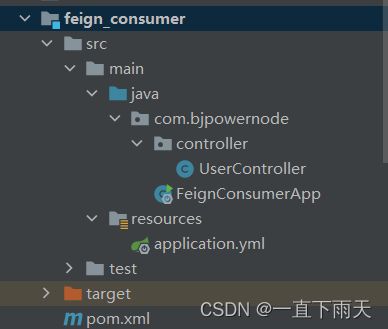
- 创建feign_consummer模块
- pom.xml
<project xmlns="http://maven.apache.org/POM/4.0.0"
         xmlns:xsi="http://www.w3.org/2001/XMLSchema-instance"
         xsi:schemaLocation="http://maven.apache.org/POM/4.0.0 http://maven.apache.org/xsd/maven-4.0.0.xsd">
    <parent>
        <artifactId>springcloud_parentartifactId>
        <groupId>com.bjpowernodegroupId>
        <version>1.0-SNAPSHOTversion>
    parent>
    <modelVersion>4.0.0modelVersion>

    <artifactId>feign_consumerartifactId>

    <properties>
        <maven.compiler.source>8maven.compiler.source>
        <maven.compiler.target>8maven.compiler.target>
    properties>

    <dependencies>
        <dependency>
            <groupId>org.springframework.bootgroupId>
            <artifactId>spring-boot-starter-webartifactId>
        dependency>
        <dependency>
            <groupId>com.alibaba.cloudgroupId>
            <artifactId>spring-cloud-starter-alibaba-nacos-discoveryartifactId>
        dependency>
        <dependency>
            <groupId>com.bjpowernodegroupId>
            <artifactId>feign_interfaceartifactId>
            <version>1.0-SNAPSHOTversion>
        dependency>
    dependencies>
project>
- application.yml
server:
  port: 80
spring:
  cloud:
    nacos:
      discovery:
        server-addr: 192.168.19.132:8848 #注册中心的地址
  application:
    name: feign-consumer #注册到nacos的服务名
- 创建UserController类
package com.bjpowernode.controller;

import com.bjpowernode.feign.UserFeign;
import com.bjpowernode.pojo.User;
import org.springframework.beans.factory.annotation.Autowired;
import org.springframework.cloud.client.ServiceInstance;
import org.springframework.cloud.client.discovery.DiscoveryClient;
import org.springframework.web.bind.annotation.PathVariable;
import org.springframework.web.bind.annotation.RequestMapping;
import org.springframework.web.bind.annotation.RestController;
import org.springframework.web.client.RestTemplate;

import java.util.List;
import java.util.Random;

/**
 * 通过声明的UserFeign接口调用feign_provider
 */
@RestController
@RequestMapping("/consumer")
public class UserController {

    @Autowired
    private UserFeign userFeign; //代理类

    @RequestMapping("/getUserById/{id}")
    public User getUerById(@PathVariable Integer id){
        System.out.println(userFeign.getClass());
        //解决url和参数拼写问题
        return userFeign.getUserById(id);
    }
}
- 创建FeignConsumerApp启动类
package com.bjpowernode;

import org.springframework.boot.SpringApplication;
import org.springframework.boot.autoconfigure.SpringBootApplication;
import org.springframework.cloud.client.discovery.EnableDiscoveryClient;
import org.springframework.cloud.openfeign.EnableFeignClients;

@SpringBootApplication
@EnableDiscoveryClient  //注册自己并发现其他服务
@EnableFeignClients  //开启feign注解扫描
public class FeignConsumerApp {

    public static void main(String[] args) {
        SpringApplication.run(FeignConsumerApp.class, args);
    }
}


