织女星开发板RISC-V核通过SPI协议驱动ARDUINO LCD模块(触屏)
前言
之前写了一个通过SPI协议初始化LCD屏幕并显示字符串和图片的文章,这次再尝试一下触屏的功能。
准备工作
1,焊接织女星开发板J1,J2,J3,J4的双排母座,以便与LCD屏通信。前段时间免费申请的织女星开发板出厂是没有焊接这些模块的,所以要自己焊一下。
2,网上查看LCD的相关资料,网址:这里是触摸屏的用户手册
3,已经能够实现通过SPI协议点亮LCD屏幕并成功显示字符串(参考我另一篇LCD显示的文章)。
代码分析和修改
Arduino LCD 模块使用的触屏驱动芯片是XPT2046,这是一款 4 导线制触摸屏控制器,内含 12 位分辨率125KHz转换速率逐步逼近型A/D 转换器。XPT2046 支持从 1.5V 到 5.25V 的低电压 I/O 接口,能通过执行两次 A/D 转换查出被按的屏幕位置。
四线电阻式触摸屏主要由两层镀有ITO镀层的薄膜组成。其中一层在屏幕的左右边缘各有一条垂直总线,另一层在屏幕的底部和顶部各有一条水平总线,如果在一层薄膜的两条总线上施加电压,在ITO 镀层上就会形成均匀电场。 当使用者触击触摸屏时,触击点处两层薄膜就会接触,在另一层薄膜上就可以测量到接触点的电压值。
Arduino LCD 模块关于触屏功能的引脚有TP-CS 和TP-IRQ ,查看LCD 模块和织女星开发板的原理图可以得到如表1所示的pin 脚对应关系。
表1 PIN脚和端子对应表
| 信号名称 | 端子号 | 信号值 |
|---|---|---|
| 时钟CKL | 12(J2) | PTB4 |
| LCD片选CS | 6(J2) | PTB6 |
| SPI数据输出 | 8(J2) | PTB5 |
| SPI数据输入 | 10(J2) | PTB7 |
| 背光BL | 4(J2) | PTB3 |
| 数据命令DC | 16(J1) | PTB1 |
| TP片选 | 10(J1) | PTB14 |
| TP中断 | 8(J1) | PTB13 |
在BOARD_InitPins()函数中根据以上分析,初始化相应的pin脚,具体实现如下:
void BOARD_InitPins(void) {

/* Clock Gate Control: 0x01u */
  CLOCK_EnableClock(kCLOCK_PortB);

/* PORTB4  is configured as LPSPI0_SCK */
  PORT_SetPinMux(PORTB, PIN4_IDX, kPORT_MuxAlt2);
/* PORTB5  is configured as LPSPI0_SOUT */
  PORT_SetPinMux(PORTB, PIN5_IDX, kPORT_MuxAlt2);
/* PORTB6  is configured as GPIO */
  PORT_SetPinMux(PORTB, PIN6_IDX, kPORT_MuxAsGpio); //注意此处与之前只实现LCD显示的代码设置不同

/* PORTB7  is configured as LPSPI0_SIN */
PORT_SetPinMux(PORTB, PIN7_IDX, kPORT_MuxAlt2);

/* PORTB1  is configured as GPIO */
  PORT_SetPinMux(PORTB, PIN1_IDX, kPORT_MuxAsGpio);
/* PORTB3  is configured as GPIO */
  PORT_SetPinMux(PORTB, PIN3_IDX, kPORT_MuxAsGpio);
  PORT_SetPinMux(PORTB, PIN13_IDX, kPORT_MuxAsGpio);  //TP_IRQ
  PORT_SetPinMux(PORTB, PIN14_IDX, kPORT_MuxAsGpio);  //TP_CS

}
Pin 1, 3, 13, 14设置为GPIO,需要初始化设置,在main函数中的语句如下:
     GPIO_PinInit(GPIOB, 1u, &spi_config);    //lcd-dc
	 GPIO_PinInit(GPIOB, 3u, &spi_config);    //lcd-bl
	 GPIO_PinInit(GPIOB, 6u, &spi_config);    //lcd-cs
	 spi_config.outputLogic =1 ;
	 GPIO_PinInit(GPIOB, 14u, &spi_config);   //tp-cs

	 gpio_pin_config_t spi1_config = {
	        kGPIO_DigitalInput, 1,
	  };
	 GPIO_PinInit(GPIOB, 13u, &spi1_config);  //tp-irq
以上,关于PIN脚的配置就完成了,接下来是关于LCD和SPI 的设置。直接调用SDK中的CLOCK_SetIpSrc函数为SPI设置时钟源和获取主时钟源。
   /*Set clock source for LPSPI and get master clock source*/
    CLOCK_SetIpSrc(kCLOCK_Lpspi0, kCLOCK_IpSrcFircAsync);
LCD初始化函数详见《织女星开发板通过SPI协议驱动ARDUINO LCD模块(显示)》。
通过之前的分析得知可以将XPT2046看作是一个AD转换器,所以也不需要什么初始化设置的,而具体的初始化其实也就是IO的初始化和SPI的初始化。
通过SPI读写一个字节的代码如下所示:
static uint8_t spi_RxTx_byte(uint8_t data){
	lpspi_transfer_t masterXfer;
	 masterXfer.txData = &data;
	 masterXfer.rxData = &data;
	 masterXfer.dataSize = 1;
	 masterXfer.configFlags =0;
	LPSPI_MasterTransferBlocking(LCD_SPI, &masterXfer);
	while (LPSPI_GetStatusFlags(LCD_SPI) & kLPSPI_ModuleBusyFlag) {}
	return data;
}
后面的功能可以直接调用上面的函数,为了方便理解,我用xpt2046名称的函数封装了一下:
uint8_t xpt2046_write_byte(uint8_t chData)
{
    return spi_RxTx_byte(chData);
}
读取XPT2046的x和y值
触摸屏根据方向分为 X 轴和 Y 轴两个部分,通过读取 X 轴和 Y 轴的数据,我们就可以知道触摸屏触摸的位置了。
图1 显示了xpt2046 8位总线接口,无DCLK时钟延迟,24时钟周期转换时序。XPT2046 完成一个完整的转换需要 24 个串行时钟,也就是需要 3 个字节的 SPI 时钟。对照图1,XPT2046 前 8 个串行时钟,是接收 1 个字节的转换命令,接收到转换命令之后,使用 1 个串行时钟的时间来完成数据转换,然后返回 12 个串行时钟长度的转换结果。最后 3 个串行时钟返回三个无效数据。

所以读取一个完整转换过程为:
- 发送 1 个 8 字节的控制命令。
- 读取 2 个字节的返回数据。
- 进行数据处理。也就是丢弃最后读取到的 3 位数据。 我们需要读取两个数据,一个 X 轴数据和一个 Y 轴数据,所以我们这里需要两个控制命令。
表1表2显示了一个完整的控制命令的结构。
表1 控制字各位描述

表2 差分模式输入配置

从表2可以知道操作数0xD0表示测量x轴位置,操作数0x90表示测量y轴位置。读取触摸到屏幕上某一点坐标的函数实现如下:
void xpt2046_read_xy(uint16_t *phwXpos, uint16_t *phwYpos)
{
	*phwXpos = xpt2046_read_average(0xD0);
	*phwYpos = xpt2046_read_average(0x90);
}
一般读取两次提高准确度:
#define ERR_RANGE 50
bool xpt2046_twice_read_xy(uint16_t *phwXpos, uint16_t *phwYpos)
{
	uint16_t hwXpos1, hwYpos1, hwXpos2, hwYpos2;
	xpt2046_read_xy(&hwXpos1, &hwYpos1);
	xpt2046_read_xy(&hwXpos2, &hwYpos2);
	if (((hwXpos2 <= hwXpos1 && hwXpos1 < hwXpos2 + ERR_RANGE) || (hwXpos1 <= hwXpos2 && hwXpos2 < hwXpos1 + ERR_RANGE))
	&& ((hwYpos2 <= hwYpos1 && hwYpos1 < hwYpos2 + ERR_RANGE) || (hwYpos1 <= hwYpos2 && hwYpos2 < hwYpos1 + ERR_RANGE))) {
		*phwXpos = (hwXpos1 + hwXpos2) >> 1;
		*phwYpos = (hwYpos1 + hwYpos2) >> 1;
		return true;
	}
	return false;
}
在读取函数的程序中,为了获取数据值的准确性,进行多次读取,然后除去最大最小值,求出平均值:
uint16_t xpt2046_read_average(uint8_t chCmd)
{
    uint8_t i, j;
    uint16_t hwbuffer[READ_TIMES], hwSum = 0, hwTemp;
    for (i = 0; i < READ_TIMES; i ++) {
        hwbuffer[i] = xpt2046_read_ad_value(chCmd);
    }
    for (i = 0; i < READ_TIMES - 1; i ++) {        //sort
        for (j = i + 1; j < READ_TIMES; j ++) {
            if (hwbuffer[i] > hwbuffer[j]) {
                hwTemp = hwbuffer[i];
                hwbuffer[i] = hwbuffer[j];
                hwbuffer[j] = hwTemp;
            }
        }
    }
    for (i = LOST_NUM; i < READ_TIMES - LOST_NUM; i ++) {
        hwSum += hwbuffer[i];
    }
    hwTemp = hwSum / (READ_TIMES - 2 * LOST_NUM);
    return hwTemp;
}
读取AD转换数据:
uint16_t xpt2046_read_ad_value(uint8_t chCmd)
{
    uint16_t hwData = 0;
    XPT2046_CS_CLR();
    xpt2046_write_byte(chCmd);  //发送控制命令
    hwData = xpt2046_write_byte(0x00); //读取两个字节的返回数据
    hwData <<= 8;
    hwData |= xpt2046_write_byte(0x00);;
    hwData >>= 4;            //只需要12位的转换结果,所以丢弃后4位
    XPT2046_CS_SET();
    return hwData;
}
屏幕校正
选取屏幕四个角上的四个点,将读取的数据存放在一个二维数组中,然后根据计算的factor值判定校准是否成功,如果成功则进入下一步,不成功的话就再来一次。触屏校正代码如下所示:
void tp_adjust(void)
{
	uint8_t  cnt = 0;
	uint16_t hwTimeout = 0, d1, d2, pos_temp[4][2];
	uint32_t tem1, tem2;
	float fac;
	lcd_clear_screen(LCD_COLOR_WHITE);
	lcd_display_string(40, 40, (const uint8_t *)"Please use the stylus click the cross on the screen. The cross will always move until the screen adjustment is completed.",
					16, LCD_COLOR_RED);
	tp_draw_touch_point(20, 20, LCD_COLOR_RED);
	s_tTouch.chStatus = 0;
	s_tTouch.fXfac = 0;
	while (1) {
		tp_scan(1);
		if((s_tTouch.chStatus & 0xC0) == TP_PRESSED) {
			hwTimeout = 0;
			s_tTouch.chStatus &= ~(1 << 6);
			pos_temp[cnt][0] = s_tTouch.hwXpos;
			pos_temp[cnt][1] = s_tTouch.hwYpos;
			cnt ++;
			switch(cnt) {
				case 1:
					tp_draw_touch_point(20, 20, LCD_COLOR_WHITE);
					tp_draw_touch_point(LCD_WIDTH - 20, 20, LCD_COLOR_RED);
					break;
				case 2:
					tp_draw_touch_point(LCD_WIDTH - 20, 20, LCD_COLOR_WHITE);
					tp_draw_touch_point(20, LCD_HEIGHT - 20, LCD_COLOR_RED);
					break;
				case 3:
					tp_draw_touch_point(20, LCD_HEIGHT - 20, LCD_COLOR_WHITE);
					tp_draw_touch_point(LCD_WIDTH - 20, LCD_HEIGHT - 20, LCD_COLOR_RED);
					break;
				case 4:
					tem1=abs((int16_t)(pos_temp[0][0]-pos_temp[1][0]));//x1-x2
					tem2=abs((int16_t)(pos_temp[0][1]-pos_temp[1][1]));//y1-y2
					tem1*=tem1;
					tem2*=tem2;
					tem1+=tem2;
					d1=sqrt(tem1);
					tem1=abs((int16_t)(pos_temp[2][0]-pos_temp[3][0]));//x3-x4
					tem2=abs((int16_t)(pos_temp[2][1]-pos_temp[3][1]));//y3-y4
					tem1*=tem1;
					tem2*=tem2;
					tem1+=tem2;
					d2=sqrt(tem1);
					fac=(float)d1/d2;
					if(fac<0.95||fac>1.05||d1==0||d2==0) {
						cnt=0;
 						tp_show_info(pos_temp[0][0],pos_temp[0][1],pos_temp[1][0],pos_temp[1][1],pos_temp[2][0],pos_temp[2][1],pos_temp[3][0],pos_temp[3][1],fac*100);
						lcd_delayms(1000);
						tp_draw_touch_point(LCD_WIDTH - 20, LCD_HEIGHT - 20, LCD_COLOR_WHITE);
						tp_draw_touch_point(20, 20, LCD_COLOR_RED);
						continue;
					}

					tem1=abs((int16_t)(pos_temp[0][0]-pos_temp[2][0]));//x1-x3
					tem2=abs((int16_t)(pos_temp[0][1]-pos_temp[2][1]));//y1-y3
					tem1*=tem1;
					tem2*=tem2;
					tem1+=tem2;
					d1=sqrt(tem1);
					tem1=abs((int16_t)(pos_temp[1][0]-pos_temp[3][0]));//x2-x4
					tem2=abs((int16_t)(pos_temp[1][1]-pos_temp[3][1]));//y2-y4
					tem1*=tem1;
					tem2*=tem2;
					tem1+=tem2;
					d2=sqrt(tem1);
					fac=(float)d1/d2;
					if(fac<0.95||fac>1.05) {
						cnt=0;
	tp_show_info(pos_temp[0][0],pos_temp[0][1],pos_temp[1][0],pos_temp[1][1],pos_temp[2][0],pos_temp[2][1],pos_temp[3][0],pos_temp[3][1],fac*100);
						lcd_delayms(1000);
						lcd_fill_rect(96, 240, 24, 16, LCD_COLOR_WHITE);
						tp_draw_touch_point(LCD_WIDTH - 20, LCD_HEIGHT - 20, LCD_COLOR_WHITE);
						tp_draw_touch_point(20, 20, LCD_COLOR_RED);
						continue;
					}
					tem1=abs((int16_t)(pos_temp[1][0]-pos_temp[2][0]));//x2-x3
					tem2=abs((int16_t)(pos_temp[1][1]-pos_temp[2][1]));//y2-y3
					tem1*=tem1;
					tem2*=tem2;
					tem1+=tem2;
					d1=sqrt(tem1);
					tem1=abs((int16_t)(pos_temp[0][0]-pos_temp[3][0]));//x1-x4
					tem2=abs((int16_t)(pos_temp[0][1]-pos_temp[3][1]));//y1-y4
					tem1*=tem1;
					tem2*=tem2;
					tem1+=tem2;
					d2=sqrt(tem1);
					fac=(float)d1/d2;
					if(fac<0.95||fac>1.05) {
						cnt=0;						tp_show_info(pos_temp[0][0],pos_temp[0][1],pos_temp[1][0],pos_temp[1][1],pos_temp[2][0],pos_temp[2][1],pos_temp[3][0],pos_temp[3][1],fac*100);
						lcd_delayms(1000);
						tp_draw_touch_point(LCD_WIDTH - 20, LCD_HEIGHT - 20, LCD_COLOR_WHITE);
						tp_draw_touch_point(20, 20, LCD_COLOR_RED);
						continue;
					}

					s_tTouch.fXfac = (float)(LCD_WIDTH - 40) / (int16_t)(pos_temp[1][0] - pos_temp[0][0]);
					s_tTouch.iXoff = (LCD_WIDTH - s_tTouch.fXfac * (pos_temp[1][0] + pos_temp[0][0])) / 2;
					s_tTouch.fYfac = (float)(LCD_HEIGHT - 40) / (int16_t)(pos_temp[2][1] - pos_temp[0][1]);
					s_tTouch.iYoff = (LCD_HEIGHT - s_tTouch.fYfac * (pos_temp[2][1] + pos_temp[0][1])) / 2;
					if(abs(s_tTouch.fXfac) > 2 || abs(s_tTouch.fYfac) > 2) {
						cnt=0;
 				    	tp_draw_touch_point(LCD_WIDTH - 20, LCD_HEIGHT - 20, LCD_COLOR_WHITE);
						tp_draw_touch_point(20, 20, LCD_COLOR_RED);
						lcd_display_string(40, 26, (const uint8_t *)"TP Need readjust!", 16, LCD_COLOR_RED);
						continue;
					}
					lcd_clear_screen(LCD_COLOR_WHITE);
					lcd_display_string(35, 110, (const uint8_t *)"Touch Screen Adjust OK!", 16, LCD_COLOR_BLUE);
					lcd_delayms(1000);
 					lcd_clear_screen(LCD_COLOR_WHITE);
					return;
			}
		}
		lcd_delayms(600);
		if (++ hwTimeout >= 6000) {
			break;
		}
 	}
}
其中调用到tp_scan()函数,检测是否有触屏并获得物理坐标值,具体实现如下:
uint8_t tp_scan(uint8_t chCoordType)
{
	if (!(XPT2046_IRQ_READ())) {
		if (chCoordType) {
			xpt2046_twice_read_xy(&s_tTouch.hwXpos, &s_tTouch.hwYpos);
		} else if (xpt2046_twice_read_xy(&s_tTouch.hwXpos, &s_tTouch.hwYpos)) {
			s_tTouch.hwXpos = s_tTouch.fXfac * s_tTouch.hwXpos + s_tTouch.iXoff;
			s_tTouch.hwYpos = s_tTouch.fYfac * s_tTouch.hwYpos + s_tTouch.iYoff;
		}
		if (0 == (s_tTouch.chStatus & TP_PRESS_DOWN)) {
			s_tTouch.chStatus = TP_PRESS_DOWN | TP_PRESSED;
			s_tTouch.hwXpos0 = s_tTouch.hwXpos;
			s_tTouch.hwYpos0 = s_tTouch.hwYpos;
		}
	} else {
		if (s_tTouch.chStatus & TP_PRESS_DOWN) {
			s_tTouch.chStatus &= ~(1 << 7);
		} else {
			s_tTouch.hwXpos0 = 0;
			s_tTouch.hwYpos0 = 0;
			s_tTouch.hwXpos = 0xffff;
			s_tTouch.hwYpos = 0xffff;
		}
	}
	return (s_tTouch.chStatus & TP_PRESS_DOWN);
}
展示一下成果(一只手拿手机拍摄另一只手拿吸管写字,哈哈):
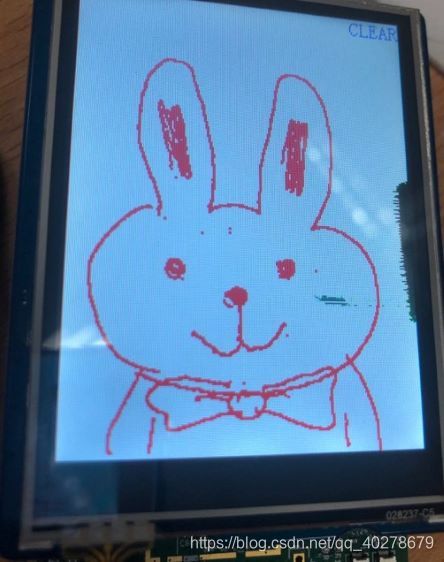
最后展示一下我的简笔画兔子(嘻嘻):

本文的部分内容参考了XPT2046触摸屏实验过程详解与STM32代码解析和2.8inch TFT Touch Shield用户手册