手把手教程:构建基于内容的数据科学文章推荐器
全文共8100字,预计学习时长16分钟
众所周知,在数据科学界十分流行写博客。这种方式也体现了数据科学开源共享的根源。数据科学家们找出某一问题的创新性解法后,最喜欢做的就是将其记录下来。在数据科学界,写博客是项双赢之举,编者可从中获取知名度,读者则可获取知识。
本教程会借助主题建模来归纳数据科学有关文章的特点,然后用主题模型的输出结果来搭建基于内容的推荐器。我们将以Kaggle数据集媒体文章(含内容)为语料库,其中有约70,000篇已归于数据科学、机器学习及人工智能这几类。这个数据集很不错,里面除了文章全文外还有点赞量、作者、网址等信息。数据集包含的最新文章发布于2018年10月。也就是说这一推荐器不会推荐最新的文章,但这也无妨。
加载数据
首先,导入数据库,将数据集加载到pandas数据框中,然后查看前几行。
import numpy as np
import pandas as pd
import re
import stringfrom sklearn.decomposition import NMF
from sklearn.feature_extraction.text import TfidfVectorizer
from sklearn.decomposition import TruncatedSVDimport gensim
from gensim.parsing.preprocessing import STOPWORDS
from gensim import corpora, models
from gensim.utils import simple_preprocessfrom nltk.stem.porter import
 PorterStemmermedium = pd.read_csv(‘Medium_AggregatedData.csv’)
medium.head()
未经处理的数据集看上去含有大量冗余信息。其实,文章的每个标签都有一行,因此每篇文章最多可有5行。压缩标签信息再删除重复行就可以解决这个问题。为了进一步减小数据集、确保推荐质量,可删掉非英语撰写和点赞数量低于25的文章。最后再删掉所有用不到的列。
# Filter articles
medium = medium[medium['language'] == 'en']
medium = medium[medium['totalClapCount'] >= 25]def findTags(title):
    '''
    Function extracts tags for an input title
    '''
    rows = medium[medium['title'] == title]
    tags = list(rows['tag_name'].values)
    return tags# Get all the titles
titles = medium['title'].unique()tag_dict = {'title': [], 'tags': []} #
 Dictionary to store tagsfor title in titles:
    tag_dict['title'].append(title)
    tag_dict['tags'].append(findTags(title))tag_df =
 pd.DataFrame(tag_dict)  # Dictionary to data frame# Now that tag data
 is extracted the duplicate rows can be dropped
medium = medium.drop_duplicates(subset = 'title', keep = 'first')def
 addTags(title):
    '''
    Adds tags back into medium data frame as a list
    '''
    try:
        tags = list(tag_df[tag_df['title'] == title]['tags'])[0]
    except:
        # If there's an error assume no tags
        tags = np.NaN
    return tags# Apply addTags
medium['allTags'] = medium['title'].apply(addTags)# Keep only the
 columns we're interested in for this project
keep_cols = ['title', 'url', 'allTags', 'readingTime',
             'author', 'text']
medium = medium[keep_cols]# Drop row with null title
null_title = medium[medium['title'].isna()].index
medium.drop(index = null_title, inplace = True)medium.reset_index(drop
 = True, inplace = True)print(medium.shape)
medium.head()
好的!现在数据集已减至仅剩24,576行,而且标记信息也保留在了“allTags”列中。接下来的操作就方便了很多。
文字清理
现在对文章文本进行预处理以进行主题建模。首先,删除链接、非字母数字字符和标点符号。还要将所有字符转换为小写字母。
def clean_text(text):
    '''
    Eliminates links, non alphanumerics, and punctuation.
    Returns lower case text.
    '''

        # Remove links
    text = re.sub('(?:(?:https?|ftp):\/\/)?[\w/\-?=%.]+
                  \.[\w/\-?=%.]+','', text)
    # Remove non-alphanumerics
    text = re.sub('\w*\d\w*', ' ', text)
    # Remove punctuation and lowercase
    text = re.sub('[%s]' % re.escape(string.punctuation),
                  ' ', text.lower())
    # Remove newline characters
    text = text.replace('\n', ' ')

        return textmedium['text'] = medium['text'].apply(clean_text)
接下来,清除停用词,这些词出现频率很高,实际意义却不大。对很多NLP任务来说,这些词像噪音,会干扰我们查找所需的信息。英语中常见的停用词有‘the’,‘is’和‘you’。此外,也要考虑特殊领域的停用词。在这个项目中,就是要找到Gensim事先定义的停用词,再添上数据科学相关停用词和预处理步骤中产生的一些残词。
stop_list = STOPWORDS.union(set(['data', 'ai', 'learning', 'time',
 'machine', 'like', 'use', 'new', 'intelligence', 'need', "it's", 'way',
 'artificial', 'based', 'want', 'know', 'learn', "don't", 'things',
 'lot', "let's", 'model', 'input', 'output', 'train', 'training',
'trained', 'it', 'we', 'don', 'you', 'ce', 'hasn', 'sa', 'do', 'som',
 'can']))# Remove stopwords
def remove_stopwords(text):
    clean_text = []
    for word in text.split(' '):
        if word not in stop_list and (len(word) > 2):
            clean_text.append(word)
    return ' '.join(clean_text)medium['text'] =
medium['text'].apply(remove_stopwords)
对语料库运行字数统计(删除停用词后)有助于快速识别一些更为明显的特定领域停用词,但通常这些停用词表需要在试验和纠错中不断完善。
预处理的最后一步要用到词干分析器,将各个时态和经屈折变换的单词转化为标准词干。这样可能会产生一些半截词干(如image → imag and business → busi),但通常一眼就能看出正确词根。
# Apply stemmer to processedText
stemmer = PorterStemmer()def stem_text(text):
    word_list = []
    for word in text.split(' '):
        word_list.append(stemmer.stem(word))
    return ' '.join(word_list)medium['text'] =
 medium['text'].apply(stem_text)
差不多可以进行主题建模了,但首先要将现有数据框存为csv文件。
medium.to_csv('pre-processed.csv')
主题建模
完成了文本预处理,终于开始进行主题建模了。主题建模旨在将文档转换为稀疏的单词向量,然后应用降维技术来找到有意义的单词组。为达此目的,这里将使用不同方法构建多个模型,然后对结果进行比较,以找出能够生成最清晰、最连贯和差异化主题的模型。这属于无监督学习领域,对结果的评估是主观的,因此需要恰当的人为判断。
构建主题模型的第一步是将文档转换为单词向量。有两种常用的方法,即BOW(词袋)和TFIDF(术语频率,逆文档频率)。BOW只计算单词出现在文档中的次数。如果“总统”一词在文档中出现5次,那么在文档的稀疏单词向量的相应部分转换为数字5。
另一方面,采用TFIDF的前提是各文档中都包含的单词在任何单一的文档中都不能太重要。比如在一个与2020年总统选举有关的语料库中,显然,“总统”这个词几乎会出现在这个主题下的所有文章里,而在分析其中任何一个文档时,“总统”这个词又没那么重要。
为简洁起见,以下仅演示TFIDF主题模型,仅适用于BOW的LDA算法除外。根据我的经验,TFIDF通常可以更好地提取清晰、连贯的和差异化的主题。首先将文档语料库转换为TFIDF稀疏向量表示,然后在稀疏语料库矩阵中应用SVD(单值分解)。
vectorizer = TfidfVectorizer(stop_words = stop_list,
                             ngram_range =(1,1))
doc_word = vectorizer.fit_transform(medium ['text'])svd =
 TruncatedSVD(8)
docs_svd = svd.fit_transform(doc_word)
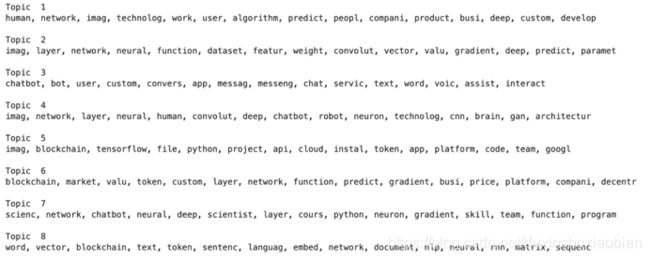
这样会从语料库中提取8个主题(8是该语料库的最佳主题数,但可以尝试试验不同的数字),然后把文档转换为8维向量,这些向量表示着该文档中各个主题。现在编写一个函数来表示出每个主题中最显眼的单词,以便评估SVD算法的执行情况。
def display_topics(model,feature_names,no_top_words,no_top_topics,
topic_names = None):
    count = 0
    for ix,topic in enumerate(model.components_):
        if count == no_top_topics:
            break
        if if not topic_names or not topic_names [ix]:
            print( “\ nTopic”,(ix + 1))
        else:
            print(“\ nTopic:'”,topic_names [ix],“'”)
        print(“,”
                        。join(topic.argsort中的i的[feature_names [i])
()[: - no_top_words -
                                                 1:-1]]))
        count + = 1display_topics(svd,
vectorizer.get_feature_names(),15,8)
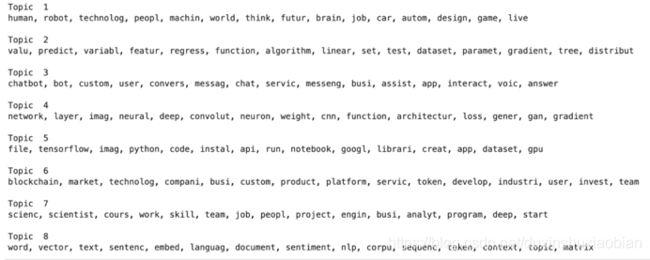
还可以,但看看能否做得更好。下一个要尝试的算法是NMF(非负矩阵分解)。该算法与SVD非常相似。有时产生的结果要更好,有时则更糟。现在来试一试吧。
nmf = NMF(8)
docs_nmf = nmf.fit_transform(doc_word)display_topics(nmf,
vectorizer.get_feature_names(),15,8)
看起来很不错。这些主题比使用SVD生成的主题更具差异性。
最后,试试LDA(潜在狄利克雷分布)。该算法最近在主题建模中很流行,很多人认为它最为先进。虽然如此,评估仍非常主观,结果不一定就比SVD或NMF要好。运行LDA需使用Gensim库,这意味着代码会有所不同。
tokenized_docs = medium['text'].apply(simple_preprocess)
dictionary = gensim.corpora.Dictionary(tokenized_docs)
dictionary.filter_extremes(no_below=15, no_above=0.5, keep_n=100000)
corpus = [dictionary.doc2bow(doc) for doc in tokenized_docs]# Workers =
 4 activates all four cores of my CPU,
 lda = models.LdaMulticore(corpus=corpus, num_topics=8,
                          id2word=dictionary, passes=10,
                          workers = 4)lda.print_topics()
这些主题非常好。但用NMF生成的主题更具差异性。对基于内容的推荐器来说,主题之间的区别至关重要。这样,推荐器才能根据用户品味匹配相关文章。考虑到上述情况,接下来继续使用NMF主题。
接下来,对NMF主题进行命名,并将文档主题向量与包含文章元数据其余部分的数据框连接。然后,将该数据框保存至csv文件,以便后续使用。
# Define column names for dataframe
column_names = ['title', 'url', 'allTags', 'readingTime', 'author',
                 'Tech', 'Modeling', 'Chatbots', 'Deep Learning',
                 'Coding', 'Business', 'Careers', 'NLP', 'sum']# Create
 topic sum for each article
# Later remove all articles with sum 0
topic_sum = pd.DataFrame(np.sum(docs_nmf, axis = 1))# Turn our docs_nmf
 array into a data frame
doc_topic_df = pd.DataFrame(data = docs_nmf)# Merge all of our article
 metadata and name columns
doc_topic_df = pd.concat([medium[['title', 'url', 'allTags',
                          'readingTime', 'author']], doc_topic_df,
                        topic_sum], axis = 1)doc_topic_df.columns =
 column_names# Remove articles with topic sum = 0, then drop sum column
doc_topic_df = doc_topic_df[doc_topic_df['sum'] !=
 0]doc_topic_df.drop(columns = 'sum', inplace = True)# Reset index then
 save
doc_topic_df.reset_index(drop = True, inplace = True)
doc_topic_df.to_csv('tfidf_nmf_8topics.csv', index = False)
搭建推荐引擎
最后,就要构建推荐器后端了。推荐器将选取主题作为输入;然后会找出一篇与主题非常匹配的文章。为避免单一,可以加入一些随机性,让系统在保证推荐质量的同时从更多文章中进行选择。
实际上,使用余弦距离不失为一个计算输入与所推荐文章之间相似性的简单方法。当两个矢量指向相同方向并且与矢量的比例不变时,余弦距离最大。保持比例不变的这一特性十分有用,因为由此可忽略矢量缩放,这一点欧几里德距离则无法做到。
至于随机性,可以向输入添加随机8维向量。为了稳定随机性的大小,应将该随机向量缩放到用户输入向量的距离。
最后还有一处需要考虑。使用for循环计算输入和每个可能输出结果之间的余弦距离会非常慢。显然不能让用户花30秒等待推荐。要解决这一问题,可以采用矢量化的方法,即使用线性代数并行化计算。可在Numpy中使用矩阵和向量运算来完成此操作。这样代码能够更快地运行数量级并立即生成建议。下面来看一看如何运作。
topic_names = ['Tech', 'Modeling', 'Chatbots', 'Deep Learning',
                'Coding', 'Business', 'Careers', 'NLP']
topic_array = np.array(doc_topic_df[topic_names])
norms = np.linalg.norm(topic_array, axis = 1)def compute_dists(top_vec,
 topic_array):
    '''
   Returns cosine distances for top_vec compared to every article
    '''
   dots = np.matmul(topic_array, top_vec)
    input_norm = np.linalg.norm(top_vec)
    co_dists = dots / (input_norm * norms)
    return co_distsdef produce_rec(top_vec, topic_array, doc_topic_df,
rand = 15):
    '''
    Produces a recommendation based on cosine distance.
    rand controls magnitude of randomness.
    '''
    top_vec = top_vec + np.random.rand(8,)/
                        (np.linalg.norm(top_vec)) * rand
    co_dists = compute_dists(top_vec, topic_array)
    return doc_topic_df.loc[np.argmax(co_dists)]
创建样本输入,查看结果。
tech = 5
modeling = 5
chatbots = 0
deep = 0
coding = 0
business = 5
careers = 0
nlp = 0top_vec = np.array([tech, modeling, chatbots, deep, coding,
 business, careers, nlp])rec = produce_rec(top_vec, topic_array,
doc_topic_df)rec
奏效了!推荐器根据输入生成了一篇有趣的文章推荐,同时得到一大堆相关的元数据。此时就可以将工作交给前端工程团队。如果你同时也负责前端,可以自己接着构建一个。
留言 点赞 关注
我们一起分享AI学习与发展的干货
欢迎关注全平台AI垂类自媒体 “读芯术”
(添加小编微信:dxsxbb,加入读者圈,一起讨论最新鲜的人工智能科技哦~)


