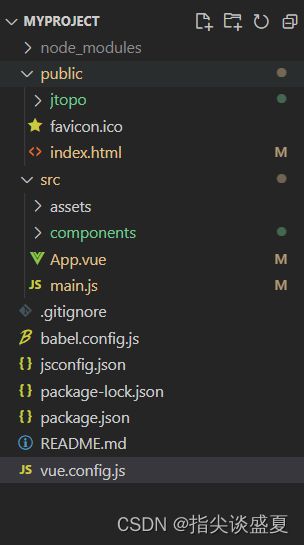
Vue 入门
main.js
//该文件是整个项目的入口文件
//引入Vue
import Vue from 'vue'
//引入App 组件
import App from './App.vue'
//关闭vue的生产提示
Vue.config.productionTip = false

// 创建Vue实例对象---vm
new Vue({
	//el:'#app', 和 $mount()二选一
	//下面的这行代码,将App组件放入容器中
	render:h=>h(App),
}).$mount('#app')
index.html
<!DOCTYPE html>
<html lang="">
  <head>
    <meta charset="utf-8">
    <!-- 针对IE浏览器的特殊配置含义是让IE浏览器以最高的渲染级别渲染页面 -->
    <meta http-equiv="X-UA-Compatible" content="IE=edge">
    <!-- 开启移动端的理想视口 -->
    <meta name="viewport" content="width=device-width,initial-scale=1.0">
    <!-- 配置页签图标(BASE_URL是public目录下) -->
    <link rel="icon" href="<%= BASE_URL %>favicon.ico">
    <!-- 配置网页标题 -->
    <title><%= htmlWebpackPlugin.options.title %></title>
  </head>
  <body>
    <!-- 当浏览器不支JS时的元素就会被渲染 -->
    <noscript>
      <strong>We're sorry but <%= htmlWebpackPlugin.options.title %> doesn't work properly without JavaScript enabled. Please enable it to continue.</strong>
    </noscript>
    <!-- 容器 -->
    <div id="app"></div>
    <!-- built files will be auto injected -->
  </body>
</html>
- main.js一般不修改名称,若要修改main.js的名称则 vue.config.js 中的入口 entry 文件名也要随之修改
- 语法检查设置:lintOnSave:false 与pages 平级
ref 属性
- 被用来给元素或子组件注册引用信息(id的替代者)this.$refs.xxx
父子传值
父传子:
// 简单声明接收
props:['name','age','sex']
// 接收的同时对数据进行类型限制
props:{
	name:String,
	age:Number,
	sex:String
}
// 接收的同时对数据进行类型限制 + 默认值的指定 + 必要性的限制
props:{
	name:{
		type:Stirng, // name 的类型是字符串
		required:true, // name 是必要的
		default:99
	},
	age:{
		type:Number,
		default:99 // 默认值
	},
	sex:{
		type:Stirng,
		required:true
	}
}
Vue 插件
在 main.js 中使用 :Vue.use(插件名)
scoped(作用域,范围)
<style scoped></style>
避免样式相互影响,一般 APP.vue 中的样式为公共样式
组件的自定义事件
1、一种组件通信的方式,适用于:子组件=》父组件
2、
全局事件总线
1、一种组件间通信的方式,适用于任意组件间通信
2、安装全局事件总线
new Vue({
  el:"#app",
  render: h => h(App),
  beforeCreate(){
    Vue.prototype.$bus = this // 安装全局事件总线,$bus 就是当前应用的 vm
  }
})
3、使用事件总线
1.接收数据:A组件想接收数据,则在A组件中给$bus 绑定自定义事件,事件的回调留在A组件自身
methods:{
	demo(data){.....}
}
mounted(){
    this.$bus.$on('xxx',this.demo)
},
2,提供数据:`this.$bus.$emit('xxx', 数据)`
4、最好在 beforeDestroy 钩子中 用 $off 去解绑当前组件所用到的事件
vuex
专门在 Vue 中实现集中式(数据) 管理的一个 Vue 插件,对 Vue 应用中多个组件的共享状态进行集中式的管理(读/写),也是一种组件间的通信方式,且适用于任意组件间的通信。
- 什么时候使用 Vuex
多个组件需要共享数据时
- 搭建 Vuex 环境
1、创建文件:src/store/index.js
// 该文件用于创建 vuex 中最为核心的store
// 引入 Vuex
import Vuex from 'vuex'
import Vue from 'vue'
// 应用vuex 插件
Vue.use(Vuex)


// 准备 actions --用于响应组件中的动作
const actions = {}

// 准备mutations --用于操作数据
const mutations = {}


// 准备state--用于存储数据
const state = {}

// // 创建 store
// const store = new Vuex.Store({
//     actions,
//     mutations,
//     state
// })

// // 暴露 store
// export default store

// 创建并暴露 store
export default new Vuex.Store({
    actions,
    mutations,
    state
})
2、在main.js中创建 vm 时传入 store 配置项
// 引入 store
.........
import store from './store'
..........
 new Vue({
  el:"#app",
  store,
  render: h => h(App),
  beforeCreate(){
    Vue.prototype.$bus = this // 安装全局事件总线
  }
})
- 四个 map 方法的使用
- 1、mapState 方法:用于帮助我们映射
state中的数据为计算属性
computed:{
	// 借助 mapState 生成计算属性: sum、school、subject(对象写法)
	...mapState({sum:'sum',school:'school',subject:'subject'})
	// 借助 mapState 生成计算属性: sum、school、subject(数组写法)
	...mapState(['sum','school','subject'])
}
- 2、mapGetters 方法:用于帮助我们映射
getters中的数据为计算属性
computed:{
	// 借助 mapGetters 生成计算属性: bigSum(对象写法)
	...mapState({bigSum:'bigSum'})
	// 借助 mapGetters 生成计算属性: bigSum(数组写法)
	...mapState(['bigSum'])
}
- 3、mapActions 方法:用于帮助我们生成与
actions对话的方法,即:包含$store.dispatch(xxx)的函数
methods:{
	// 靠 mapActions 生成:incrementOdd、incrementWait(对象形式)
	...mapActions({incrementOdd:'jiaOdd',incrementWait:'jiaWait'})
	// 靠 mapActions 生成:incrementOdd、incrementWait(数组形式)
	...mapActions(['jiaOdd','jiaWait'])
}
- 4、mapMutations 方法:用于帮助我们生成与
mutations对话的方法,即:包含$store.commit(xxx)的函数
methods:{
	// 靠 mapMutations生成:JIA、JIAN(对象形式)
	...mapMutations({increment:'JIA',decrement:'JIAN'})
	// 靠 mapMutations生成:JIA、JIAN(数组形式)
	...mapMutations(['JIA','JIAN'])
}
router
实现切换
<router-link to="/about">about</router-link>
展示指定位置
<router-view></router-view>
query 传参
// 跳转路由并携带 query 参数, to 的字符串写法
<router-link :to="`/home/message/detail?id=${m.id}&title=${m.title}`">{{m.title}}</router-link>
// 跳转路由并携带 query 参数, to 的对象写法
<router-link :to="{
	path:'/home/message/detail',
	query:{
		id:m.id,
		title:m.title
	}
}">
	{{m.title}}
</router-link>
query 接受参数
$router.query.id
$router.query.title
路由的 params 参数
- 配置路由,声明接收 params 参数
{
    path:'/home',
    component:Home,
    children:[
    	component:Message,
    	children:[
    		{
    			name:'xianqing',
    			path:'detail/:id/:title',      // 使用占位符 (/:id/:title) 声明接收 params 参数
    			component:Detail
    		}
    	]
    ]
}
- 传递参数
// 跳转路由并携带 params 参数, to 的字符串写法
<router-link :to="`/home/message/detail/${m.id}/${m.title}`">{{m.title}}</router-link>
// 跳转路由并携带 params 参数, to 的对象写法
<router-link :to="{
	name:'xianqing',  // 此处路由只能用 name 不能用 path
	params:{
		id:m.id,
		title:m.title
	}
}">
	{{m.title}}
</router-link>
路由的 缓存方法 :在mounted()使用定时器 , beforeDestroy() 中清除定时器没效果;可用其他两个生命周期 activated、deactivated.。
// 用keep-alive 进行路由的缓存,include 进行要缓存的路由()
<keep-alive include="home">
	<router-link></router-link>
</keep-alive>
路由守卫(权限)
meta:{isAuth:true}
// 全局前置路由守卫--初始化的时候被调用、每次路由切换之前被调用
router.beforeEach((to,from,next)=>{
	if(to.meta.isAuth){ // 判断是否需要鉴权
		next() // 放行
	}else{
		next() // 放行
	}
})

// 全局后置路由守卫--初始化的时候被调用、每次路由切换之后被调用(无 next 参数)
// 一般用于切换窗口名称时调用该方法
router.afterEach((to,from)=>{
	document.title = to.meta.title || 'xx名称'
})
独享守卫
beforeEnter(to,from,next){
	if(to.meta.isAuth){ // 判断是否需要鉴权
		next() // 放行
	}else{
		next() // 放行
	}
}
组件内路由守卫
// 通过路由规则,进入该组件时被调用
beforeRouterEnter(to,from,next){

}
// 通过路由规则,离开该组件时被调用
beforeRouterLeave(to,from,next){

}
hash 模式与 history 模式
mode:‘hash’
http://localhost:8080/#/Student ------------------------#及其后面的内容就是hash 值 hash 模式不会把 # 后的参数传给服务器
