ArcGIS API for Silverlight 入门学习笔记(三):基础地图实例
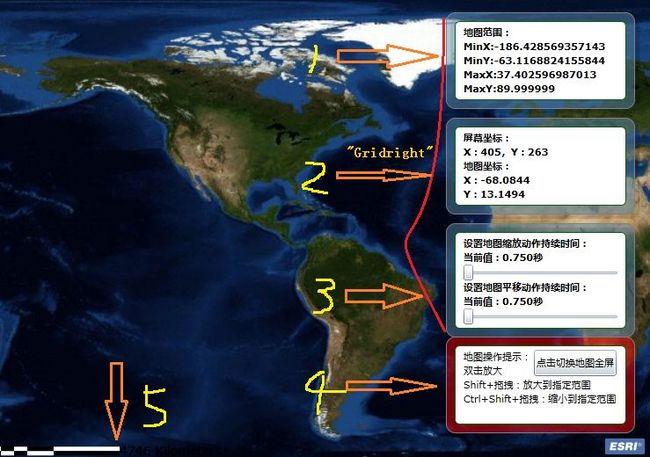
该实例主要是包含六部分:地图范围、坐标、动画效果、全屏、比例尺、进度条。
前期准备工作
     <

     UserControl

     x:Class

     ="APIforSilverlightSamp.s2"


 xmlns

     ="http://schemas.microsoft.com/winfx/2006/xaml/presentation"


 xmlns:x

     ="http://schemas.microsoft.com/winfx/2006/xaml"


 xmlns:d

     ="http://schemas.microsoft.com/expression/blend/2008"


 xmlns:mc

     ="http://schemas.openxmlformats.org/markup-compatibility/2006"


 xmlns:ESRI

     ="clr-namespace:ESRI.ArcGIS.Client;assembly=ESRI.ArcGIS.Client"


 mc:Ignorable

     ="d"

     >


     <

     Grid

     x:Name

     ="LayoutRoot"

      Background

     ="White"

     >


     <

     ESRI:Map

     x:Name

     ="mymap"

     >


     <

     ESRI:Map.Layers

     >


     <

     ESRI:ArcGISTiledMapServiceLayer

     ID

     ="WorldImageLayer"

      x:Name

     ="WorldImageLayer"

      Initialized

     ="WorldImageLayer_Initialized"


Url

     ="http://services.arcgisonline.com/ArcGIS/rest/services/ESRI_Imagery_World_2D/MapServer"


     />


     </

     ESRI:Map.Layers

     >


     </

     ESRI:Map

     >


     </

     Grid

     >


     </

     UserControl

     >
       <

       Application.Resources

       >


       <

       Style

       x:Key

       ="rectBottom"

        TargetType

       ="Rectangle"

       >


       <

       Setter

       Property

       ="RadiusX"

        Value

       ="10"


       />


       <

       Setter

       Property

       ="RadiusY"

        Value

       ="10"


       />


       <

       Setter

       Property

       ="Fill"

        Value

       ="#22000000"


       />


       <

       Setter

       Property

       ="Canvas.Left"

        Value

       ="5"


       />


       <

       Setter

       Property

       ="Canvas.Top"

        Value

       ="5"


       />


       <

       Setter

       Property

       ="Width"

        Value

       ="215"


       />


       <

       Setter

       Property

       ="Height"

        Value

       ="110"


       />


       </

       Style

       >


       <

       Style

       x:Key

       ="rectMiddle"

        TargetType

       ="Rectangle"

       >


       <

       Setter

       Property

       ="RadiusX"

        Value

       ="10"


       />


       <

       Setter

       Property

       ="RadiusY"

        Value

       ="10"


       />


       <

       Setter

       Property

       ="Fill"

        Value

       ="#775C90B2"


       />


       <

       Setter

       Property

       ="Canvas.Left"

        Value

       ="0"


       />


       <

       Setter

       Property

       ="Canvas.Top"

        Value

       ="0"


       />


       <

       Setter

       Property

       ="Width"

        Value

       ="215"


       />


       <

       Setter

       Property

       ="Height"

        Value

       ="110"


       />


       <

       Setter

       Property

       ="Stroke"

        Value

       ="Gray"


       />


       </

       Style

       >


       <

       Style

       x:Key

       ="rectTop"

        TargetType

       ="Rectangle"

       >


       <

       Setter

       Property

       ="RadiusX"

        Value

       ="5"


       />


       <

       Setter

       Property

       ="RadiusY"

        Value

       ="5"


       />


       <

       Setter

       Property

       ="Fill"

        Value

       ="#FFFFFFFF"


       />


       <

       Setter

       Property

       ="Canvas.Left"

        Value

       ="10"


       />


       <

       Setter

       Property

       ="Canvas.Top"

        Value

       ="10"


       />


       <

       Setter

       Property

       ="Width"

        Value

       ="195"


       />


       <

       Setter

       Property

       ="Height"

        Value

       ="90"


       />


       <

       Setter

       Property

       ="Stroke"

        Value

       ="DarkGreen"


       />


       </

       Style

       >


       </

       Application.Resources

       >
1.地图范围
     private


     void

      WorldImageLayer_Initialized(

     object

      sender, EventArgs e)
{
Map1.ExtentChanged

     +=


     new

      EventHandler

     <

     ESRI.ArcGIS.ExtentEventArgs

     >

     (Map1_ExtentChange);
Map1.ExtentChanging

     +=


     new

      EventHandler

     <

     ESRI.ArcGIS.ExtentEventArgs

     >

     (Map1_ExtentChange);
}


     private


     void

      Map1_ExtentChange(

     object

      sender, ESRI.ArcGIS.ExtentEventArgs e)
{
TBextent.Text

     =


     string

     .Format(

     "

     地图范围:\nMinX:{0}\nMinY:{1}\nMaxX:{2}\nMaxY:{3}

     "

     ,
e.NewExtent.XMin, e.NewExtent.YMin, e.NewExtent.XMax, e.NewExtent.YMax);
}
Map控件里面已经封装了一些事件来供我们使用,我们可以在需要的时候捕获它们来进行处理。如果做过ArcGIS产品的二次开发,你应该已经想到我们要捕获的就是Map的ExtentChanged事件;而要在地图移动或者缩放的过程中也实时显示地图范围,则还要对ExtentChanging事件做处理。
2.地图坐标
     <!--

     mouse coords

     -->


     <

     Canvas

     Width

     ="215"

      Height

     ="110"

      Margin

     ="0,120,0,0"

      VerticalAlignment

     ="Top"

     >


     <

     Rectangle

     Style

     ="

     {StaticResource rectBottom}

     "


     />


     <

     Rectangle

     Style

     ="

     {StaticResource rectMiddle}

     "


     />


     <

     Rectangle

     Style

     ="

     {StaticResource rectTop}

     "


     />


     <

     StackPanel

     Orientation

     ="Vertical"

      Margin

     ="20,15,15,0"

     >


     <

     TextBlock

     x:Name

     ="TBscreencoords"


HorizontalAlignment

     ="Left"

      VerticalAlignment

     ="Center"

      Text

     ="屏幕坐标:"

      TextWrapping

     ="Wrap"

      FontWeight

     ="Bold"


     />


     <

     TextBlock

     x:Name

     ="TBmapcoords"


HorizontalAlignment

     ="Left"

      VerticalAlignment

     ="Center"

      Text

     ="地图坐标:"

      TextWrapping

     ="Wrap"

      FontWeight

     ="Bold"


     />


     </

     StackPanel

     >


     </

     Canvas

     >
那么接下来要捕捉那个事件呢?当然就是MouseMove啦。不过如果查看SilverlightAPI中的Map类,发现并没有这个事件。但要记住Map是继承自xaml中的Control,Control继承自FrameworkElement,FrameworkElement继承自UIElement,这里就有一个MouseMove事件了。所以Map控件的MouseMove是xaml中而不是Siverlight API中的事件(当然整个SilverlightAPI都是建立在xaml基础上的)。在ESRI:Map标签中添加一个MouseMove事件<ESRI:Map x:Name="Map1" MouseMove="Map1_MouseMove">
     private


     void

      Map1_MouseMove(

     object

      sender, MouseEventArgs e)
{


     if

      (Map1.Extent

     !=


     null

     )
{
System.Windows.Point screenPnt

     =

      e.GetPosition(Map1);
TBscreencoords.Text

     =


     string

     .Format(

     "

     屏幕坐标:\nX:{0},Y:{1}

     "

     , screenPnt.X, screenPnt.Y);

ESRI.ArcGIS.Geometry.MapPoint mapPnt

     =

      Map1.ScreenToMap(screenPnt);
TBmapcoords.Text

     =


     string

     .Format(

     "

     地图坐标:\nX:{0}\nY:{1}

     "

     , Math.Round(mapPnt.X,

     4

     ), Math.Round(mapPnt.Y,

     4

     ));
}
}
可以看到Map控件提供了屏幕与地图坐标之间转换的方法,好比开发人员的一座桥梁,用来往返于Silverlight特性与地图之间,非常方便。需要说明的是,这里GetPosition(Map1)获得的屏幕坐标是相对于Map控件的,而不是显示器的左上角。ok,继续来看第三部分。
3.Map里的动画效果
     <!--

     map animation slider

     -->


     <

     Canvas

     Width

     ="215"

      Height

     ="130"

      Margin

     ="0,240,0,0"

      VerticalAlignment

     ="Top"

     >


     <

     Rectangle

     Style

     ="

     {StaticResource rectBottom}

     "

      Height

     ="130"


     />


     <

     Rectangle

     Style

     ="

     {StaticResource rectMiddle}

     "

      Height

     ="130"


     />


     <

     Rectangle

     Style

     ="

     {StaticResource rectTop}

     "

      Height

     ="110"


     />


     <

     StackPanel

     Orientation

     ="Vertical"

      Margin

     ="20,15,15,0"

     >


     <

     TextBlock

     HorizontalAlignment

     ="Left"

      Text

     ="设置地图缩放动作持续时间:"

      TextWrapping

     ="Wrap"

      FontWeight

     ="Bold"


     />


     <

     TextBlock

     x:Name

     ="TBzoomdurationvalue"

      HorizontalAlignment

     ="Left"

      Text

     ="当前值:"

      TextWrapping

     ="Wrap"

      FontWeight

     ="Bold"


     />


     <

     Slider

     x:Name

     ="sliderzoomanimation"

      Orientation

     ="Horizontal"

      Minimum

     ="0"

      Maximum

     ="20"

      SmallChange

     ="1"


LargeChange

     ="5"

      Cursor

     ="Hand"

      ValueChanged

     ="slideranimation_ValueChanged"

      Width

     ="180"


     />


     <

     TextBlock

     HorizontalAlignment

     ="Left"

      Text

     ="设置地图平移动作持续时间:"

      TextWrapping

     ="Wrap"

      FontWeight

     ="Bold"


     />


     <

     TextBlock

     x:Name

     ="TBpandurationvalue"

      HorizontalAlignment

     ="Left"

      Text

     ="当前值:"

      TextWrapping

     ="Wrap"

      FontWeight

     ="Bold"


     />


     <

     Slider

     x:Name

     ="sliderpananimation"

      Orientation

     ="Horizontal"

      Minimum

     ="0"

      Maximum

     ="20"

      SmallChange

     ="1"


LargeChange

     ="5"

      Cursor

     ="Hand"

      ValueChanged

     ="slideranimation_ValueChanged"

      Width

     ="180"


     />


     </

     StackPanel

     >


     </

     Canvas

     >
当地图放大和平移时都可以看到平滑的效果,这归功于Silverlight的动画功能。Map在封装完动画效果后,给了我们两个属性来对它们进行设置:PanDuration和ZoomDuration,用于设置这两个动作持续的时间。它们都是TimeSpan类型的变量,合理的设置可以带来良好的用户体验。
     private


     void

      slideranimation_ValueChanged(

     object

      sender, RoutedPropertyChangedEventArgs

     <

     double

     >

      e)
 {
 Slider s

     =

      sender

     as

      Slider;


     if

      (s.Name

     ==


     "

     sliderzoomanimation

     "

     )
 {
 Map1.ZoomDuration

     =


     new

      TimeSpan(

     0

     ,

     0

     , Convert.ToInt32(sliderzoomanimation.Value));
 TBzoomdurationvalue.Text

     =


     string

     .Format(

     "

     当前值:{0}秒

     "

     , Convert.ToInt32(sliderzoomanimation.Value));
 }


     else


 {
 Map1.PanDuration

     =


     new

      TimeSpan(

     0

     ,

     0

     , Convert.ToInt32(sliderpananimation.Value));
 TBpandurationvalue.Text

     =


     string

     .Format(

     "

     当前值:{0}秒

     "

     , Convert.ToInt32(sliderpananimation.Value));
 }
 }
对应着地图效果,应该很容易理解。但是细心的朋友可能会发现,初始时值没有显示,不要紧,有办法解决,在页面初始函数中加入下面两句就可以了
TBzoomdurationvalue.Text = string.Format("当前值:{0}.{1}秒", Map1.ZoomDuration.Seconds, Map1.ZoomDuration.Milliseconds);
TBpandurationvalue.Text = string.Format("当前值:{0}.{1}秒", Map1.PanDuration.Seconds, Map1.PanDuration.Milliseconds);
4.设置全屏
     <!--

     operation info

     -->


     <

     Canvas

     Width

     ="215"

      Height

     ="110"

      Margin

     ="0,0,0,30"

      VerticalAlignment

     ="Bottom"

     >


     <

     Rectangle

     Style

     ="

     {StaticResource rectBottom}

     "


     />


     <

     Rectangle

     Style

     ="

     {StaticResource rectMiddle}

     "

      Fill

     ="#77FF0000"


     />


     <

     Rectangle

     Style

     ="

     {StaticResource rectTop}

     "


     />


     <

     TextBlock

     Margin

     ="20,15,15,0"

      Text

     ="地图操作提示: "


     >


     <

     LineBreak

     ></

     LineBreak

     >

     双击放大


     <

     LineBreak

     ></

     LineBreak

     >

     Shift+拖拽:放大到指定范围


     <

     LineBreak

     ></

     LineBreak

     >

      Ctrl+Shift+拖拽:缩小到指定范围


     </

     TextBlock

     >


     <

     ToggleButton

     x:Name

     ="TBfullscreen"

      Content

     ="点击切换地图全屏"

      HorizontalAlignment

     ="Center"

      Canvas.Left

     ="100"

      Canvas.Top

     ="15"

      Height

     ="30"

      Click

     ="TBfullscreen_Click"


     />


     </

     Canvas

     >
把以上代码放到Gridright Grid中
后台代码:
    private


    void

     TBfullscreen_Click(

    object

     sender, RoutedEventArgs e)
{
System.Windows.Interop.Content content

    =

     Application.Current.Host.Content;
content.IsFullScreen

    =!

    content.IsFullScreen;
}
5.比例尺
    <!--

    scale bar 放在LayoutRoot Grid中

    -->


    <

    Canvas

    HorizontalAlignment

    ="Left"

     VerticalAlignment

    ="Bottom"

     Margin

    ="10,0,0,20"

    >


    <

    ESRI:ScaleBar

    x:Name

    ="scalebar"

     MapUnit

    ="DecimalDegrees"

     DisplayUnit

    ="Kilometers"

     Background

    ="Red"

     FillColor1

    ="Black"

     FillColor2

    ="White"

     FontSize

    ="14"

     TextColor

    ="Black"

    />


    </

    Canvas

    >
在页面初始函数中加入
scalebar.Map = Map1;6.进度条
    <!--

    progressbar 放在LayoutRoot中

    -->


    <

    Grid

    HorizontalAlignment

    ="Center"

     x:Name

    ="progressGrid"

     VerticalAlignment

    ="Center"

     Width

    ="200"

     Height

    ="20"

     Margin

    ="5,5,5,5"

    >


    <

    ProgressBar

    x:Name

    ="MyProgressBar"

     Minimum

    ="0"

     Maximum

    ="100"


    />


    <

    TextBlock

    x:Name

    ="ProgressValueTextBlock"

     Text

    ="100%"

     HorizontalAlignment

    ="Center"

     VerticalAlignment

    ="Center"


    />


    </

    Grid

    >
<ESRI:Map x:Name="Map1" MouseMove="Map1_MouseMove" Progress="Map1_Progress" >
    private


    void

     Map1_Progress(

    object

     sender, ESRI.ArcGIS.Client.ProgressEventArgs e)
 {


    if

     (e.Progress

    <


    100

    )
 {
 progressGrid.Visibility

    =

     Visibility.Visible;
 MyProgressBar.Value

    =

     e.Progress;
 ProgressValueTextBlock.Text

    =

     String.Format(

    "

    正在处理 {0}%

    "

    , e.Progress);
 }


    else


 {
 progressGrid.Visibility

    =

     Visibility.Collapsed;
 }
 }
按照上面的步骤,就可以实现地图的一些基本操作,效果如开始的图片所示,在添加前台代码时注意添加的位置。我现在也是刚刚开始学习,欢迎大家提出问题,交流学习心得
事例源码下载