LXC相关简单介绍与使用
LXC相关简单介绍与使用
文章目录
- LXC相关简单介绍与使用
- 一、容器是什么?
- 二.Linux容器技术
- 三、LXC是什么?
- 四、docker容器编排
- 总结
一、容器是什么?
- 容器是一种基础工具;泛指任何可以用于容纳其他物品的工具,可以部分或完全封闭,被用于容纳、储存、运输物品;物体可以被放置在容器中,而容器则可以保护内容物;
- 人类使用容器的历史至少有十万年,甚至可能有数百万年的历史;
- 容器的类型
瓶 - 指口部比腹部窄小、颈长的容器
罐 - 指那些开口较大、一般为近圆筒形的器皿
箱 - 通常是立方体或圆柱体。形状固定
篮 - 以条状物编织而成
桶 - 一种圆柱形的容器
袋 - 柔性材料制成的容器,形状会受内容物而变化
瓮 - 通常是指陶制,口小肚大的容器
碗 - 用来盛载食物的容器
柜 - 指一个由盒组成的家具
鞘 - 用于装载刀刃的容器
传统虚拟化与容器的区别
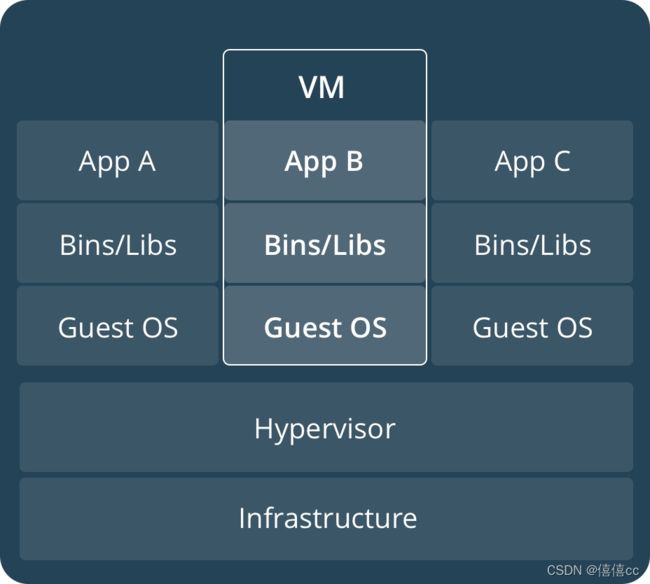
 虚拟化分为以下两类:
- 主机级虚拟化
全虚拟化
半虚拟化
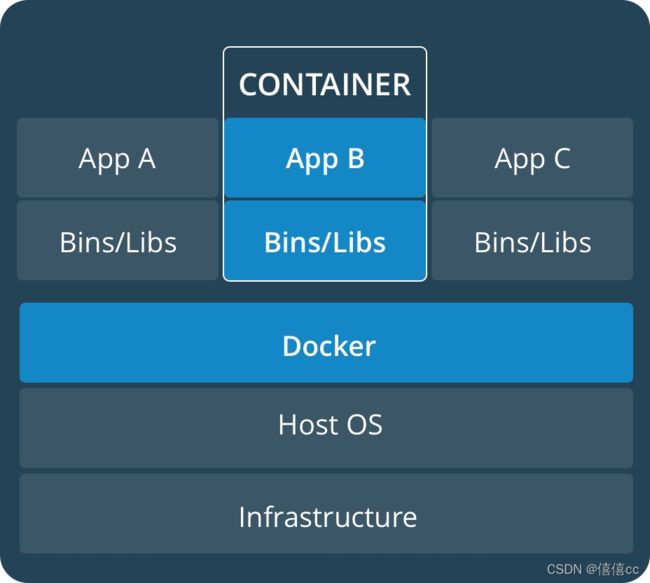
- 容器级虚拟化
容器分离开的资源:
- UTS(主机名与域名)
- Mount(文件系统挂载树)
- IPC
- PID进程树
- User
- Network(tcp/ip协议栈)
二.Linux容器技术
Linux容器其实并不是什么新概念。最早的容器技术可以追遡到1982年Unix系列操作系统上的chroot工具(直到今天,主流的Unix、Linux操作系统仍然支持和带有该工具)
CGroups
控制组(CGroups)是Linux内核的一个特性,用来对共享资源进行隔离、限制、审计等。只有能控制分配到容器的资源,Docker才能避免多个容器同时运行时的系统资源竞争。
控制组可以提供对容器的内存、CPU、磁盘IO等资源进行限制。
CGroups能够限制的资源有:
- blkio:块设备IO
- cpu:CPU
- cpuacct:CPU资源使用报告
- cpuset:多处理器平台上的CPU集合
- devices:设备访问
- freezer:挂起或恢复任务
- memory:内存用量及报告
- perf_event:对cgroup中的任务进行统一性能测试
- net_cls:cgroup中的任务创建的数据报文的类别标识符
具体来看,控制组提供如下功能:
- 资源限制(Resource
Limitting)组可以设置为不超过设定的内存限制。比如:内存子系统可以为进行组设定一个内存使用上限,一旦进程组使用的内存达到限额再申请内存,就会发出Out
of Memory警告 - 优先级(Prioritization)通过优先级让一些组优先得到更多的CPU等资源
- 资源审计(Accounting)用来统计系统实际上把多少资源用到合适的目的上,可以使用cpuacct子系统记录某个进程组使用的CPU时间
- 隔离(Isolation)为组隔离命名空间,这样一个组不会看到另一个组的进程、网络连接和文件系统
控制(Control)挂起、恢复和重启等操作
三、LXC是什么?
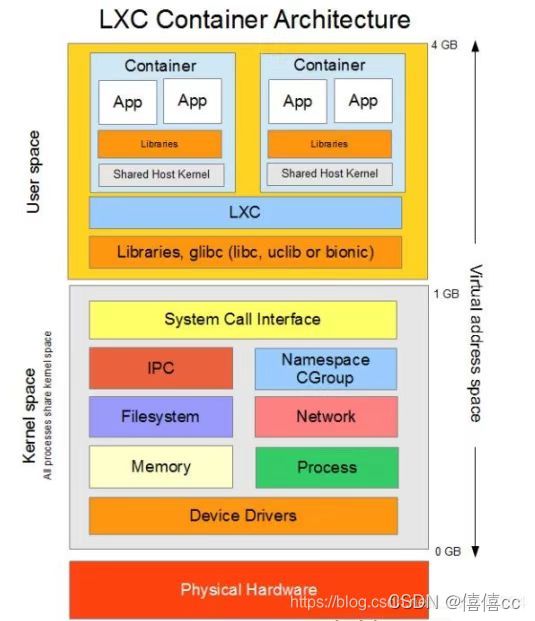
LXC(LinuX Containers)Linux容器,一种操作系统层虚拟化技术,为Linux内核容器功能的一个用户空间接口。它将应用软件系统打包成一个软件容器(Container),内含应用软件本身的代码,以及所需要的操作系统核心和库。透过统一的名字空间和共享API来分配不同软件容器的可用硬件资源,创造出应用程序的独立沙箱运行环境,使得Linux用户可以容易的创建和管理系统或应用容器。
在Linux内核中,提供了cgroups功能,来达成资源的隔离。它同时也提供了名称空间隔离的功能,使应用程序看到的操作系统环境被区隔成独立区间,包括进程树,网络,用户id,以及挂载的文件系统。但是cgroups并不一定需要启动任何虚拟机。
LXC利用cgroups与名称空间的功能,提供应用软件一个独立的操作系统环境。LXC不需要Hypervisor这个软件层,软件容器(Container)本身极为轻量化,提升了创建虚拟机的速度。
而Docker本质来说不是容器,而是容器的管理工具,最初的Docker也是基于LXC实现的。
LXC关键技术点:
- chroot,根切换,从容器内的角度来看,仿佛真的有自己的根树
- namespaces:名称空间,负责将资源隔离,比如pid,网络,mnt,user,uts等
- CGroups:控制组,负责控制资源的分配
LXC基础架构
 ## lxc基础操作
部署lxc
环境CentOS7
准备工作
#准备工作
[root@localhost ~]# yum -y install epel-release  //安装epel源

[root@localhost ~]# yum -y install lxc lxc-templates bridge-utils lxc-libs libcgroup libvirt perl debootstrap   //安装lxc的依赖包

#依赖包详解
lxc           #主程序包
lxc-templates #lxc的配置模板
bridge-utils  #网桥管理工具
lxc-libs      #lxc所需的库文件
libcgroup     #cgroup是为Linux内核提供任务聚集和划分的机制,通过一组参数集合将一些任务组织成一个或多个子系统。
libvirt       #管理Linux的虚拟化功能所需的服务器端守护程序。 需要针对特定驱动程序的管理程序。
启动服务
[root@localhost ~]# systemctl start lxc
[root@localhost ~]# systemctl start libvirtd
[root@localhost ~]# systemctl status lxc.service
● lxc.service - LXC Container Initialization and Autoboot Code
   Loaded: loaded (/usr/lib/systemd/system/lxc.service; disabled; vendor preset: disabled)
   Active: active (exited) since 日 2022-04-24 19:47:26 CST; 30s ago
  Process: 77992 ExecStart=/usr/libexec/lxc/lxc-autostart-helper start (code=exited, status=0/SUCCESS)
  Process: 77985 ExecStartPre=/usr/libexec/lxc/lxc-devsetup (code=exited, status=0/SUCCESS)
 Main PID: 77992 (code=exited, status=0/SUCCESS)
    Tasks: 0
   Memory: 0B
   CGroup: /system.slice/lxc.service
lxc-checkconfig 命令查看是否满足使用容器需求
[root@localhost ~]# lxc-checkconfig
Kernel configuration not found at /proc/config.gz; searching...
Kernel configuration found at /boot/config-3.10.0-1062.el7.x86_64
--- Namespaces ---
Namespaces: enabled
Utsname namespace: enabled
Ipc namespace: enabled
Pid namespace: enabled
User namespace: enabled
Warning: newuidmap is not setuid-root
Warning: newgidmap is not setuid-root
Network namespace: enabled
Multiple /dev/pts instances: enabled

--- Control groups ---
Cgroup: enabled
Cgroup clone_children flag: enabled
Cgroup device: enabled
Cgroup sched: enabled
Cgroup cpu account: enabled
Cgroup memory controller: enabled
Cgroup cpuset: enabled

--- Misc ---
Veth pair device: enabled
Macvlan: enabled
Vlan: enabled
Bridges: enabled
Advanced netfilter: enabled
CONFIG_NF_NAT_IPV4: enabled
CONFIG_NF_NAT_IPV6: enabled
CONFIG_IP_NF_TARGET_MASQUERADE: enabled
CONFIG_IP6_NF_TARGET_MASQUERADE: enabled
CONFIG_NETFILTER_XT_TARGET_CHECKSUM: enabled

--- Checkpoint/Restore ---
checkpoint restore: enabled
CONFIG_FHANDLE: enabled
CONFIG_EVENTFD: enabled
CONFIG_EPOLL: enabled
CONFIG_UNIX_DIAG: enabled
CONFIG_INET_DIAG: enabled
CONFIG_PACKET_DIAG: enabled
CONFIG_NETLINK_DIAG: enabled
File capabilities: enabled

Note : Before booting a new kernel, you can check its configuration
usage : CONFIG=/path/to/config /usr/bin/lxc-checkconfig
/usr/share/lxc/templates/ 此目录用于存放模板
[root@localhost ~]# ls /usr/share/lxc/templates/  //用于查看系统可用的lxc模板
lxc-alpine     lxc-centos    lxc-fedora        lxc-oracle  lxc-ubuntu-cloud
lxc-altlinux   lxc-cirros    lxc-gentoo        lxc-plamo
lxc-archlinux  lxc-debian    lxc-openmandriva  lxc-sshd
lxc-busybox    lxc-download  lxc-opensuse      lxc-ubuntu
[root@localhost ~]# lxc-create -t centos -n test
Copy /var/cache/lxc/centos/x86_64/7/rootfs to /var/lib/lxc/test/rootfs ...
Copying rootfs to /var/lib/lxc/test/rootfs ...
sed:无法读取 /var/lib/lxc/test/rootfs/etc/init/tty.conf:没有那个文件或目录
Storing root password in '/var/lib/lxc/test/tmp_root_pass'
chpasswd:无法打开 /etc/passwd
正在终止用户 root 的密码。
passwd: Libuser error at line: 425 - Error replacing `/etc/passwd': 权限不够.
passwd: 错误
sed:无法读取 /var/lib/lxc/test/rootfs/etc/rc.sysinit:没有那个文件或目录
sed:无法读取 /var/lib/lxc/test/rootfs/etc/rc.d/rc.sysinit:没有那个文件或目录

Container rootfs and config have been created.
Edit the config file to check/enable networking setup.

The temporary root password is stored in:

        '/var/lib/lxc/test/tmp_root_pass'   //存放初始密码的文件


The root password is set up as expired and will require it to be changed
at first login, which you should do as soon as possible.  If you lose the
root password or wish to change it without starting the container, you
can change it from the host by running the following command (which will
also reset the expired flag):

        chroot /var/lib/lxc/test/rootfs passwd  //修改密码的命令
修改密码
[root@localhost ~]# setenforce 0  //修改密码需要将selinux关闭

[root@localhost ~]# chroot /var/lib/lxc/test/rootfs passwd
更改用户 root 的密码 。
新的 密码:
重新输入新的 密码:
passwd:所有的身份验证令牌已经成功更新。
[root@localhost ~]# lxc-start -n test  //启动容器
lxc-start: conf.c: remount_all_slave: 4204 No such file or directory - Failed to make /run/media/kurumi/CentOS\0407\040x86_64 rslave
                                                   lxc-start: conf.c: remount_all_slave: 4205 Continuing...
                          systemd 219 running in system mode. (+PAM +AUDIT +SELINUX +IMA -APPARMOR +SMACK +SYSVINIT +UTMP +LIBCRYPTSETUP +GCRYPT +GNUTLS +ACL +XZ +LZ4 -SECCOMP +BLKID +ELFUTILS +KMOD +IDN)
Detected virtualization lxc.
Detected architecture x86-64.

Welcome to CentOS Linux 7 (Core)!

Running in a container, ignoring fstab device entry for /dev/root.
Cannot add dependency job for unit display-manager.service, ignoring: Unit not found.
[  OK  ] Started Dispatch Password Requests to Console Directory Watch.
[  OK  ] Created slice Root Slice.
[  OK  ] Created slice System Slice.
[  OK  ] Listening on Delayed Shutdown Socket.
[  OK  ] Listening on /dev/initctl Compatibility Named Pipe.
[  OK  ] Started Forward Password Requests to Wall Directory Watch.
[  OK  ] Reached target Paths.
[  OK  ] Created slice User and Session Slice.
[  OK  ] Reached target Swap.
[  OK  ] Created slice system-getty.slice.
[  OK  ] Listening on Journal Socket.
         Mounting Huge Pages File System...
         Starting Journal Service...
         Mounting POSIX Message Queue File System...
[  OK  ] Reached target Local Encrypted Volumes.
[  OK  ] Reached target Slices.
         Starting Remount Root and Kernel File Systems...
         Mounting FUSE Control File System...
[  OK  ] Reached target Remote File Systems.
         Starting Read and set NIS domainname from /etc/sysconfig/network...
[  OK  ] Mounted FUSE Control File System.
[  OK  ] Mounted POSIX Message Queue File System.
[  OK  ] Mounted Huge Pages File System.
[  OK  ] Started Journal Service.
[  OK  ] Started Read and set NIS domainname from /etc/sysconfig/network.
[  OK  ] Started Remount Root and Kernel File Systems.
         Starting Flush Journal to Persistent Storage...
[  OK  ] Reached target Local File Systems (Pre).
         Starting Configure read-only root support...
         Starting Rebuild Hardware Database...
<46>systemd-journald[15]: Received request to flush runtime journal from PID 1
[  OK  ] Started Flush Journal to Persistent Storage.
[  OK  ] Started Configure read-only root support.
         Starting Load/Save Random Seed...
[  OK  ] Reached target Local File Systems.
         Starting Mark the need to relabel after reboot...
         Starting Rebuild Journal Catalog...
         Starting Create Volatile Files and Directories...
[  OK  ] Started Load/Save Random Seed.
[  OK  ] Started Mark the need to relabel after reboot.
[  OK  ] Started Rebuild Journal Catalog.
[  OK  ] Started Create Volatile Files and Directories.
         Starting Update UTMP about System Boot/Shutdown...
[  OK  ] Started Update UTMP about System Boot/Shutdown.
[  OK  ] Started Rebuild Hardware Database.
         Starting Update is Completed...
[  OK  ] Started Update is Completed.
[  OK  ] Reached target System Initialization.
[  OK  ] Listening on D-Bus System Message Bus Socket.
[  OK  ] Reached target Sockets.
[  OK  ] Started Daily Cleanup of Temporary Directories.
[  OK  ] Reached target Timers.
[  OK  ] Reached target Basic System.
         Starting Login Service...
         Starting LSB: Bring up/down networking...
         Starting Permit User Sessions...
         Starting OpenSSH Server Key Generation...
[  OK  ] Started D-Bus System Message Bus.
[  OK  ] Started Permit User Sessions.
         Starting Cleanup of Temporary Directories...
[  OK  ] Started Command Scheduler.
[  OK  ] Started Console Getty.
[  OK  ] Reached target Login Prompts.
[  OK  ] Started Login Service.
[  OK  ] Started Cleanup of Temporary Directories.
[  OK  ] Started OpenSSH Server Key Generation.

CentOS Linux 7 (Core)
Kernel 3.10.0-1062.el7.x86_64 on an x86_64

test login: root   //root账户
Password:          //之前chroot创建的密码
<28>systemd-sysctl[297]: Failed to write '1' to '/proc/sys/fs/protected_symlinks': Read-only file system
[root@test ~]# ip a
1: lo: <LOOPBACK,UP,LOWER_UP> mtu 65536 qdisc noqueue state UNKNOWN group default qlen 1000
    link/loopback 00:00:00:00:00:00 brd 00:00:00:00:00:00
    inet 127.0.0.1/8 scope host lo
       valid_lft forever preferred_lft forever
    inet6 ::1/128 scope host
       valid_lft forever preferred_lft forever
5: eth0@if6: <BROADCAST,MULTICAST,UP,LOWER_UP> mtu 1500 qdisc noqueue state UP group default qlen 1000
    link/ether fe:a0:72:d8:3a:d0 brd ff:ff:ff:ff:ff:ff link-netnsid 0
    inet 192.168.146.128/24 brd 192.168.146.128 scope global dynamic eth0
       valid_lft 3302sec preferred_lft 3302sec
    inet6 fe80::fca0:72ff:fed8:3ad0/64 scope link
       valid_lft forever preferred_lft forever
另一台主机
[root@localhost ~]# lxc-info -n test  //查看容器相关信息
Name:           test
State:          RUNNING
PID:            92109
IP:             192.168.146.128
CPU use:        0.13 seconds
BlkIO use:      912.00 KiB
Memory use:     1.56 MiB
KMem use:       0 bytes
Link:           vethJ9X2KO
 TX bytes:      1.77 KiB
 RX bytes:      12.64 KiB
 Total bytes:   14.41 KiB
[root@localhost ~]# lxc-stop  //停止容器中所有的进程

lxc-console
//附加至指定容器的控制台;
格式:lxc-console -n NAME -t NUMBER

lxc-stop
//停止容器;

lxc-destory
//删除处于停机状态的容器;

lxc-snapshot
//创建和恢复快照;

//退出容器方式:<Ctrl+a q>
四、docker容器编排
当我们要去构建一个lnmp架构的时候,它们之间会有依赖关系,哪个应用应该在什么时候启动,在谁之前或之后启动,这种依赖关系我们应该要事先定义好,最好是按照一定的次序实现,而docker自身没有这个功能,所以我们需要一个在docker的基础上,能够把这种应用程序之间的依赖关系、从属关系、隶属关系等等反映在启动、关闭时的次序和管理逻辑中,这种功能被称为容器编排。
有了docker以后,运维的发布工作必须通过编排工具来实现容器的编排,如果没有编排工具,运维人员想去管理容器其实比直接管理程序要更加麻烦,增加了运维环境管理的复杂度。
常见的容器编排工具:
- machine+swarm(把N个docker主机当一个主机来管理)+compose(单机编排)
- mesos(实现统一资源调度和分配)+marathon kubernetes --> k8s