Vue Router基础 + Typescript语法
文章目录
- 前言
- 使用Vue CLI UI创建项目
- router-link和router-view
- 创建路由
- 懒加载路由/按需加载
-
- webpackChunkName
- Vue Router Active Class
- named routes/命名路由
- 动态路由:params/参数
-
- 访问路由参数
- 路由参数改变时重新渲染对应页面
- hash/history mode
- 将参数作为props传入组件
-
- 布尔模式
- 嵌套路由
- GoBack/返回
- 路由转换动画
- 404页面路由
- Navigation guard导航守卫
-
- beforeEnter路由独享的守卫
- beforeEach
-
- 身份认证中间件
- scrollBehavior
-
- 固定导航栏
- query parameters查询参数
- 其他细节
-
- data定义
- array find方法中的类型定义
- @Component
- 引入assets
- 限定范围的style
前言
这篇笔记是基于Vue School的Vue Router for Everyone课程的,课程使用的是JS语法,而我使用了TS语法支持,因此有很多改动的地方。
git地址: https://github.com/HaibiPeng/frontend-needtoknow/tree/master/vuejs-router-starter-files/vue-router-travel
使用Vue CLI UI创建项目
安装Vue CLI:
npm install -g @vue/cli
启动UI:
vue ui
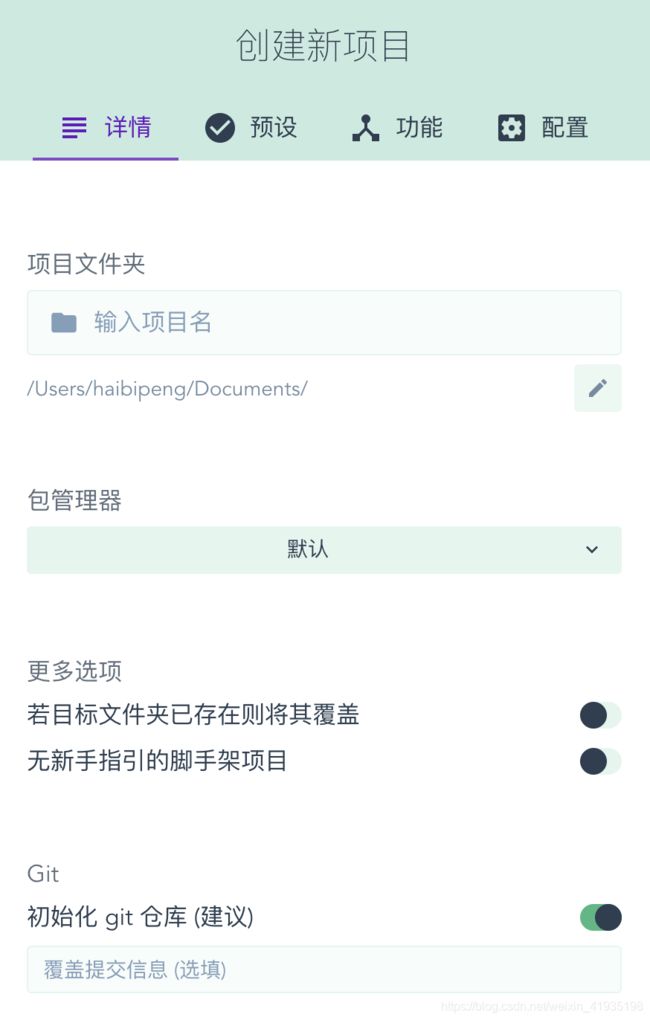
创建并配置项目:

手动配置项目:

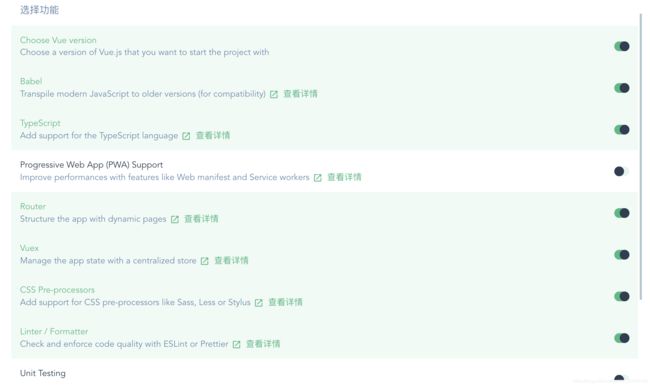
配置所需功能,可选的有TypeScript支持,Router,Vuex等

配置版本和具体的属性:
linter一般选用 ESLint + Prettier

创建完后在 任务-server中运行、停止和查看输出记录:

router-link和router-view
<div id="app">
  <h1>Hello App!h1>
  <p>


    <router-link to="/">Go to Homerouter-link>
    <router-link to="/about">Go to Aboutrouter-link>
  p>


  <router-view>router-view>
div>
创建路由
import Vue from "vue";
import VueRouter, { Route, RouteConfig } from "vue-router";
import Home from "../views/Home.vue";

Vue.use(VueRouter);

const routes: Array<RouteConfig> = [
  //使用object创建路由,常用key包括path/name/component/meta等
  {
    path: "/",
    name: "Home",
    component: Home,
    props: true,
  },
  //user路由
  {
    path: "/user",
    name: "user",
    component: () => import(/* webpackChunkName: "User" */ "../views/User.vue"),
    meta: { requiresAuth: true },
  },
];

const router = new VueRouter({
  routes,
});

export default router;
懒加载路由/按需加载
使用component: () => import(/* webpackChunkName: "User" */ "../views/User.vue")进行路由懒加载,只有在路由被访问的时候才加载对应组件
const routes: Array<RouteConfig> = [
  //使用object创建路由,常用key包括path/name/component/meta等
  {
    path: "/",
    name: "Home",
    component: Home,
    props: true,
  },
  //user路由
  {
    path: "/user",
    name: "user",
    component: () => import(/* webpackChunkName: "User" */ "../views/User.vue"),
    meta: { requiresAuth: true },
  },
];
webpackChunkName
webpackChunkName是webpack特性,magic comment,作用就是webpack在打包的时候,使用异步路由以及异步引入的库代码进行代码分割时(需要配置webpack的SplitChunkPlugin插件),为分割后的代码块命名。
-
import()异步加载的写法实现页面模块lazy loading懒加载(Vue中的路由异步加载):
Vue中运用import的懒加载语句以及webpack的魔法注释,在项目进行webpack打包的时候,对不同模块进行代码分割,加载时,用到哪个模块再加载哪个模块,实现懒加载进行页面的优化。 -
在动态import()代码处添加注释webpackChunkName告诉webpack打包后的chunk的名称(注释中的内容很重要,不能省掉),这里打包以后的name就是MyFile。
import(/* webpackChunkName: "MyFile" */`../containers/MyFile`)
- 大多数情况下我们使用动态import()是通过循环来做的,这样我们就不得不引入变量了,使用[request]来告诉webpack,这里的值是根据后面传入的字符串来决定,本例中就是变量pathName的值,具体如下:
import(/* webpackChunkName: "[request]" */`../containers/${pathName}`)
Vue Router Active Class
active-class是vue-router模块的router-link组件中的属性,用来做选中样式的切换。
直接在路由ts文件中配置linkActiveClass/linkExactActiveClass
const router = new VueRouter({
  //修改路由Active Class
  linkExactActiveClass: "vue-router-class",
  routes,
});
当路由被选中(active)时,可以设置其css样式,呈现不同的效果:
/* vue-router-class为在index.ts中修改过的Active Class */
#nav a.vue-router-class {
  color: #ab26ab;
}
named routes/命名路由
除了 path 之外,你还可以为任何路由提供 name。这有以下优点:
- 没有硬编码的 URL
- params 的自动编码/解码。
- 防止你在 url 中出现打字错误。
- 绕过路径排序(如显示一个)
即使用名称来代替url进行路由,同时注明路由中的参数来区别不同的路由:
<div v-for="destination in destinations" :key="destination.name">

  <router-link
    :to="{
      name: 'DestinationDetails',
      params: { slug: destination.slug },
    }"
  >
    <h2>{{ destination.name }}h2>
  router-link>
div>
可以结合v-for进行多个路由的渲染
动态路由:params/参数
我们经常需要把某种模式匹配到的所有路由,全都映射到同个组件。例如,我们有一个 User 组件,对于所有 ID 各不相同的用户,都要使用这个组件来渲染。那么,我们可以在 vue-router 的路由路径中使用 “动态路径参数”(dynamic segment) 来达到这个效果。
在path中,可以声明参数(path: "/destination/:slug"):
//多个路由地址
const routes: Array<RouteConfig> = [
  //named routes:动态路由
  {
    path: "/destination/:slug",
    name: "DestinationDetails",
    props: true,
    // route level code-splitting
    // this generates a separate chunk (about.[hash].js) for this route
    // which is lazy-loaded when the route is visited.
    component: () =>
      // webpack特性,magic comment,给chunk命名
      import(
        /* webpackChunkName: "DestinationDetails" */ "../views/DestinationDetails.vue"
      ),
]
访问路由参数
this.$route.params.id
路由参数改变时重新渲染对应页面
需要在router-view标签中声明对应的key:
<router-view :key="$router.path" />
当路由发生变化时,就会触发组件的重新渲染,用新数据渲染页面。
hash/history mode
mode是new Router({}) 内置参数
默认值: “hash” (浏览器环境) | “abstract” (Node.js 环境)
可选值: “hash” | “history” | “abstract”
配置路由模式:
hash: 使用 URL hash 值来作路由。支持所有浏览器,包括不支持 HTML5 History Api 的浏览器。
history: 依赖 HTML5 History API 和服务器配置。查看 HTML5 History 模式。
abstract: 支持所有 JavaScript 运行环境,如 Node.js 服务器端。如果发现没有浏览器的 API,路由会自动强制进入这个模式。
vue-router 默认 hash 模式 —— 使用 URL 的 hash 来模拟一个完整的 URL,于是当 URL 改变时,页面不会重新加载。
如果不想要很丑的 hash(#符号),我们可以用路由的 history 模式,这种模式充分利用 history.pushState API 来完成 URL 跳转而无须重新加载页面。
const router = new VueRouter({
  mode: "history",
  routes,
});
将参数作为props传入组件
在组件中使用 $route 会使之与其对应路由形成高度耦合,从而使组件只能在某些特定的 URL 上使用,限制了其灵活性。
使用 props 将组件和路由解耦:
布尔模式
如果 props 被设置为 true,route.params 将会被设置为组件属性。
声明props: true
{
    path: "/destination/:slug",
    name: "DestinationDetails",
    props: true,
}
在@Component中声明props:
@Component({
  props: {
    slug: {
      type: String,
      required: true,
    },
  },
  data() {
    return {
      //destinationId: this.$route.params.id as string,
      //slug: this.$route.params.slug as string,
    };
  },
export default class DestinationDetails extends Vue {}
这样就不需要使用this.$route来获取slug参数值了。此时参数可以是从input/路由/或其他途径获取。这样你便可以在任何地方使用该组件,使得该组件更易于重用和测试。
嵌套路由
URL 中各段动态路径也按某种结构对应嵌套的各层组件,例如:
/user/foo/profile                     /user/foo/posts
+------------------+                  +-----------------+
| User             |                  | User            |
| +--------------+ |                  | +-------------+ |
| | Profile      | |  +------------>  | | Posts       | |
| |              | |                  | |             | |
| +--------------+ |                  | +-------------+ |
+------------------+                  +-----------------+
借助 vue-router,使用嵌套路由配置,就可以很简单地表达这种关系。
在App.vue中:
<template>
  <div id="app">
    <div id="nav">
      <TheNavigation />
      <router-view :key="$route.path" />
    div>
  div>
template>
这里的
在DestinationDetail.vue中:
<section class="experiences">
  <h2>Top experiences in {{ destination.name }}h2>
  <div class="cards" id="experience">
    <div
      v-for="experience in destination.experiences"
      :key="experience.slug"
      class="card"
    >
      <router-link
        :to="{
          name: 'ExperienceDetails',
          params: { experienceSlug: experience.slug },
          hash: '#experience',
        }"
      >
      router-link>
    div>
  div>
  <transition name="slide" mode="out-in">
    <router-view :key="$router.path" />
  transition>
section>
要在嵌套的出口中渲染组件,需要在 VueRouter 的参数中使用 children 配置:
const routes: Array<RouteConfig> = [
  {
    path: "/destination/:slug",
    name: "DestinationDetails",
    props: true,
    component: () =>
      import(
        /* webpackChunkName: "DestinationDetails" */ "../views/DestinationDetails.vue"
      ),
    children: [
      {
        path: ":experienceSlug",
        name: "ExperienceDetails",
        props: true,
        component: () =>
          import(
            /* webpackChunkName: "ExperienceDetails" */ "../views/ExperienceDetails.vue"
          ),
      },
    ],
];
在children的path中,只需注明参数即可,base URL在父路由中已经定义了。
GoBack/返回
创建一个返回按钮组件:
<template>
  <span class="go-back">
    <button @click="goBack">Go Back</button>
  </span>
</template>

<script lang="ts">
import { Component, Vue } from "vue-property-decorator";

@Component({
  methods: {
    goBack() {
      return this.$router.go(-1);
    },
  },
})
export default class GoBack extends Vue {}
其中,使用this.$router.go()方法进行路由跳转,参数为可以为数字,-1表示上一个路由。
或者跳转到指定路由页面:
<button @click="goToLink">返回page1</button>
methods:{
  goToLink(){
    this.$router.push('/page1')
}
或者指定路由名称:
this.$router.push({name:'page1'})
路由转换动画
<transition name="fade" mode="out-in">
   <router-view :key="$route.path" />
 transition>
这个之后再补充
404页面路由
指定路由之外的所有路由都重定向到404页面,使用alias设置路由别名:
//404路由
{
  path: "/404",
  alias: "*",
  name: "NotFound",
  component: () =>
    import(/* webpackChunkName: "NotFound" */ "../views/NotFound.vue"),
},
“别名”的功能让你可以自由地将 UI 结构映射到任意的 URL,而不是受限于配置的嵌套路由结构。
我们不能将当前页面替换为一个用*命名的路由,因此需要用一个明确的路由地址来标识404
页面。此时可以用到alias设置路由别名:当用户访问一个不存在的页面时(路由匹配了*),用户将被“重定向”到404页面,此时URL将会保持为404,而不是*。
Navigation guard导航守卫
用来在加载目标路由页面之前检验目标地址实际上是否存在。
Vue有几种不同的导航守卫,可以把它们看成是Vue的生命周期钩子,让我们可以在导航起效之前或之后执行一些代码。
beforeEnter路由独享的守卫
可以在路由配置上(定义在了DestinationDetails上)直接定义 beforeEnter 守卫:
beforeEnter: (to, from, next) => {
  const exists = store.destinations.find(
    (destination) => (destination as Record<string, unknown>).slug === to.params.slug
  );
  if (exists) {
    next();
  } else {
    next({ name: "NotFound" });
  }
},
beforeEach
可以使用 router.beforeEach 注册一个全局前置守卫:
const router = new VueRouter({ ... })

router.beforeEach((to, from, next) => {
  // ...
})
当一个导航触发时,全局前置守卫按照创建顺序调用。守卫是异步解析执行,此时导航在所有守卫 resolve 完之前一直处于 等待中。
每个守卫方法接收三个参数:
-
to: Route: 即将要进入的目标 路由对象
-
from: Route: 当前导航正要离开的路由
-
next: Function: 一定要调用该方法来 resolve 这个钩子。执行效果依赖 next 方法的调用参数。
next('/') 或者 next({ path: '/' }): 跳转到一个不同的地址。当前的导航被中断,然后进行一个新的导航。你可以向 next 传递任意位置对象,且允许设置诸如 replace: true、name: 'home' 之类的选项以及任何用在 router-link 的 to prop 或 router.push 中的选项。
身份认证中间件
在login和invoices路由中添加meta字段(路由元信息),标识此路由需要登录认证后才能访问:
//user路由
  {
    path: "/user",
    name: "user",
    component: () => import(/* webpackChunkName: "User" */ "../views/User.vue"),
    meta: { requiresAuth: true },
  },
  {
    path: "/invoices",
    name: "invoices",
    component: () =>
      import(/* webpackChunkName: "Invoices" */ "../views/Invoices.vue"),
    meta: { requiresAuth: true },
  },
路由设置的每个路由对象被称为一个路由记录(route record),因为有嵌套路由的存在,可能会匹配一个以上的路由记录。
因此在全局前置守卫中,使用to.matched方法来匹配路由记录:
router.beforeEach((to, from, next) => {
  if (to.matched.some((record) => record.meta.requiresAuth)) {
    if (!store.user) {
      next({
        name: "login",
        query: { redirect: to.fullPath },
      });
    } else {
      next();
    }
  } else {
    next();
  }
});
scrollBehavior
使用前端路由,当切换到新路由时,想要页面滚到顶部,或者是保持原先的滚动位置,就像重新加载页面那样。 vue-router 能做到,而且更好,它让你可以自定义路由切换时页面如何滚动。
当创建一个 Router 实例,你可以提供一个 scrollBehavior 方法:
const router = new VueRouter({
  mode: "history",
  scrollBehavior(to: Route, from: Route, savedPosition: void | Position) {
    if (savedPosition) {
    //返回 savedPosition,在按下 后退/前进 按钮时,就会像浏览器的原生表现那样
      return savedPosition;
    } else {
      const position = {
        selector: "",
        offset: {} as Position,
      };
      //模拟“滚动到锚点”的行为
      //如果有hash(锚点)
      if (to.hash) {
        position.selector = to.hash;
        if (to.hash === "#experience") {
          position.offset = { x: 0, y: 140 };
        }
        //返回与指定的选择器组匹配的文档中的元素列表, 返回的对象是NodeList
        if (document.querySelector(to.hash)) {
          return position;
        }
        return null;
      }
    }
  },
  routes,
});
scrollBehavior 方法接收 to 和 from 路由对象。第三个参数 savedPosition 当且仅当 popstate 导航 (通过浏览器的 前进/后退 按钮触发) 时才可用。
这个方法返回滚动位置的对象信息,长这样:
{ x: number, y: number }
{ selector: string, offset? : { x: number, y: number }} (offset 只在 2.6.0+ 支持)
如果返回一个 falsy (译者注:falsy 不是 false,参考这里的值,或者是一个空对象,那么不会发生滚动。
scrollBehavior 方法的返回值savedPosition可以是一个位置信息或一个falsy值。
模拟“滚动到锚点”的行为,需要在router-link标签中添加对应的hash标识:
hash标识是一个id属性
同时要在对应的div标签中添加对应的id:
<div class="cards" id="experience">
	<div
	  v-for="experience in destination.experiences"
	  :key="experience.slug"
	  class="card"
	>
	  <router-link
	    :to="{
	      name: 'ExperienceDetails',
	      params: { experienceSlug: experience.slug },
	      hash: '#experience',
	    }"
	  >
	  router-link>
	div>
div>
固定导航栏
使用position: sticky;固定导航栏到顶端,同时使用z-index: 1;让导航栏一直在最上层,不会被遮盖。
#nav {
  display: flex;
  align-items: center;
  position: sticky;
  top: 0;
  background-color: white;
  border-bottom: 1px solid grey;
  z-index: 1;
}
query parameters查询参数
查询参数可以用来过滤或者搜索。
这里使用查询参数实现在用户登录后跳转到之前想要查看(需要认证)的页面:
methods: {
    login() {
      store.user = (this as unknown as Record<string, unknown>).username;
      const redirectPath = this.$route.query.redirect || "/";
      //this.$router.push("/user");
      this.$router.push(redirectPath as RawLocation);
    },
  },
同时在导航守卫的next()方法中添加对应的query属性,设置为to.fullpath:
next({
	name: "login",
	query: { redirect: to.fullPath },
});
其他细节
data定义
在store.ts中,需要对data进行类型定义:
interface StoreConfig {
  user: unknown;
  destinations: Array<unknown>;
}

const store: StoreConfig = {
  user: null,
  destinations: [
  ...
  ]
};

export default store;
array find方法中的类型定义
回调函数的参数需要定义对应类型:
computed: {
  destination() {
    return store.destinations.find(
      (destination) =>
        (destination as Record<string, unknown>).slug ==
        (this as unknown as Record<string, unknown>).slug
    );
  },
},
@Component
从JavaScript语法迁移到TypeScript语法,将export defaut转换为:
import { Component, Vue } from "vue-property-decorator";

@Component({
  props: {
  },
  components: {
  },
  data() {
    return {
    };
  },
  computed: {
  },
})
export default class DestinationDetails extends Vue {}
引入assets
使用:src="require(@/assets/${experience.image})"
<img
  :src="require(`@/assets/${experience.image}`)"
  alt="experience.name"
/>
限定范围的style
scoped标识标识style只对当前的view起作用:
<style scoped>
.form {
  display: flex;
  flex-direction: column;
  max-width: 400px;
  margin: 0 auto;
}
style>
