ubuntu22.04 pytorch gtx1080ti
Recently, I have updated my Ubuntu Operating System to version 22.04 and I find out that the installation of CUDA and Cudnn is much more simpler that earlier version. Therefore, I have decided to create this blog to help others setting up the environment easily.
Nvidia Drivers
Let’s us start with Installation of Nvidia Driver. Basically this driver is installed when we update our Ubuntu Operation System. Basically we need to know which driver has been used by our Operating System. In Ubuntu 22.04, we can click the “show application” on the bottom left and type in “additional driver” to check for the Nvidia Driver that we are using.

additional driver

Nvidia Drivers
As we can see, there are multiple Nvidia drivers and I have selected Nvidia-driver-525 to use. To install for multiple drivers, we can run these commands.
sudo apt update
sudo apt upgrade
sudo ubuntu-drivers autoinstall
reboot
nvidia-smi
Cuda Toolkits
Once we have chosen the Nvidia Driver (Nvidia-driver 525 for my case) suitable for us, we could start installing the Cuda toolkits.
sudo apt update
sudo apt upgrade
sudo apt install nvidia-cuda-toolkit
After installing the toolkit, we need to know the supported CuDNN version for the installed Cuda toolkits. We could run the following command.
nvcc --version
this is the output :

Suitable CuDNN version
CuDNN
From the output, we get to know the installed Cuda toolkits is version 11.x. Therefore, the corresponding CuDNN is Local Installer for Ubuntu22.04 x86_64 (Deb). If we go the nvidia CuDNN website, we will notice that there are 2 versions of CuDNN for Cuda 12.x and Cuda 11.x. We could choose another version of CuDNN Local Installer for Ubuntu22.04 x86_64 (Deb) if the installed Cuda is 12.x.
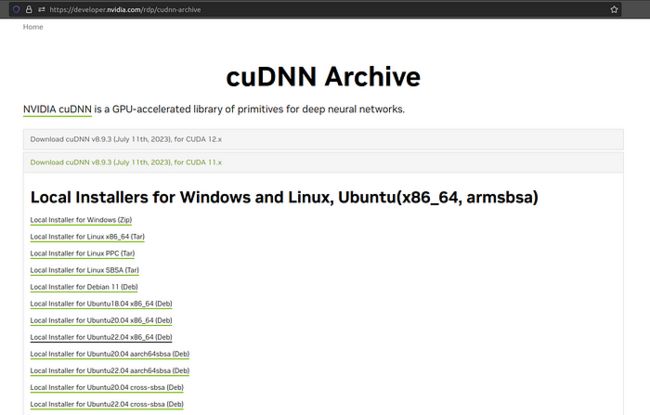
List of CuDNN
Once we have downloaded the suitable CuDNN, we could run the following command to install the CuDNN.
sudo dpkg -i cudnn-local-repo-ubuntu2204-8.9.3.28_1.0-1_amd64.deb
sudo cp /var/cudnn-local-repo-ubuntu2204-8.9.3.28/cudnn-local-7F7A158C-keyring.gpg /usr/share/keyrings/
After the command finish running, we are done with the installation! Before we celebrate the success, let’s us test the CUDA & CuDNN installation from virtual environment using torch library.
Virtual Environment
Installation of virtual environment can be done using the following scripts.
sudo apt-get install python3-pip
sudo pip3 install virtualenv
virtualenv -p py3.10 venv
source venv/bin/activate
CUDA & CuDNN test : pytorch & tensorflow
Installation of pytorch library can be done using the following scripts.
import torch
print(torch.cuda.is_available()) # should be True
in additional, we could test it using tensorflow.
pip3 install tensorflow
This python script can be used to do the test.
import tensorflow as tf
print("Num GPUs Available: ", tf.config.list_physical_devices('GPU') , len(tf.config.list_physical_devices('GPU')))
Once we see the following output, we can start celebrating by giving me a clap!!!
Num GPUs Available: [PhysicalDevice(name='/physical_device:GPU:0', device_type='GPU')] 1
Before leaving, I have a shameless promotion on my Udemy course : Practical Real-World SQL and Data Visualization. I have been working in the top travel platform company for years and I find that the free visualization tool, Metabase, is very useful. Therefore, I spend weekends creating the course and I wish you could benefit from the course. Lastly, I really appreciate if you could take a look on the course and even better, please help me to share the course with your friends just like I share the knowledge to you. Thank you!!!