PyQt5 实战记录1 如何进行资源打包
一、如何进行资源打包

1.在Qt 设计师 - Qt Designer 右下角资源浏览器中, 点击左上角的 编辑资源(铅笔图标) 进入编辑资源界面如上图左半部分,点击下方的打开资源,选择相应的qrc资源文件,如下图所示:
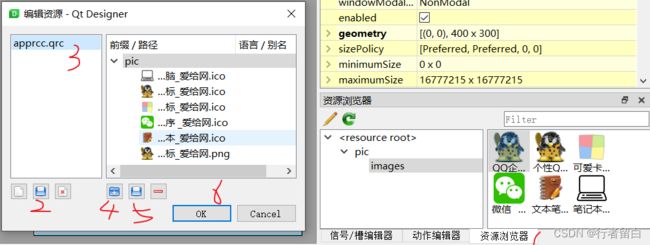
2. 这里选择了apprcc.qrc资源文件打开,然后选中apprcc.qrc文件 , -- 设置前缀 -- 添加文件 -- 添加ico图标文件,以及png图片文件。
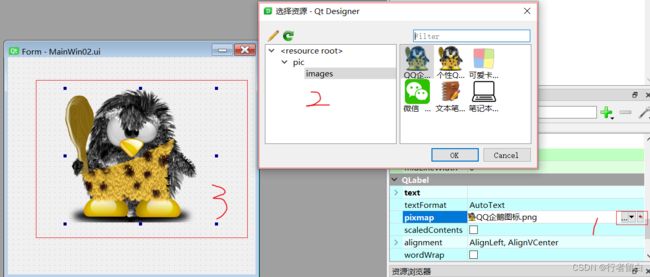
3.在MainWin02.ui中 插入 Label控件,属性编辑器中,属性 -- QLabel -- pixmap 选中资源中的一张图片。结果如下图所示。
MainWin02.py 相应的代码:
# -*- coding: utf-8 -*-

# Form implementation generated from reading ui file 'MainWin02.ui'
#
# Created by: PyQt5 UI code generator 5.15.4
#
# WARNING: Any manual changes made to this file will be lost when pyuic5 is
# run again.  Do not edit this file unless you know what you are doing.


from PyQt5 import QtCore, QtGui, QtWidgets


class Ui_Form(object):
    def setupUi(self, Form):
        Form.setObjectName("Form")
        Form.resize(400, 300)
        # 补充代码Label
        self.label = QtWidgets.QLabel(Form)
        self.label.setGeometry(QtCore.QRect(80, 0, 531, 321))
        self.label.setText("")
        self.label.setPixmap(QtGui.QPixmap(":/pic/images/QQ企鹅图标.png"))
        self.label.setObjectName("label")
        #

        self.retranslateUi(Form)
        QtCore.QMetaObject.connectSlotsByName(Form)

    def retranslateUi(self, Form):
        _translate = QtCore.QCoreApplication.translate
        Form.setWindowTitle(_translate("Form", "Form"))


import apprcc_rc
需要在py文件中导入相应的资源文件 `import apprcc-rc`
4.其中apprcc_rc.py文件由apprcc.qrc资源文件转化过来,用到了了pyqt5-tools 的命令
在终端(在资源文件apprcc.qrc对应的路径下)输入指令:
pyrcc5 -o apprcc_rc.py apprcc.qrc
然后apprcc_rc.py 代码如下图所示,省略了很多字节串代码
# -*- coding: utf-8 -*-

# Resource object code
#
# Created by: The Resource Compiler for PyQt5 (Qt v5.15.2)
#
# WARNING! All changes made in this file will be lost!

from PyQt5 import QtCore

qt_resource_data = b"\
\x00\x01\x85\x5e\
...
# 省略多行
\xff\xff\xff\xff\xff\xff\xff\xff\xff\xff\xff\xff\xff\
"

qt_resource_name = b"\
\x00\x03\
...
\x67\x2c\x7b\x14\x8b\xb0\x67\x2c\x00\x2e\x00\x69\x00\x63\x00\x6f\
"

qt_resource_struct_v1 = b"\
\x00\x00\x00\x00\x00\x02\x00\x00\x00\x01\x00\x00\x00\x01\
....
\x00\x00\x00\x90\x00\x00\x00\x00\x00\x01\x00\x01\xfa\x29\
"

qt_resource_struct_v2 = b"\
\x00\x00\x00\x00\x00\x02\x00\x00\x00\x01\x00\x00\x00\x01\
\x00\x00\x00\x00\x00\x00\x00\x00\
....
\x00\x00\x01\x80\x8c\xe9\x29\xa3\
"

qt_version = [int(v) for v in QtCore.qVersion().split('.')]
if qt_version < [5, 8, 0]:
    rcc_version = 1
    qt_resource_struct = qt_resource_struct_v1
else:
    rcc_version = 2
    qt_resource_struct = qt_resource_struct_v2

def qInitResources():
    QtCore.qRegisterResourceData(rcc_version, qt_resource_struct, qt_resource_name, qt_resource_data)

def qCleanupResources():
    QtCore.qUnregisterResourceData(rcc_version, qt_resource_struct, qt_resource_name, qt_resource_data)

qInitResources()
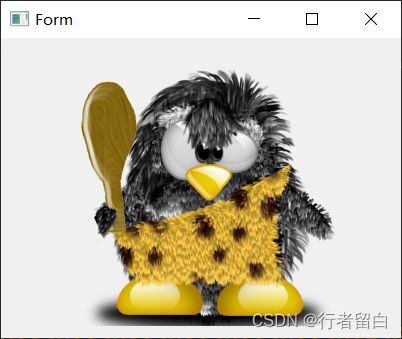
最后通过运行 CallMainWin02_.py 运行结果如下:
对应的 CallMainWin02_.py 文件代码如下:
import sys
from PyQt5.QtWidgets import QApplication, QMainWindow
from MainWin02 import Ui_Form


class MyMainWindow(QMainWindow, Ui_Form):
    def __init__(self, parent=None):
        super(MyMainWindow, self).__init__(parent)
        self.setupUi(self)


if __name__ == '__main__':
    app = QApplication(sys.argv)
    myWin = MyMainWindow()
    myWin.show()
    sys.exit(app.exec_())