Android设计模式详解之外观模式
前言
外观模式也称门面模式,在开发过程中的运用频率非常高;
定义:要求一个子系统的外部与其内部的通信必须通过一个统一的对象进行;门面模式提供一个高层次的接口,使得子系统更易于使用;
使用场景:
- 为一个复杂子系统提供一个简单接口;外观模式可以提供一个简单统一的接口,对外隐藏子系统的具体实现、隔离变化;
- 需要构建一个层次结构的子系统时,使用门面模式定义子系统中每层的入口点;如果子系统之间是相互依赖的,你可以让他们仅通过门面接口进行通信,从而简化它们之间的依赖关系;
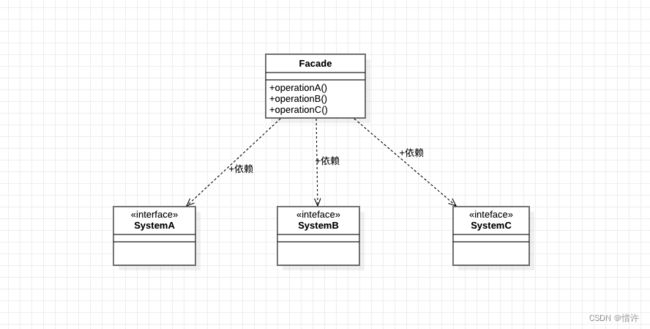
UML类图:

Facade:系统对外的统一接口,系统内部系统地工作;
SystemA、SystemB、SystemC:子系统接口;
外观模式比较简单,就是通过一个统一的接口对外提供服务,使得外部程序只通过一个类就可以实现系统内部的多种功能;
示例代码
这里以手机功能举例,手机集合了电话、拍照功能,通过手机就可以完成各种功能,而不是说打电话需要一个手机,拍照还需要一个相机;下面我们就使用外观模式进行实现;
- 定义相机接口,
Camera
/**
 * 相机接口
 */
interface Camera {

    /**
     * 打开相机
     */
    fun open()

    /**
     * 拍照
     */
    fun takePicture()

    /**
     * 关闭相机
     */
    fun close()
}
- 定义相机实现类,
CameraImpl
/**
 * 相机实现类,相当于子接口
 */
class CameraImpl : Camera {
    override fun open() {
        println("打开相机")
    }

    override fun takePicture() {
       println("相机拍照")
    }

    override fun close() {
        println("关闭相机")
    }
}
- 定义电话功能接口,
Phone
/**
 * 电话功能
 */
interface Phone {

    /**
     * 打电话
     */
    fun dail()

    /**
     * 挂断
     */
    fun hangup()
}
- 定义电话功能实现类,
PhoneImpl
/**
 * 电话实现类,相当于子系统
 */
class PhoneImpl : Phone {
    override fun dail() {
        println("打电话")
    }

    override fun hangup() {
        println("挂断电话")
    }
}
- 定义手机类,
Mobile
/**
 * 启动电脑,系统统一接口
 */
class Mobile {
    private val phone = PhoneImpl()
    private val camera = CameraImpl()

    /**
     * 视频通话
     */
    fun videochat() {
        println("视频通话中")
        camera.open()
        phone.dail()
    }

    /**
     * 拍照
     */
    fun takePicture() {
        camera.takePicture()
    }

    /**
     * 挂断电话
     */
    fun hangup() {
        phone.hangup()
    }


}
- 编写测试代码
object Test {

    @JvmStatic
    fun main(args: Array<String>) {
       val mobile = Mobile()
        mobile.videochat()
        println("-----------------")
        mobile.hangup()
        println("-----------------")
        mobile.takePicture()

    }
}
代码输出结果如下:
视频通话中
打开相机
打电话
-----------------
挂断电话
-----------------
相机拍照
Android源码中的外观模式
ContextImpl类
class ContextImpl extends Context {

    @Override
    public void startActivity(Intent intent, Bundle options) {
		...
        mMainThread.getInstrumentation().execStartActivity(
                getOuterContext(), mMainThread.getApplicationThread(), null,
                (Activity) null, intent, -1, options);
    }

	 @Override
    public ComponentName startService(Intent service) {
        warnIfCallingFromSystemProcess();
        return startServiceCommon(service, false, mUser);
    }

private ComponentName startServiceCommon(Intent service, boolean requireForeground,
            UserHandle user) {
        try {
            validateServiceIntent(service);
            service.prepareToLeaveProcess(this);
            ComponentName cn = ActivityManager.getService().startService(
                    mMainThread.getApplicationThread(), service,
                    service.resolveTypeIfNeeded(getContentResolver()), requireForeground,
                    getOpPackageName(), getAttributionTag(), user.getIdentifier());
   				...
            }
            return cn;
        } catch (RemoteException e) {
            throw e.rethrowFromSystemServer();
        }
    }


    @Override
    public void sendBroadcast(Intent intent) {
        warnIfCallingFromSystemProcess();
        String resolvedType = intent.resolveTypeIfNeeded(getContentResolver());
        try {
            intent.prepareToLeaveProcess(this);
            ActivityManager.getService().broadcastIntentWithFeature(
                    mMainThread.getApplicationThread(), getAttributionTag(), intent, 			resolvedType,
                    null, Activity.RESULT_OK, null, null, null, AppOpsManager.OP_NONE, null, false,
                    false, getUserId());
        } catch (RemoteException e) {
            throw e.rethrowFromSystemServer();
        }
    }
}
可以看到ContextImpl封装了startActivity、startService、sendBroadcast一系列核心方法,而各个方法内部又是通过调用其它类来实现的,很明显是外观模式;
Retrofit类,感兴趣的小伙伴可以查看Retrofit原理解析(二)
总结
优点:
- 对客户程序隐藏子系统的细节,减少客户端对于子系统的耦合,能够拥抱变化;
- 外观类对子系统的接口封装,使得系统更易于使用;
缺点:
- 外观类接口膨胀,由于子系统的接口都有外观类统一对外暴露,使得外观类API接口较多,在一定程度上增加了用户使用成本;
- 外观类没有遵循开闭原则,当业务出现变更时,需要直接修改外观类;
结语
如果以上文章对您有一点点帮助,希望您不要吝啬的点个赞加个关注,您每一次小小的举动都是我坚持写作的不懈动力!ღ( ´・ᴗ・` )