Springboot实战——CRUD实验
CRUD实验
-
-
- Thymeleaf模板引擎:
- 用户登录操作
- 拦截器设置
- CRUD文件设置
- 员工添加页面:
- 添加操作设置
- 日期格式化
- 员工修改
- 员工删除功能
-
Thymeleaf模板引擎:
Thymeleaf用于创建HTML模板,该模板可用浏览器直接打开。把各个用户公用的页面提取,根据不同的数据对页面进行渲染。
@ConfigurationProperties(
    prefix = "spring.thymeleaf"
)
public class ThymeleafProperties {
    private static final Charset DEFAULT_ENCODING = Charset.forName("UTF-8");
    private static final MimeType DEFAULT_CONTENT_TYPE = MimeType.valueOf("text/html");
    public static final String DEFAULT_PREFIX = "classpath:/templates/";
    public static final String DEFAULT_SUFFIX = ".html";
设置了前缀是类路径的templates,后缀是.html,controller注解类里面的postmapping注解类返回的string只需要文件名,即可被识别为templates中的html文件,thymeleaf即可对html页面自动渲染。
对使用themeleaf语法的HTML文件导入thymeleaf名称空间:
<html lang="en" xmlns:th="http://www.thymeleaf.org">
注解与application.properties里面thymeleaf相关联:

用户登录操作

postmapping中为URL地址,登录失败,返回login.html,返回登录界面
自定义MvcConfig类处理Url映射:
addvViewController可以便捷地实现请求跳转,格式如下:addViewController(浏览器请求路径),setViewName(请求跳转到的文件路径),success被thymeleaf识别为resource下的html文件
@Configuration
public class MyMvcConfig extends WebMvcConfigurerAdapter {//WebMvcConfigurerAdapter来SpringMvc功能
@Override
public void addViewControllers(ViewControllerRegistry registry) {
   // super.addViewControllers(registry);
    //浏览器发送 /atguigu 请求来到 success
    registry.addViewController("/atguigu").setViewName("success");
}
... ...
}
对于加入其它的WebMvcConfigurerAdapter,只需要加入容器,项目启动时,便会一起生效:
@Bean //将组件注册在容器
public WebMvcConfigurerAdapter webMvcConfigurerAdapter(){
    WebMvcConfigurerAdapter adapter = new WebMvcConfigurerAdapter() {
        @Override
        public void addViewControllers(ViewControllerRegistry registry) {
            registry.addViewController("/").setViewName("login");
            registry.addViewController("/index.html").setViewName("login");
            registry.addViewController("/main.html").setViewName("dashboard");
        }
由于配置文件写了项目路径为/crud,所以请求路径前添上/crud:

拦截器设置
//拦截器
public class LoginHandlerInterceptor implements HandlerInterceptor {
    //目标方法执行之前
    @Override
    public boolean preHandle(HttpServletRequest request, HttpServletResponse response, Object handler) throws Exception {
        Object user = request.getSession().getAttribute("loginUser");
        if(user == null){
            //未登陆,返回登陆页面
            request.setAttribute("msg","没有权限请先登陆");
            request.getRequestDispatcher("/index.html").forward(request,response);
            return false;
        }else{
            //已登陆,放行请求
            return true;
        }
 }
其中:request.getSession()可以帮你得到HttpSession类型的对象,通常称之为session对象,它的作用域为一次会话
session对象:在ASP中代表了服务器与客户端之间的“会话”。Session的作用时间从用户到达某个特定的Web页开始,到该用户离开Web站点,或在程序中利用代码终止某个Session结束 。
loginUser是成功登陆后session设置的值(用户名):
 在MvcConfig中注册拦截器:
//注册拦截器
            @Override
            public void addInterceptors(InterceptorRegistry registry) {
               registry.addInterceptor(new LoginHandlerInterceptor()).addPathPatterns("/**")
                        .excludePathPatterns("/index.html","/","/user/login");//排除对这几个路径的拦截
            }
        };
CRUD文件设置
跳转设置:
从员工列表页面点击“员工添加”来到emp的URL地址从而来到添加页面:(list.html文件中)
![]() 从emp请求到添加页面
从emp请求到添加页面
 从bootstrap中复制表单到resources下template下的HTML文件,并加以修改
员工添加页面:
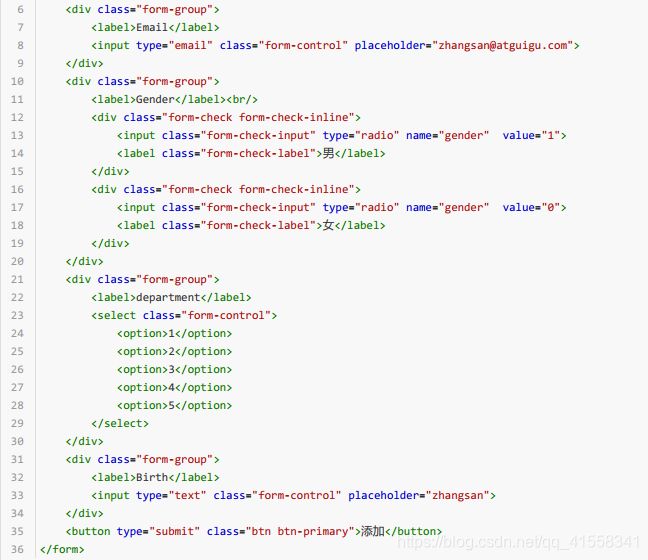
add.html为添加页面,main里面的内容即为要添加时的列表内容,是一个form表单:


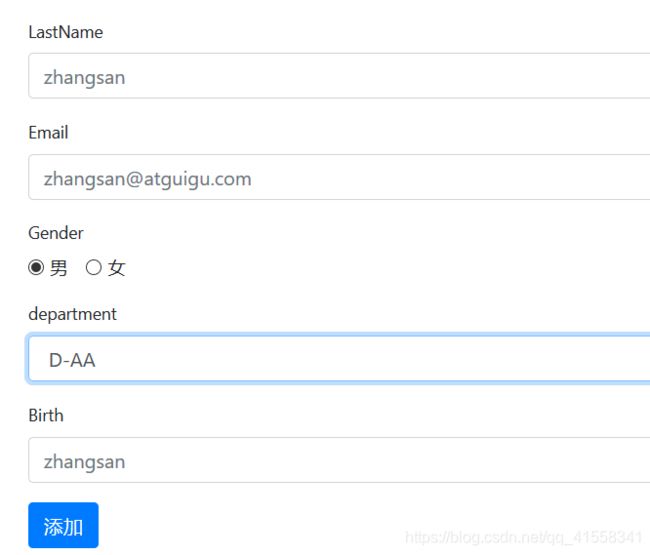
 由于部门显示的是默认的1234,需要修改本demo的部门名字,
注入departmentDao,将获取的部门放入depts中,来方便HTML文件的使用:
 提交部门id,对部门进行遍历,将部门名字写入标签内的值
 对应界面显示效果:

添加操作设置
在当前目录下发送emp请求,post方式为添加,对应postMapping,当点击button按钮后,submit对应post方式,跳转到emp
![]()
![]()
//员工添加,
//SpringMVC自动将请求参数和入参对象的属性进行一一绑定;要求请求参数的名字和javaBean入参的对象里面的属性名是一样的
即emp请求后跟的参数值是employee对象的属性值
@PostMapping("/emp")
public String addEmp(Employee employee){
    //来到员工列表页面
    System.out.println("保存的员工信息:"+employee);
    //保存员工
    employeeDao.save(employee);
    // redirect: 表示重定向到一个地址  /代表当前项目路径
    // forward: 表示转发到一个地址
    return "redirect:/emps";
}
员工添加:对add.html的修改说明
input表示要提交,name是各label里面对应需要提交的属性,对部门来说,需要提交部门id
<div class="form-group">
   <label>LastName</label>
   <input name="lastName" type="text" class="form-control" placeholder="zhangsan" th:value="${emp!=null}?${emp.lastName}">
</div>

<div class="form-group">
   <label>department</label>
   <!--提交的是部门的id-->
   <select class="form-control" name="department.id">
      <option th:selected="${emp!=null}?${dept.id == emp.department.id}"
            th:value="${dept.id}" th:each="dept:${depts}" th:text="${dept.departmentName}">1</option>
   </select>
</div>
日期格式化
![]() 输入时期只能用上述配置文件设定的格式。
输入时期只能用上述配置文件设定的格式。
list.html文件存放标签跳转url的逻辑:
![]()
![]() 分别对应添加和编辑按钮的URL跳转。
分别对应添加和编辑按钮的URL跳转。

员工修改
点击修改,需要显示员工部门信息,获取所有的department存到depts,对depts进行遍历,当符合emp当前部门时,选中该部门信息,显示出来


员工修改时对birth的操作需要转换为指定格式,输出时格式统一:
 员工修改需要指定为put方式,由于该表单已经为post,故不需要再创建了。当已经有emp时,则生成input项,并指定请求方式为put,当点击button,submit提交即是put方式
 当员工修改时,需要提交员工ID,生成ID标签:
 员工修改功能实现:
//员工修改;需要提交员工id;
@PutMapping("/emp")
public String updateEmployee(Employee employee){
    System.out.println("修改的员工数据:"+employee);
    employeeDao.save(employee);
    return "redirect:/emps";//修改完跳转到员工列表页面
}
员工删除功能
为了实现删除员工时重复制造表单导致员工列表项大小不一致的情况,将form放在main标签外部,并未删除按钮绑定单击事件deleteBtn,form表单为post表单,且请求方式为delete,
为每个按钮添加自定义属性attr为crud/emp/id
 用js方式获取单击事件,然后改变表单的action(delete方式对应deleteMapping)地址,地址改为某个具体指定的员工id表单,也就是del_uri。

删除方法实现:
//员工删除
@DeleteMapping("/emp/{id}")
public String deleteEmployee(@PathVariable("id") Integer id){
    employeeDao.delete(id);
    return "redirect:/emps";
}
至此,基于springboot的员工列表crud实验完结。


