Openstack ocata版安装
Openstack ocata版
目录
- Openstack ocata版
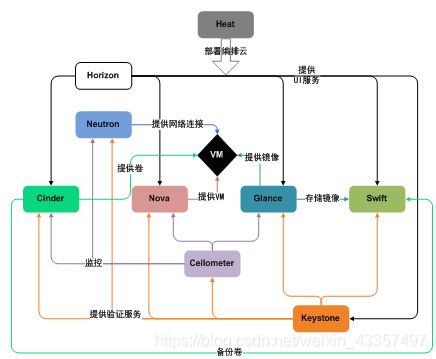
- 1. Openstack基础架构
- 2. Openstack部署安装ocata 版
-
- 2.1 准备环境
-
- 2.1.1 时间同步
- 2.1.2 配置YUM源,并安装客户端
- 2.1.3 安装数据库
- 2.1.4 安装消息列队rabbitmq
- 2.1.5 安装memcache缓存
- 2.1.6 检查端口是否启动
- 2.2 安装keystone认证服务
- 2.3 安装glance服务
- 2.4 安装nova服务
-
- 2.4.1 控制节点安装nova服务
- 2.4.2 计算节点安装nova服务
- 2.5 安装neutron服务
-
- 2.5.1控制节安装neutron服务
- 2.5.2 计算节点安装neutron服务
- 2.6 安装dashboard服务
- 2.7 启动一个实例
- 3. glance服务迁移(扩展)
- 4. cinder块存储服务
-
- 4.1 控制节点安装cinder服务
- 4.2 存储节点安装cinder服务
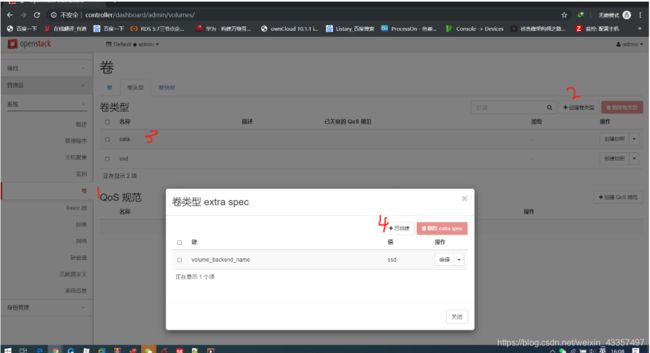
- 4.3 web界面创建卷类型并关联extra spec
- 5. cinder对接nfs后端存储服务(扩展)
- 6. 把控制节点兼职计算节点(扩展)
- 7 .openstack云主机冷迁移(扩展)
- 8. 设置Vxlan网络配置(扩展)
-
- 8.1. 控制节点操作
- 8.2 计算节点操作
- 8.3 控制节点验证
- 8.4 dashboard需要开启route
- 8.5.web界面操作
-
- 8.5.1 创建私有网络一个网络
- 8.5.2 将访问往外的网络改为外部网络
- 8.5.3 添加路由
- 8.5.4 私有网络关联到路由中
- 8.5.5 启动一个实例创建的时候选择私有网络
- 8.5.6 添加浮动ip地址 便于外部访问内部
- openstack 命令
-
- 1 openstack,用户,项目,角色的关系
1. Openstack基础架构
-
核心服务
- Dashboard控制台 :web方式管理云平台,建云主机,分配网络,配安全组,加云盘。
- Nova计算:负责响应虚拟机创建请求、调度、销毁云主机
- Neutron网络:实现SDN(软件定义网络),提供一整套API,用户可以基于该API实现自己定义专属网络,不同厂商可以基于此API提供自己的产品实现
-
储存服务
- Swift对象存储 :REST风格的接口和扁平的数据组织结构。RESTFUL HTTPAPI来保存和访问任意非结构化数据,ring环的方式实现数据自动复制和高度可以扩展架构,保证数据的高度容错和可靠性
- Cinder块存储:提供持久化块存储,即为云主机提供附加云盘。
-
共享服务
- Keystone.认证服务 :为访问openstack各组件提供认证和授权功能,认证通过后,提供一个服务列表(存放你有权访问的服务),可以通过该列表访问各个组件。
- Glance镜像服务: 为云主机安装操作系统提供不同的镜像选择
- Ceilometer计费服务 :
收集云平台资源使用数据,用来计费或者性能监控
2. Openstack部署安装ocata 版
官方文档
https://docs.openstack.org/ocata/zh_CN/install-guide-rdo/environment-packages.html
镜像下载网站
http://mirrors.ustc.edu.cn/centos-cloud/centos/7/images/ 国内中科大
https://docs.openstack.org/image-guide/obtain-images.html 官方镜像
queens版yum仓库
rpm -ivh http://mirrors.aliyun.com/epel/epel-release-latest-7.noarch.rpm
curl -o /etc/yum.repos.d/epel.repo http://mirrors.aliyun.com/repo/epel-7.repo
curl -o /etc/yum.repos.d/CentOS-Base.repo http://mirrors.aliyun.com/repo/Centos-7.repo
yum install -y centos-release-openstack-queens
2.1 准备环境
| 主机名称 | 角色 | IP | 内存 |
|---|---|---|---|
| controller | 控制节点 | 192.168.10.9 | 4G |
| compute1 | 计算节点 | 192.168.10.10 | 1G |
添加hosts文件
192.168.10.9 controller
192.168.10.10 compute1
2.1.1 时间同步
#服务端
1:安装chrony
yum install chrony
vim /etc/chrony.conf
	allow 192.168.10.0/24
systemctl restart chronyd
systemctl enable chronyd

#客户端
1:#安装chrony
yum install chrony
sed -ri '/^server/d' /etc/chrony.conf
sed -ri '3aserver 192.168.10.9 iburst' /etc/chrony.conf
systemctl restart chronyd
2:#设置每隔一小时同步一次
crontab -e
* */1 * * * /usr/bin/systemctl restart chronyd
2.1.2 配置YUM源,并安装客户端
#所有节点
1:#安装阿里BASH仓库
curl -o /etc/yum.repos.d/CentOS-Base.repo http://mirrors.aliyun.com/repo/Centos-7.repo


2:#安装OpenStack仓库
openstack_ocata_rpm.tar.gz下载
链接:https://pan.baidu.com/s/1UDDJ5gdhQHbU1iKUv4ijGA
提取码:oc1c
复制这段内容后打开百度网盘手机App,操作更方便哦
上传到系统中
tar zxvf openstack_ocata_rpm.tar.gz -C /tmp
cat >/etc/yum.repos.d/openstack.repo <<-EOF
[openstack]
name=openstack
baseurl=file:///tmp/repo
enabled=1
gpgcheck=0
EOF

3:#验证 清楚缓存
yum clean all
yum install python-openstackclient -y
2.1.3 安装数据库
#控制节点
1:安装软件包
yum install mariadb mariadb-server python2-PyMySQL
#openstack是由python开发所以需要python2-PyMySQL用来连接数据库

2:#修改mariadb配置文件
vim /etc/my.cnf.d/openstack.cnf
[mysqld]
bind-address = 192.168.10.9
default-storage-engine = innodb
innodb_file_per_table = on
max_connections = 4096
collation-server = utf8_general_ci
character-set-server = utf8

3:#启动数据库
systemctl enable mariadb.service
systemctl start mariadb.service

4:#mariadb安全初始化
mysql_secure_installation
2.1.4 安装消息列队rabbitmq
#控制节点
1:#安装消息列队
yum install rabbitmq-server

2:#启动消息列队服务
systemctl enable rabbitmq-server.service
systemctl start rabbitmq-server.service

3:#在rabbitmq创建用户
rabbitmqctl add_user openstack 123.com.cn

4:#为刚刚创建的oppenstack授权
rabbitmqctl set_permissions openstack ".*" ".*" ".*"
2.1.5 安装memcache缓存
#控制节点
1:#安装mecache
各类服务的身份认证机制使用Memcached缓存令牌。缓存服务memecached通常运行在控制节点。在生产部署中,我们推荐联合启用防火墙、认证和加密保证它的安全。
yum install memcached python-memcached

2:#配置/etc/sysconfig/memcached
##修改最后一行
vim /etc/sysconfig/memcached
OPTIONS="-l 0.0.0.0"

3:#启动服务
systemctl enable memcached.service
systemctl start memcached.service
2.1.6 检查端口是否启动
netstat -lntup | grep -E '123|3306|5672|11211'
2.2 安装keystone认证服务
#控制节点操作
1:创库授权
mysql -u root -p
#创建库
CREATE DATABASE keystone;
#对库进行授权
GRANT ALL PRIVILEGES ON keystone.* TO 'keystone'@'localhost'
IDENTIFIED BY '123456';
GRANT ALL PRIVILEGES ON keystone.* TO 'keystone'@'%'
IDENTIFIED BY '123456';

2:安装keystone服务
#http配合mode_wsgi插件调用python项目
yum install openstack-keystone httpd mod_wsgi openstack-utils -y

#过滤keystone配置文件以#号开头
cp /etc/keystone/keystone.conf{,.bak}
grep -Ev '^$|#' /etc/keystone/keystone.conf.bak > /etc/keystone/keystone.conf

#修改keystone配置文件
vim /etc/keystone/keystone.conf
在 [database] 部分,配置数据库访问:
[database]
connection = mysql+pymysql://keystone:123456@controller/keystone

在``[token]``部分,配置Fernet UUID令牌的提供者。
[token]
provider = fernet

3:同步数据库
su -s /bin/sh -c "keystone-manage db_sync" keystone
##切到普通用户或程序用户下,使用指定的shell执行某一条命令

#检查数据库是否有表
mysql keystone -e 'show tables;' &>/dev/null ;echo $?
无表:1表示失败请检查数据库连接情况

#初始化令牌凭据
keystone-manage fernet_setup --keystone-user keystone --keystone-group keystone
keystone-manage credential_setup --keystone-user keystone --keystone-group keystone

#初始化keystone身份认证服务
 keystone-manage bootstrap --bootstrap-password 123456 \
  --bootstrap-admin-url http://controller:35357/v3/ \
  --bootstrap-internal-url http://controller:5000/v3/ \
  --bootstrap-public-url http://controller:5000/v3/ \
  --bootstrap-region-id RegionOne

4:配置httpd
echo "ServerName controller" >> /etc/httpd/conf/httpd.conf
ln -s /usr/share/keystone/wsgi-keystone.conf /etc/httpd/conf.d/
##启动httpd等效与keystone
systemctl enable httpd.service
systemctl start httpd.service

5:#声明环境变量
vim /root/.bashrc
export OS_USERNAME=admin
export OS_PASSWORD=123456
export OS_PROJECT_NAME=admin
export OS_USER_DOMAIN_NAME=Default
export OS_PROJECT_DOMAIN_NAME=Default
export OS_AUTH_URL=http://controller:35357/v3
export OS_IDENTITY_API_VERSION=3

6:# 验证
openstack user list
+----------------------------------+-------+
| ID                               | Name  |
+----------------------------------+-------+
| 7c559e9b3a1a4301919002fc0ae3e0f3 | admin |
+----------------------------------+-------+
7:#创建服务中包含有用户service的项目
openstack project create --domain default --description "Service Project" service


#验证
openstack project list
+----------------------------------+---------+
| ID                               | Name    |
+----------------------------------+---------+
| df96e84e4e4044269d7decdf61457dba | admin   |
| fd5076aba0094fcea1c01ddeefb44f4c | service |
+----------------------------------+---------+
2.3 安装glance服务
功能:管理镜像模板机 端口号9191 9292
1:创库授权
mysql -u root -p
#创建glance库
CREATE DATABASE glance;
GRANT ALL PRIVILEGES ON glance.* TO 'glance'@'localhost' IDENTIFIED BY '123.com.cn';
GRANT ALL PRIVILEGES ON glance.* TO 'glance'@'%' IDENTIFIED BY '123.com.cn';

2:keystone上创建用户,关联用户
#创建 glance 用户:
openstack user create --domain default --password 123456 glance
#添加 admin 角色到 glance 用户和 service 项目上。
openstack role add --project service --user glance admin

3:keystone上创建服务
#创建``glance``服务实体:
openstack service create --name glance --description "OpenStack Image" image
#创建镜像服务的 API 端点:
openstack endpoint create --region RegionOne image public http://controller:9292
openstack endpoint create --region RegionOne image internal http://controller:9292
openstack endpoint create --region RegionOne image admin http://controller:9292

4:安装服务软件包
yum install openstack-glance
5:修改配置文件(连接数据库,keystone授权)
#修改glance-api.conf文件 作用:上传下载删除
cp /etc/glance/glance-api.conf{,.bak}
cat /etc/glance/glance-api.conf.bak  | grep -Ev '^$|#' > /etc/glance/glance-api.conf

vim /etc/glance/glance-api.conf
[database]
# ...
connection = mysql+pymysql://glance:123.com.cn@controller/glance

[keystone_authtoken]
# ...
auth_uri = http://controller:5000
auth_url = http://controller:35357
memcached_servers = controller:11211
auth_type = password
project_domain_name = default
user_domain_name = default
project_name = service
username = glance
password = 123456

[paste_deploy]
# ...
flavor = keystone

[glance_store]
# ...
stores = file,http
default_store = file
filesystem_store_datadir = /var/lib/glance/images/

#修改glance-registry.conf文件  作用:修改镜像的属性 x86 根分区大小
cp /etc/glance/glance-registry.conf{,.bak}
cat /etc/glance/glance-registry.conf.bak  | grep -Ev '^$|#' > /etc/glance/glance-registry.conf
vim /etc/glance/glance-registry.conf
[database]
# ...
connection = mysql+pymysql://glance:123.com.cn@controller/glance

[keystone_authtoken]
# ...
auth_uri = http://controller:5000
auth_url = http://controller:35357
memcached_servers = controller:11211
auth_type = password
project_domain_name = default
user_domain_name = default
project_name = service
username = glance
password = 123456

[paste_deploy]
# ...
flavor = keystone
6:同步数据库
su -s /bin/sh -c "glance-manage db_sync" glance
mysql glance -e 'show tables' | wc -l
16

7:启动服务
systemctl enable openstack-glance-api.service openstack-glance-registry.service
systemctl start openstack-glance-api.service openstack-glance-registry.service
[root@controller ~]# netstat -ant | grep -E '9191|9292'
tcp        0      0 0.0.0.0:9191            0.0.0.0:*               LISTEN
tcp        0      0 0.0.0.0:9292            0.0.0.0:*               LISTEN

8.命令行上传镜像
wget http://download.cirros-cloud.net/0.3.5/cirros-0.3.5-x86_64-disk.img
openstack image create "cirros" --file cirros-0.3.5-x86_64-disk.img --disk-format qcow2 --container-format bare --public
#验证
[root@controller ~]# openstack image list
+--------------------------------------+--------+--------+
| ID                                   | Name   | Status |
+--------------------------------------+--------+--------+
| 69bfc92f-ec7f-4f42-a3d6-8dc8d848cf5f | cirros | active |
+--------------------------------------+--------+--------
2.4 安装nova服务
2.4.1 控制节点安装nova服务
1:创库授权
mysql -u root -p
CREATE DATABASE nova_api;
CREATE DATABASE nova;
CREATE DATABASE nova_cell0;
GRANT ALL PRIVILEGES ON nova_api.* TO 'nova'@'localhost' IDENTIFIED BY '123.com.cn';
GRANT ALL PRIVILEGES ON nova_api.* TO 'nova'@'%' IDENTIFIED BY '123.com.cn';
GRANT ALL PRIVILEGES ON nova.* TO 'nova'@'localhost' IDENTIFIED BY '123.com.cn';
GRANT ALL PRIVILEGES ON nova.* TO 'nova'@'%' IDENTIFIED BY '123.com.cn';
GRANT ALL PRIVILEGES ON nova_cell0.* TO 'nova'@'localhost' IDENTIFIED BY '123.com.cn';
GRANT ALL PRIVILEGES ON nova_cell0.* TO 'nova'@'%' IDENTIFIED BY '123.com.cn';

2:keystone上创建用户,关联角色
#创建 nova 用户
openstack user create --domain default --password 123456 nova
#给 nova 用户添加 admin 角色
openstack role add --project service --user nova admin

#placement 追踪云主机资源使用具体情况 创建 placement 用户
openstack user create --domain default --password 123456 placement
#给placement用户添加admin角色
openstack role add --project service --user placement admin

3:keystone上创建服务,http访问地址(api地址)
#创建 nova 服务实体:
openstack service create --name nova --description "OpenStack Compute" compute
openstack endpoint create --region RegionOne compute public http://controller:8774/v2.1
openstack endpoint create --region RegionOne compute internal http://controller:8774/v2.1
openstack endpoint create --region RegionOne compute admin http://controller:8774/v2.1

#建 placement 服务实体:
openstack service create --name placement --description "Placement API" placement
openstack endpoint create --region RegionOne placement public http://controller:8778
openstack endpoint create --region RegionOne placement internal http://controller:8778
openstack endpoint create --region RegionOne placement admin http://controller:8778

4:安装服务软件包
yum install openstack-nova-api openstack-nova-conductor openstack-nova-console openstack-nova-novncproxy openstack-nova-scheduler openstack-nova-placement-api

openstack-nova-api				管理者
openstack-nova-conductor		连接数据库代理
openstack-nova-console			控制台 账号密码
openstack-nova-novncproxy   	web界面版的vnc客户端
openstack-nova-scheduler		节点调度器
openstack-nova-placement-api	最总虚拟机所使用的资源
openstack-nova-compute			计算节点

5:修改配置文件(连接数据库,keystone授权)
#修改 nova配置文件
cp /etc/nova/nova.conf{,.bak}
cat /etc/nova/nova.conf.bak | grep -Ev '^$|#'  > /etc/nova/nova.conf
vim /etc/nova/nova.conf
[DEFAULT]
##启动nova服务api喝metadata的api
enabled_apis = osapi_compute,metadata
##连接消息队列rabbitmq
transport_url = rabbit://openstack:123.com.cn@controller
my_ip = 192.168.10.9
#启动enutron网络服务,禁用nova内置防火墙
use_neutron = True
firewall_driver = nova.virt.firewall.NoopFirewallDriver
[api]
auth_strategy = keystone
[api_database]
connection = mysql+pymysql://nova:123.com.cn@controller/nova_api
[barbican]
[cache]
[cells]
[cinder]
[compute]
[conductor]
[console]
[consoleauth]
[cors]
[crypto]
[database]
connection = mysql+pymysql://nova:123.com.cn@controller/nova
[devices]
[ephemeral_storage_encryption]
[filter_scheduler]
[glance]
api_servers = http://controller:9292
[guestfs]
[healthcheck]
[hyperv]
[ironic]
[key_manager]
[keystone]
[keystone_authtoken]
auth_uri = http://controller:5000
auth_url = http://controller:35357
memcached_servers = controller:11211
auth_type = password
project_domain_name = default
user_domain_name = default
project_name = service
username = nova
password = 123456
[libvirt]
[matchmaker_redis]
[metrics]
[mks]
[neutron]
[notifications]
[osapi_v21]
[oslo_concurrency]
lock_path = /var/lib/nova/tmp
[oslo_messaging_amqp]
[oslo_messaging_kafka]
[oslo_messaging_notifications]
[oslo_messaging_rabbit]
[oslo_messaging_zmq]
[oslo_middleware]
[oslo_policy]
[pci]
#追踪虚拟机使用情况
[placement]
os_region_name = RegionOne
project_domain_name = Default
project_name = service
auth_type = password
user_domain_name = Default
auth_url = http://controller:35357/v3
username = placement
password = 123456
[quota]
[rdp]
[remote_debug]
[scheduler]
[serial_console]
[service_user]
[spice]
[upgrade_levels]
[vault]
[vendordata_dynamic_auth]
[vmware]
#vnc连接信息
[vnc]
enabled = true
vncserver_listen = $my_ip
vncserver_proxyclient_address = $my_ip
[workarounds]
[wsgi]
[xenserver]
[xvp]

#修改apache配置文件
vim /etc/httpd/conf.d/00-nova-placement-api.conf
##添加到virtualHost里面
<VirtualHost *:8778>
.....
<Directory /usr/bin>
   <IfVersion >= 2.4>
      Require all granted
   </IfVersion>
   <IfVersion < 2.4>
      Order allow,deny
      Allow from all
   </IfVersion>
</Directory>
</VirtualHost>

systemctl restart httpd


6:同步数据库(创表)
su -s /bin/sh -c "nova-manage api_db sync" nova
su -s /bin/sh -c "nova-manage cell_v2 map_cell0" nova
su -s /bin/sh -c "nova-manage cell_v2 create_cell --name=cell1 --verbose" nova
su -s /bin/sh -c "nova-manage db sync" nova

#检查
nova-manage cell_v2 list_cells

7:启动服务
systemctl enable openstack-nova-api.service openstack-nova-consoleauth.service openstack-nova-scheduler.service openstack-nova-conductor.service openstack-nova-novncproxy.service
systemctl start openstack-nova-api.service openstack-nova-consoleauth.service openstack-nova-scheduler.service openstack-nova-conductor.service openstack-nova-novncproxy.service

#验证
[root@controller ~]# openstack compute service list
+----+------------------+------------+----------+---------+-------+----------------------------+
| Id | Binary           | Host       | Zone     | Status  | State | Updated At                 |
+----+------------------+------------+----------+---------+-------+----------------------------+
|  1 | nova-consoleauth | controller | internal | enabled | up    | 2020-05-31T08:42:35.000000 |
|  2 | nova-scheduler   | controller | internal | enabled | up    | 2020-05-31T08:42:36.000000 |
|  3 | nova-conductor   | controller | internal | enabled | up    | 2020-05-31T08:42:36.000000 |
+----+------------------+------------+----------+---------+-------+----------------------------+
2.4.2 计算节点安装nova服务
1:安装openstack-nova-compute
yum install openstack-nova-compute
2:修改配nova配置文件
cp /etc/nova/nova.conf{,.bak}
cat /etc/nova/nova.conf.bak | grep -Ev '^$|#'  > /etc/nova/nova.conf

vim /etc/nova/nova.conf
[DEFAULT]
enabled_apis = osapi_compute,metadata
transport_url = rabbit://openstack:123.com.cn@controller
my_ip = 192.168.10.10
use_neutron = True
firewall_driver = nova.virt.firewall.NoopFirewallDriver
[api]
auth_strategy = keystone
[api_database]
[barbican]
[cache]
[cells]
[cinder]
[compute]
[conductor]
[console]
[consoleauth]
[cors]
[crypto]
[database]
[devices]
[ephemeral_storage_encryption]
[filter_scheduler]
[glance]
api_servers = http://controller:9292
[guestfs]
[healthcheck]
[hyperv]
[ironic]
[key_manager]
[keystone]
[keystone_authtoken]
auth_uri = http://controller:5000
auth_url = http://controller:35357
memcached_servers = controller:11211
auth_type = password
project_domain_name = default
user_domain_name = default
project_name = service
username = nova
password = 123456
[libvirt]
cpu_mode = none
virt_type=qemu
[matchmaker_redis]
[matchmaker_redis]
[metrics]
[mks]
[neutron]
[notifications]
[osapi_v21]
[oslo_concurrency]
lock_path = /var/lib/nova/tmp
[oslo_messaging_amqp]
[oslo_messaging_kafka]
[oslo_messaging_notifications]
[oslo_messaging_rabbit]
[oslo_messaging_zmq]
[oslo_middleware]
[oslo_policy]
[pci]
[placement]
os_region_name = RegionOne
project_domain_name = Default
project_name = service
auth_type = password
user_domain_name = Default
auth_url = http://controller:35357/v3
username = placement
password = 123456
[quota]
[rdp]
[remote_debug]
[scheduler]
[serial_console]
[service_user]
[spice]
[upgrade_levels]
[vault]
[vendordata_dynamic_auth]
[vmware]
[vnc]
enabled = True
vncserver_listen = 0.0.0.0
vncserver_proxyclient_address = $my_ip
novncproxy_base_url = http://controller:6080/vnc_auto.html
[workarounds]
[wsgi]
[xenserver]
[xvp]
3:验证是否支持虚拟化 1表示支持
egrep -c '(vmx|svm)' /proc/cpuinfo

4:启动
systemctl enable libvirtd.service openstack-nova-compute.service
systemctl start libvirtd.service openstack-nova-compute.service

5:在主控节点验证
openstack compute service list
[root@controller yum.repos.d]# openstack compute service list
+----+------------------+------------+----------+---------+-------+----------------------------+
| Id | Binary           | Host       | Zone     | Status  | State | Updated At                 |
+----+------------------+------------+----------+---------+-------+----------------------------+
|  1 | nova-consoleauth | controller | internal | enabled | up    | 2020-05-31T09:19:36.000000 |
|  2 | nova-scheduler   | controller | internal | enabled | up    | 2020-05-31T09:19:36.000000 |
|  3 | nova-conductor   | controller | internal | enabled | up    | 2020-05-31T09:19:37.000000 |
|  6 | nova-compute     | compute1   | nova     | enabled | up    | 2020-05-31T09:19:35.000000 |
+----+------------------+------------+----------+---------+-------+----------------------------+
6:在控制节点上 发现计算节点
su -s /bin/sh -c "nova-manage cell_v2 discover_hosts --verbose" nova
2.5 安装neutron服务
2.5.1控制节安装neutron服务
1:创库授权
mysql -u root -p
CREATE DATABASE neutron;
GRANT ALL PRIVILEGES ON neutron.* TO 'neutron'@'localhost' IDENTIFIED BY '123.com.cn';
GRANT ALL PRIVILEGES ON neutron.* TO 'neutron'@'%' IDENTIFIED BY '123.com.cn';

2:在keystone上创建用户,关联角色
openstack user create --domain default --password 123456 neutron
openstack role add --project service --user neutron admin

3:keystone上创建服务,http访问地址(api地址)
openstack service create --name neutron  --description "OpenStack Networking" network
openstack endpoint create --region RegionOne network public http://controller:9696
openstack endpoint create --region RegionOne network internal http://controller:9696
openstack endpoint create --region RegionOne network admin http://controller:9696

4:安装软件包
#网络选项一
yum install openstack-neutron openstack-neutron-ml2 openstack-neutron-linuxbridge ebtables

5:修改配置文件(连接数据库,keystone授权)
#修改neutron.conf文件
cp /etc/neutron/neutron.conf{,.bak}
grep -Ev '^$|#' /etc/neutron/neutron.conf.bak   > /etc/neutron/neutron.conf
vim /etc/neutron/neutron.conf
[DEFAULT]
core_plugin = ml2
service_plugins =
transport_url = rabbit://openstack:123.com.cn@controller
auth_strategy = keystone
notify_nova_on_port_status_changes = true
notify_nova_on_port_data_changes = true
[agent]
[cors]
[database]
connection = mysql+pymysql://neutron:123.com.cn@controller/neutron
[keystone_authtoken]
auth_uri = http://controller:5000
auth_url = http://controller:35357
memcached_servers = controller:11211
auth_type = password
project_domain_name = default
user_domain_name = default
project_name = service
username = neutron
password = 123456
[matchmaker_redis]
[nova]
auth_url = http://controller:35357
auth_type = password
project_domain_name = default
user_domain_name = default
region_name = RegionOne
project_name = service
username = nova
password = 123456
[oslo_concurrency]
lock_path = /var/lib/neutron/tmp
[oslo_messaging_amqp]
[oslo_messaging_kafka]
[oslo_messaging_notifications]
[oslo_messaging_rabbit]
[oslo_messaging_zmq]
[oslo_middleware]
[oslo_policy]
[quotas]
[ssl]


#修改ml2_conf.ini文件
cp /etc/neutron/plugins/ml2/ml2_conf.ini{,.bak}
grep -Ev '^$|#' /etc/neutron/plugins/ml2/ml2_conf.ini.bak > /etc/neutron/plugins/ml2/ml2_conf.ini
vim /etc/neutron/plugins/ml2/ml2_conf.ini
[DEFAULT]
[l2pop]
[ml2]
type_drivers = flat,vlan
tenant_network_types =
mechanism_drivers = linuxbridge
extension_drivers = port_security
[ml2_type_flat]
flat_networks = provider
[ml2_type_geneve]
[ml2_type_gre]
[ml2_type_vlan]
[ml2_type_vxlan]
[securitygroup]
enable_ipset = true

#修改linuxbridge_agent.ini文件
cp /etc/neutron/plugins/ml2/linuxbridge_agent.ini{,.bak}
grep -Ev '^$|#' /etc/neutron/plugins/ml2/linuxbridge_agent.ini.bak  >  /etc/neutron/plugins/ml2/linuxbridge_agent.ini
vim /etc/neutron/plugins/ml2/linuxbridge_agent.ini
[DEFAULT]
[agent]
[linux_bridge]
physical_interface_mappings = provider:ens33
[network_log]
[securitygroup]
enable_security_group = true
firewall_driver = neutron.agent.linux.iptables_firewall.IptablesFirewallDriver
[vxlan]
enable_vxlan = false

#修改配置文件/etc/neutron/dhcp_agent.ini
cp /etc/neutron/dhcp_agent.ini{,.bak}
grep -Ev '^$|#' /etc/neutron/dhcp_agent.ini.bak  >  /etc/neutron/dhcp_agent.ini
vim /etc/neutron/dhcp_agent.ini
[DEFAULT]
interface_driver = linuxbridge
dhcp_driver = neutron.agent.linux.dhcp.Dnsmasq
enable_isolated_metadata = true
[agent]
[ovs]

#修改配置文件
cp /etc/neutron/metadata_agent.ini{,.bak}
grep -Ev '^$|#' /etc/neutron/metadata_agent.ini.bak > /etc/neutron/metadata_agent.ini
vim /etc/neutron/metadata_agent.ini
[DEFAULT]
nova_metadata_ip = controller
metadata_proxy_shared_secret = METADATA_SECRET
[agent]
[cache]


#修改配置文件/etc/nova/nova.conf
vim /etc/nova/nova.conf
[neutron]
# ...
url = http://controller:9696
auth_url = http://controller:35357
auth_type = password
project_domain_name = default
user_domain_name = default
region_name = RegionOne
project_name = service
username = neutron
password = 123456
service_metadata_proxy = true
metadata_proxy_shared_secret = METADATA_SECRET
........

6:同步数据库(创表)
ln -s /etc/neutron/plugins/ml2/ml2_conf.ini /etc/neutron/plugin.ini
su -s /bin/sh -c "neutron-db-manage --config-file /etc/neutron/neutron.conf --config-file /etc/neutron/plugins/ml2/ml2_conf.ini upgrade head" neutron

7:启动服务
systemctl restart openstack-nova-api.service
systemctl enable neutron-server.service neutron-linuxbridge-agent.service neutron-dhcp-agent.service neutron-metadata-agent.service
systemctl start neutron-server.service neutron-linuxbridge-agent.service neutron-dhcp-agent.service neutron-metadata-agent.service
systemctl enable neutron-l3-agent.service
systemctl start neutron-l3-agent.service
2.5.2 计算节点安装neutron服务
1:安装软件包
yum install openstack-neutron-linuxbridge ebtables ipset
2:修改配置文件
cp /etc/neutron/neutron.conf{,.bak}
grep -Ev '^$|#' /etc/neutron/neutron.conf.bak   > /etc/neutron/neutron.conf
vim /etc/neutron/neutron.conf
[DEFAULT]
transport_url = rabbit://openstack:123.com.cn@controller
auth_strategy = keystone
[agent]
[cors]
[database]
[keystone_authtoken]
auth_uri = http://controller:5000
auth_url = http://controller:35357
memcached_servers = controller:11211
auth_type = password
project_domain_name = default
user_domain_name = default
project_name = service
username = neutron
password = 123456
[matchmaker_redis]
[nova]
[oslo_concurrency]
lock_path = /var/lib/neutron/tmp
[oslo_messaging_amqp]
[oslo_messaging_kafka]
[oslo_messaging_notifications]
[oslo_messaging_rabbit]
[oslo_messaging_zmq]
[oslo_middleware]
[oslo_policy]
[quotas]
[ssl]

#编辑linuxbridge_agent.ini文件
cp /etc/neutron/plugins/ml2/linuxbridge_agent.ini{,.bak}
grep -Ev '^$|#' /etc/neutron/plugins/ml2/linuxbridge_agent.ini.bak  >  /etc/neutron/plugins/ml2/linuxbridge_agent.ini
vim /etc/neutron/plugins/ml2/linuxbridge_agent.ini
[DEFAULT]
[agent]
[linux_bridge]
physical_interface_mappings = provider:ens33
[network_log]
[securitygroup]
enable_security_group = true
firewall_driver = neutron.agent.linux.iptables_firewall.IptablesFirewallDriver
[vxlan]
enable_vxlan = false

#编辑nova.conf配置文件
vim /etc/nova/nova.conf
[neutron]
url = http://controller:9696
auth_url = http://controller:35357
auth_type = password
project_domain_name = default
user_domain_name = default
region_name = RegionOne
project_name = service
username = neutron
password = 123456


3:启动
systemctl restart openstack-nova-compute.service
systemctl enable neutron-linuxbridge-agent.service
systemctl start neutron-linuxbridge-agent.service

4:在控制节点验证
neutron agent-list
+--------------------------------------+--------------------+------------+-------------------+-------
| id                                   | agent_type         | host       | availability_zone | alive | admin_state_up | binary                    |
+--------------------------------------+--------------------+------------+-------------------+-------+----------------+---------------------------+
| 50aa555f-74da-4f41-9a99-eafa656a56ce | Linux bridge agent | controller |                   | :-)   | True           | neutron-linuxbridge-agent |
| 64d294f7-9d58-4013-86c9-835ce4bb2903 | Metadata agent     | controller |                   | :-)   | True           | neutron-metadata-agent    |
| 6b0c775e-3727-43f7-9b7c-e9944e46980d | Linux bridge agent | compute1   |                   | :-)   | True           | neutron-linuxbridge-agent |
| c633e176-1d34-4bc8-bba3-e8b741d30e6c | DHCP agent         | controller | nova              | :-)   | True           | neutron-dhcp-agent        |
+--------------------------------------+--------------------+------------+-------------------+-------

openstack network agent list
+--------------------------------------+--------------------+------------+-------------------+-------+------
| ID                                   | Agent Type         | Host       | Availability Zone | Alive | State | Binary                    |
+--------------------------------------+--------------------+------------+-------------------+-------+------
| 8a24ea0a-388a-48bf-bb1f-f1ff7faa52b0 | Linux bridge agent | controller | None              | True  | UP    | neutron-linuxbridge-agent |
| 94d09287-3b68-41a5-a7bd-5a1679a59215 | DHCP agent         | controller | nova              | True  | UP    | neutron-dhcp-agent        |
| ac2b8999-35e6-481c-b992-67cbe17b2481 | Linux bridge agent | computer1  | None              | True  | UP    | neutron-linuxbridge-agent |
| ce59bf79-e97b-472a-8026-8af603ecc357 | Metadata agent     | controller | None              | True  | UP    | neutron-metadata-agent    |
+--------------------------------------+--------------------+------------+-------------------+-------+------
2.6 安装dashboard服务
#在控制节点安装
1:安装
yum install openstack-dashboard memcached python-memcached
2:配置local_settings
#2.1 可以使用已配置好的local_settings
链接:https://pan.baidu.com/s/1CaMJ0fWAUu4o3aI7L8k5BA
提取码:h6hh

上传到系统 root目录
cat local_settings > openstack-dashboard/local_settings
systemctl start httpd

#2.2 自行修改local_setting
vim /etc/openstack-dashboard/local_settings
#允许访问dashoard地址
30 ALLOWED_HOSTS = ['*']
#配置API版本:
61 OPENSTACK_API_VERSIONS = {
62     "identity": 3,
63     "image": 2,
64     "volume": 2,
65 }
#启用对域的支持
65 OPENSTACK_KEYSTONE_MULTIDOMAIN_SUPPORT = true
#配置default为默认域
78 PENSTACK_KEYSTONE_DEFAULT_DOMAIN = 'default'

#配置 memcached 会话存储服务:
128 CACHES = {
129     'default': {
130         'BACKEND': 'django.core.cache.backends.memcached.MemcachedCache',
131         'LOCATION': 'controller:11211',
132     },
133 }

#在 controller 节点上配置仪表盘以使用 OpenStack 服务:
158 OPENSTACK_HOST = "controller"
#启用第3版认证API:
159 OPENSTACK_KEYSTONE_URL = "http://%s:5000/v3" % OPENSTACK_HOST

#通过仪表盘创建的用户默认角色配置为 user :
160 OPENSTACK_KEYSTONE_DEFAULT_ROLE = "user"

#如果您选择网络参数1,禁用支持3层网络服务:
272 OPENSTACK_NEUTRON_NETWORK = {
273     'enable_router': False,
274     'enable_quotas': False,
275     'enable_ipv6': False,
276     'enable_distributed_router': False,
277     'enable_ha_router': False,
278     'enable_lb': False,
279     'enable_firewall': False,
280     'enable_': False,
281     'enable_fip_topology_check': False,
#可以选择性地配置时区
382 TIME_ZONE = "Asia/Shanghai"

3:启动
systemctl restart httpd.service memcached.service
4:测试
http://192.168.10.10/dashboard
用户明 admin 密码123456 (非默认密码keystone的身份认证账户)

报错问题
浏览器包Internal Server Error
解决问题在/etc/httpd/conf.d/openstack-dashboard.conf(或者搜索文件openstack-dashboard.conf,在apache子路径下)中添加下面一行代码

WSGIApplicationGroup %{GLOBAL}
2.7 启动一个实例
1:创建网络
neutron net-create --shared --provider:physical_network provider --provider:network_type flat WAN
neutron subnet-create --name subnet-wan --allocation-pool start=192.168.154.50,end=192.168.154.60 --dns-nameserver 223.5.5.5 --gateway 192.168.154.2 WAN 192.168.154.0/24

2:创建硬件配置方案
openstack flavor create --id 0 --vcpus 1 --ram 252 --disk 1 m1.nano
#配置密钥
ssh-keygen -q -N "" -f ~/.ssh/id_rsa
openstack keypair create --public-key ~/.ssh/id_rsa.pub mykey
#配置安全组
openstack security group rule create --proto icmp default
openstack security group rule create --proto tcp --dst-port 22 default
到此处安装完成以下是扩展文档
===================================================
3. glance服务迁移(扩展)
环境
| 主机 | 地址 | 角色 |
|---|---|---|
| glance | 192.168.10.12 | 镜像服务 |
| controller | 192.168.10.9 | 控制节点 |
修改hosts文件解析

#控制节点
1:停掉控制节点glance服务
systemctl disable openstack-glance-api.service openstack-glance-registry.service
systemctl stop openstack-glance-api.service openstack-glance-registry.service

#glance节点
2:在glance主机上安装mariadb
echo "192.168.10.9 controller" >> /etc/hosts
yum install mariadb mariadb-server python2-PyMySQL

cat > /etc/my.cnf.d/openstack.cnf <<-EOF
[mysqld]
bind-address = 192.168.10.12
default-storage-engine = innodb
innodb_file_per_table = on
max_connections = 4096
collation-server = utf8_general_ci
character-set-server = utf8
EOF

systemctl start mariadb
systemctl enable mariadb
#初始化数据库
mysql_secure_installation

3:恢复glance数据库的数据
控制节点:
mysqldump -B glance > glance.sql
scp glance.sql 192.168.10.12:/root

glance主机节点:
mysql < glance.sql
mysql glance -e "show table"
GRANT ALL PRIVILEGES ON glance.* TO 'glance'@'localhost' IDENTIFIED BY '123.com.cn';
GRANT ALL PRIVILEGES ON glance.* TO 'glance'@'%' IDENTIFIED BY '123.com.cn';
mysql glance -e "show tables";

4:安装配置glance服务
yum -y install openstack-glance openstack-utils
scp -rp 192.168.10.9:/etc/glance/glance-api.conf /etc/glance/glance-api.conf
scp -rp 192.168.10.9:/etc/glance/glance-registry.conf /etc/glance/glance-registry.conf
sed -ri 's#glance:123.com.cn@controller#glance:[email protected]#g' /etc/glance/glance-api.conf
sed -ri 's#glance:123.com.cn@controller#glance:[email protected]#g' /etc/glance/glance-registry.conf

systemctl start openstack-glance-api openstack-glance-registry
systemctl enable openstack-glance-api openstack-glance-registry

6:glance镜像文件迁移
scp -rp 192.168.10.9:/var/lib/glance/images/ /var/lib/glance/
chown -R glance.glance /var/lib/glance/

#控制节点
6:通过数据库修改keystone服务目录的glance的api地址
表明 endpoint

 openstack endpoint list | grep image
| 954a4059bf6c4736b0c059bef42521e1 | RegionOne | glance       | image        | True    | internal  | http://192.168.10.12:9292   |
| cddf3dc4111b4469877d7fac95b2c224 | RegionOne | glance       | image        | True    | public    | http://192.168.10.12:9292   |
| ea29a0ebbc574505a3f908ce5a8ee7f4 | RegionOne | glance       | image        | True    | admin     | http://192.168.10.12:9292   |

7:验证是否控制节点是否连接glance服务
[root@controller ~]# openstack image list
+--------------------------------------+--------+--------+
| ID                                   | Name   | Status |
+--------------------------------------+--------+--------+
| 69bfc92f-ec7f-4f42-a3d6-8dc8d848cf5f | cirros | active |
+--------------------------------------+--------+--------+

8:修改所有节点nova的配置文件
sed -ri 's#http://controller:9292#http://192.168.10.12:9292#g'  /etc/nova/nova.conf
9:重启服务
控制节点:
systemctl restart openstack-nova-api
计算节点
systemctl restart openstack-nova-compute

10:启动一个实例
上传一个新镜像,并启动新实例
4. cinder块存储服务
cinder-volume 可以调用 LVM、NFS、glausterFS、ceph
- inder-api 接受API请求,并将其路由到
cinder-volume执行。 - cinder-volume 提供存储空间
- cinder-scheduler 调度器,解决将要分配的空间由哪一个cinder-volume提供
- cinder-backup 备份创建的卷
环境
| 主机 | 地址 | 角色 |
|---|---|---|
| controller | 192.168.10.9 | cinder 控制节点 |
| cinder | 192.168.10.11 | cinder 存储节点 |
4.1 控制节点安装cinder服务
1:创库授权
CREATE DATABASE cinder;
GRANT ALL PRIVILEGES ON cinder.* TO 'cinder'@'localhost' IDENTIFIED BY '123.com.cn';
GRANT ALL PRIVILEGES ON cinder.* TO 'cinder'@'%' IDENTIFIED BY '123.com.cn';

2:在kenstone创建系统用户并授权admin角色
openstack user create --domain default --password 123456 cinder
openstack role add --project service --user cinder admin
3:在kenstone上创建服务和注册api
openstack service create --name cinderv2 --description "OpenStack Block Storage" volumev2
openstack service create --name cinderv3 --description "OpenStack Block Storage" volumev3
openstack endpoint create --region RegionOne volumev2 public http://controller:8776/v2/%\(project_id\)s
openstack endpoint create --region RegionOne volumev2 internal http://controller:8776/v2/%\(project_id\)s
openstack endpoint create --region RegionOne volumev2 admin http://controller:8776/v2/%\(project_id\)s
openstack endpoint create --region RegionOne volumev3 public http://controller:8776/v3/%\(project_id\)s
openstack endpoint create --region RegionOne volumev3 internal http://controller:8776/v3/%\(project_id\)s
openstack endpoint create --region RegionOne volumev3 admin http://controller:8776/v3/%\(project_id\)s

4:安装并修改配置文件
yum install openstack-cinder openstack-utils

cp /etc/cinder/cinder.conf{,.bak}
grep -Ev '^$|#' /etc/cinder/cinder.conf.bak  > /etc/cinder/cinder.conf
#修改cinder.conf
vim /etc/cinder/cinder.conf
[DEFAULT]
auth_strategy = keystone
my_ip = 192.168.10.9
transport_url = rabbit://openstack:123.com.cn@controller
[backend]
[barbican]
[brcd_fabric_example]
[cisco_fabric_example]
[coordination]
[cors]
[cors.subdomain]
[database]
connection = mysql+pymysql://cinder:123.com.cn@controller/cinder
[fc-zone-manager]
[healthcheck]
[key_manager]
[keystone_authtoken]
auth_uri = http://controller:5000
auth_url = http://controller:35357
memcached_servers = controller:11211
auth_type = password
project_domain_name = default
user_domain_name = default
project_name = service
username = cinder
password = 123456
[matchmaker_redis]
[oslo_concurrency]
lock_path = /var/lib/cinder/tmp
[oslo_messaging_amqp]
[oslo_messaging_kafka]
[oslo_messaging_notifications]
[oslo_messaging_rabbit]
[oslo_messaging_zmq]
[oslo_middleware]
[oslo_policy]
[oslo_reports]
[oslo_versionedobjects]
[profiler]
[ssl]

# 修改nova配置文件
vim /etc/nova/nova.conf
[cinder]
os_region_name = RegionOne

5:同步数据库(创表)
su -s /bin/sh -c "cinder-manage db sync" cinder
6:启动
systemctl restart openstack-nova-api.service
systemctl enable openstack-cinder-api.service openstack-cinder-scheduler.service
systemctl start openstack-cinder-api.service openstack-cinder-scheduler.service

7:验证
[root@controller ~]# cinder service-list
+------------------+------------+------+---------+-------+----------------------------+--------------
| Binary           | Host       | Zone | Status  | State | Updated_at                 | Disabled Reason |
+------------------+------------+------+---------+-------+----------------------------+--------------
| cinder-scheduler | controller | nova | enabled | up    | 2020-06-05T06:09:53.000000 | -
+------------------+------------+------+---------+-------+----------------------------+--------------
4.2 存储节点安装cinder服务
1:先决条件
yum install lvm2 -y
systemctl start lvm2-lvmetad.service
systemctl enable lvm2-lvmetad.service
2:虚拟机增加两个块硬盘 支持热添加 注:如何是热添加的磁盘可需要执行以下echo命令
#使用echo重新刷新硬盘
echo '- - -' > /sys/class/scsi_host/host0/scan
echo '- - -' > /sys/class/scsi_host/host1/scan
echo '- - -' > /sys/class/scsi_host/host2/scan

fdisk -l
pvcreate /dev/sdb
pvcreate /dev/sbc
vgcreate cinder-ssd /dev/sdb
vgcreate cinder-sata /dev/sdc

3:修改/etc/lvm/lvm.conf
在130下面插入一行
sed -ri '130a filter = [ "a/sdb/" , "a/sdc/" , "r/.*/" ]' /etc/lvm/lvm.conf
4:安装并配置
yum -y install openstack-cinder targetcli python-keystone -y

cp /etc/cinder/cinder.conf{,.bak}
grep -Ev '^$|#' /etc/cinder/cinder.conf.bak  > /etc/cinder/cinder.conf
#修改cinder.conf
vim /etc/cinder/cinder.conf
[DEFAULT]
transport_url = rabbit://openstack:123.com.cn@controller
auth_strategy = keystone
my_ip = 192.168.10.11
enabled_backends = sdb,sdc
glance_api_servers = http://controller:9292
[backend]
[barbican]
[brcd_fabric_example]
[cisco_fabric_example]
[coordination]
[cors]
[cors.subdomain]
[database]
connection = mysql+pymysql://cinder:123.com.cn@controller/cinder
[fc-zone-manager]
[healthcheck]
[key_manager]
[keystone_authtoken]
auth_uri = http://controller:5000
auth_url = http://controller:35357
memcached_servers = controller:11211
auth_type = password
project_domain_name = default
user_domain_name = default
project_name = service
username = cinder
password = 123456
[matchmaker_redis]
[oslo_concurrency]
lock_path = /var/lib/cinder/tmp
[oslo_messaging_amqp]
[oslo_messaging_kafka]
[oslo_messaging_notifications]
[oslo_messaging_rabbit]
[oslo_messaging_zmq]
[oslo_middleware]
[oslo_policy]
[oslo_reports]
[oslo_versionedobjects]
[profiler]
[ssl]
[sdb]
volume_driver = cinder.volume.drivers.lvm.LVMVolumeDriver
volume_group = cinder-sdb
iscsi_protocol = iscsi
iscsi_helper = lioadm
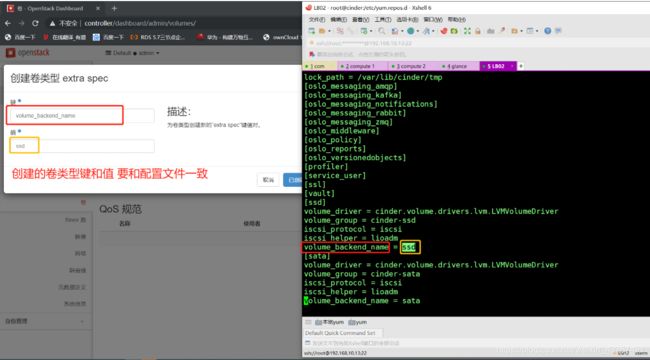
volume_backend_name = sdb
[sdc]
volume_driver = cinder.volume.drivers.lvm.LVMVolumeDriver
volume_group = cinder-sdc
iscsi_protocol = iscsi
iscsi_helper = lioadm
volume_backend_name = sdc

5:启动
systemctl enable openstack-cinder-volume.service target.service
systemctl start openstack-cinder-volume.service target.service

6:验证 控制节点进行查看
[root@controller ~]# cinder service-list
+------------------+-------------+------+---------+-------+----------------------------+-----------------+
| Binary           | Host        | Zone | Status  | State | Updated_at                 | Disabled Reason |
+------------------+-------------+------+---------+-------+----------------------------+-------------
| cinder-scheduler | controller  | nova | enabled | up    | 2020-06-05T07:38:55.000000 | -               |
| cinder-volume    | cinder@sata | nova | enabled | up    | 2020-06-05T07:38:48.000000 | -               |
| cinder-volume    | cinder@ssd  | nova | enabled | up    | 2020-06-05T07:38:47.000000 | -               |
+------------------+-------------+------+---------+-------+----------------------------+-------------

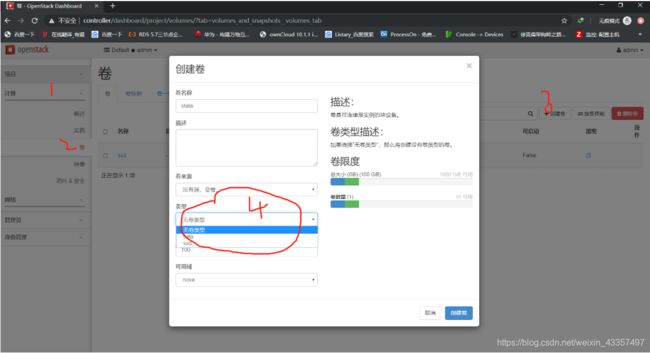
通过web界面 项目-计算-卷-创建卷
存储节点 输入lvs 查看
volume-3b379136-7048-4523-9b2c-113493ec6258 cinder-sata Vwi-a-tz--  20.00g cinder-sata-pool        0.00
4.3 web界面创建卷类型并关联extra spec
注意: 关联的类型要与配置文件一致
5. cinder对接nfs后端存储服务(扩展)
cinder:不提供存储,支持多种存储技术,lvm、nfs、glusterFS、ceph
1.部署nfs共享存储
。。。。。。。。。
2.修改cinder存储节点添加nfs
yum -y install nfs-utils

vim /etc/cinder/cinder.conf
[DEFAULT]
enabled_backends = sdb,nfs

[nfs]
volume_driver = cinder.volume.drivers.nfs.NfsDriver
nfs_shares_config = /etc/cinder/nfs_shares
volume_backend_name = nfs			#此文件需要关联

#添加nfs信息
[root@cinder ~]# cat /etc/cinder/nfs_shares
NFS主机地址:/data/cinder_nfs

systemctl restart openstack-cinder-volume

#控制节点查看
[root@controller ~]# cinder service-list
+------------------+------------+------+---------+-------+----------------------------+-----------------+
| Binary           | Host       | Zone | Status  | State | Updated_at                 | Disabled Reason |
+------------------+------------+------+---------+-------+----------------------------+-----------------+
| cinder-scheduler | controller | nova | enabled | up    | 2020-06-12T02:39:39.000000 | -               |
| cinder-volume    | cinder@nfs | nova | enabled | up    | 2020-06-12T02:39:34.000000 | -               |
| cinder-volume    | cinder@sdb | nova | enabled | up    | 2020-06-12T02:39:34.000000 | -               |
+------------------+------------+------+---------+-------+----------------------------+-----------------+
6. 把控制节点兼职计算节点(扩展)
#控制节点
yum install openstack-nova-compute

vim /etc/nova/nova.conf
[vnc]
enabled = True
vncserver_listen = 0.0.0.0
vncserver_proxyclient_address = $my_ip
novncproxy_base_url = http://192.168.10.9:6080/vnc_auto.html

systemctl restart libvirtd.service openstack-nova-compute.service
systemctl enable libvirtd.service openstack-nova-compute.service
[root@controller ~]# nova service-list
+--------------------------------------+------------------+------------+----------+---------+-------+-------
| Id                                   | Binary           | Host       | Zone     | Status  | State | Updated_at                 | Disabled Reason | Forced down |
+--------------------------------------+------------------+------------+----------+---------+-------+-------
| 82a898e8-29f1-4200-8d48-3bed9fe19063 | nova-consoleauth | controller | internal | enabled | up    | 2020-06-16T07:25:59.000000 | -               | False       |
| 56d68181-33a3-4a21-9c15-ac6be81f266d | nova-scheduler   | controller | internal | enabled | up    | 2020-06-16T07:26:01.000000 | -               | False       |
| fd4d4675-e826-4614-abba-40cc45e6096d | nova-conductor   | controller | internal | enabled | up    | 2020-06-16T07:25:59.000000 | -               | False       |
| 07a903e1-ffb7-4b29-b458-0049d3073ba3 | nova-compute     | computer1  | nova     | enabled | up    | 2020-06-16T07:26:05.000000 | -               | False       |
| 4d828209-5c77-4159-abf8-d93cac05d4f9 | nova-compute     | controller | nova     | enabled | up    | 2020-06-16T07:26:06.000000 | -               | False       |
+--------------------------------------+------------------+------------+----------+---------+-------+-------

#:在控制节点上 发现计算节点
su -s /bin/sh -c "nova-manage cell_v2 discover_hosts --verbose" nova
7 .openstack云主机冷迁移(扩展)
注意: 虚拟机迁移,计算节点必须为相同域。
1:开启nova计算节点之间互信

冷迁移需要nova计算节点之间使用nova用户互相免密码访问
默认nova用户禁止登陆,开启所有计算节点的nova用户登录shell。
usermod -s /bin/bash nova
su - nova
ssh-keygen -t rsa
#生成密钥
cp -fa id_rsa.pub authorized_keys

#将公钥发送给其他计算节点的nova用户的/var/lib/nova/.ssh目录下,注意权限和所属组
scp .ssh/* 192.168.10.10 /var/lib/nova/.ssh


2:修改控制节点nova.conf
vi /etc/nova/nova.conf
[DEFAULT]
scheduler_default_filters=RetryFilter,AvailabilityZoneFilter,RamFilter,DiskFilter,ComputeFilter,ComputeCapabilitiesFilter,ImagePropertiesFilter,ServerGroupAntiAffinityFilter,ServerGroupAffinityFilter

重启nova调度节点
systemctl restart openstack-nova-scheduler.service


3:修改所有计算节点
vi /etc/nova/nova.conf
[DEFAULT]
allow_resize_to_same_host = True

重启openstack-nova-compute
systemctl restart openstack-nova-compute.service
8. 设置Vxlan网络配置(扩展)
官方链接 https://docs.openstack.org/ocata/zh_CN/install-guide-rdo/neutron-controller-install-option2.html
前提:
每个主机添加一块网卡ens34。 用来做Vxlan隧道传输。并配置相应ip地址。
8.1. 控制节点操作
vim /etc/neutron/neutron.conf
[DEFAULT]
# ...
core_plugin = ml2
service_plugins = router
allow_overlapping_ips = true
transport_url = rabbit://openstack:123.com.cn@controller
auth_strategy = keystone
notify_nova_on_port_status_changes = true
notify_nova_on_port_data_changes = true
[keystone_authtoken]
# ...
auth_uri = http://controller:5000
auth_url = http://controller:35357
memcached_servers = controller:11211
auth_type = password
project_domain_name = default
user_domain_name = default
project_name = service
username = neutron
password = 123456
[nova]
# ...
auth_url = http://controller:35357
auth_type = password
project_domain_name = default
user_domain_name = default
region_name = RegionOne
project_name = service
username = nova
password = 123456

[oslo_concurrency]
# ...
lock_path = /var/lib/neutron/tmp

#修改 Modular Layer 2 (ML2) 插件
vim /etc/neutron/plugins/ml2/ml2_conf.ini
[ml2]
# ...
type_drivers = flat,vlan,vxlan
tenant_network_types = vxlan
mechanism_drivers = linuxbridge,l2population
extension_drivers = port_security
[ml2_type_flat]
flat_networks = provider
[ml2_type_vxlan]
#Vxlan 范围号最大支持1:16777216
vni_ranges = 1:1000
[securitygroup]
# ...
enable_ipset = true

#配置Linuxbridge代理
vim /etc/neutron/plugins/ml2/linuxbridge_agent.ini
[DEFAULT]
[agent]
[linux_bridge]
physical_interface_mappings = provider:ens33
[network_log]
[securitygroup]
enable_security_group = true
firewall_driver = neutron.agent.linux.iptables_firewall.IptablesFirewallDriver
[vxlan]
enable_vxlan = true
#本地隧道地址 地址必须是真实的
local_ip = 172.16.1.9
l2_population = true

#配置layer-3代理
vim /etc/neutron/l3_agent.ini
[DEFAULT]
interface_driver = linuxbridge

#配置DHCP代理
[DEFAULT]
# ...
interface_driver = linuxbridge
dhcp_driver = neutron.agent.linux.dhcp.Dnsmasq
enable_isolated_metadata = true
re

#重启服务
 systemctl restart neutron-server.service neutron-linuxbridge-agent.service neutron-dhcp-agent.service neutron-metadata-agent.service
 systemctl start neutron-l3-agent.service
 systemctl enable neutron-l3-agent.service
8.2 计算节点操作
vim /etc/neutron/plugins/ml2/linuxbridge_agent.ini
[DEFAULT]
[agent]
[linux_bridge]
physical_interface_mappings = provider:ens33
[network_log]
[securitygroup]
enable_security_group = true
firewall_driver = neutron.agent.linux.iptables_firewall.IptablesFirewallDriver
[vxlan]
enable_vxlan = True
#本地隧道地址 地址必须是真实的
local_ip = 172.16.1.13
l2_population = True

#重启服务
systemctl restart neutron-linuxbridge-agent.service
8.3 控制节点验证
[root@controller ~]# neutron agent-list
neutron CLI is deprecated and will be removed in the future. Use openstack CLI instead.
+--------------------------------------+--------------------+------------+-------------------+-------+------
| id                                   | agent_type         | host       | availability_zone | alive | admin_state_up | binary                    |

| 09ca7bf7-15cc-4b3f-865e-562b0090a1b1 | L3 agent           | controller | nova              | :-)   | True           | neutron-l3-agent          |
| 8a24ea0a-388a-48bf-bb1f-f1ff7faa52b0 | Linux bridge agent | controller |                   | :-)   | True           | neutron-linuxbridge-agent |
| 94d09287-3b68-41a5-a7bd-5a1679a59215 | DHCP agent         | controller | nova              | :-)   | True           | neutron-dhcp-agent        |
| ac2b8999-35e6-481c-b992-67cbe17b2481 | Linux bridge agent | computer1  |                   | :-)   | True           | neutron-linuxbridge-agent |
| ce59bf79-e97b-472a-8026-8af603ecc357 | Metadata agent     | controller |                   | :-)   | True           | neutron-metadata-agent    |
+--------------------------------------+--------------------+------------+-------------------+-------+------
8.4 dashboard需要开启route
vim /etc/openstack-dashboard/local_settings
OPENSTACK_NEUTRON_NETWORK = {
#将 Fasle 改为True
    'enable_router': True,
8.5.web界面操作
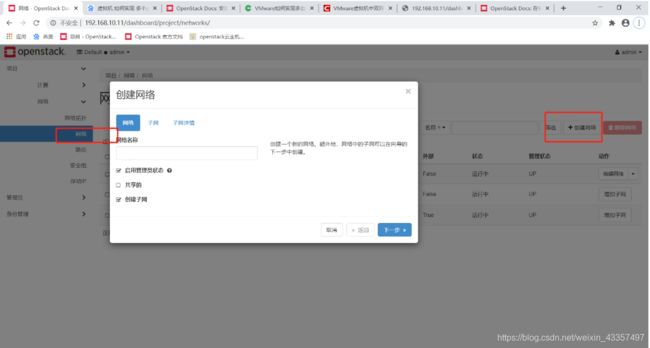
8.5.1 创建私有网络一个网络
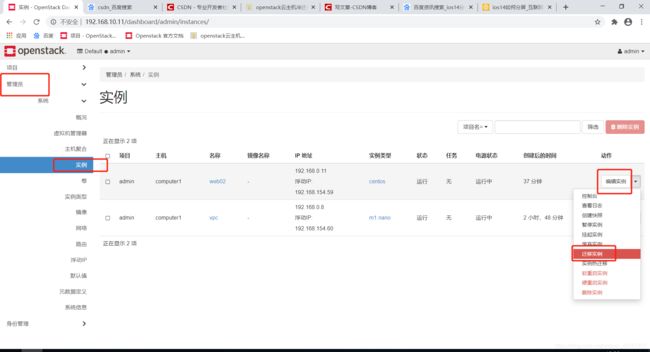
8.5.2 将访问往外的网络改为外部网络
8.5.3 添加路由
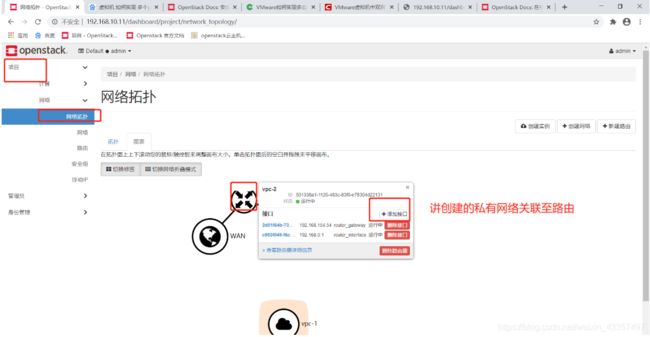
8.5.4 私有网络关联到路由中
8.5.5 启动一个实例创建的时候选择私有网络
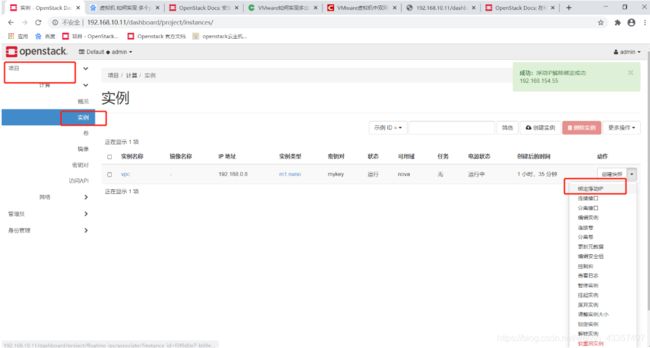
8.5.6 添加浮动ip地址 便于外部访问内部
openstack 命令
1 openstack,用户,项目,角色的关系
#创建 nova 用户s
openstack user create --domain default --password 123456 nova
#给 nova 用户添加 admin 角色
openstack role add --project service --user nova admin
#placement 追踪云主机资源使用具体情况 创建 placement 用户
openstack user create --domain default --password 123456 placement
#给placement用户添加admin角色
openstack role add --project service --user placement admin
nova 命令
#查询连接节点状态
openstack compute service list
#查询节点网络状态
neutron agent-list
openstack image create “cirros” --file cirros-0.3.5-x86_64-disk.img --disk-format qcow2 --container-format bare --public
