Spring Boot 整合 Spring Security + OAuth2
学习在 Spring Boot 中整合 Spring Security 和 OAuth2 。
1 OAuth2 概述
1.1 OAuth2 简介
OAuth 是一个开放标准,该标准允许用户让第三方应用访问该用户在某一网站上存储的私密资源(如头像、照片、视频等),而在这个过程中无需将用户名和密码提供给第三方应用。实现这一功能是通过提供一个令牌(token),而不是用户名和密码来访问他们存放在特定服务提供者的数据。采用令牌(token)的方式可以让用户灵活的对第三方应用授权或者收回权限。
OAuth2 是 OAuth 协议的下一版本,但不向下兼容 OAuth 1.0 。传统的 Web 开发登录认证一般都是基于 session 的,但是在前后端分离的架构中继续使用 session 就会有许多不便,因为移动端(Android、iOS、微信小程序等)要么不支持 cookie (微信小程序),要么使用非常不便,对于这些问题,使用 OAuth2 认证都能解决。
1.2 OAuth2 授权模式
OAuth 协议的授权模式共分为四种:
- 授权码模式:常见的第三方平台登录功能基本都是使用这种模式。
- 简化模式:简化模式是不需要客户端服务器参与,直接在浏览器中向授权服务器申请令牌(token),一般如果网站是纯静态页面则可以采用这种方式。
- 密码模式:密码模式是用户把用户名密码直接告诉客户端,客户端使用说这些信息向授权服务器申请令牌(token)。这需要用户对客户端高度信任,例如客户端应用和服务提供商就是同一家公司。
- 客户端模式:客户端模式是指客户端使用自己的名义而不是用户的名义向服务提供者申请授权,严格来说,客户端模式并不能算作 OAuth 协议要解决的问题的一种解决方案,但是,对于开发者而言,在一些前后端分离应用或者为移动端提供的认证授权服务器上使用这种模式还是非常方便的。
这四种模式各有千秋,分别适用于不同的开发场景,开发者要根据实际情况进行选择,本文主要介绍密码模式。
2 实战
2.1 创建工程并配置
创建 Spring Boot 项目 spring-boot-springsecurity-oauth2 ,添加 Web/Spring Security/Redis 依赖,如下:

之后手动在 pom 文件中添加 oauth2/commos-pool2 依赖,最终的依赖如下:
<dependencies>
    <dependency>
        <groupId>org.springframework.bootgroupId>
        <artifactId>spring-boot-starter-data-redisartifactId>
    dependency>
    <dependency>
        <groupId>org.springframework.bootgroupId>
        <artifactId>spring-boot-starter-securityartifactId>
    dependency>
    <dependency>
        <groupId>org.springframework.bootgroupId>
        <artifactId>spring-boot-starter-webartifactId>
    dependency>
    <dependency>
        <groupId>org.springframework.security.oauthgroupId>
        <artifactId>spring-security-oauth2artifactId>
        <version>2.3.6.RELEASEversion>
    dependency>
    <dependency>
        <groupId>org.apache.commonsgroupId>
        <artifactId>commons-pool2artifactId>
    dependency>
    <dependency>
        <groupId>org.springframework.bootgroupId>
        <artifactId>spring-boot-starter-testartifactId>
        <scope>testscope>
        <exclusions>
            <exclusion>
                <groupId>org.junit.vintagegroupId>
                <artifactId>junit-vintage-engineartifactId>
            exclusion>
        exclusions>
    dependency>
    <dependency>
        <groupId>org.springframework.securitygroupId>
        <artifactId>spring-security-testartifactId>
        <scope>testscope>
    dependency>
dependencies>
接着在 application.properties 配置文件中添加 Redis 相关信息的配置和 Redis 连接池的配置,如下:
# 方法1:通过配置文件配置用户/角色
# spring.security.user.name=admin
# spring.security.user.password=123456
# spring.security.user.roles=admin

# Redis 配置
spring.redis.host=192.168.71.62
spring.redis.port=6379
spring.redis.database=0
spring.redis.password=000000

# 连接池配置, Spring Boot 默认用的是 lettuce ,而不是 Jedis ,需增加 commons-pool2 依赖
spring.redis.lettuce.pool.min-idle=5
spring.redis.lettuce.pool.max-idle=10
spring.redis.lettuce.pool.max-active=8
spring.redis.lettuce.pool.max-wait=1ms
spring.redis.lettuce.shutdown-timeout=100ms
2.2 配置 OAuth2
- 资源服务配置
// 资源服务配置
@Configuration
@EnableResourceServer
public class MyResourceServerConfigurer extends ResourceServerConfigurerAdapter {
    @Override
    public void configure(ResourceServerSecurityConfigurer resources) throws Exception {
        // 资源 id = rid
        resources.resourceId("rid").stateless(true);
    }

    @Override
    public void configure(HttpSecurity http) throws Exception {
        http.authorizeRequests()
                .antMatchers("/admin/**").hasRole("admin")
                .antMatchers("/user/**").hasRole("user")
                .anyRequest().authenticated();
    }
}
- 授权服务配置
// 授权服务配置
@Configuration
@EnableAuthorizationServer
public class MyAuthorizationServerConfigurer extends AuthorizationServerConfigurerAdapter {
    @Autowired
    AuthenticationManager authenticationManager;
    @Autowired
    RedisConnectionFactory redisConnectionFactory;
    @Autowired
    UserDetailsService userDetailsService;

    @Bean
    PasswordEncoder passwordEncoder() {
        // return NoOpPasswordEncoder.getInstance();// 密码不加密
        return new BCryptPasswordEncoder();// 密码加密
    }

    @Override
    public void configure(ClientDetailsServiceConfigurer clients) throws Exception {
        clients.inMemory()
                .withClient("cid")// 客户端 id
                .authorizedGrantTypes("password", "refresh_token")// 授权方式
                .accessTokenValiditySeconds(1800)
                .resourceIds("rid")// 资源 id,与资源服务配置中的保持一致
                .scopes("all")
                .secret("$2a$10$kwLIAqAupvY87OM.O25.Yu1QKEXV1imAv7jWbDaQRFUFWSnSiDEwG");// 客户端秘钥(123)
    }

    @Override
    public void configure(AuthorizationServerEndpointsConfigurer endpoints) throws Exception {
        endpoints.tokenStore(new RedisTokenStore(redisConnectionFactory))
                .authenticationManager(authenticationManager)
                .userDetailsService(userDetailsService);
    }

    @Override
    public void configure(AuthorizationServerSecurityConfigurer security) throws Exception {
        security.allowFormAuthenticationForClients();
    }
}
2.3 配置 Spring Security
新增 SecurityConfig 配置类,如下:
@Configuration
public class SecurityConfig extends WebSecurityConfigurerAdapter {
@Override
@Bean
protected AuthenticationManager authenticationManager() throws Exception {
return super.authenticationManager();
}
@Bean
@Override
protected UserDetailsService userDetailsService() {
return super.userDetailsService();
}
@Override
protected void configure(AuthenticationManagerBuilder auth) throws Exception {
// 在内存中配置2个用户
/*auth.inMemoryAuthentication()
.withUser("admin").password("123456").roles("admin")
.and()
.withUser("user").password("123456").roles("user");// 密码不加密*/
auth.inMemoryAuthentication()
.withUser("admin").password("$2a$10$fB2UU8iJmXsjpdk6T6hGMup8uNcJnOGwo2.QGR.e3qjIsdPYaS4LO").roles("admin")
.and()
.withUser("user").password("$2a$10$3TQ2HO/Xz1bVHw5nlfYTBON2TDJsQ0FMDwAS81uh7D.i9ax5DR46q").roles("user");// 密码加密
}
@Override
protected void configure(HttpSecurity http) throws Exception {
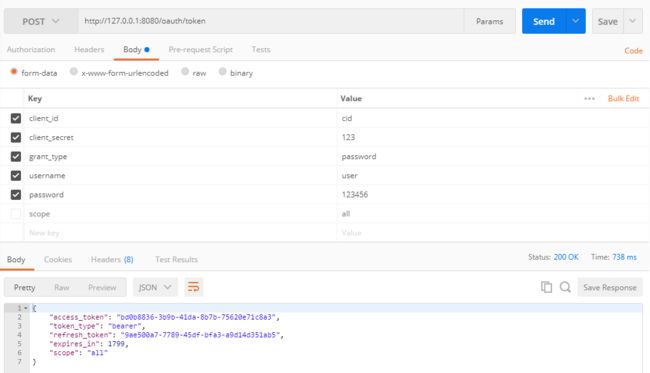
// 1.先访问 http://127.0.0.1:8080/oauth/token [POST] 获取 token
// 输入参数:
/*client_id:cid
client_secret:123
grant_type:password
username:user
password:123456
scope:all(这个貌似可以不用传)*/
// 输出参数:
/*{
"access_token": "bd0b8836-3b9b-41da-8b7b-75620e71c8a3",
"token_type": "bearer",
"refresh_token": "9ae500a7-7789-45df-bfa3-a9d14d351ab5",
"expires_in": 1799,
"scope": "all"
}*/
// 2.再根据上面获取的 access_token 访问实际的请求 http://127.0.0.1:8080/user/hello?access_token=bd0b8836-3b9b-41da-8b7b-75620e71c8a3 [GET]
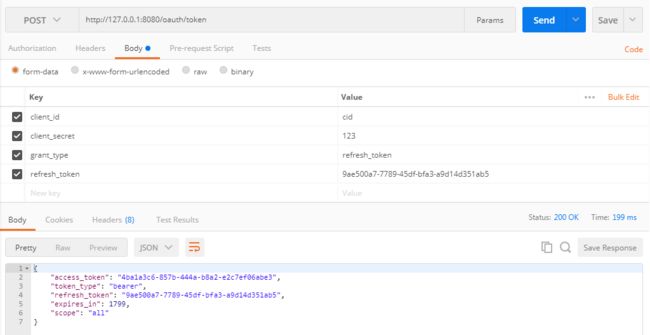
// 另外可访问 http://127.0.0.1:8080/oauth/token [POST] 刷新 token
// 输入参数:
/*client_id:cid
client_secret:123
grant_type:refresh_token
refresh_token:9ae500a7-7789-45df-bfa3-a9d14d351ab5*/
// 输出参数:
/*{
"access_token": "4ba1a3c6-857b-444a-b8a2-e2c7ef06abe3",
"token_type": "bearer",
"refresh_token": "9ae500a7-7789-45df-bfa3-a9d14d351ab5",
"expires_in": 1799,
"scope": "all"
}*/
// 放过 /oauth/token 等请求
http.antMatcher("/oauth/**")
.authorizeRequests()
.antMatchers("/oauth/**").permitAll()
.and()
.csrf().disable();
}
}
2.4 测试
新建 HelloController ,如下:
@RestController
public class HelloController {
    @GetMapping("/hello")
    public String hello() {
        return "hello";
    }

    @GetMapping("/admin/hello")
    public String admin() {
        return "hello admin";
    }

    @GetMapping("/user/hello")
    public String user() {
        return "hello user";
    }
}
项目启动之后,用 Postman 完成测试。
先访问 http://127.0.0.1:8080/oauth/token [POST] 获取 token 。
再根据上面获取的 access_token 访问实际的请求 http://127.0.0.1:8080/user/hello?access_token=bd0b8836-3b9b-41da-8b7b-75620e71c8a3 [GET]。

另外可访问 http://127.0.0.1:8080/oauth/token [POST] 刷新 token 。
- Spring Boot 教程合集(微信左下方阅读全文可直达)。
- Spring Boot 教程合集示例代码:https://github.com/cxy35/spring-boot-samples
- 本文示例代码:https://github.com/cxy35/spring-boot-samples/tree/master/spring-boot-security/spring-boot-springsecurity-oauth2
扫码关注微信公众号 程序员35 ,获取最新技术干货,畅聊 #程序员的35,35的程序员# 。独立站点:https://cxy35.com