Spring源码解析-2.IOC容器源码解析
目录
- 前言
- 一、IOC是什么?
- 二、代码实践
- 三、构建流程分析
-
- BeanFactory 简介
- 启动过程分析
- 四、Component注解实现原理(手动实现)
- 五、@Autowired源码浅析
- 参考
前言
Spring 三大核心思想:控制反转(IOC),依赖注入(DI)和面向切面编程(AOP)。
Spring最核心,最基础的概念是什么?将spring类比java,java最核心,最基础的概念就是object了。java中,所有的操作都是针对对象的(基础类型除外),java中,一切皆对象,一切都是object。类比下来,spring中最基础的概念是bean。在spring中,所以的类都可以认为是一个bean。(个人认为)在spring中的所有文件,都可以认为是注册了的bean和未注册的bean。 spring中所有操作都是针对bean的操作。自然,spring的三大核心思想中操作的对象,也是bean。
一、IOC是什么?
IOC控制反转:在没有spring之前我们创建任何一个对象都是直接new的,每次创建对象都要new,太过繁琐;而直到spring的出现,创建对象的职责交给了spring,只要将类交给spring管理,我们就能直接向spring容器中取对象,降低了代码复杂性,耦合性。将类交给spring容器管理主要有两种方式:①xml配置文件 ②声明式注解。
二、代码实践
以下代码是在spring源码中的实践。
如是普通maven项目只需添加spring-context依赖即可。spring-context 会自动将 spring-core、spring-beans、spring-aop、spring-expression 这几个基础依赖带进来。
- 组件扫描配置类:扫描com.lkl包下的所有类。
@ComponentScan("com.lkl")
public class ContextConfig {
}
- 创建类加入spring容器。
IUserService
public interface IUserService {
}
UserService
@Service
public class UserService implements IUserService {
	public UserService() {
		System.out.println(this.getClass().getSimpleName() + "构造方法...");
	}
}
- 测试类及运行结果。
public class ContextApplication {
	public static void main(String[] args) {
		ApplicationContext context = new AnnotationConfigApplicationContext(ContextConfig.class);

		UserService bean = context.getBean(UserService.class);
		System.out.println(bean);
	}
}
运行结果如下:

ApplicationContext context = new AnnotationConfigApplicationContext(...);其实很好理解,从名字上就可以猜出一二,使用注解配置类文件来构建 ApplicationContext。当然,除了 AnnotationConfigApplicationContext以外,我们也还有其他构建 ApplicationContext 的方案可供选择,我们先来看看ApplicationContext 大体的继承结构是怎么样的:
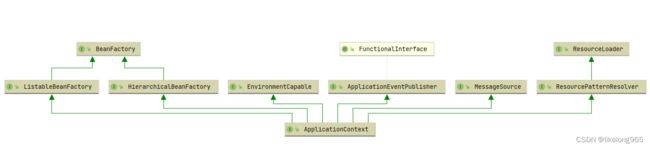
ApplicationContext 子类及继承关系:

根据上述关系图可以看出,构建ApplicationContext的主要有三个类。除了AnnotationConfigApplicationContext以外还有ClassPathXmlApplicationContext 和FileSystemXmlApplicationContext。
- FileSystemXmlApplicationContext 的构造函数需要一个 xml 配置文件在系统中的路径,其他和ClassPathXmlApplicationContext 基本上一样。
例如:ApplicationContext context = new ClassPathXmlApplicationContext("classpath:applicationContext.xml"); - AnnotationConfigApplicationContext 是基于注解来使用的,它不需要配置文件,采用 java 配置类和各种注解来配置。
三、构建流程分析
怎样通过配置类来启动 Spring 的 ApplicationContext ?这就是要分析的 IOC 的核心了。ApplicationContext 启动过程中,会负责创建实例 Bean,往各个 Bean 中注入依赖等。
BeanFactory 简介
BeanFactory,从名字上很好理解,生产 bean 的工厂,它负责生产和管理各个 bean 实例。
ApplicationContext 其实就是一个 BeanFactory。我们来看下和 BeanFactory 接口相关的主要的继承结构:
- ApplicationContext 继承了 ListableBeanFactory,ListableBeanFactory又继承BeanFactory,通过这个接口,我们可以获取多个 Bean,最顶层 BeanFactory 接口的方法都是获取单个 Bean 的。
- ApplicationContext 继承了 HierarchicalBeanFactory,Hierarchical (等级的、分层的)单词本身已经能说明问题了,也就是说我们可以在应用中起多个 BeanFactory,然后可以将各个 BeanFactory 设置为父子关系。
- AutowireCapableBeanFactory 这个名字中的 Autowire 大家都非常熟悉,它就是用来自动装配 Bean 用的,但是ApplicationContext 并没有继承它,不过不用担心,不使用继承,不代表不可以使用组合,如果你看到 ApplicationContext 接口定义中的最后一个方法 getAutowireCapableBeanFactory() 就知道了。
- ConfigurableListableBeanFactory 也是一个特殊的接口,看图,特殊之处在于它继承了第二层所有的三个接口,而 ApplicationContext 没有。这点之后会用到。
启动过程分析
第一步,肯定要从 AnnotationConfigApplicationContext的构造方法说起。AnnotationConfigApplicationContext 多态构造方法。
1、默认构造方法初始化一个空容器,不包含任何Bean信息,需要在稍后通过调用register()方法配置类,并调用refresh()方法刷新容器,触发容器对注解bean的载入、解析、注册过程。
2、AnnotationConfigApplicationContext(Class… annotatedClasses)通过将涉及到的配置类传递给构造函数,以实现将相应配置类中的bean自动注册到容器中。
public class AnnotationConfigApplicationContext extends GenericApplicationContext implements AnnotationConfigRegistry {

    //读取注解的Bean定义读取器,并将其设置到容器中
	private final AnnotatedBeanDefinitionReader reader;

	private final ClassPathBeanDefinitionScanner scanner;

	public AnnotationConfigApplicationContext() {
		this.reader = new AnnotatedBeanDefinitionReader(this);
		this.scanner = new ClassPathBeanDefinitionScanner(this);
	}

	public AnnotationConfigApplicationContext(Class<?>... componentClasses) {
		this();
		register(componentClasses);
		refresh();
	}
	}
register(componentClasses)最后调用的核心方法
	//注册 Bean 定义
	private <T> void doRegisterBean(Class<T> beanClass, @Nullable String name,
			@Nullable Class<? extends Annotation>[] qualifiers, @Nullable Supplier<T> supplier,
			@Nullable BeanDefinitionCustomizer[] customizers) {

		AnnotatedGenericBeanDefinition abd = new AnnotatedGenericBeanDefinition(beanClass);
		if (this.conditionEvaluator.shouldSkip(abd.getMetadata())) {
			return;
		}

		abd.setInstanceSupplier(supplier);
		ScopeMetadata scopeMetadata = this.scopeMetadataResolver.resolveScopeMetadata(abd);
		abd.setScope(scopeMetadata.getScopeName());
		String beanName = (name != null ? name : this.beanNameGenerator.generateBeanName(abd, this.registry));

		AnnotationConfigUtils.processCommonDefinitionAnnotations(abd);
		if (qualifiers != null) {
			for (Class<? extends Annotation> qualifier : qualifiers) {
				if (Primary.class == qualifier) {
					abd.setPrimary(true);
				}
				else if (Lazy.class == qualifier) {
					abd.setLazyInit(true);
				}
				else {
					abd.addQualifier(new AutowireCandidateQualifier(qualifier));
				}
			}
		}
		if (customizers != null) {
			for (BeanDefinitionCustomizer customizer : customizers) {
				customizer.customize(abd);
			}
		}

		BeanDefinitionHolder definitionHolder = new BeanDefinitionHolder(abd, beanName);
		definitionHolder = AnnotationConfigUtils.applyScopedProxyMode(scopeMetadata, definitionHolder, this.registry);
		BeanDefinitionReaderUtils.registerBeanDefinition(definitionHolder, this.registry);
	}
refresh()方法(重要)
public void refresh() throws BeansException, IllegalStateException {
   // 来个锁,不然 refresh() 还没结束,你又来个启动或销毁容器的操作,那就乱套了
   synchronized (this.startupShutdownMonitor) {

      // 准备工作,记录下容器的启动时间、标记“已启动”状态、处理配置文件中的占位符
      prepareRefresh();

      // 这步比较关键,这步完成后,配置文件就会解析成一个个 Bean 定义,注册到 BeanFactory 中,
      // 当然,这里说的 Bean 还没有初始化,只是配置信息都提取出来了,
      // 注册也只是将这些信息都保存到了注册中心(说到底核心是一个 beanName-> beanDefinition 的 map)
      ConfigurableListableBeanFactory beanFactory = obtainFreshBeanFactory();

      // 设置 BeanFactory 的类加载器,添加几个 BeanPostProcessor,手动注册几个特殊的 bean
      prepareBeanFactory(beanFactory);

      try {
         // 【这里需要知道 BeanFactoryPostProcessor 这个知识点,Bean 如果实现了此接口,
         // 那么在容器初始化以后,Spring 会负责调用里面的 postProcessBeanFactory 方法。】

         // 这里是提供给子类的扩展点,到这里的时候,所有的 Bean 都加载、注册完成了,但是都还没有初始化
         // 具体的子类可以在这步的时候添加一些特殊的 BeanFactoryPostProcessor 的实现类或做点什么事
         postProcessBeanFactory(beanFactory);
         // 调用 BeanFactoryPostProcessor 各个实现类的 postProcessBeanFactory(factory) 方法
         invokeBeanFactoryPostProcessors(beanFactory);

         // 注册 BeanPostProcessor 的实现类,注意看和 BeanFactoryPostProcessor 的区别
         // 此接口两个方法: postProcessBeforeInitialization 和 postProcessAfterInitialization
         // 两个方法分别在 Bean 初始化之前和初始化之后得到执行。注意,到这里 Bean 还没初始化
         registerBeanPostProcessors(beanFactory);

         // 初始化当前 ApplicationContext 的 MessageSource,国际化
         initMessageSource();

         // 初始化当前 ApplicationContext 的事件广播器
         initApplicationEventMulticaster();

         // 从方法名就可以知道,典型的模板方法(钩子方法),
         // 具体的子类可以在这里初始化一些特殊的 Bean(在初始化 singleton beans 之前)
         onRefresh();

         // 注册事件监听器,监听器需要实现 ApplicationListener 接口
         registerListeners();

         // 重点,重点,重点
         // 初始化所有的 singleton beans
         //(lazy-init 的除外)
         finishBeanFactoryInitialization(beanFactory);

         // 最后,广播事件,ApplicationContext 初始化完成
         finishRefresh();
      }

      catch (BeansException ex) {
         if (logger.isWarnEnabled()) {
            logger.warn("Exception encountered during context initialization - " +
                  "cancelling refresh attempt: " + ex);
         }

         // Destroy already created singletons to avoid dangling resources.
         // 销毁已经初始化的 singleton 的 Beans,以免有些 bean 会一直占用资源
         destroyBeans();

         // Reset 'active' flag.
         cancelRefresh(ex);

         // 把异常往外抛
         throw ex;
      }

      finally {
         // Reset common introspection caches in Spring's core, since we
         // might not ever need metadata for singleton beans anymore...
         resetCommonCaches();
      }
   }
}
spring中@Component、@Controller、@Service、@Repository这几个注解都可以把类加到spring容器中管理,然后可以使用@Autowired从容器中取对象。
这几个注解是怎么实现这些功能的?源码分析一波。
注解的机制和原理
注解的作用就是将定义的类注册到spring容器中,交给spring容器去管理、创建、销毁对象。
常用注解说明
- @Controller控制器(注入服务),用于标注控制层组件
- @Service服务(注入dao),用于标注业务层组件
- @Repository dao(实现dao访问),用于标注数据访问组件,即DAO组件
- @Component (把普通pojo实例化到spring容器中,相当于配置文件中的),泛指组件,当组件不好归类的时候,我们可以使用这个注解进行标注
在annotaion配置注解中用@Component来表示一个通用注释,用于说明一个类是一个spring容器管理的类。即该类已经放入到spring的管理了。而@Controller, @Service, @Repository是@Component的细化,这三个注解比@Component带有更多的语义,它们分别对应了控制层、服务层、持久层的类。 - @Autowired:自动根据类型注入
@Qualifier(“名称”):指定自动注入的id名称 - @Resource(“名称”):根据名称注入
@ PostConstruct 自定义初始化(在构造器之后会执行)
@ PreDestroy 自定义销毁(类销毁之前执行)
四、Component注解实现原理(手动实现)
1.将ComponentScan注解的类放进一个配置上下文类里面(ApplicattionContext)
定义一个BeanConfigContext类,解析带有ComponentScan注解的类。
public class ContextApp {
   public static void main(String[] args) {
       BeanConfigContext beanConfigContext = new BeanConfigContext(ContextConfig.class);
}
@ComponentScan("com.lkl.service")
public class ContextConfig {
}
2.定义注解
ComponentScan注解定义
import java.lang.annotation.ElementType;
import java.lang.annotation.Retention;
import java.lang.annotation.RetentionPolicy;
import java.lang.annotation.Target;

@Retention(RetentionPolicy.RUNTIME)//生命周期是运行时
@Target(ElementType.TYPE)//只能在类上面定义此注解
public @interface ComponentScan {
    String value();
}
Component注解定义
import java.lang.annotation.ElementType;
import java.lang.annotation.Retention;
import java.lang.annotation.RetentionPolicy;
import java.lang.annotation.Target;

@Retention(RetentionPolicy.RUNTIME)
@Target(ElementType.TYPE)
public @interface Component {
    String value();
}
Scope注解定义
这个注解是判断bean是单例还是多例的。
import java.lang.annotation.ElementType;
import java.lang.annotation.Retention;
import java.lang.annotation.RetentionPolicy;
import java.lang.annotation.Target;

@Retention(RetentionPolicy.RUNTIME)
@Target(ElementType.TYPE)
public @interface Scope {
    String value();
}
3.创建bean的定义类(只写了一些必要的属性,实际还有很多的属性)
public class BeanDefinition {

    private Class clazz;
    private String scope;

  public BeanDefinition(){

  }

   public Class getClazz() {
       return clazz;
   }

   public String getScope() {
       return scope;
   }

   public void setClazz(Class clazz) {
       this.clazz = clazz;
   }

   public void setScope(String scope) {
       this.scope = scope;
   }
}
4.最重要的类BeanConfigContext
public class BeanConfigContext {

    private Class configClass;

    private ConcurrentHashMap<String, Object> singletonObjects = new ConcurrentHashMap<>();//单例池
    private ConcurrentHashMap<String, BeanDefinition> beanDefinitionMap = new ConcurrentHashMap<>();

    public BeanConfigContext(Class configClass) {
        this.configClass = configClass;

        scan(configClass);//扫描路径

        for (Map.Entry<String, BeanDefinition> entry : beanDefinitionMap.entrySet()) {
            String beanName = entry.getKey();
            BeanDefinition beanDefinition = entry.getValue();
            //如果beanDefinitionMap里面有singleton的就创建一个对象,并且将这个对象放入singletonObjects(单例池map)中去。
            if ("singleton".equals(beanDefinition.getScope())) {
                Object o = createBean(beanDefinition);
                singletonObjects.put(beanName, o);
            }

        }
    }

    private Object createBean(BeanDefinition beanDefinition) {
        Object obj = null;
        try {
            obj = beanDefinition.getClazz().newInstance();
        } catch (Exception e) {
            e.printStackTrace();
        }
        return obj;
    }

    //将ComponentScan注解包路径下所有带Component注解的类构建成 beanName->BeanDefinition 放入map中
    private void scan(Class configClass) {
        ComponentScan componentScanAnnotation = (ComponentScan) configClass.getDeclaredAnnotation(ComponentScan.class);//这一步是获得ComponentScan注解的对象
        String path = componentScanAnnotation.value();//通过这个对象的value属性获得一个路径
        path = path.replace('.', '/');//将这个路径里面的.用/来进行代替

        //类加载器
        //BootStrap  启动类加载器  jre/lib/rt.jar里所有的class
        //Extensions 拓展类加载器 加载JRE的扩展目录,lib/ext或者由java.ext.dirs系统属性指定的目录中的JAR包的类
        //Application 应用类加载器 针对与classpath路径下的类,我们这里用到的就是这个加载器
        //扫描路径
        ClassLoader classLoader = BeanConfigContext.class.getClassLoader();//获得类加载器
        URL resource = classLoader.getResource(path);//通过类加载器多的这个路径的URL对象

        File file = new File(resource.getFile());//获得这个url路径下的文件
        if (file.isDirectory()) {
            File[] files = file.listFiles();
            for (File f : files) {
                String className = f.getAbsolutePath();//获得文件的绝对路径
                if (className.endsWith(".class")) {
                    className = className.substring(className.indexOf("com"), className.indexOf(".class"));//将此路径转换为com\xxx\xxx格式
                    className = className.replace('\\', '.');//将路径中的\替换成.
                    Class<?> clazz;
                    try {
                        clazz = classLoader.loadClass(className);//将这个路径下的类通过类加载器进行加载

                        if (clazz.isAnnotationPresent(Component.class)) {

                            Component component = clazz.getDeclaredAnnotation(Component.class);//得到这个类的注解的component对象。
                            String beanName = component.value();//得到component对象的value属性
                            BeanDefinition beanDefinition = new BeanDefinition();//dean的定义类,里面是bean的一些属性
                            beanDefinition.setClazz(clazz);
                            if (clazz.isAnnotationPresent(Scope.class)) {
                                Scope scope = clazz.getDeclaredAnnotation(Scope.class);
                                beanDefinition.setScope(scope.value());//设置是否是单例bean还是多例bean(没有去考虑懒加载机制)
                            } else {
                                beanDefinition.setScope("singleton");//默认设置为单例
                            }
                            beanDefinitionMap.put(beanName, beanDefinition);//map里面放入bean名字和一个bean定义类对象
                        }
                    } catch (ClassNotFoundException e) {
                        e.printStackTrace();
                    }

                }
            }
        }
    }

    //应该是实现ApplicationContext接口重写getBean()方法
    public Object getBean(String beanName) {
        if (beanDefinitionMap.containsKey(beanName)) {
            BeanDefinition beanDefinition = beanDefinitionMap.get(beanName);
            Object o;
            if ("singleton".equals(beanDefinition.getScope())) {
                o = singletonObjects.get(beanName);
            } else {
                o = createBean(beanDefinition);
            }
            return o;

        } else {
            throw new NoSuchElementException();
        }

    }

}
5.测试

测试代码如下:
    public static void main(String[] args) {

        BeanConfigContext context = new BeanConfigContext(ContextConfig.class);
        UserService userService = (UserService) context.getBean("userService");
        System.out.println(userService.getName());
    }
}
运行结果如下:

五、@Autowired源码浅析
@Autowired源码如下:
@Target({ElementType.CONSTRUCTOR, ElementType.METHOD, ElementType.PARAMETER, ElementType.FIELD, ElementType.ANNOTATION_TYPE})
@Retention(RetentionPolicy.RUNTIME)
@Documented
public @interface Autowired {
	boolean required() default true;
}
Autowired注解,只有一个required元素,默认是true。
require=ture 时,表示解析被标记的字段或方法,一定有对应的bean存在。
require=false 时,表示解析被标记的字段或方法,没有对应的bean存在不会报错。
@Autowired注解的作用是由AutowiredAnnotationBeanPostProcessor实现的
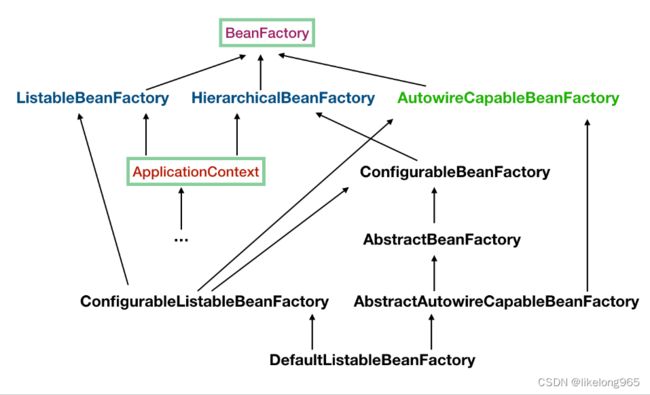
AutowiredAnnotationBeanPostProcessor继承关系图:

AutowiredAnnotationBeanPostProcessor实现MergedBeanDefinitionPostProcessor接口从而实现了
postProcessMergedBeanDefinition()方法,@Autowired注解正是通过这个方法实现注入类型的预解析,将需要依赖注入的属性信息封装到InjectionMetadata类中,InjectionMetadata类中包含了哪些需要注入的元素及元素要注入到哪个目标类中。
public class AutowiredAnnotationBeanPostProcessor implements SmartInstantiationAwareBeanPostProcessor,
		MergedBeanDefinitionPostProcessor, PriorityOrdered, BeanFactoryAware {
		}
postProcessMergedBeanDefinition()实现
	@Override
	public void postProcessMergedBeanDefinition(RootBeanDefinition beanDefinition, Class<?> beanType, String beanName) {
		InjectionMetadata metadata = findAutowiringMetadata(beanName, beanType, null);
		metadata.checkConfigMembers(beanDefinition);
	}
InjectionMetadata类
public class InjectionMetadata {
	private final Class<?> targetClass;
	private final Collection<InjectedElement> injectedElements;
	private volatile Set<InjectedElement> checkedElements;
1.Spring容器在启动的时候会执行AbstractApplicationContext类的refresh方法:
    @Override
	public void refresh() throws BeansException, IllegalStateException {
		synchronized (this.startupShutdownMonitor) {
			StartupStep contextRefresh = this.applicationStartup.start("spring.context.refresh");

			// Prepare this context for refreshing.
			prepareRefresh();

			// Tell the subclass to refresh the internal bean factory.
			ConfigurableListableBeanFactory beanFactory = obtainFreshBeanFactory();

			// Prepare the bean factory for use in this context.
			prepareBeanFactory(beanFactory);

			try {
				// Allows post-processing of the bean factory in context subclasses.
				postProcessBeanFactory(beanFactory);

				StartupStep beanPostProcess = this.applicationStartup.start("spring.context.beans.post-process");
				// Invoke factory processors registered as beans in the context.
				invokeBeanFactoryPostProcessors(beanFactory);

				// Register bean processors that intercept bean creation.
				registerBeanPostProcessors(beanFactory);
				beanPostProcess.end();

				// Initialize message source for this context.
				initMessageSource();

				// Initialize event multicaster for this context.
				initApplicationEventMulticaster();

				// Initialize other special beans in specific context subclasses.
				onRefresh();

				// Check for listener beans and register them.
				registerListeners();

				// Instantiate all remaining (non-lazy-init) singletons.
				finishBeanFactoryInitialization(beanFactory);

				// Last step: publish corresponding event.
				finishRefresh();
			}

			catch (BeansException ex) {
				if (logger.isWarnEnabled()) {
					logger.warn("Exception encountered during context initialization - " +
							"cancelling refresh attempt: " + ex);
				}

				// Destroy already created singletons to avoid dangling resources.
				destroyBeans();

				// Reset 'active' flag.
				cancelRefresh(ex);

				// Propagate exception to caller.
				throw ex;
			}

			finally {
				// Reset common introspection caches in Spring's core, since we
				// might not ever need metadata for singleton beans anymore...
				resetCommonCaches();
				contextRefresh.end();
			}
		}
	}
2.refresh方法中registerBeanPostProcessors(beanFactory)完成了对AutowiredAnnotationBeanPostProcessor的注册;
3.当执行finishBeanFactoryInitialization(beanFactory)方法对非延迟初始化的单例bean进行初始化时;会调用getBean(String bean)方法获取bean实例

接下来执行doGetBean()方法里的createBean()方法,最后执行到AbstractAutowireCapableBeanFactory类的doCreateBean方法
protected Object doCreateBean(final String beanName, final RootBeanDefinition mbd, final @Nullable Object[] args)
			throws BeanCreationException {
         ...
		// Initialize the bean instance.
		Object exposedObject = bean;
		try {
			//设置属性,非常重要 @Autowired和@Resource 也是在这里面注入属性
			//这个地方会调用两次后置处理器的方法  第五次和第六次
			//分别是InstantiationAwareBeanPostProcessor这个类中的 这两个
            //postProcessAfterInstantiation()和postProcessPropertyValues
			populateBean(beanName, mbd, instanceWrapper);
			//执行后置处理器,aop 就是在这里完成的处理
			//第七次和第八次在这里面完成 执行的是 BeanPostProcessor中的
			//1. postProcessBeforeInitialization
			//2. postProcessAfterInitialization
			exposedObject = initializeBean(beanName, exposedObject, mbd);
		}
		catch (Throwable ex) {
			if (ex instanceof BeanCreationException && beanName.equals(((BeanCreationException) ex).getBeanName())) {
				throw (BeanCreationException) ex;
			}
			else {
				throw new BeanCreationException(
						mbd.getResourceDescription(), beanName, "Initialization of bean failed", ex);
			}
		}

		if (earlySingletonExposure) {
			Object earlySingletonReference = getSingleton(beanName, false);
			if (earlySingletonReference != null) {
				if (exposedObject == bean) {
					exposedObject = earlySingletonReference;
				}
				else if (!this.allowRawInjectionDespiteWrapping && hasDependentBean(beanName)) {
					String[] dependentBeans = getDependentBeans(beanName);
					Set<String> actualDependentBeans = new LinkedHashSet<>(dependentBeans.length);
					for (String dependentBean : dependentBeans) {
						if (!removeSingletonIfCreatedForTypeCheckOnly(dependentBean)) {
							actualDependentBeans.add(dependentBean);
						}
					}
					if (!actualDependentBeans.isEmpty()) {
						throw new BeanCurrentlyInCreationException(beanName,
								"Bean with name '" + beanName + "' has been injected into other beans [" +
								StringUtils.collectionToCommaDelimitedString(actualDependentBeans) +
								"] in its raw version as part of a circular reference, but has eventually been " +
								"wrapped. This means that said other beans do not use the final version of the " +
								"bean. This is often the result of over-eager type matching - consider using " +
								"'getBeanNamesOfType' with the 'allowEagerInit' flag turned off, for example.");
					}
				}
			}
		}

		// Register bean as disposable.
		try {
			registerDisposableBeanIfNecessary(beanName, bean, mbd);
		}
		catch (BeanDefinitionValidationException ex) {
			throw new BeanCreationException(
					mbd.getResourceDescription(), beanName, "Invalid destruction signature", ex);
		}

		return exposedObject;
	}
4.通过populateBean(beanName, mbd, instanceWrapper);来填充@Autowired和@Resouece注入的对象
	protected void populateBean(String beanName, RootBeanDefinition mbd, @Nullable BeanWrapper bw) {

		boolean continueWithPropertyPopulation = true;

		if (!mbd.isSynthetic() && hasInstantiationAwareBeanPostProcessors()) {
			for (BeanPostProcessor bp : getBeanPostProcessors()) {
				if (bp instanceof InstantiationAwareBeanPostProcessor) {
					InstantiationAwareBeanPostProcessor ibp = (InstantiationAwareBeanPostProcessor) bp;
					//第五次调用后置处理器的方法
					if (!ibp.postProcessAfterInstantiation(bw.getWrappedInstance(), beanName)) {
						continueWithPropertyPopulation = false;
						break;
					}
				}
			}
		}

		if (!continueWithPropertyPopulation) {
			return;
		}

		PropertyValues pvs = (mbd.hasPropertyValues() ? mbd.getPropertyValues() : null);
		//自动装配模式: byType、byName
		if (mbd.getResolvedAutowireMode() == AUTOWIRE_BY_NAME || mbd.getResolvedAutowireMode() == AUTOWIRE_BY_TYPE) {
			MutablePropertyValues newPvs = new MutablePropertyValues(pvs);
			// Add property values based on autowire by name if applicable.
			if (mbd.getResolvedAutowireMode() == AUTOWIRE_BY_NAME) {
				autowireByName(beanName, mbd, bw, newPvs);
			}
			// Add property values based on autowire by type if applicable.
			if (mbd.getResolvedAutowireMode() == AUTOWIRE_BY_TYPE) {
				autowireByType(beanName, mbd, bw, newPvs);
			}
			pvs = newPvs;
		}

		boolean hasInstAwareBpps = hasInstantiationAwareBeanPostProcessors();
		boolean needsDepCheck = (mbd.getDependencyCheck() != AbstractBeanDefinition.DEPENDENCY_CHECK_NONE);

		if (hasInstAwareBpps || needsDepCheck) {
			if (pvs == null) {
				pvs = mbd.getPropertyValues();
			}
			PropertyDescriptor[] filteredPds = filterPropertyDescriptorsForDependencyCheck(bw, mbd.allowCaching);
			if (hasInstAwareBpps) {
				for (BeanPostProcessor bp : getBeanPostProcessors()) {
					//这里会解析通过@Autowired和@Resource来注入属性
					//通过AutowireAnnotationBeanPostProcess  解析 @Autowired
					//CommonAnnotationBeanPostProcessor   解析 @Resource
					//上面两个后置处理器都是spring 注册时放进去的(7个)
					if (bp instanceof InstantiationAwareBeanPostProcessor) {
						InstantiationAwareBeanPostProcessor ibp = (InstantiationAwareBeanPostProcessor) bp;
						//第六次调用后置处理器方法填充属性,注入
						pvs = ibp.postProcessPropertyValues(pvs, filteredPds, bw.getWrappedInstance(), beanName);
						if (pvs == null) {
							return;
						}
					}
				}
			}
			if (needsDepCheck) {
				checkDependencies(beanName, mbd, filteredPds, pvs);
			}
		}

		if (pvs != null) {
			applyPropertyValues(beanName, mbd, bw, pvs);
		}
	}
5.ibp.postProcessPropertyValues(pvs, filteredPds, bw.getWrappedInstance(), beanName);实际上调用的是AutowireAnnotationBeanPostProcess .postProcessProperties()方法,用来专门解析加有@Autowired注解的属性
	@Override
	public PropertyValues postProcessProperties(PropertyValues pvs, Object bean, String beanName) {
		InjectionMetadata metadata = findAutowiringMetadata(beanName, bean.getClass(), pvs);
		try {
		    //获取需要注入的值
			metadata.inject(bean, beanName, pvs);
		}
		catch (BeanCreationException ex) {
			throw ex;
		}
		catch (Throwable ex) {
			throw new BeanCreationException(beanName, "Injection of autowired dependencies failed", ex);
		}
		return pvs;
	}
6.获取当前bean 所有依赖的对象,并且一个一个的注入
	public void inject(Object target, @Nullable String beanName, @Nullable PropertyValues pvs) throws Throwable {
		Collection<InjectedElement> checkedElements = this.checkedElements;
		Collection<InjectedElement> elementsToIterate =
				(checkedElements != null ? checkedElements : this.injectedElements);
		//判断是否有需要依赖的值
		if (!elementsToIterate.isEmpty()) {
		    //遍历所有需要被依赖的对象
			for (InjectedElement element : elementsToIterate) {
			    //注入对象
				element.inject(target, beanName, pvs);
			}
		}
	}
7.AutowiredFieldElement.inject(target,beanBname,pvs), element包含了被注入属性的信息:类,属性名
		protected void inject(Object bean, @Nullable String beanName, @Nullable PropertyValues pvs) throws Throwable {

				try {
					//获取需要被注入的对象
					value = beanFactory.resolveDependency(desc, beanName, autowiredBeanNames, typeConverter);
				}
				catch (BeansException ex) {
					throw new UnsatisfiedDependencyException(null, beanName, new InjectionPoint(field), ex);
				}

		}
8.解析依赖关系
	public Object resolveDependency(DependencyDescriptor descriptor, @Nullable String requestingBeanName,
			@Nullable Set<String> autowiredBeanNames, @Nullable TypeConverter typeConverter) throws BeansException {

		descriptor.initParameterNameDiscovery(getParameterNameDiscoverer());
		if (Optional.class == descriptor.getDependencyType()) {
			return createOptionalDependency(descriptor, requestingBeanName);
		}
		else if (ObjectFactory.class == descriptor.getDependencyType() ||
				ObjectProvider.class == descriptor.getDependencyType()) {
			return new DependencyObjectProvider(descriptor, requestingBeanName);
		}
		else if (javaxInjectProviderClass == descriptor.getDependencyType()) {
			return new Jsr330Factory().createDependencyProvider(descriptor, requestingBeanName);
		}
		else {
			Object result = getAutowireCandidateResolver().getLazyResolutionProxyIfNecessary(
					descriptor, requestingBeanName);
			if (result == null) {
			    //解析依赖关系:将被依赖的bean注入: 先根据type然后根据名称
				result = doResolveDependency(descriptor, requestingBeanName, autowiredBeanNames, typeConverter);
			}
			return result;
		}
	}
9.doResolveDependency()真正解析依赖的方法
@Nullable
	public Object doResolveDependency(DependencyDescriptor descriptor, @Nullable String beanName,
			@Nullable Set<String> autowiredBeanNames, @Nullable TypeConverter typeConverter) throws BeansException {

		InjectionPoint previousInjectionPoint = ConstructorResolver.setCurrentInjectionPoint(descriptor);
		try {
			Object shortcut = descriptor.resolveShortcut(this);
			if (shortcut != null) {
				return shortcut;
			}
			//注入属性的类型
			Class<?> type = descriptor.getDependencyType();
            // 用于检查一个类定义是否有自动注入请求的解析器:  为空 特殊请款除外
			Object value = getAutowireCandidateResolver().getSuggestedValue(descriptor);
			if (value != null) {
				if (value instanceof String) {
					String strVal = resolveEmbeddedValue((String) value);
					BeanDefinition bd = (beanName != null && containsBean(beanName) ? getMergedBeanDefinition(beanName) : null);
					value = evaluateBeanDefinitionString(strVal, bd);
				}
				TypeConverter converter = (typeConverter != null ? typeConverter : getTypeConverter());
				return (descriptor.getField() != null ?
						converter.convertIfNecessary(value, type, descriptor.getField()) :
						converter.convertIfNecessary(value, type, descriptor.getMethodParameter()));
			}
            //一些逻辑判断无影响
			Object multipleBeans = resolveMultipleBeans(descriptor, beanName, autowiredBeanNames, typeConverter);
			if (multipleBeans != null) {
				return multipleBeans;
			}
            //根据注入对象的类型查询匹配到的 bean   可能有多个 比如接口的实现类
			Map<String, Object> matchingBeans = findAutowireCandidates(beanName, type, descriptor);
			//根据类型找不到bean, 报错
			if (matchingBeans.isEmpty()) {
				if (isRequired(descriptor)) {
					raiseNoMatchingBeanFound(type, descriptor.getResolvableType(), descriptor);
				}
				return null;
			}

			String autowiredBeanName;
			Object instanceCandidate;
			//根据bean的类型如果找到了不止一个,那么就根据属性名称来确定注入的bean
			if (matchingBeans.size() > 1) {
                //根据beanName从多个bean匹配
				autowiredBeanName = determineAutowireCandidate(matchingBeans, descriptor);
                //找不到,报错
				if (autowiredBeanName == null) {
					if (isRequired(descriptor) || !indicatesMultipleBeans(type)) {
						return descriptor.resolveNotUnique(type, matchingBeans);
					}
					else {
						return null;
					}
				}
                //获得bean
				instanceCandidate = matchingBeans.get(autowiredBeanName);
			}
			else {
				// We have exactly one match.
				Map.Entry<String, Object> entry = matchingBeans.entrySet().iterator().next();
				autowiredBeanName = entry.getKey();
				instanceCandidate = entry.getValue();
			}

			if (autowiredBeanNames != null) {
				autowiredBeanNames.add(autowiredBeanName);
			}
			if (instanceCandidate instanceof Class) {
				//如果当前bean依赖的对象并没有创建,那么就会通过下面的方法创建
				instanceCandidate = descriptor.resolveCandidate(autowiredBeanName, type, this);
			}
			Object result = instanceCandidate;
			if (result instanceof NullBean) {
				if (isRequired(descriptor)) {
					raiseNoMatchingBeanFound(type, descriptor.getResolvableType(), descriptor);
				}
				result = null;
			}
			if (!ClassUtils.isAssignableValue(type, result)) {
				throw new BeanNotOfRequiredTypeException(autowiredBeanName, type, instanceCandidate.getClass());
			}
			return result;
		}
		finally {
			ConstructorResolver.setCurrentInjectionPoint(previousInjectionPoint);
		}
	}
由上可知,先根据beanType去查询bean,如果存在多个则使用属性名称去匹配
Map<String, Object> matchingBeans = findAutowireCandidates(beanName, type, descriptor);
			//根据bean的类型如果找到了不止一个,那么就根据属性名称来确定注入的bean
			if (matchingBeans.size() > 1) {
                //根据beanName从多个bean匹配
				autowiredBeanName = determineAutowireCandidate(matchingBeans, descriptor);
			}
如果根据beanType获取不到bean 则直接报错
			//根据类型找不到bean, 报错
			if (matchingBeans.isEmpty()) {
				if (isRequired(descriptor)) {
					raiseNoMatchingBeanFound(type, descriptor.getResolvableType(), descriptor);
				}
				return null;
			}
所有由上面的分析可知,加有@Autowired注解的属性是先通过属性的类型去查找bean,然后再通过属性名去查找
参考
Spring IOC 容器源码分析
@Autowired源码解析1
@Autowired源码解析2