关于函数(atan2,cos,sin)在绘制图形的应用——实战绘制直线箭头详解
目录
atan2(y,x):
cos(radian):
sin(radian):
弧度 角度:
接下来进入正题:绘制直线箭头
开胃菜结束,进入今天的重点
——如何在计算机数轴上通过“两点一线”绘制它
观察对比,右方上下两张动图
是时候,开始分析一个箭头如何通过坐标点构成
偏转法(旋转)
(atan2,cos,sin)都是基于笛卡尔坐标系,非计算机坐标系
atan2(y,x):
该函数传入两个参数,注意先传y再x——返回x和y的反正切值(弧度制)
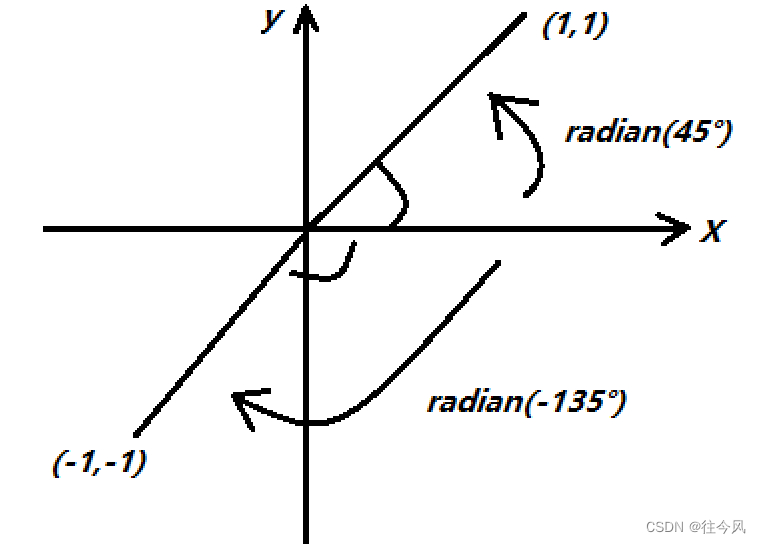
表示圆点(0,0)到(x,y)的直线与水平(X)轴正方向>的夹角【值域:--π, π】
正值为X轴正方向(0)逆时针旋转偏移的弧度,负为顺时针旋转
import math

#math.atan2(y,x)

#y = 1, x = 1 第一象限
print(math.atan2(1,1)) ——>0.7853981633974483

#y = 1, x = -1 第二象限
print(math.atan2(1,-1)) ——>2.356194490192345

#y = -1, x = 1 第三象限
print(math.atan2(-1,1)) ——>-0.7853981633974483

#y = -1, x = -1 第三象限
print(math.atan2(-1,-1)) ——>-2.356194490192345总结:传入已知直线坐标,返回该直线与X轴的夹角(弧度制),正负由y值决定。
cos(radian):
返回 x 弧度的余弦值(邻边 / 斜边)已知一边,可求另一边。
sin(radian):
返回 x 弧度的正弦值(对边 / 斜边),同上
import math

#构造一个弧度
angle = math.atan2(3,4)
#已知直线长为5
r = 5

c = math.cos(angle)#x/r
s = math.sin(angle)#y/r

print(c) ——> 0.8
print(s) ——> 0.6

#x
print(r*c) ——> 4.0
#y
print(r*s) ——> 3.0
弧度  角度:
角度:
由180° = π 可推:
![]() ° = 1 rad 1° =
° = 1 rad 1° = ![]() rad
rad
或者使用math.radian(angle°) = math.degrees(rad)
接下来进入正题: 绘制直线箭头
小试牛刀:使用turtle绘制箭头
import turtle as t

t.setup(500,500)  # 设置画布大小
mainLine = 100  # 主直线长度
ArrowLine = 45  # 箭头直线长度
offestAngle = 150  # 偏移角度(主直线与箭头直线夹角)
toward = int(input('请输入小海龟开始方向(角度):'))

t.setheading(toward)  # 设置开始朝向
t.forward(mainLine)  # 前进

t2 = t.clone()  # 克隆
t3 = t.clone()

t2.left(offestAngle)  # 左转
t2.forward(ArrowLine)

t3.right(offestAngle)
t3.forward(ArrowLine)

t.hideturtle()  # 隐藏小乌龟
t2.hideturtle()
t3.hideturtle()

t.done()  # 暂停

#⇣⇣⇣⇣⇣⇣⇣⇣⇣⇣⇣⇣⇣⇣⇣⇣⇣⇣⇣⇣⇣⇣⇣⇣⇣结果见下方第一张图
turtle箭头
在左边的图像中我们通过"小海龟"的移动和旋转和克隆绘制了一个箭头。
观察
整个箭头是由三条直线组成(t , t2 ,t3)
首先
我们想让三条直线形成箭头形状,就需要确定一条主线(t),
接下来
由主线的一个终端绘制出存在偏转角度两条直线(t2,t3)
开胃菜结束,进入今天的重点
——如何在计算机数轴上通过“两点一线”绘制它
 笛卡尔坐标系上的箭头
注:本次绘图使用PySide6演示。
 计算机坐标系上的箭头
观察对比,右方上下两张动图
是的,你没看错它们的y轴是相反的,图像似乎进行了水平翻转
y轴自上到下为正方向,越往下值越大 x轴正方向不变
在PySide6里就是这么规定x与y的方向
通过上述观察,我们了解到在PySide6里面使用的坐标系的特殊
是时候,开始分析一个箭头如何通过坐标点构成
首先,我们观察一个箭头是由几个端点构成的,也就是几个坐标点
- 第一个坐标点是:箭头开始的位置(x1,y1)
- 第二个坐标点是:箭头结束的位置(x2,y2)
- 第三个坐标点是:箭头斜线的终端,它总比第二点更接近原点
- 第四个坐标点与第三个坐标点差不多,只是在箭头下方
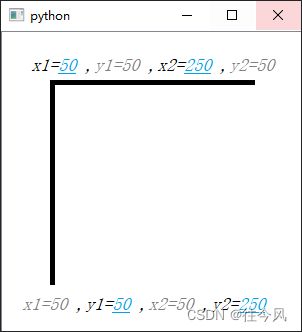
第一、二坐标点,我们就假设箭头是一条x=100,y=100直线
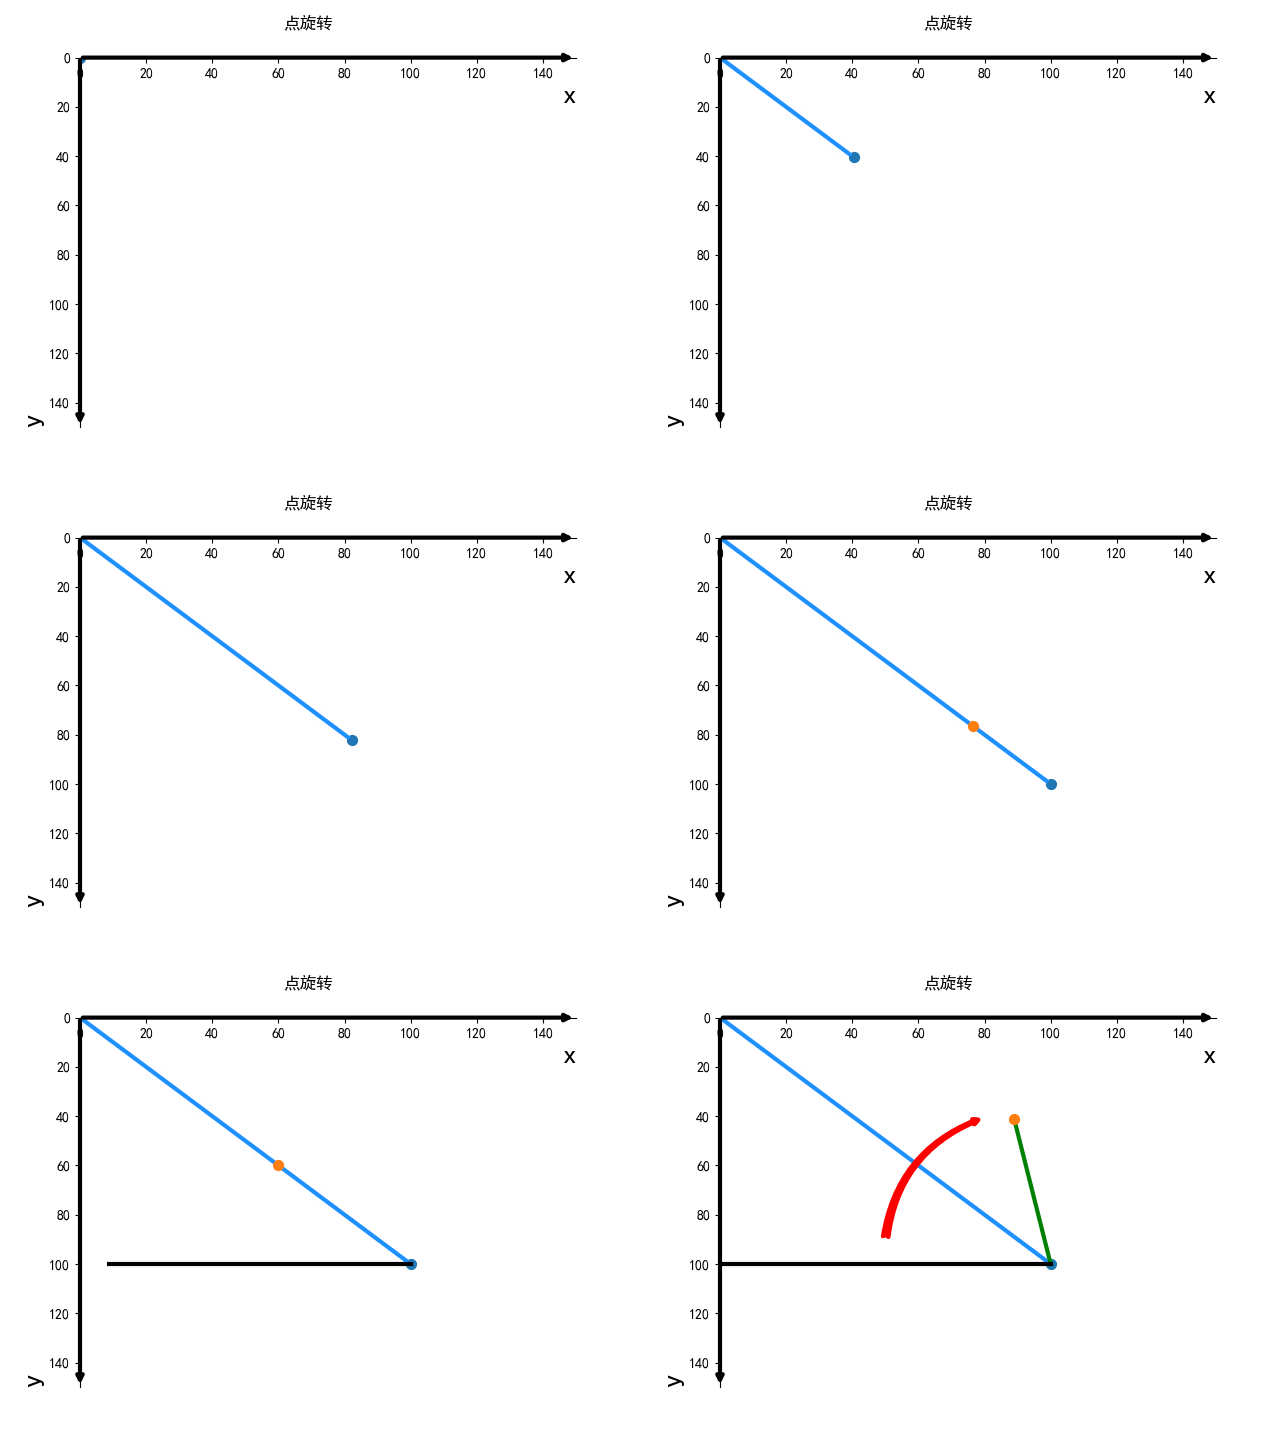
接下来我们该如何获得第三、四坐标点呢?再观察一下上图 此时我们已有了这箭头斜线的一端(x2,y2),我们该如何获取下一点呢?
——“平移” 观察下图
上图就是整个平移思想绘制过程,由上我们可以观察到当第二点(深蓝)通过平移x和y个偏移单位,就得到了斜线终端(浅蓝),这整过程我们需要知道箭头直线开始和结束的坐标以及它需要和结束点偏移的量
#平移法创建箭头,参考代码
from PySide6.QtWidgets import (QApplication, QWidget, QGraphicsScene,
                               QGraphicsView, QGraphicsLineItem)
from PySide6.QtGui import QPen
from PySide6.QtCore import Qt
class myWindow(QWidget):
    def __init__(self):
        super().__init__()
        #设置场景和视图
        self.resize(300, 300)
        self.scene = QGraphicsScene(self)
        self.scene.setSceneRect(0,0,300,300)#这一步一定要有,不然图元坐标不正确
        self.view = QGraphicsView(self)

        self.view.setScene(self.scene)

        x1,y1 = (0,0)
        x2,y2 = (100,100)
        #创建图元
        mainLine = QGraphicsLineItem()

        arrowLine_1 = QGraphicsLineItem()
        arrowLine_2 = QGraphicsLineItem()
        #设置画笔
        mainLine.setPen(QPen(Qt.black,3))
        arrowLine_1.setPen(QPen(Qt.black,3))
        arrowLine_2.setPen(QPen(Qt.black,3))
        #设置直线坐标
        mainLine.setLine(x1,y1,x2,y2)
        arrowLine_1.setLine(x2,y2,x2-50,y2-25)
        arrowLine_2.setLine(x2,y2,x2-25,y2-50)
        #图元加入场景
        self.scene.addItem(mainLine)
        self.scene.addItem(arrowLine_1)
        self.scene.addItem(arrowLine_2)

if __name__ == '__main__':
    app = QApplication([])
    window = myWindow()
    window.show()#展示
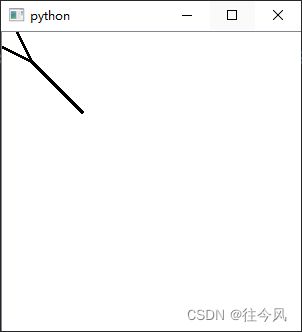
app.exec()上面就是实现的程序,细心的你如果去尝试改变箭头开始和结束的位置,你一定会发现这其中的bug,它的箭头斜线的终点是由平移得到的,但这个偏移量并不是每一个箭头都适用的。
所以我们再次使用原偏移量应用在另一个与箭头直线非正比的箭头上,它将会出现如图问题↓↓↓
总结一下:平移法适用于已知开始和结束和对应的偏移量时,适合简单不变的箭头。
看到这的的小伙伴们肯定要急了:磨磨唧唧的等过年呢!快给我上最完美,通用的!!!
好吧!请看下图⇩⇩⇩
如何?你们是否想到了什么?
偏转法(旋转)
大家如果是一字不漏的读完上篇,一定注意到了开头那几个三角函数,它们就是该方法的核心.如果不太了解请回到开头,仔细阅读思考
下面我们直接上该方法代码,再做解析:
from PySide6.QtWidgets import (QApplication, QWidget, QGraphicsScene,
                               QGraphicsView, QGraphicsLineItem)
from PySide6.QtGui import QPen
from PySide6.QtCore import Qt
from PySide6.QtGui import QMouseEvent
import random, math


class myWindow(QWidget):
    def __init__(self):
        super().__init__()
        self.resize(300, 300)
        self.scene = QGraphicsScene(self)
        self.scene.setSceneRect(0, 0, 300, 300)
        self.view = QGraphicsView(self)

        self.view.setScene(self.scene)

        self.drawArrow()

    def setItem(self):
        mainLine = QGraphicsLineItem()
        arrowLine_1 = QGraphicsLineItem()
        arrowLine_2 = QGraphicsLineItem()
        mainLine.setPen(QPen(Qt.black, 3))
        arrowLine_1.setPen(QPen(Qt.black, 3))
        arrowLine_2.setPen(QPen(Qt.black, 3))

        self.scene.addItem(mainLine)
        self.scene.addItem(arrowLine_1)
        self.scene.addItem(arrowLine_2)

        return mainLine, arrowLine_1, arrowLine_2

    def setPos(self):
        l = 15
        offsetAngle = 0.6  # 弧度制

        x1, y1 = random.randint(0, 300), random.randint(0, 300)
        x2, y2 = random.randint(0, 300), random.randint(0, 300)
        # x, y = random.sample(range(301), 2)

        # 返回箭头直线与X轴的夹角,注:y先x后作者再次踩坑提醒
        includedAngle = math.atan2(y2 - y1, x2 - x1)

        #                   返回 x/r 比值(弧度制)
        x3 = x2 - l * math.cos(includedAngle - offsetAngle)
        #                   返回 y/r 比值(弧度制)
        y3 = y2 - l * math.sin(includedAngle - offsetAngle)

        x4 = x2 - l * math.cos(includedAngle + offsetAngle)
        y4 = y2 - l * math.sin(includedAngle + offsetAngle)
        return x1, y1, x2, y2, x3, y3, x4, y4

    def drawArrow(self):
        x1, y1, x2, y2, x3, y3, x4, y4 = self.setPos()
        mainLine, arrowLine_1, arrowLine_2 = self.setItem()

        mainLine.setLine(x1, y1, x2, y2)
        arrowLine_1.setLine(x2, y2, x3, y3)
        arrowLine_2.setLine(x2, y2, x4, y4)

    # 鼠标点击事件
    def mousePressEvent(self, event: QMouseEvent) -> None:
        super().mousePressEvent(event)
        if event.button() == Qt.MouseButton.RightButton:  # 右键时触发
            self.drawArrow()


if __name__ == '__main__':
    app = QApplication([])
    window = myWindow()
    window.show()
    app.exec()
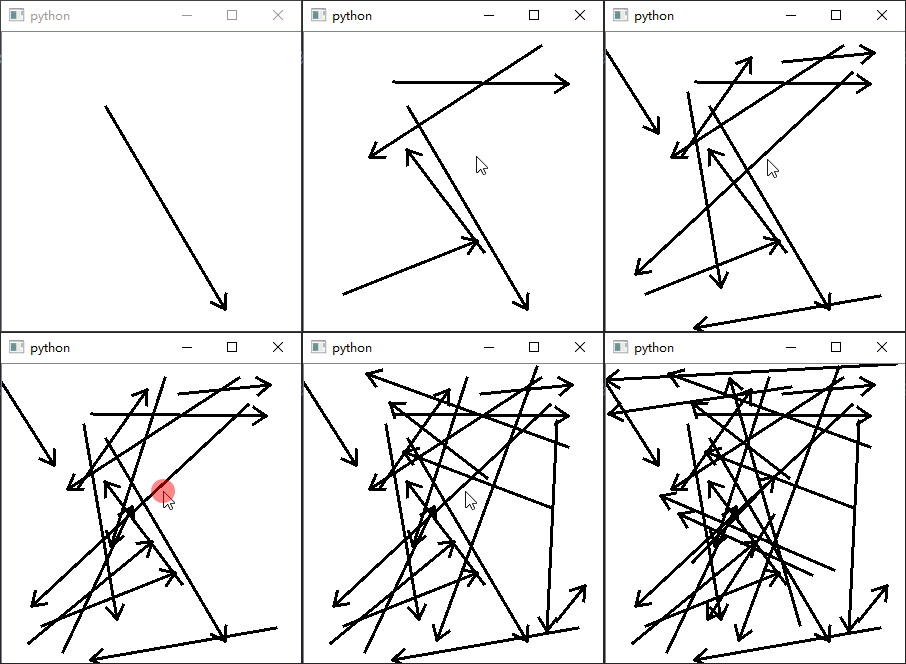
上图的就是最终效果,它可以在不同方向使用,可以说完美,我们来解析一下:
- 首先,我们先将最关键的代码提出了讲解
l = 15
offsetAngle = 0.6

x1, y1 = random.randint(0, 300), random.randint(0, 300)
x2, y2 = random.randint(0, 300), random.randint(0, 300)

includedAngle = math.atan2(y2 - y1, x2 - x1)

x3 = x2 - l * math.cos(includedAngle - offsetAngle)
y3 = y2 - l * math.sin(includedAngle - offsetAngle)

x4 = x2 - l * math.cos(includedAngle + offsetAngle)
y4 = y2 - l * math.sin(includedAngle + offsetAngle)
我们一行一行来:
- l 控制斜线的长度,可以理解为 r
- offsetAngle 控制斜线再次偏转的弧度
- x1,y1,x2,y2 箭头直线的坐标
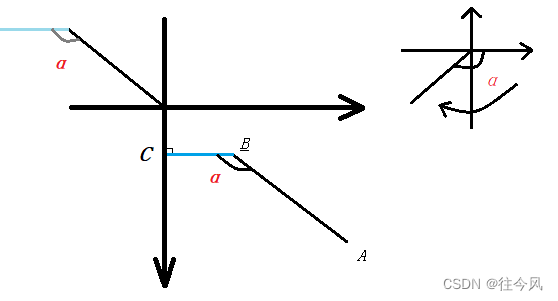
- includedAngle 返回X轴与直线的夹角,请看下图:
较大的坐标是我们所使用的坐标系,从A(x1,y1)开始,B(x2,y2)结束。此时开始点A(x1,y1)并不是从原点出发的,这会导致我们构造的线段BC与线段AB的夹角值不正确,因为atan2计算的是点到原点反正切函数值,终点B(x2,y2)到原点的atan2()值并不是我们需要线段AB与X轴的夹角值,所以我们需要通过(y2-y1,x2-x1)求这条直线的向量,此时就会有一条方向相同,长度相同,根据平行的内错角(Z),同位角(F),可以得到向量与X轴atan2值等于α
- y3 = y2 - l * math.sin(includedAngle - offsetAngle),这个和上面差不多,区别在于求偏移量的y坐标
https://wwpb.lanzoue.com/i8YO215ikkoj
本篇参考:QT总结10-绘制箭头_qt画箭头_windxgz的博客-CSDN博客
